本文主要是介绍【嵌入式AI】python转换tflite模型并在PC上调用,希望对大家解决编程问题提供一定的参考价值,需要的开发者们随着小编来一起学习吧!
用python转换tflite模型并在PC上调用
环境
- python3.6
- tf-nightly 1.13
- win10 64位
- i7 8550U
制作frozen模型
就是后缀为pb的模型文件,转换直接调用TF的接口来保存frozen模型文件即可。
转换为tflite模型
非量化转换
转换代码:
# -*- coding:utf-8 -*-
import tensorflow as tfin_path = "./model/frozen_graph.pb"
out_path = "./model/frozen_graph.tflite"
# out_path = "./model/quantize_frozen_graph.tflite"# 模型输入节点
input_tensor_name = ["input/x"]
input_tensor_shape = {"input/x":[1, 784]}
# 模型输出节点
classes_tensor_name = ["out/fc2"]converter = tf.lite.TFLiteConverter.from_frozen_graph(in_path,input_tensor_name, classes_tensor_name,input_shapes = input_tensor_shape)
#converter.post_training_quantize = True
tflite_model = converter.convert()with open(out_path, "wb") as f:f.write(tflite_model)
转换模型前后,模型文件大小几乎一样,都是12M左右。
量化转换
把上面代码里‘converter.post_training_quantize = True’启用就行了。
转换出的模型大小变为原来的约1/4, 只有3M左右。
PC上用python调用tflite模型
调用非量化模型
# -*- coding:utf-8 -*-
import os
os.environ["CUDA_VISIBLE_DEVICES"]="-1"
import cv2
import numpy as np
import timeimport tensorflow as tftest_image_dir = './test_images/'
#model_path = "./model/quantize_frozen_graph.tflite"
model_path = "./model/frozen_graph.tflite"# Load TFLite model and allocate tensors.
interpreter = tf.lite.Interpreter(model_path=model_path)
interpreter.allocate_tensors()# Get input and output tensors.
input_details = interpreter.get_input_details()
print(str(input_details))
output_details = interpreter.get_output_details()
print(str(output_details))#with tf.Session( ) as sess:
if 1:file_list = os.listdir(test_image_dir)model_interpreter_time = 0start_time = time.time()# 遍历文件for file in file_list:print('=========================')full_path = os.path.join(test_image_dir, file)print('full_path:{}'.format(full_path))# 只要黑白的,大小控制在(28,28)img = cv2.imread(full_path, cv2.IMREAD_GRAYSCALE )res_img = cv2.resize(img,(28,28),interpolation=cv2.INTER_CUBIC) # 变成长784的一维数据new_img = res_img.reshape((784))# 增加一个维度,变为 [1, 784]image_np_expanded = np.expand_dims(new_img, axis=0)image_np_expanded = image_np_expanded.astype('float32') # 类型也要满足要求# 填装数据model_interpreter_start_time = time.time()interpreter.set_tensor(input_details[0]['index'], image_np_expanded)# 注意注意,我要调用模型了interpreter.invoke()output_data = interpreter.get_tensor(output_details[0]['index'])model_interpreter_time += time.time() - model_interpreter_start_time# 出来的结果去掉没用的维度result = np.squeeze(output_data)print('result:{}'.format(result))#print('result:{}'.format(sess.run(output, feed_dict={newInput_X: image_np_expanded})))# 输出结果是长度为10(对应0-9)的一维数据,最大值的下标就是预测的数字print('result:{}'.format( (np.where(result==np.max(result)))[0][0]  ))used_time = time.time() - start_timeprint('used_time:{}'.format(used_time))print('model_interpreter_time:{}'.format(model_interpreter_time))
调用非量化模型
方法不变,把模型路径改为量化的模型路径即可。
win10 python3.6下的时间对比
用11张图片测试,单独统计11次推理部分的时间之和,统计如下
| 方案 | frozen模型 | tflite模型 | 量化tflite模型 |
|---|---|---|---|
| 时间 | 634ms | 70ms | 80ms |
很奇怪的是量化模型没有比非量化模型更快。个人猜测这可能跟intel CPU很强的浮点计算能力有关,量化来量化去反而增加了额外的时间。在ARM等移动终端上应该有另外的结论
识别准确率
经过测试,转换为tflite模型后,用mnist数据集里的1万个测试数据测试,准确率在**97.2%**左右,和转换前的97.48%没有明显区别。
命令行转换
从tf1.9开始,tflite_convert就作为和tensorflow一起安装的二进制工具了。以前版本的转换工具叫toco,测试发现toco在tf1.13仍然存在,但是和tflite_convert选项基本一致,可能已经合并了。
不支持的操作
转换模型中遇到一次错误:
Some of the operators in the model are not supported by the standard TensorFlow Lite runtime. If those are native Tensor
Flow operators, you might be able to use the extended runtime by passing --enable_select_tf_ops, or by setting target_op
s=TFLITE_BUILTINS,SELECT_TF_OPS when calling tf.lite.TFLiteConverter(). Otherwise, if you have a custom implementation f
or them you can disable this error with --allow_custom_ops, or by setting allow_custom_ops=True when calling tf.lite.TFL
iteConverter(). Here is a list of builtin operators you are using: ADD, CONV_2D, DEPTHWISE_CONV_2D, DIV, FLOOR, FULLY_CO
NNECTED, MAX_POOL_2D, MUL. Here is a list of operators for which you will need custom implementations: RandomUniform.
上面提示也比较清楚了,就是有不支持的算子:RandomUniform。通过tensorboard查看,发现这个算子在dropout里面。我简单的把dropout去掉了。实际生产中可以用L2正则化和BN来防止过拟合。
试着转换fater_rcnn模型,遇到很多不支持的操作:
2019-01-07 10:35:52.654913: I tensorflow/lite/toco/import_tensorflow.cc:1327] Converting unsupported operation: Enter
2019-01-07 10:35:52.655148: I tensorflow/lite/toco/import_tensorflow.cc:1327] Converting unsupported operation: TensorArrayV3
2019-01-07 10:35:52.655404: I tensorflow/lite/toco/import_tensorflow.cc:193] Unsupported data type in placeholder op: 20
2019-01-07 10:35:52.658516: I tensorflow/lite/toco/import_tensorflow.cc:1327] Converting unsupported operation: TensorArrayScatterV3
2019-01-07 10:35:52.659010: I tensorflow/lite/toco/import_tensorflow.cc:1327] Converting unsupported operation: LoopCond
2019-01-07 10:35:52.659219: I tensorflow/lite/toco/import_tensorflow.cc:1327] Converting unsupported operation: Exit
2019-01-07 10:35:52.660613: I tensorflow/lite/toco/import_tensorflow.cc:1327] Converting unsupported operation: Round
2019-01-07 10:35:52.661490: I tensorflow/lite/toco/import_tensorflow.cc:1327] Converting unsupported operation: Reciprocal
2019-01-07 10:35:52.664014: I tensorflow/lite/toco/import_tensorflow.cc:1327] Converting unsupported operation: Where
2019-01-07 10:35:52.670159: I tensorflow/lite/toco/import_tensorflow.cc:1327] Converting unsupported operation: LoopCond
2019-01-07 10:35:52.670838: I tensorflow/lite/toco/import_tensorflow.cc:1327] Converting unsupported operation: TensorArraySizeV3
2019-01-07 10:35:52.671080: I tensorflow/lite/toco/import_tensorflow.cc:1327] Converting unsupported operation: TensorArrayReadV3
2019-01-07 10:35:52.671869: I tensorflow/lite/toco/import_tensorflow.cc:1327] Converting unsupported operation: TensorArrayScatterV3
2019-01-07 10:35:52.672106: I tensorflow/lite/toco/import_tensorflow.cc:1327] Converting unsupported operation: TensorArrayGatherV3
2019-01-07 10:35:52.673044: I tensorflow/lite/toco/import_tensorflow.cc:1327] Converting unsupported operation: TensorArrayV3
2019-01-07 10:35:52.676008: I tensorflow/lite/toco/import_tensorflow.cc:1327] Converting unsupported operation: CropAndResize
2019-01-07 10:35:52.677367: I tensorflow/lite/toco/import_tensorflow.cc:1327] Converting unsupported operation: TensorArrayWriteV3
2019-01-07 10:35:52.678589: I tensorflow/lite/toco/import_tensorflow.cc:1327] Converting unsupported operation: NonMaxSuppressionV2
2019-01-07 10:35:52.679152: I tensorflow/lite/toco/import_tensorflow.cc:1327] Converting unsupported operation: Size
2019-01-07 10:35:52.686332: I tensorflow/lite/toco/import_tensorflow.cc:1327] Converting unsupported operation: TensorArrayReadV3
2019-01-07 10:35:52.687485: I tensorflow/lite/toco/import_tensorflow.cc:1327] Converting unsupported operation: Reciprocal
2019-01-07 10:35:52.689467: I tensorflow/lite/toco/import_tensorflow.cc:1327] Converting unsupported operation: NonMaxSuppressionV22019-01-07 10:35:52.744613: I tensorflow/lite/toco/graph_transformations/graph_transformations.cc:39] Before Removing unused ops: 1175 operators, 1717 arrays (0 quantized)
2019-01-07 10:35:52.828899: I tensorflow/lite/toco/graph_transformations/graph_transformations.cc:39] After Removing unused ops pass 1: 1144 operators, 1673 arrays (0 quantized)
2019-01-07 10:35:53.303533: I tensorflow/lite/toco/graph_transformations/graph_transformations.cc:39] Before dequantization graph transformations: 737 operators, 1102 arrays (0 quantized)
2019-01-07 10:35:53.351090: F tensorflow/lite/toco/tooling_util.cc:627] Check failed: dim >= 1 (0 vs. 1)
BUG 1
用提tf1.12把模型转换为tflite格式遇到错误‘No module named ‘_tensorflow_wrap_toco’’,搜索了下竟然是官方的问题。升级为tf-nightly1.13问题解决了。
另外一个同事说他用tf1.9也成功了。
BUG 2
在调用tflite模型的时候遇到一个问题,报错信息为:
ValueError: Cannot set tensor: Got tensor of type 3 but expected type 1 for input 9
出错位置为:
interpreter.set_tensor(input_details[0]['index'], image_np_expanded)
看样子是类型错误。通过打印发现我喂的图片是uint8的,而不是float32的。通过调用numpy的astype(‘float32’)方法可以解决这个问题。
同样的读取图片方法在普通的tensorflow模式下不会出错,在tflite下会出错。这说明普通的tensorflow模式下会进行隐式类型转换。
吐槽
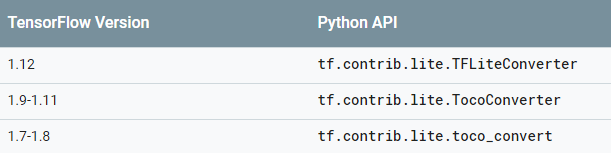
据说contrib在tf2.0上要废止了。不知道到时接口又要变成什么样。
最近几个版本上的接口如下:
参考资料
官方文档:Converter Python API guide
tensorflow/tensorflow/lite/python/interpreter_test.py
tensorflow/tensorflow/lite/python/interpreter.py
tensorflow 20:搭网络、导出模型、运行模型
How to load a tflite model in script?
-
github上讨论‘No module named '_tensorflow_wrap_toco’的issue
-
另外一个类似的issue
这篇关于【嵌入式AI】python转换tflite模型并在PC上调用的文章就介绍到这儿,希望我们推荐的文章对编程师们有所帮助!


