本文主要是介绍C++ PCL点云dscan密度分割三维,希望对大家解决编程问题提供一定的参考价值,需要的开发者们随着小编来一起学习吧!
程序示例精选
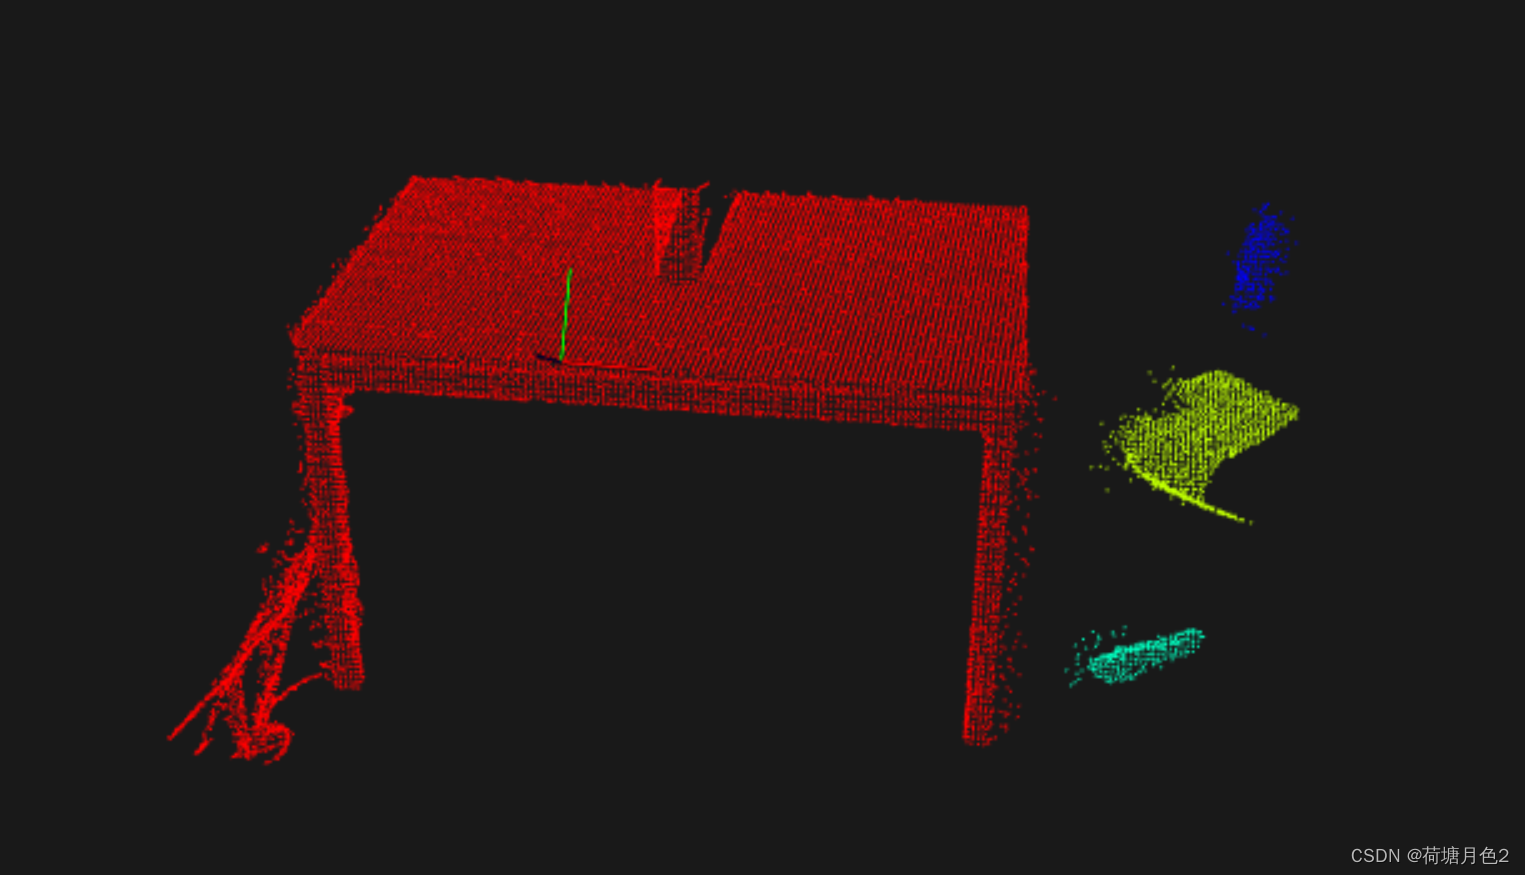
C++ PCL点云dscan密度分割三维
如需安装运行环境或远程调试,见文章底部个人QQ名片,由专业技术人员远程协助!
前言
这篇博客针对《C++ PCL点云dscan密度分割三维》编写代码,代码整洁,规则,易读。 学习与应用推荐首选。
运行结果
文章目录
一、所需工具软件
二、使用步骤
1. 主要代码
2. 运行结果
三、在线协助
一、所需工具软件
1. VS2019, Qt
2. C++
二、使用步骤
代码如下(示例):
#include <pcl/point_types.h>
#include <pcl/io/pcd_io.h>
#include <pcl/visualization/cloud_viewer.h>
#include <pcl/filters/voxel_grid.h>
#include <pcl/filters/passthrough.h>
#include <pcl/segmentation/sac_segmentation.h>
#include <pcl/segmentation/extract_clusters.h>
#include <pcl/ModelCoefficients.h>
// Visualization, [The CloudViewer](https://pcl.readthedocs.io/projects/tutorials/en/latest/cloud_viewer.html#cloud-viewer)
template <typename PointCloudPtrType>
void show_point_cloud(PointCloudPtrType cloud, std::string display_name) {pcl::visualization::CloudViewer viewer(display_name);viewer.showCloud(cloud);while (!viewer.wasStopped()){}
}int main(int argc, char** argv) {// IO, [Reading Point Cloud data from PCD files](https://pcl.readthedocs.io/projects/tutorials/en/latest/reading_pcd.html#reading-pcd)pcl::PCDReader reader;pcl::PointCloud<pcl::PointXYZ>::Ptr cloud(new pcl::PointCloud<pcl::PointXYZ>), cloud_f(new pcl::PointCloud<pcl::PointXYZ>);reader.read("10quyang2.pcd", *cloud);std::cout << "PointCloud before filtering has: " << cloud->points.size () << " data points." << std::endl;show_point_cloud(cloud, "original point cloud");// remove the biggest plane// Segmentation, Ransac, [Plane model segmentation](https://pcl.readthedocs.io/projects/tutorials/en/latest/planar_segmentation.html#planar-segmentation)pcl::SACSegmentation<pcl::PointXYZ> seg;pcl::PointIndices::Ptr inliers(new pcl::PointIndices);pcl::ModelCoefficients::Ptr coefficients(new pcl::ModelCoefficients);pcl::PointCloud<pcl::PointXYZ>::Ptr cloud_plane(new pcl::PointCloud<pcl::PointXYZ>);seg.setOptimizeCoefficients(true);seg.setModelType(pcl::SACMODEL_PLANE);seg.setMethodType(pcl::SAC_RANSAC);seg.setMaxIterations(100);if (inliers->indices.size() == 0) {std::cout << "Could not estimate a planar anymore." << std::endl;} else {// Filter, [Extracting indices from a PointCloud](https://pcl.readthedocs.io/projects/tutorials/en/latest/extract_indices.html#extract-indices)pcl::ExtractIndices<pcl::PointXYZ> extract;extract.setInputCloud(cloud_filtered);extract.setIndices(inliers);extract.setNegative(false);extract.filter(*cloud_plane);pcl::PointXYZ min, max;pcl::getMinMax3D(*cloud_filtered, min, max);double min_z = min.z;std::cout << "ground plane size: " << cloud_plane->points.size()  << ", min_z:" << min_z << std::endl;}// KdTree, for more information, please ref [How to use a KdTree to search](https://pcl.readthedocs.io/projects/tutorials/en/latest/kdtree_search.html#kdtree-search)pcl::search::KdTree<pcl::PointXYZ>::Ptr tree(new pcl::search::KdTree<pcl::PointXYZ>);tree->setInputCloud(cloud_filtered);// Segmentation, [Euclidean Cluster Extraction](https://pcl.readthedocs.io/projects/tutorials/en/latest/cluster_extraction.html#cluster-extraction)std::vector<pcl::PointIndices> cluster_indices;clock_t start_ms = clock();// test 1. uncomment the following two lines to test the simple dbscan// DBSCANSimpleCluster<pcl::PointXYZ> ec;// ec.setCorePointMinPts(20);// test 2. uncomment the following two lines to test the precomputed dbscan// DBSCANPrecompCluster<pcl::PointXYZ>  ec;// ec.setCorePointMinPts(20);// test 3. uncomment the following two lines to test the dbscan with Kdtree for acceleratingDBSCANKdtreeCluster<pcl::PointXYZ> ec;ec.setCorePointMinPts(20);// test 4. uncomment the following line to test the EuclideanClusterExtraction// pcl::EuclideanClusterExtraction<pcl::PointXYZ> ec;clock_t end_ms = clock();std::cout << "cluster time cost:" << double(end_ms - start_ms) / CLOCKS_PER_SEC << " s" << std::endl;pcl::PointCloud<pcl::PointXYZI>::Ptr cloud_clustered(new pcl::PointCloud<pcl::PointXYZI>);int j = 0;// visualization, use indensity to show different color for each cluster.for (std::vector<pcl::PointIndices>::const_iterator it = cluster_indices.begin(); it != cluster_indices.end(); it++, j++) {for(std::vector<int>::const_iterator pit = it->indices.begin(); pit != it->indices.end(); ++pit) {pcl::PointXYZI tmp;tmp.x = cloud_filtered->points[*pit].x;tmp.y = cloud_filtered->points[*pit].y;tmp.z = cloud_filtered->points[*pit].z;tmp.intensity = j%8;cloud_clustered->points.push_back(tmp);}}show_point_cloud(cloud_clustered, "colored clusters of point cloud");// IO, [Writing Point Cloud data to PCD files](https://pcl.readthedocs.io/projects/tutorials/en/latest/writing_pcd.html#writing-pcd)pcl::PCDWriter writer;writer.write<pcl::PointXYZI>("cloud_clustered.pcd", *cloud_clustered, false);return 0;
}
运行结果
三、在线协助:
如需安装运行环境或远程调试,见文章底部个人 QQ 名片,由专业技术人员远程协助!
1)远程安装运行环境,代码调试
2)Visual Studio, Qt, C++, Python编程语言入门指导
3)界面美化
4)软件制作
5)云服务器申请
6)网站制作
当前文章连接:https://blog.csdn.net/alicema1111/article/details/132666851
个人博客主页:https://blog.csdn.net/alicema1111?type=blog
博主所有文章点这里:https://blog.csdn.net/alicema1111?type=blog
博主推荐:
Python人脸识别考勤打卡系统:
https://blog.csdn.net/alicema1111/article/details/133434445
Python果树水果识别:https://blog.csdn.net/alicema1111/article/details/130862842
Python+Yolov8+Deepsort入口人流量统计:https://blog.csdn.net/alicema1111/article/details/130454430
Python+Qt人脸识别门禁管理系统:https://blog.csdn.net/alicema1111/article/details/130353433
Python+Qt指纹录入识别考勤系统:https://blog.csdn.net/alicema1111/article/details/129338432
Python Yolov5火焰烟雾识别源码分享:https://blog.csdn.net/alicema1111/article/details/128420453
Python+Yolov8路面桥梁墙体裂缝识别:https://blog.csdn.net/alicema1111/article/details/133434445
这篇关于C++ PCL点云dscan密度分割三维的文章就介绍到这儿,希望我们推荐的文章对编程师们有所帮助!


