本文主要是介绍2018 Additive Attention分析及代码,希望对大家解决编程问题提供一定的参考价值,需要的开发者们随着小编来一起学习吧!
最近需要评估一些self-attention模块的效果, 除了简单好用的Squeeze-Excitation外, Additive Attention (
AA) 是最近开始受到人们注意的一个新型self-attention的注意力机制, 来自犹他大学和亚马逊的作者们, 原意是将其用在BiLSTM的序列模型中的, 但是因为我是做CV方向的, 所以借由他的实现, 参考论文, 实现了精简版的(即可以接到卷积模块后面)AA.
0. 介绍
Additive Attention是由犹他大学的Guineng Zheng(在亚马逊实习)于2018年发表的一篇文章 <OpenTag: Open Attribute Value Extraction from Product Profiles> 中提到的. 跟其它的Self-attention机制一样, 作者也认为在他们采用BiLSTM的任务中, 所有隐藏状态都重要, 但不是同样重要. 这种时候, 就需要一个self-attention来动态的调整不同的隐藏状态的重要性.
相比Squeeze-Excitation[2]粗犷的给特征图的每个通道都乘以一个权重系数的策略, Additive Attention的策略更细, 它对特征图中每个通道的每个值都有独特的调整系数. 这当然带来了不错的效果, 但是因此而带来的计算开销也比较大.
1. 计算逻辑
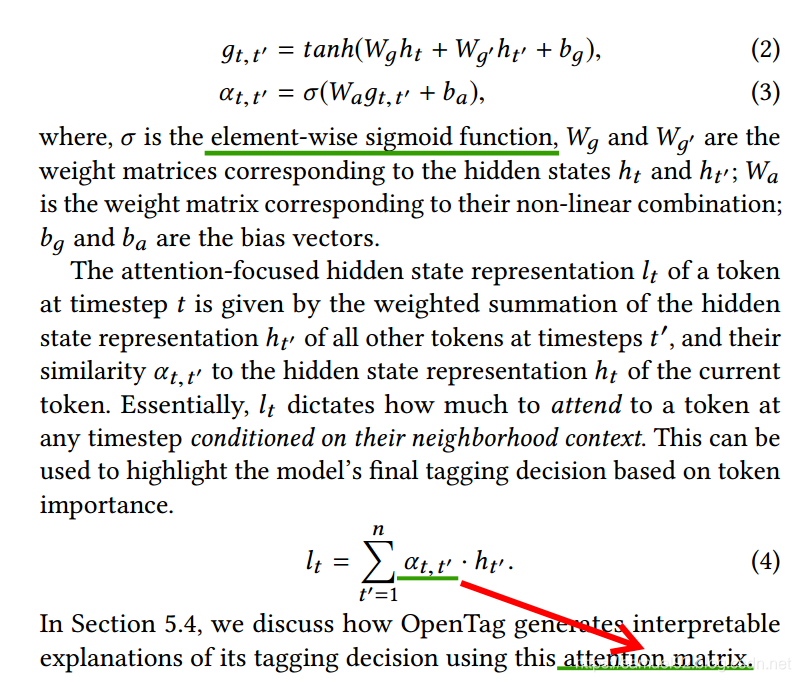
这里就看公式(2), (3)和(4)即可, 我们可以看到, 此注意力机制的核心 :
- ① 使用3种权重 W g W_g Wg, W g ′ W_{g'} Wg′和 W a W_a Wa.
- ② 得到注意力矩阵 α t , t ′ \alpha_{t, t'} αt,t′.
- ③ 将注意力矩阵与本层的输入相乘即可.
1. 代码实现(keras 2.2.4)
我们这个版本是对2D卷积这种结构的神经网络来说的, 需要注意的是, 这个版本的实现必须要求输入给SeqSelfAttention层的特征图的高(Height)和宽(Width)相等.
class SeqSelfAttention(keras.layers.Layer):def __init__(self,units=64,attention_width=None,attention_type='additive',return_attention=False,history_only=False,kernel_initializer='glorot_normal',bias_initializer='zeros',kernel_regularizer=None,bias_regularizer=None,kernel_constraint=None,bias_constraint=None,use_additive_bias=True,use_attention_bias=True,attention_activation=None,attention_regularizer_weight=0.0,**kwargs):"""Layer initialization.For additive attention, see: https://arxiv.org/pdf/1806.01264.pdf:param units: The dimension of the vectors that used to calculate the attention weights.:param attention_width: The width of local attention.:param attention_type: 'additive' or 'multiplicative'.:param return_attention: Whether to return the attention weights for visualization.:param history_only: Only use historical pieces of data.:param kernel_initializer: The initializer for weight matrices.:param bias_initializer: The initializer for biases.:param kernel_regularizer: The regularization for weight matrices.:param bias_regularizer: The regularization for biases.:param kernel_constraint: The constraint for weight matrices.:param bias_constraint: The constraint for biases.:param use_additive_bias: Whether to use bias while calculating the relevance of inputs featuresin additive mode.:param use_attention_bias: Whether to use bias while calculating the weights of attention.:param attention_activation: The activation used for calculating the weights of attention.:param attention_regularizer_weight: The weights of attention regularizer.:param kwargs: Parameters for parent class."""self.supports_masking = Trueself.units = unitsself.attention_width = attention_widthself.attention_type = attention_typeself.return_attention = return_attentionself.history_only = history_onlyif history_only and attention_width is None:self.attention_width = int(1e9)self.use_additive_bias = use_additive_biasself.use_attention_bias = use_attention_biasself.kernel_initializer = keras.initializers.get(kernel_initializer)self.bias_initializer = keras.initializers.get(bias_initializer)self.kernel_regularizer = keras.regularizers.get(kernel_regularizer)self.bias_regularizer = keras.regularizers.get(bias_regularizer)self.kernel_constraint = keras.constraints.get(kernel_constraint)self.bias_constraint = keras.constraints.get(bias_constraint)self.attention_activation = keras.activations.get(attention_activation)self.attention_regularizer_weight = attention_regularizer_weightself._backend = keras.backend.backend()if attention_type == SeqSelfAttention.ATTENTION_TYPE_ADD:self.Wx, self.Wt, self.bh = None, None, Noneself.Wa, self.ba = None, Noneelif attention_type == SeqSelfAttention.ATTENTION_TYPE_MUL:self.Wa, self.ba = None, Noneelse:raise NotImplementedError('No implementation for attention type : ' + attention_type)super(SeqSelfAttention, self).__init__(**kwargs)def get_config(self):config = {'units': self.units,'attention_width': self.attention_width,'attention_type': self.attention_type,'return_attention': self.return_attention,'history_only': self.history_only,'use_additive_bias': self.use_additive_bias,'use_attention_bias': self.use_attention_bias,'kernel_initializer': keras.regularizers.serialize(self.kernel_initializer),'bias_initializer': keras.regularizers.serialize(self.bias_initializer),'kernel_regularizer': keras.regularizers.serialize(self.kernel_regularizer),'bias_regularizer': keras.regularizers.serialize(self.bias_regularizer),'kernel_constraint': keras.constraints.serialize(self.kernel_constraint),'bias_constraint': keras.constraints.serialize(self.bias_constraint),'attention_activation': keras.activations.serialize(self.attention_activation),'attention_regularizer_weight': self.attention_regularizer_weight,}base_config = super(SeqSelfAttention, self).get_config()return dict(list(base_config.items()) + list(config.items()))def build(self, input_shape):if isinstance(input_shape, list):input_shape = input_shape[0]self._build_additive_attention(input_shape)super(SeqSelfAttention, self).build(input_shape)def _build_additive_attention(self, input_shape):# 2019.3.29 星期五# feature_dim 应该是Channel.feature_dim = input_shape[-1]self.Wt = self.add_weight(shape=(feature_dim, self.units),name='{}_Add_Wt'.format(self.name),initializer=self.kernel_initializer,regularizer=self.kernel_regularizer,constraint=self.kernel_constraint)self.Wx = self.add_weight(shape=(feature_dim, self.units),name='{}_Add_Wx'.format(self.name),initializer=self.kernel_initializer,regularizer=self.kernel_regularizer,constraint=self.kernel_constraint)if self.use_additive_bias:self.bh = self.add_weight(shape=(self.units,),name='{}_Add_bh'.format(self.name),initializer=self.bias_initializer,regularizer=self.bias_regularizer,constraint=self.bias_constraint)self.Wa = self.add_weight(shape=(self.units, 1),name='{}_Add_Wa'.format(self.name),initializer=self.kernel_initializer,regularizer=self.kernel_regularizer,constraint=self.kernel_constraint)if self.use_attention_bias:self.ba = self.add_weight(shape=(1,),name='{}_Add_ba'.format(self.name),initializer=self.bias_initializer,regularizer=self.bias_regularizer,constraint=self.bias_constraint)def call(self, inputs, mask=None, **kwargs):# 2019.3.29 这个机制是在假设H和W相等的情况下, 才能用这种机制.input_len = K.shape(inputs)[1]e = self._call_additive_emission(inputs)if self.attention_activation is not None:e = self.attention_activation(e)# exp: element-wise的指数操作. e^x次方. e = 2.718281828459045..e = K.exp(e - K.max(e, axis=-1, keepdims=True))# 默认情况下, self.attention_width为None.if self.attention_width is not None:ones = tf.ones((input_len, input_len))if self.history_only:local = tf.matrix_band_part(ones,K.minimum(input_len, self.attention_width - 1),0,)else:local = tf.matrix_band_part(ones,K.minimum(input_len, self.attention_width // 2),K.minimum(input_len, (self.attention_width - 1) // 2),)e = e * K.expand_dims(local, 0)# 默认情况下, mask为None.if mask is not None:mask = K.cast(mask, K.floatx())mask = K.expand_dims(mask)e = K.permute_dimensions(K.permute_dimensions(e * mask, (0, 2, 1)) * mask, (0, 2, 1))# a_{t} = \text{softmax}(e_t)# 2019.3.29 经验证:# s = K.sum(e, axis=-1) 返回的是N x input_len x input_len的Tensor,# s = K.tile(...) 返回的是N x input_len x input_len x input_len的Tensor, 上一步的s中每一项, 都会复制input_len份, 成为独立的一行.s = K.sum(e, axis=-1)s = K.tile(K.expand_dims(s, axis=-1), K.stack([1, 1, 1, input_len]))# >>> keras.backend.epsilon() # 1e-07a = e / (s + K.epsilon())# l_t = \sum_{t'} a_{t, t'} x_{t'}# H = input_len# a: N x H x H x H. # inputs: N x H x H x C.# v = K.batch_dot(a, inputs): N x H x H x C.v = K.batch_dot(a, inputs)# 2019.3.29 星期五 attention_regularizer_weight默认为0.0.if self.attention_regularizer_weight > 0.0:self.add_loss(self._attention_regularizer(a))# 2019.3.29 星期五 return_attention默认为False.if self.return_attention:return [v, a]return vdef _call_additive_emission(self, inputs):input_shape = K.shape(inputs)batch_size, input_len = input_shape[0], input_shape[1]# h_{t, t'} = \tanh(x_t^T W_t + x_{t'}^T W_x + b_h)# print(inputs)# inputs: N x H x H x C ; self.Wt: C x unit ; self.Wx: C x unit# q: N x H x H x unit k: N x H x H x unit.q, k = K.dot(inputs, self.Wt), K.dot(inputs, self.Wx)# q = K.expand_dims(q, 2), q的新shape: N x H x 1 x H x unit.# q = tf.tile(q, K.stack([1, 1, H, 1, 1])): N x H x H x H x unit.q = K.tile(K.expand_dims(q, 2), K.stack([1, 1, input_len, 1,1]))# k 同样的, 为N x H x H x H x unit.(k对应的是Height维度上的, q对应的是Width维度上的).k = K.tile(K.expand_dims(k, 1), K.stack([1, input_len, 1, 1,1]))if self.use_additive_bias:h = K.tanh(q + k + self.bh)else:h = K.tanh(q + k)# e_{t, t'} = W_a h_{t, t'} + b_aif self.use_attention_bias:e = K.reshape(K.dot(h, self.Wa) + self.ba, (batch_size, input_len, input_len, input_len))else:e = K.reshape(K.dot(h, self.Wa), (batch_size, input_len, input_len, input_len))return edef compute_output_shape(self, input_shape):if isinstance(input_shape, list):input_shape, pos_shape = input_shapeoutput_shape = (input_shape[0], pos_shape[1], input_shape[2])else:output_shape = input_shapeif self.return_attention:attention_shape = (input_shape[0], output_shape[1], input_shape[1])return [output_shape, attention_shape]return output_shapedef _attention_regularizer(self, attention):batch_size = K.cast(K.shape(attention)[0], K.floatx())input_len = K.shape(attention)[-1]return self.attention_regularizer_weight * K.sum(K.square(K.batch_dot(attention,K.permute_dimensions(attention, (0, 2, 1))) - tf.eye(input_len))) / batch_size@staticmethoddef get_custom_objects():return {'SeqSelfAttention': SeqSelfAttention}这里, 我们先不用看里面复杂的设计, 对计算逻辑来讲, 只需要看一下成员函数_build_additive_attention(self, input_shape), call(self, inputs, mask=None, **kwargs)以及_call_additive_emission(self, inputs).
其中, 与第1部分对应的计算逻辑被封装在_call_additive_emission(self, inputs)中:
2.1 _call_additive_emission(self, inputs)
这里, input_len就对应特征图的高和宽, 所以这版代码要求特征图的高和宽必须相同, 此外, 容易看出, 我们根据q和k计算出h, 这个h就是公式(2)中对应的 g t , t ′ g_{t, t'} gt,t′. 而e等于公式(2)中对应的 α t , t ′ \alpha_{t, t'} αt,t′.
其中具体的计算和可能发生的维度变化, 我都在代码中注明, 应该比较容易懂(建议感兴趣的朋友可以在动态图模式下自己试着跑跑K.dot, K.batch_dot, K.exp等ops).
def _call_additive_emission(self, inputs):input_shape = K.shape(inputs)batch_size, input_len = input_shape[0], input_shape[1]# h_{t, t'} = \tanh(x_t^T W_t + x_{t'}^T W_x + b_h)# print(inputs)# inputs: N x H x H x C ; self.Wt: C x unit ; self.Wx: C x unit# q: N x H x H x unit k: N x H x H x unit.q, k = K.dot(inputs, self.Wt), K.dot(inputs, self.Wx)# q = K.expand_dims(q, 2), q的新shape: N x H x 1 x H x unit.# q = tf.tile(q, K.stack([1, 1, H, 1, 1])): N x H x H x H x unit.q = K.tile(K.expand_dims(q, 2), K.stack([1, 1, input_len, 1,1]))# k 同样的, 为N x H x H x H x unit.(k对应的是Height维度上的, q对应的是Width维度上的).k = K.tile(K.expand_dims(k, 1), K.stack([1, input_len, 1, 1,1]))if self.use_additive_bias:h = K.tanh(q + k + self.bh)else:h = K.tanh(q + k)# e_{t, t'} = W_a h_{t, t'} + b_aif self.use_attention_bias:e = K.reshape(K.dot(h, self.Wa) + self.ba, (batch_size, input_len, input_len, input_len))else:e = K.reshape(K.dot(h, self.Wa), (batch_size, input_len, input_len, input_len))return e
2.2 build(self, input_shape)
build是是继承keras.layers.Layer必须要重载的方法, 里面需要初始化在这个layer或者ops中, 用户需要的参数(如权重, 偏置等).
可以看出, 我们初始化构造了权重 W a W_{a} Wa, W t W_{t} Wt, W x W_{x} Wx和偏置 b a b_{a} ba, b h b_{h} bh.
2.3 call(self, inputs, mask=None, **kwargs)
call和build一样, 都是继承keras.layers.Layer必须要重载的方法, 用户需要在这个成员函数中规定你的计算逻辑. 得到e, 也就是说, _call_additive_emission返回的并不是最终的注意力矩阵 α t , t ′ \alpha_{t, t'} αt,t′, 而是需要进行下面的操作
ps: 对其中一部分关于e的处理进行了隐藏, 没有都列出来. 只是为了说明情况.
...
e = self._call_additive_emission(inputs)
if self.attention_activation is not None:e = self.attention_activation(e)
# exp: element-wise的指数操作. e^x次方. e = 2.718281828459045..
e = K.exp(e - K.max(e, axis=-1, keepdims=True))# 2019.3.29 经验证:
# s = K.sum(e, axis=-1) 返回的是N x input_len x input_len的Tensor,
# s = K.tile(...) 返回的是N x input_len x input_len x input_len的Tensor, 上一步的s中每一项, 都会复制input_len份, 成为独立的一行.
s = K.sum(e, axis=-1)
s = K.tile(K.expand_dims(s, axis=-1), K.stack([1, 1, 1, input_len]))
# >>> keras.backend.epsilon()
# 1e-07
a = e / (s + K.epsilon())
...
3. 总结
Additive Attention作为从NLP领域萌发的自注意力机制, 在CV里面也有很大的用武之地, 我认为它在一些生成模型中会发挥非常大的作用, 关于这个模型的PyTorch版本也比较容易实现, 如有同学想要, 请联系我, 谢谢~
参考资料:
[1] OpenTag: Open Attribute Value Extraction from Product Profiles
[2] Squeeze-and-Excitation Networks
这篇关于2018 Additive Attention分析及代码的文章就介绍到这儿,希望我们推荐的文章对编程师们有所帮助!


