本文主要是介绍Autofac实现拦截器和切面编程,希望对大家解决编程问题提供一定的参考价值,需要的开发者们随着小编来一起学习吧!
Autofac.Annotation框架是我用.netcore写的一个注解式DI框架,基于Autofac参考 Spring注解方式所有容器的注册和装配,切面,拦截器等都是依赖标签来完成。
开源地址:https://github.com/yuzd/Autofac.Annotation
上期说了Autofac实现有条件的DI
本期讲的是最新重构的功能,这个功能也是赋予了这个框架的无限可能,也是我觉得设计的比较好的地方, 今天来说说我是怎么设计的。本篇文章我写的时候想了很久如何脱离代码去讲的很清楚,但是发现很难,因为设计的巧妙之处还是在于代码,得细品。至少我觉得比Spring的拦截器链用的代码少而精巧,而且更容器理解(手动狗头)
切面和拦截器介绍
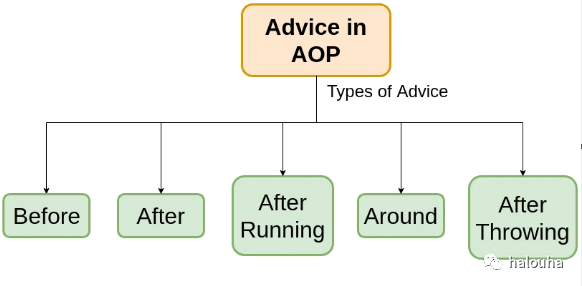
拦截器是什么?
可以帮助我们方便在执行目标方法的
前(Before)
后(After)
返回值时(AfterReturn)
抛错误时(AfterThrowing)
环绕(Around)
简单示例:
//自己实现一个拦截器public class TestHelloBefore:AspectBefore{public override Task Before(AspectContext aspectContext){Console.WriteLine("TestHelloBefore");return Task.CompletedTask;}}[Component]public class TestHello{[TestHelloBefore]//打上拦截器public virtual void Say(){Console.WriteLine("Say");}}先执行 TestHelloBefor的Before方法再执行你的Say方法
更多使用示例请查看 Aspect拦截器
切面是什么?
定义一个切面(根据筛选器去实现满足条件的多个类的多个方法的“拦截器”
简单示例:
[Component]public class ProductController{public virtual string GetProduct(string productId){return "GetProduct:" + productId;}public virtual string UpdateProduct(string productId){return "UpdateProduct:" + productId;}}[Component]public class UserController{public virtual string GetUser(string userId){return "GetUser:" + userId;}public virtual string DeleteUser(string userId){return "DeleteUser:" + userId;}}// *Controller 代表匹配 只要是Controller结尾的类都能匹配// Get* 代表上面匹配成功的类下 所以是Get打头的方法都能匹配[Pointcut(Class = "*Controller",Method = "Get*")]public class LoggerPointCut{[Around]public async Task Around(AspectContext context,AspectDelegate next){Console.WriteLine("PointcutTest1.Around-start");await next(context);Console.WriteLine("PointcutTest1.Around-end");}[Before]public void Before(){Console.WriteLine("PointcutTest1.Before");}[After]public void After(){Console.WriteLine("PointcutTest1.After");}[AfterReturn(Returing = "value1")]public void AfterReturn(object value1){Console.WriteLine("PointcutTest1.AfterReturn");}[AfterThrows(Throwing = "ex1")]public void Throwing(Exception ex1){Console.WriteLine("PointcutTest1.Throwing");} }更多示例请查看 Pointcut切面编程
如何实现的
分为3步
1.搜集拦截算子(比如Before/After等这个我们叫算子)
2.构造拦截器链(按照上面图的方式把算子链接起来)
3.生成代理类代理目标方法去执行上面构造的拦截器链
1.搜集拦截算子
因为拦截器的使用是约定了要继承 AspectInvokeAttribute
/// <summary>/// AOP拦截器 默认包含继承关系/// </summary>[AttributeUsage(AttributeTargets.Method | AttributeTargets.Class)]public class AspectInvokeAttribute : Attribute{/// <summary>/// 排序 值越低,优先级越高/// </summary>public int OrderIndex { get; set; }/// <summary>/// 分组名称/// </summary>public string GroupName { get; set; }}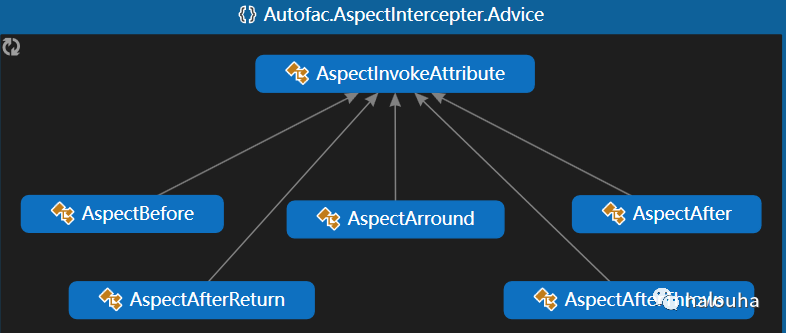
这一组注解是暴露给外部使用,来搜集哪些类的哪些方法需要增强
接下来需要去针对性去实现每一种增强器要做的事情
定义一个增强器接口IAdvice
internal interface IAdvice{/// <summary>/// 拦截器方法/// </summary>/// <param name="aspectContext">执行上下文</param>/// <param name="next">下一个增强器</param>/// <returns></returns>Task OnInvocation(AspectContext aspectContext, AspectDelegate next);}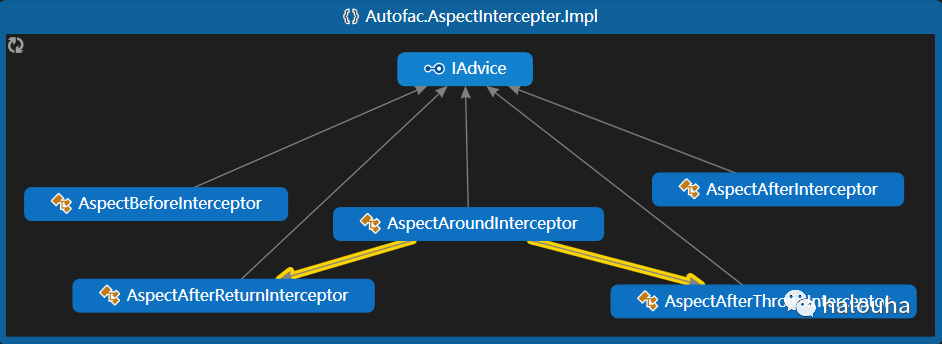
Before增强器
/// <summary>/// 前置增强器/// </summary>internal class AspectBeforeInterceptor : IAdvice{private readonly AspectBefore _beforeAttribute;public AspectBeforeInterceptor(AspectBefore beforeAttribute){_beforeAttribute = beforeAttribute;}public async Task OnInvocation(AspectContext aspectContext, AspectDelegate next){//先执行Before逻辑await this._beforeAttribute.Before(aspectContext);//在走下一个增强器await next.Invoke(aspectContext);}}After增强器
/// <summary>/// 后置增强器/// </summary>internal class AspectAfterInterceptor : IAdvice{private readonly AspectAfter _afterAttribute;private readonly bool _isAfterAround;public AspectAfterInterceptor(AspectAfter afterAttribute, bool isAfterAround = false){_afterAttribute = afterAttribute;_isAfterAround = isAfterAround;}public async Task OnInvocation(AspectContext aspectContext, AspectDelegate next){try{if (!_isAfterAround) await next.Invoke(aspectContext);}finally{//不管成功还是失败都会执行的 await this._afterAttribute.After(aspectContext, aspectContext.Exception ?? aspectContext.ReturnValue);}}}环绕增强器
/// <summary>/// 环绕返回拦截处理器/// </summary>internal class AspectAroundInterceptor : IAdvice{private readonly AspectArround _aroundAttribute;private readonly AspectAfterInterceptor _aspectAfter;private readonly AspectAfterThrowsInterceptor _aspectThrows;public AspectAroundInterceptor(AspectArround aroundAttribute, AspectAfter aspectAfter, AspectAfterThrows chainAspectAfterThrows){_aroundAttribute = aroundAttribute;if (aspectAfter != null){_aspectAfter = new AspectAfterInterceptor(aspectAfter, true);}if (chainAspectAfterThrows != null){_aspectThrows = new AspectAfterThrowsInterceptor(chainAspectAfterThrows, true);}}public async Task OnInvocation(AspectContext aspectContext, AspectDelegate next){Exception exception = null;try{if (_aroundAttribute != null){await _aroundAttribute.OnInvocation(aspectContext, next);return;}}catch (Exception ex){exception = ex;}finally{if (exception == null && _aspectAfter != null) await _aspectAfter.OnInvocation(aspectContext, next);}try{if (exception != null && _aspectAfter != null){await _aspectAfter.OnInvocation(aspectContext, next);}if (exception != null && _aspectThrows != null){await _aspectThrows.OnInvocation(aspectContext, next);}}finally{if (exception != null) throw exception;}}}返回值增强器
/// <summary>/// 后置返值增强器/// </summary>internal class AspectAfterReturnInterceptor : IAdvice{private readonly AspectAfterReturn _afterAttribute;public AspectAfterReturnInterceptor(AspectAfterReturn afterAttribute){_afterAttribute = afterAttribute;}public async Task OnInvocation(AspectContext aspectContext, AspectDelegate next){await next.Invoke(aspectContext);//执行异常了不执行after 去执行Throwif (aspectContext.Exception != null){return;}if (_afterAttribute != null){await this._afterAttribute.AfterReturn(aspectContext, aspectContext.ReturnValue);}}}异常返回增强器
/// <summary>/// 异常返回增强器/// </summary>internal class AspectAfterThrowsInterceptor : IAdvice{private readonly AspectAfterThrows _aspectThrowing;private readonly bool _isFromAround;public AspectAfterThrowsInterceptor(AspectAfterThrows throwAttribute, bool isFromAround = false){_aspectThrowing = throwAttribute;_isFromAround = isFromAround;}public async Task OnInvocation(AspectContext aspectContext, AspectDelegate next){try{if (!_isFromAround) await next.Invoke(aspectContext);}finally{//只有目标方法出现异常才会走 增强的方法出异常不要走if (aspectContext.Exception != null){Exception ex = aspectContext.Exception;if (aspectContext.Exception is TargetInvocationException targetInvocationException){ex = targetInvocationException.InnerException;}if (ex == null){ex = aspectContext.Exception;}var currentExType = ex.GetType();if (_aspectThrowing.ExceptionType == null || _aspectThrowing.ExceptionType == currentExType){await _aspectThrowing.AfterThrows(aspectContext, aspectContext.Exception);}}}}}2. 组装增强器们成为一个调用链
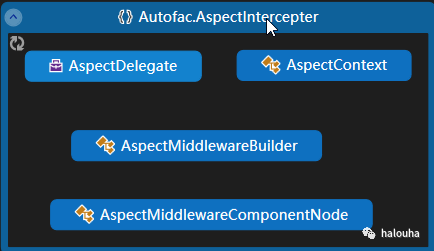
每一个node的有三个信息,如下
/// <summary>/// 拦截node组装/// </summary>internal class AspectMiddlewareComponentNode{/// <summary>/// 下一个/// </summary>public AspectDelegate Next;/// <summary>/// 执行器/// </summary>public AspectDelegate Process;/// <summary>/// 组件/// </summary>public Func<AspectDelegate, AspectDelegate> Component;}采用LinkedList来构建我们的拉链式调用, 我们把上面的每个增强器作为一个个middeware,添加进来。
internal class AspectMiddlewareBuilder{private readonly LinkedList<AspectMiddlewareComponentNode> Components = new LinkedList<AspectMiddlewareComponentNode>();/// <summary>/// 新增拦截器链/// </summary>/// <param name="component"></param>public void Use(Func<AspectDelegate, AspectDelegate> component){var node = new AspectMiddlewareComponentNode{Component = component};Components.AddLast(node);}/// <summary>/// 构建拦截器链/// </summary>/// <returns></returns>public AspectDelegate Build(){var node = Components.Last;while (node != null){node.Value.Next = GetNextFunc(node);node.Value.Process = node.Value.Component(node.Value.Next);node = node.Previous;}return Components.First.Value.Process;}/// <summary>/// 获取下一个/// </summary>/// <param name="node"></param>/// <returns></returns>private AspectDelegate GetNextFunc(LinkedListNode<AspectMiddlewareComponentNode> node){return node.Next == null ? ctx => Task.CompletedTask : node.Next.Value.Process;}}然后build方法会构建成一个一层嵌套一层的pipeline管道(一个委托)
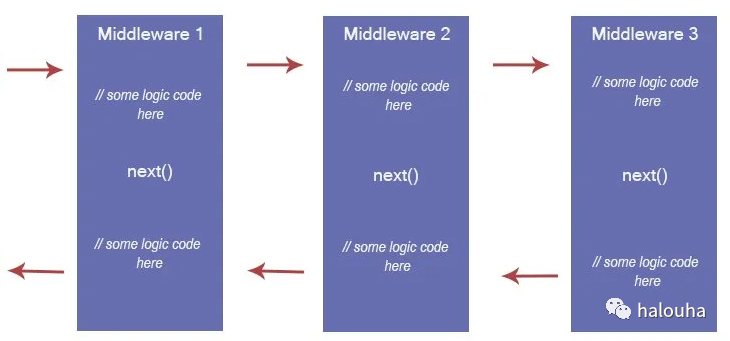
更多关于这种设计模式更多信息请参考我另外一篇文章:中间件(middlewware)模式
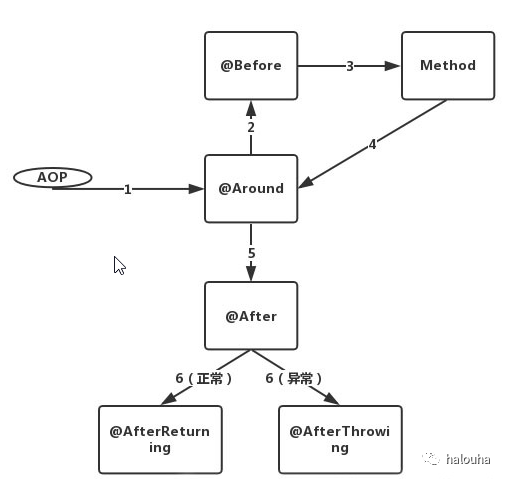
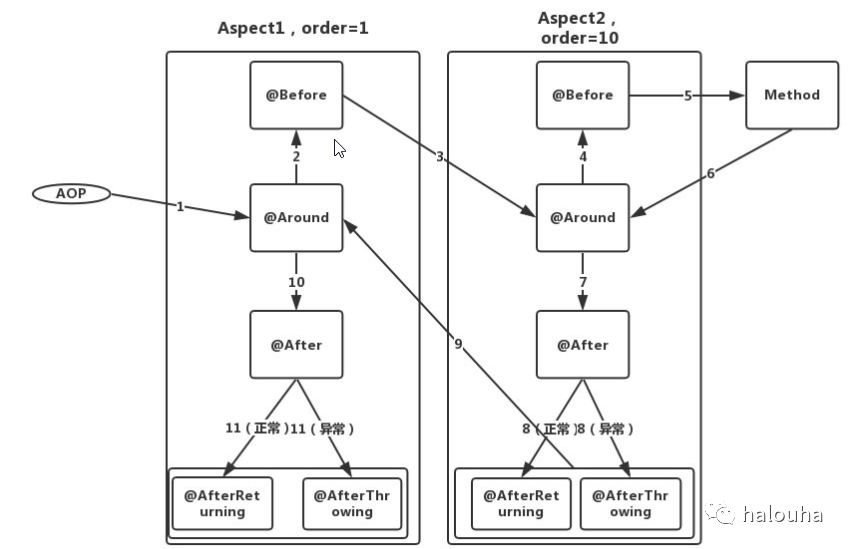
构建的顺序: After, Around,Before,最后才是实际的方法
这里尤其要注意需要将AfterReturn 和 AfterThrowing在Around增强器里面调用,这里要细品!
按照我们的需求构建的完整执行示意图如下:
单个拦截器或者切面
多个拦截器或者切面
3.生成代理类代理目标方法去执行上面构造的拦截器链
这一步就简单了,如果检测到目标有打拦截器注解,则会给这个类动态创建一个proxy类,
生成代理类用的是castle.core的dynamic组件
默认的是Class+virtual的方式对目标方法进行拦截
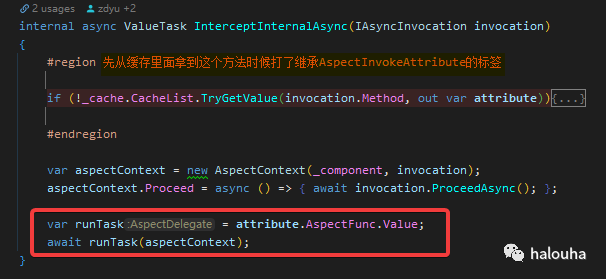
注意:考虑到性能,在项目启动的时候把构建好进行缓存,然后再拦截器里面使用
https://github.com/yuzd/Autofac.Annotation/wiki
我是正东,学的越多不知道也越多。热爱可低漫长岁月,这一刻我很爽!
这篇关于Autofac实现拦截器和切面编程的文章就介绍到这儿,希望我们推荐的文章对编程师们有所帮助!


