本文主要是介绍Python自动处理pptx:新建、另存、添加幻灯片、添加标题、插入文本图片图形、提取文本,希望对大家解决编程问题提供一定的参考价值,需要的开发者们随着小编来一起学习吧!
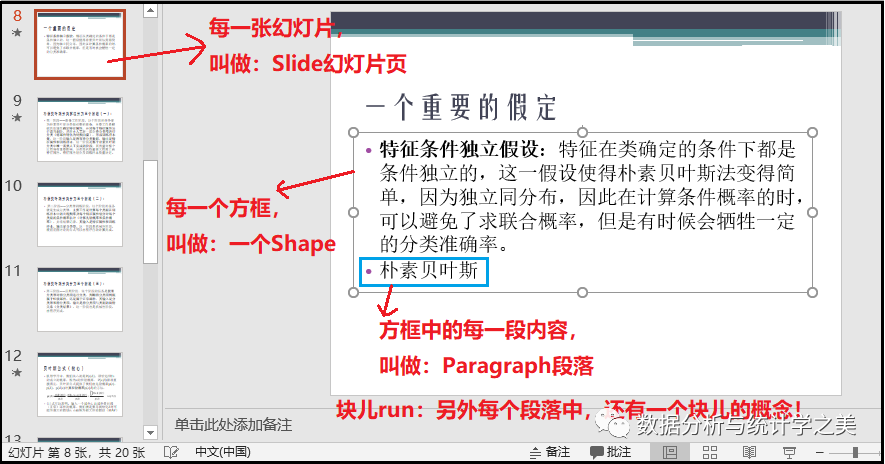
Python-pptx库是一个用于创建、更新和读取Microsoft PowerPoint .pptx 文件的Python库。它允许我们使用Python脚本自动化PowerPoint文件的创建、更新和读取操作,是一个非常方便自动化处理PPTX的工具。
安装
pip install python-pptx
创建
from pptx import Presentation
ppt = Presentation()
ppt.save('demo.pptx')
打开、另存
from pptx import Presentation
ppt = Presentation('demo.pptx')
ppt.save('new_demo.pptx')
添加幻灯片
from pptx import Presentation
ppt = Presentation()
for i in range(11):layout = ppt.slide_layouts[i]slide = ppt.slides.add_slide(layout)
ppt.save('添加幻灯片.pptx')
添加标题
from pptx import Presentation
ppt = Presentation()
layout = ppt.slide_layouts[0]
slide = ppt.slides.add_slide(layout)
title = slide.shapes.title
title.text = '演示文稿制作自动化'
subtitle = slide.placeholders[1]
subtitle.text = 'python-pptx库从入门到精通'
ppt.save('添加标题1.pptx')
from pptx import Presentation
ppt = Presentation()
layout = ppt.slide_layouts[1]
slide = ppt.slides.add_slide(layout)
title_shape = slide.shapes.title
title_shape.text = 'python-pptx库的基本操作'
body_shape = slide.shapes.placeholders[1]
tf = body_shape.text_frame
p = tf.add_paragraph()
p.text = '演示文稿的基本操作'
p.level = 0
p = tf.add_paragraph()
p.text = '创建演示文稿'
p.level = 1
p = tf.add_paragraph()
p.text = '打开和保存演示文稿'
p.level = 1
p = tf.add_paragraph()
p.text = '打开演示文稿'
p.level = 2
p = tf.add_paragraph()
p.text = '保存演示文稿'
p.level = 2
ppt.save('添加标题2.pptx')添加文本框
from pptx import Presentation
from pptx.util import Cm
ppt = Presentation()
layout = ppt.slide_layouts[6]
slide = ppt.slides.add_slide(layout)
left = top = Cm(3)
width = height = Cm(10)
txBox = slide.shapes.add_textbox(left, top, width, height)
tf = txBox.text_frame
tf.text = '海内存知己,天涯若比邻。'
ppt.save('添加文本框.pptx')
设置文本格式
from pptx import Presentation
from pptx.util import Cm, Pt
from pptx.dml.color import RGBColor
from pptx.enum.dml import MSO_THEME_COLOR
from pptx.enum.text import MSO_ANCHOR, PP_ALIGN
# 创建演示文稿并添加幻灯片
ppt = Presentation()
layout = ppt.slide_layouts[6]
slide = ppt.slides.add_slide(layout)
left, top, width, height = Cm(2.7), Cm(2), Cm(20), Cm(15)
# 添加文本框,并设置文本区域的格式
txBox = slide.shapes.add_textbox(left, top, width, height)
text_frame = txBox.text_frame
text_frame.margin_top = Cm(0.5)
text_frame.vertical_anchor = MSO_ANCHOR.TOP
text_frame.word_wrap = True
# 添加第1段文本并设置段落格式和字体格式
text_frame.clear()
text_frame.text = '计算机科学经典著作'
p = text_frame.paragraphs[0]
p.alignment = PP_ALIGN.CENTER
p.space_after = Pt(18)
r = p.runs[0]
r.font.name = '方正隶变简体'
r.font.size = Pt(42)
r.font.bold = True
r.font.color.theme_color = MSO_THEME_COLOR.ACCENT_1
# 添加第2个段落并设置段落格式
p = text_frame.add_paragraph()
p.alignment = PP_ALIGN.JUSTIFY
p.line_spacing = 1.5
# 在第2个段落中添加第1个文本片段并设置字体格式
r = p.add_run()
r.text = 'Introduction to Algorithms'
r.font.name = 'Times New Roman'
r.font.size = Pt(26)
r.font.italic = True
r.font.bold = True
r.font.color.rgb = RGBColor(255, 0, 0)
# 在第2个段落中添加第2个文本片段并设置字体格式
r = p.add_run()
r.text = ',中文译名为《算法导论》。本书语言通俗易懂,很适合自学。'
r.font.name = '方正准雅宋_GBK'
r.font.size = Pt(26)
r.font.italic = False
r.font.bold = False
r.font.color.rgb = RGBColor(0, 0, 0)
ppt.save('设置文本格式.pptx')
添加图片
from pptx import Presentation
from pptx.util import Cm
ppt = Presentation()
layout = ppt.slide_layouts[5]
slide = ppt.slides.add_slide(layout)
slide.shapes.title.text = '烟花三月下扬州'
image_file = '水彩.jpg'
left = Cm(2.7)
top = Cm(4)
width = Cm(20)
pic = slide.shapes.add_picture(image_file, left, top, width)
ppt.save('添加图片.pptx')
添加形状
from pptx import Presentation
from pptx.enum.shapes import MSO_SHAPE
from pptx.util import Cm
ppt = Presentation()
layout = ppt.slide_layouts[5]
slide = ppt.slides.add_slide(layout)
slide.shapes.title.text = '添加形状'
left = top = Cm(4)
width = height = Cm(6)
shape = slide.shapes.add_shape(MSO_SHAPE.SUN, left, top, width, height)
shape.text = '太阳'
ppt.save('添加形状.pptx')
形状填充颜色
from pptx import Presentation
from pptx.enum.shapes import MSO_SHAPE
from pptx.enum.dml import MSO_THEME_COLOR
from pptx.util import Cm
ppt = Presentation()
layout = ppt.slide_layouts[5]
slide = ppt.slides.add_slide(layout)
slide.shapes.title.text = '添加形状'
left, top, width, height = Cm(0.8), Cm(4), Cm(5), Cm(2.5)
for n in range(1, 6):shape = slide.shapes.add_shape(MSO_SHAPE.CHEVRON, left, top, width, height)shape.text = f'第 {n} 步'fill = shape.fillfill.solid()fill.fore_color.theme_color = MSO_THEME_COLOR.ACCENT_1fill.fore_color.brightness = -0.1 * nleft = left + width - Cm(0.3)
ppt.save('为形状填充颜色.pptx')
添加表格
from pptx import Presentation
from pptx.util import Cm
ppt = Presentation()
layout = ppt.slide_layouts[5]
slide = ppt.slides.add_slide(layout)
slide.shapes.title.text = '添加表格'
# 添加表格
rows = 5
cols = 4
left = Cm(2.7)
top = Cm(4)
width = Cm(20)
height = Cm(6)
table = slide.shapes.add_table(rows, cols, left, top, width, height).table
# 设置列宽
table.columns[0].width = Cm(6)
table.columns[1].width = Cm(5)
table.columns[2].width = Cm(4.5)
table.columns[3].width = Cm(4.5)
# 填充表头
table.cell(0, 0).text = '财务类型'
table.cell(0, 1).text = '大类'
table.cell(0, 2).text = '金额(万元)'
table.cell(0, 3).text = '占比'
# 填充单元格
table.cell(1, 0).text = '资产'
table.cell(1, 1).text = '长期资产'
table.cell(1, 2).text = '5645'
table.cell(1, 3).text = '61.24%'
table.cell(2, 1).text = '流动资产'
table.cell(2, 2).text = '3573'
table.cell(2, 3).text = '38.76%'table.cell(3, 0).text = '负债'
table.cell(3, 1).text = '股东权益'
table.cell(3, 2).text = '3400'
table.cell(3, 3).text = '48.76%'
table.cell(4, 1).text = '流动负债'
table.cell(4, 2).text = '3573'
table.cell(4, 3).text = '51.24%'
# 合并单元格
cell1 = table.cell(1, 0)
cell1.merge(table.cell(2, 0))
cell2 = table.cell(3, 0)
cell2.merge(table.cell(4, 0))
# 调整内边距
cell1.margin_top = Cm(0.75)
cell1.margin_left = Cm(2.5)
cell2.margin_top = Cm(0.75)
cell2.margin_left = Cm(2.5)ppt.save('添加表格.pptx')
添加图表
from pptx import Presentation
from pptx.chart.data import CategoryChartData
from pptx.enum.chart import XL_CHART_TYPE, XL_LEGEND_POSITION
from pptx.util import Cm
# 创建一页幻灯片
ppt = Presentation()
layout = ppt.slide_layouts[5]
slide = ppt.slides.add_slide(layout)
slide.shapes.title.text = '各分部参加考试人数'
# 定义图表数据
chart_data = CategoryChartData()
chart_data.categories = ['北京', '上海', '深圳']
chart_data.add_series('男', (19, 21, 16))
chart_data.add_series('女', (27, 15, 20))
# 在幻灯片中添加图表
left, top, width, height = Cm(2.7), Cm(4), Cm(20), Cm(12)
chart = slide.shapes.add_chart(XL_CHART_TYPE.COLUMN_CLUSTERED, left, top, width, height, chart_data).chart
chart.has_legend = True
chart.legend.position = XL_LEGEND_POSITION.RIGHT
chart.legend.include_in_layout = Falseppt.save('添加图表.pptx')
提取文本
from pptx import Presentation
ppt = Presentation('提取文本.pptx')
text_runs = []
for slide in ppt.slides:for shape in slide.shapes:if shape.has_text_frame:for paragraph in shape.text_frame.paragraphs:for run in paragraph.runs:text_runs.append(run.text)
text_runs = '\n'.join(text_runs)
with open('提取文本.txt', mode='w', encoding='utf-8') as f:f.write(text_runs)
添加备注
from pptx import Presentation
ppt = Presentation('添加备注.pptx')
for slide in ppt.slides:if not slide.has_notes_slide:notes_slide = slide.notes_slidetext_frame = notes_slide.notes_text_frametext_frame.text = '注意控制语速和时间'
ppt.save('添加备注1.pptx')
基于模板制作
import pptx
from pptx import Presentation
from pptx.dml.color import RGBColor
from pptx.util import Cm, Pt
from pptx.enum.text import MSO_ANCHOR, PP_ALIGN
ppt = Presentation('模板.pptx')
# 制作标题幻灯片
layout = ppt.slide_layouts[0]
slide = ppt.slides.add_slide(layout)
slide.shapes.placeholders[0].text = '个人作品展示'
slide.shapes.placeholders[1].text = '2022年1月'
# 制作第1页正文
layout = ppt.slide_layouts[1]
slide = ppt.slides.add_slide(layout)
slide.shapes.placeholders[0].text = '零基础学Python网络爬虫案例实战\n全流程详解(入门与提高篇)'
slide.shapes.placeholders[1].text = '定价:99.00元\nISBN:978-7-111-68368-1\n出版时间:2021年7月'
left, top, width, height = Cm(1.3), Cm(10.2), Cm(15), Cm(7)
content_box = slide.shapes.add_textbox(left, top, width, height)
text_frame = content_box.text_frame
text_frame.vertical_anchor = MSO_ANCHOR.TOP
text_frame.word_wrap = True
p = text_frame.paragraphs[0]
p.alignment = PP_ALIGN.JUSTIFY
r = p.add_run()
r.text = '网络爬虫是当今获取数据不可或缺的重要手段。本书讲解了爬虫的基础知识和必备技能,能够帮助零基础的读者快速入门并熟练使用爬虫。'
r.font.name = '方正兰亭细黑_GBK'
r.font.size = Pt(24)
r.font.color.rgb = RGBColor(0, 0, 0)
image_file = '封面1.png'
left, top, height = Cm(18), Cm(4.3), Cm(13.5)
slide.shapes.add_picture(image_file=image_file, left=left, top=top, height=height)
# 制作第2页正文
layout = ppt.slide_layouts[1]
slide = ppt.slides.add_slide(layout)
slide.shapes.placeholders[0].text = '零基础学Python网络爬虫案例实战\n全流程详解(高级进阶篇)'
slide.shapes.placeholders[1].text = '定价:89.80元\nISBN:978-7-111-68474-9\n出版时间:2021年7月'
left, top, width, height = Cm(1.3), Cm(10.2), Cm(15), Cm(7)
content_box = slide.shapes.add_textbox(left, top, width, height)
text_frame = content_box.text_frame
text_frame.vertical_anchor = MSO_ANCHOR.TOP
text_frame.word_wrap = True
p = text_frame.paragraphs[0]
p.alignment = PP_ALIGN.JUSTIFY
r = p.add_run()
r.text = '网络爬虫是当今获取数据不可或缺的重要手段。本书讲解了爬虫的进阶理论与技术,能够帮助读者进一步提升实际应用水平。'
r.font.name = '方正兰亭细黑_GBK'
r.font.size = Pt(24)
r.font.color.rgb = RGBColor(0, 0, 0)
image_file = '封面2.png'
left, top, height = Cm(18), Cm(4.3), Cm(13.5)
slide.shapes.add_picture(image_file=image_file, left=left, top=top, height=height)
# 制作结尾幻灯片
layout = ppt.slide_layouts[2]
slide = ppt.slides.add_slide(layout)
slide.shapes.placeholders[0].text = '感谢关注'
ppt.save('作品展示.pptx')
参考
https://python-pptx.readthedocs.io/en/latest/index.html
这篇关于Python自动处理pptx:新建、另存、添加幻灯片、添加标题、插入文本图片图形、提取文本的文章就介绍到这儿,希望我们推荐的文章对编程师们有所帮助!


