本文主要是介绍LibTorch实战三:C++版本YOLOV5.4的部署,希望对大家解决编程问题提供一定的参考价值,需要的开发者们随着小编来一起学习吧!
目录
一、环境配置
二、.torchscript.pt版本模型导出
三、C++版本yolov5.4实现
四、问题记录
4.1、注释 detector.h中,注释如下头文件
4.2、错误: “std”: 不明确的符号
4.3、建议常被debug版本libtorch
4.4、问题:编译成功后,运行代码,发现torch::cuda::is_available()返回false
4.5、导出模型,命令行有警告
五、reference
一、环境配置
- win10
- vs2017
- libtorch-win-shared-with-deps-debug-1.8.1+cpu
- opencv349
由于yolov5代码,作者还在更新(写这篇博客的时候,最新是5.4,没错这是几年前写的),模型结构可能会有改变,所以咱们使用的libtorch必须满足其要求,最好是一致。我这里提供本博客采用的yolov5版本python源码。
在源码中的requirments.txt中要求依赖库版本如下;在c++环境中,咱们这里用的libtorch1.8.1(今天我也测试了环境:libtorch-win-shared-with-deps-1.7.1+cu110,也能够正常检测,和本博客最终结果一致);同时用opencv&c++作图像处理,不需要c++版本torchvision:
# pip install -r requirements.txt# base ----------------------------------------
matplotlib>=3.2.2
numpy>=1.18.5
opencv-python>=4.1.2
Pillow
PyYAML>=5.3.1
scipy>=1.4.1
torch>=1.7.0
torchvision>=0.8.1# 以下内容神略
为了便于调试,我这里下载的是debug版本libtorch,而且是cpu版本,代码调好后,转GPU也很简单吧。opencv版本其实随意,opencv3++就行。
二、.torchscript.pt版本模型导出
打开yolov5.4源码目录下models文件夹,编辑export.py脚本,如下,将58行注释,新增59行(GPU版本还需要修改一些内容,GPU版本后续更新,这篇博客只管CPU版本)
"""Exports a YOLOv5 *.pt model to ONNX and TorchScript formatsUsage:$ export PYTHONPATH="$PWD" && python models/export.py --weights ./weights/yolov5s.pt --img 640 --batch 1
"""import argparse
import sys
import timesys.path.append('./')  # to run '$ python *.py' files in subdirectoriesimport torch
import torch.nn as nnimport models
from models.experimental import attempt_load
from utils.activations import Hardswish, SiLU
from utils.general import set_logging, check_img_size
from utils.torch_utils import select_deviceif __name__ == '__main__':parser = argparse.ArgumentParser()parser.add_argument('--weights', type=str, default='./yolov5s.pt', help='weights path')  # from yolov5/models/parser.add_argument('--img-size', nargs='+', type=int, default=[640, 640], help='image size')  # height, widthparser.add_argument('--batch-size', type=int, default=1, help='batch size')parser.add_argument('--dynamic', action='store_true', help='dynamic ONNX axes')parser.add_argument('--grid', action='store_true', help='export Detect() layer grid')parser.add_argument('--device', default='cpu', help='cuda device, i.e. 0 or 0,1,2,3 or cpu')opt = parser.parse_args()opt.img_size *= 2 if len(opt.img_size) == 1 else 1  # expandprint(opt)set_logging()t = time.time()# Load PyTorch modeldevice = select_device(opt.device)model = attempt_load(opt.weights, map_location=device)  # load FP32 modellabels = model.names# Checksgs = int(max(model.stride))  # grid size (max stride)opt.img_size = [check_img_size(x, gs) for x in opt.img_size]  # verify img_size are gs-multiples# Inputimg = torch.zeros(opt.batch_size, 3, *opt.img_size).to(device)  # image size(1,3,320,192) iDetection# Update modelfor k, m in model.named_modules():m._non_persistent_buffers_set = set()  # pytorch 1.6.0 compatibilityif isinstance(m, models.common.Conv):  # assign export-friendly activationsif isinstance(m.act, nn.Hardswish):m.act = Hardswish()elif isinstance(m.act, nn.SiLU):m.act = SiLU()# elif isinstance(m, models.yolo.Detect):#     m.forward = m.forward_export  # assign forward (optional)#model.model[-1].export = not opt.grid  # set Detect() layer grid exportmodel.model[-1].export = Falsey = model(img)  # dry run# TorchScript exporttry:print('\nStarting TorchScript export with torch %s...' % torch.__version__)f = opt.weights.replace('.pt', '.torchscript.pt')  # filenamets = torch.jit.trace(model, img)ts.save(f)print('TorchScript export success, saved as %s' % f)except Exception as e:print('TorchScript export failure: %s' % e)
# 以下代码省略,无需求改
......
接着在conda环境激活yolov5.4的虚拟环境,执行下面脚本:
python models/export.py --weights ./weights/yolov5s.pt --img 640 --batch 1错误解决:1、bash窗口可能提示 not module utils;这是因为没有将源码根目录添加进环境变量,linux下执行以下命令就行export PYTHONPATH="$PWD"win下,我建议直接用pycharm打开yolov5.4工程,在ide中去执行export.py就行,如果你没有下载好yolovs.pt,他会自动下载,下载链接会打印在控制台,如下,如果下不动,可以尝试复制链接到迅雷。
Downloading https://github.com/ultralytics/yolov5/releases/download/v4.0/yolov5s.pt to yolov5s.pt...
执行export.py后出现如下警告:
D:\yolov5-0327\models\yolo.py:50: TracerWarning: Converting a tensor to a Python boolean might cause the trace to be incorrect. We can't record the data flow of Python values, so this value will be treated as a constant in the future. This means that the trace might not generalize to other inputs!if self.grid[i].shape[2:4] != x[i].shape[2:4]:
D:\Program Files\Anaconda\envs\yolov5\lib\site-packages\torch\jit\_trace.py:934: TracerWarning: Encountering a list at the output of the tracer might cause the trace to be incorrect, this is only valid if the container structure does not change based on the module's inputs. Consider using a constant container instead (e.g. for `list`, use a `tuple` instead. for `dict`, use a `NamedTuple` instead). If you absolutely need this and know the side effects, pass strict=False to trace() to allow this behavior.module._c._create_method_from_trace(
TorchScript export success, saved as ./yolov5s.torchscript.pt
ONNX export failure: No module named 'onnx'
CoreML export failure: No module named 'coremltools'Export complete (10.94s). Visualize with https://github.com/lutzroeder/netron.
警告内容以后分析,不影响部署
三、C++版本yolov5.4实现
libtorch在vs环境中配置(在项目属性中设置下面加粗项目):
include:
D:\libtorch-win-shared-with-deps-debug-1.8.1+cpu\libtorch\include
D:\libtorch-win-shared-with-deps-debug-1.8.1+cpu\libtorch\include\torch\csrc\api\include
lib:
D:\libtorch-win-shared-with-deps-debug-1.8.1+cpu\libtorch\lib
依赖库(你可能用的更新的libtorch,所以具体lib目录下所有.lib文件都要自己贴到连接器-附加依赖中):
asmjit.lib
c10.lib
c10d.lib
c10_cuda.lib
caffe2_detectron_ops_gpu.lib
caffe2_module_test_dynamic.lib
caffe2_nvrtc.lib
clog.lib
cpuinfo.lib
dnnl.lib
fbgemm.lib
fbjni.lib
gloo.lib
gloo_cuda.lib
libprotobuf-lite.lib
libprotobuf.lib
libprotoc.lib
mkldnn.lib
pthreadpool.lib
pytorch_jni.lib
torch.lib
torch_cpu.lib
torch_cuda.lib
XNNPACK.lib
环境变量(需要重启):
D:\libtorch-win-shared-with-deps-debug-1.8.1+cpu\libtorch\lib
配置好之后,vs2017 设置为debug X64模式,下面是yolov5.4版本c++代码
输入是:
- 上述转好的.torchscript.pt格式的模型文件
- coco.names
- 一张图
完整libtorch c++源码:
#include <torch/script.h>
#include <torch/torch.h>
#include<opencv2/opencv.hpp>
#include <iostream>std::vector<std::string> LoadNames(const std::string& path)
{// load class namesstd::vector<std::string> class_names;std::ifstream infile(path);if (infile.is_open()) {std::string line;while (std::getline(infile, line)) {class_names.emplace_back(line);}infile.close();}else {std::cerr << "Error loading the class names!\n";}return class_names;
}std::vector<float> LetterboxImage(const cv::Mat& src, cv::Mat& dst, const cv::Size& out_size)
{auto in_h = static_cast<float>(src.rows);auto in_w = static_cast<float>(src.cols);float out_h = out_size.height;float out_w = out_size.width;float scale = std::min(out_w / in_w, out_h / in_h);int mid_h = static_cast<int>(in_h * scale);int mid_w = static_cast<int>(in_w * scale);cv::resize(src, dst, cv::Size(mid_w, mid_h));int top = (static_cast<int>(out_h) - mid_h) / 2;int down = (static_cast<int>(out_h) - mid_h + 1) / 2;int left = (static_cast<int>(out_w) - mid_w) / 2;int right = (static_cast<int>(out_w) - mid_w + 1) / 2;cv::copyMakeBorder(dst, dst, top, down, left, right, cv::BORDER_CONSTANT, cv::Scalar(114, 114, 114));std::vector<float> pad_info{ static_cast<float>(left), static_cast<float>(top), scale };return pad_info;
}enum Det
{tl_x = 0,tl_y = 1,br_x = 2,br_y = 3,score = 4,class_idx = 5
};struct Detection
{cv::Rect bbox;float score;int class_idx;
};void Tensor2Detection(const at::TensorAccessor<float, 2>& offset_boxes,const at::TensorAccessor<float, 2>& det,std::vector<cv::Rect>& offset_box_vec,std::vector<float>& score_vec)
{for (int i = 0; i < offset_boxes.size(0); i++) {offset_box_vec.emplace_back(cv::Rect(cv::Point(offset_boxes[i][Det::tl_x], offset_boxes[i][Det::tl_y]),cv::Point(offset_boxes[i][Det::br_x], offset_boxes[i][Det::br_y])));score_vec.emplace_back(det[i][Det::score]);}
}void ScaleCoordinates(std::vector<Detection>& data, float pad_w, float pad_h,float scale, const cv::Size& img_shape)
{auto clip = [](float n, float lower, float upper){return std::max(lower, std::min(n, upper));};std::vector<Detection> detections;for (auto & i : data) {float x1 = (i.bbox.tl().x - pad_w) / scale;  // x paddingfloat y1 = (i.bbox.tl().y - pad_h) / scale;  // y paddingfloat x2 = (i.bbox.br().x - pad_w) / scale;  // x paddingfloat y2 = (i.bbox.br().y - pad_h) / scale;  // y paddingx1 = clip(x1, 0, img_shape.width);y1 = clip(y1, 0, img_shape.height);x2 = clip(x2, 0, img_shape.width);y2 = clip(y2, 0, img_shape.height);i.bbox = cv::Rect(cv::Point(x1, y1), cv::Point(x2, y2));}
}torch::Tensor xywh2xyxy(const torch::Tensor& x)
{auto y = torch::zeros_like(x);// convert bounding box format from (center x, center y, width, height) to (x1, y1, x2, y2)y.select(1, Det::tl_x) = x.select(1, 0) - x.select(1, 2).div(2);y.select(1, Det::tl_y) = x.select(1, 1) - x.select(1, 3).div(2);y.select(1, Det::br_x) = x.select(1, 0) + x.select(1, 2).div(2);y.select(1, Det::br_y) = x.select(1, 1) + x.select(1, 3).div(2);return y;
}std::vector<std::vector<Detection>> PostProcessing(const torch::Tensor& detections,float pad_w, float pad_h, float scale, const cv::Size& img_shape,float conf_thres, float iou_thres)
{/**** 结果纬度为batch index(0), top-left x/y (1,2), bottom-right x/y (3,4), score(5), class id(6)* 13*13*3*(1+4)*80*/constexpr int item_attr_size = 5;int batch_size = detections.size(0);// number of classes, e.g. 80 for coco datasetauto num_classes = detections.size(2) - item_attr_size;// get candidates which object confidence > thresholdauto conf_mask = detections.select(2, 4).ge(conf_thres).unsqueeze(2);std::vector<std::vector<Detection>> output;output.reserve(batch_size);// iterating all images in the batchfor (int batch_i = 0; batch_i < batch_size; batch_i++) {// apply constrains to get filtered detections for current imageauto det = torch::masked_select(detections[batch_i], conf_mask[batch_i]).view({ -1, num_classes + item_attr_size });// if none detections remain then skip and start to process next imageif (0 == det.size(0)) {continue;}// compute overall score = obj_conf * cls_conf, similar to x[:, 5:] *= x[:, 4:5]det.slice(1, item_attr_size, item_attr_size + num_classes) *= det.select(1, 4).unsqueeze(1);// box (center x, center y, width, height) to (x1, y1, x2, y2)torch::Tensor box = xywh2xyxy(det.slice(1, 0, 4));// [best class only] get the max classes score at each result (e.g. elements 5-84)std::tuple<torch::Tensor, torch::Tensor> max_classes = torch::max(det.slice(1, item_attr_size, item_attr_size + num_classes), 1);// class scoreauto max_conf_score = std::get<0>(max_classes);// indexauto max_conf_index = std::get<1>(max_classes);max_conf_score = max_conf_score.to(torch::kFloat).unsqueeze(1);max_conf_index = max_conf_index.to(torch::kFloat).unsqueeze(1);// shape: n * 6, top-left x/y (0,1), bottom-right x/y (2,3), score(4), class index(5)det = torch::cat({ box.slice(1, 0, 4), max_conf_score, max_conf_index }, 1);// for batched NMSconstexpr int max_wh = 4096;auto c = det.slice(1, item_attr_size, item_attr_size + 1) * max_wh;auto offset_box = det.slice(1, 0, 4) + c;std::vector<cv::Rect> offset_box_vec;std::vector<float> score_vec;// copy data back to cpuauto offset_boxes_cpu = offset_box.cpu();auto det_cpu = det.cpu();const auto& det_cpu_array = det_cpu.accessor<float, 2>();// use accessor to access tensor elements efficientlyTensor2Detection(offset_boxes_cpu.accessor<float, 2>(), det_cpu_array, offset_box_vec, score_vec);// run NMSstd::vector<int> nms_indices;cv::dnn::NMSBoxes(offset_box_vec, score_vec, conf_thres, iou_thres, nms_indices);std::vector<Detection> det_vec;for (int index : nms_indices) {Detection t;const auto& b = det_cpu_array[index];t.bbox =cv::Rect(cv::Point(b[Det::tl_x], b[Det::tl_y]),cv::Point(b[Det::br_x], b[Det::br_y]));t.score = det_cpu_array[index][Det::score];t.class_idx = det_cpu_array[index][Det::class_idx];det_vec.emplace_back(t);}ScaleCoordinates(det_vec, pad_w, pad_h, scale, img_shape);// save final detection for the current imageoutput.emplace_back(det_vec);} // end of batch iteratingreturn output;
}void Demo(cv::Mat& img,const std::vector<std::vector<Detection>>& detections,const std::vector<std::string>& class_names,bool label = true)
{if (!detections.empty()) {for (const auto& detection : detections[0]) {const auto& box = detection.bbox;float score = detection.score;int class_idx = detection.class_idx;cv::rectangle(img, box, cv::Scalar(0, 0, 255), 2);if (label) {std::stringstream ss;ss << std::fixed << std::setprecision(2) << score;std::string s = class_names[class_idx] + " " + ss.str();auto font_face = cv::FONT_HERSHEY_DUPLEX;auto font_scale = 1.0;int thickness = 1;int baseline = 0;auto s_size = cv::getTextSize(s, font_face, font_scale, thickness, &baseline);cv::rectangle(img,cv::Point(box.tl().x, box.tl().y - s_size.height - 5),cv::Point(box.tl().x + s_size.width, box.tl().y),cv::Scalar(0, 0, 255), -1);cv::putText(img, s, cv::Point(box.tl().x, box.tl().y - 5),font_face, font_scale, cv::Scalar(255, 255, 255), thickness);}}}cv::namedWindow("Result", cv::WINDOW_NORMAL);cv::imshow("Result", img);}int main()
{// yolov5Ns.torchscript.pt 报错,所以仅能读取yolov5.4模型torch::jit::script::Module module = torch::jit::load("yolov5sxxx.torchscript.pt");torch::DeviceType device_type = torch::kCPU;module.to(device_type);/*module.to(torch::kHalf);*/module.eval();// img 必须读取3-channels图片cv::Mat img = cv::imread("zidane.jpg", -1);// 读取类别std::vector<std::string> class_names = LoadNames("coco.names");if (class_names.empty()) {return -1;}// set up thresholdfloat conf_thres = 0.4;float iou_thres = 0.5;//inferencetorch::NoGradGuard no_grad;cv::Mat img_input = img.clone();std::vector<float> pad_info = LetterboxImage(img_input, img_input, cv::Size(640, 640));const float pad_w = pad_info[0];const float pad_h = pad_info[1];const float scale = pad_info[2];cv::cvtColor(img_input, img_input, cv::COLOR_BGR2RGB);  // BGR -> RGB//归一化需要是浮点类型img_input.convertTo(img_input, CV_32FC3, 1.0f / 255.0f);  // normalization 1/255// 加载图像到设备auto tensor_img = torch::from_blob(img_input.data, { 1, img_input.rows, img_input.cols, img_input.channels() }).to(device_type);// BHWC -> BCHWtensor_img = tensor_img.permute({ 0, 3, 1, 2 }).contiguous();  // BHWC -> BCHW (Batch, Channel, Height, Width)std::vector<torch::jit::IValue> inputs;// 在容器尾部添加一个元素,这个元素原地构造,不需要触发拷贝构造和转移构造inputs.emplace_back(tensor_img);torch::jit::IValue output = module.forward(inputs);// 解析结果auto detections = output.toTuple()->elements()[0].toTensor();auto result = PostProcessing(detections, pad_w, pad_h, scale, img.size(), conf_thres, iou_thres);// visualize detectionsif (true) {Demo(img, result, class_names);cv::waitKey(0);}return 1;
}
四、问题记录
我参考的是链接[1][2]代码,非常坑,[1][2]代码是一样的,也不知道谁抄谁的,代码中没有说明yolov5具体版本,而且有很多问题,不过还是感谢给了参考。
4.1、注释 detector.h中,注释如下头文件
//#include <c10/cuda/CUDAStream.h>
#//include <ATen/cuda/CUDAEvent.h>
4.2、错误: “std”: 不明确的符号
解决办法1:项目->属性->c/c++->语言->符合模式->选择否
(看清楚vs项目属性窗口对应的到底是Debug还是Release,血的教训!)
解决办法2:还有有个老哥给出的方法是,在std报错的地方改为:"::std",不推荐!
4.3、建议常被debug版本libtorch
libtorch中,执行到加载模型那一行代码,跳进libtorch库中的Assert,提示错误:AT_ASSERT(isTuple(), "Expected Tuple but got ", tagKind());(咱们是libtorch debug版本,还能跳到这一行,要是release,你都不知道错在哪里,所以常备debug版本,很有必要)
可能是你转模型的yolov5版本不是5.4,而是5.3、5.3.1、5.3、5.1;还有可能是你export.py脚本中没有按照上面设置。
参考:https://blog.csdn.net/weixin_42398658/article/details/111954760
4.4、问题:编译成功后,运行代码,发现torch::cuda::is_available()返回false
解决:
- a、配置环境的时候,请将库lib文件夹下所有“.lib”文件名粘贴到项目属性(Release)-链接器 - 输入 - 附加依赖项
- b、在项目属性(Release)-链接器 - 命令行 - 其他选项贴入下面命令
/INCLUDE:?warp_size@cuda@at@@YAHXZ完美解决!
4.5、导出模型,命令行有警告
上面导出模型控制台打印的警告信息还没解决,但是部署后,检测效果和python版本有差别(其实几乎差不多),如下:
如下:左边是官方结果,右边是libtorch模型部署结构,置信度不相上下,开心!
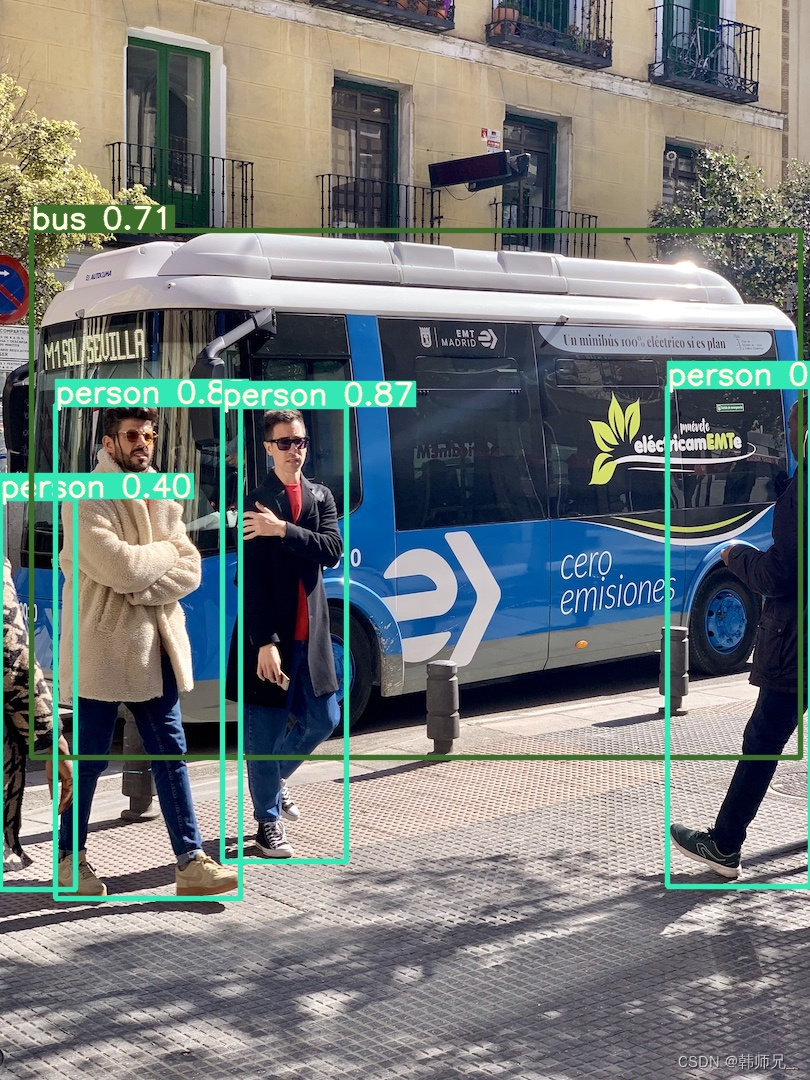
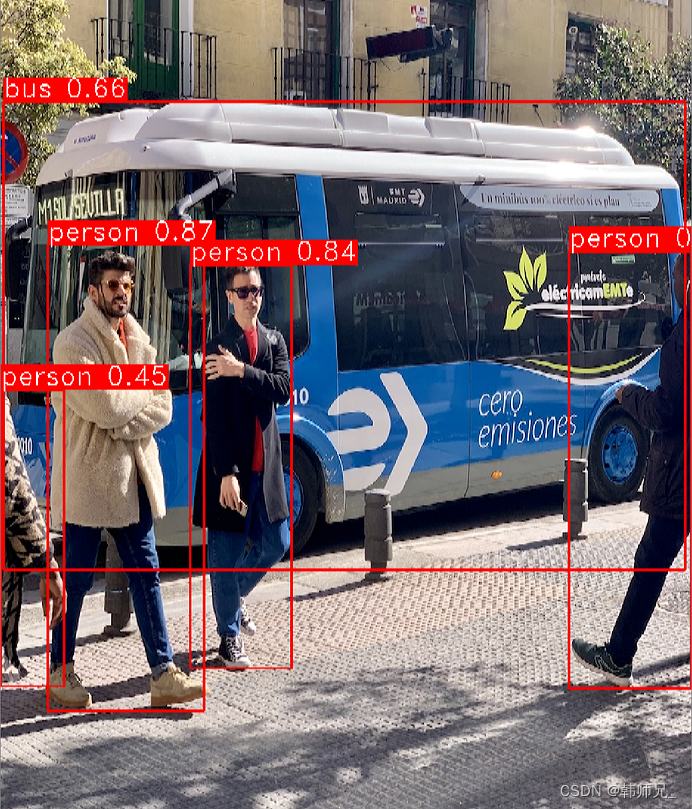
可以看到右边那个人领带没有检测出来,这是因为咱们用的是5s模型,在yolov5最新版本中,作者对模型的修改更加注重5x模型的精度,5s性能确实略微下降。


五、reference
[1] libtorch代码参考;https://zhuanlan.zhihu.com/p/338167520
[2] libtorch代码参考;https://gitee.com/goodtn/libtorch-yolov5-gpu/tree/master
[3] libtorch相关报错总结(非常nice!):https://blog.csdn.net/qq_18305555/article/details/114013236
这篇关于LibTorch实战三:C++版本YOLOV5.4的部署的文章就介绍到这儿,希望我们推荐的文章对编程师们有所帮助!


