本文主要是介绍Android 自定义View 开发 入门与实践3 shadowlayer 阴影 BlurMaskFilter 发光 LinearGradient,希望对大家解决编程问题提供一定的参考价值,需要的开发者们随着小编来一起学习吧!
7.2 setShadowLayer与阴影效果
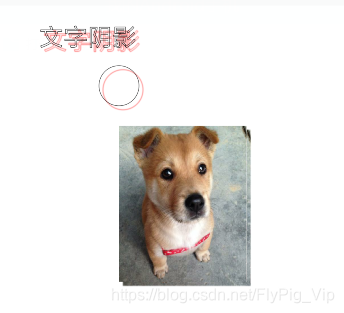
public class MyTextView extends TextView {private Paint mPaint;private Bitmap bitmap;public MyTextView(Context context) {this(context, null);}public MyTextView(Context context, @Nullable AttributeSet attrs) {this(context, attrs, 0);}public MyTextView(Context context, @Nullable AttributeSet attrs, int defStyleAttr) {super(context, attrs, defStyleAttr);mPaint = new Paint();mPaint.setAntiAlias(true);mPaint.setDither(true);mPaint.setStyle(Paint.Style.STROKE);mPaint.setTextSize(ConvertUtils.sp2px(22));//radius : 模糊半径,参数越大,越模糊,越小,越清晰,为0则阴影消失//dx : 阴影的横向偏移距离 ,正值向右偏移,负值向左偏移//dy : 阴影的纵向偏移距离 ,正值向下偏移,负值向上偏移//shadowColor :绘制阴影的画笔颜色,对图片阴影无效mPaint.setShadowLayer(1, 10, 10, Color.RED);bitmap = BitmapFactory.decodeResource(getResources(), R.drawable.dog);}@SuppressLint("DrawAllocation")@Overrideprotected void onDraw(Canvas canvas) {super.onDraw(canvas);canvas.drawColor(Color.WHITE);canvas.drawText("文字阴影", 100, 100, mPaint);canvas.drawCircle(300, 200, 50, mPaint);Rect rect = new Rect(300, 300, bitmap.getWidth(), bitmap.getHeight());canvas.drawBitmap(bitmap, null, rect, mPaint);}}
清除阴影

@SuppressLint("AppCompatCustomView")
public class MyTextView extends TextView {private Paint mPaint;private Bitmap bitmap;// 是否绘制阴影private boolean isShowShadow;public void setShowShadow(boolean showShadow) {isShowShadow = showShadow;postInvalidate();}public MyTextView(Context context) {this(context, null);}public MyTextView(Context context, @Nullable AttributeSet attrs) {this(context, attrs, 0);}public MyTextView(Context context, @Nullable AttributeSet attrs, int defStyleAttr) {super(context, attrs, defStyleAttr);mPaint = new Paint();mPaint.setAntiAlias(true);mPaint.setDither(true);mPaint.setStyle(Paint.Style.STROKE);mPaint.setTextSize(ConvertUtils.sp2px(22));//radius : 模糊半径,参数越大,越模糊,越小,越清晰,为0则阴影消失//dx : 阴影的横向偏移距离 ,正值向右偏移,负值向左偏移//dy : 阴影的纵向偏移距离 ,正值向下偏移,负值向上偏移//shadowColor :绘制阴影的画笔颜色,对图片阴影无效
//        mPaint.setShadowLayer(1, 10, 10, Color.RED);bitmap = BitmapFactory.decodeResource(getResources(), R.drawable.dog);}@SuppressLint("DrawAllocation")@Overrideprotected void onDraw(Canvas canvas) {super.onDraw(canvas);if (isShowShadow) {mPaint.setShadowLayer(1, 10, 10, Color.RED);} else {mPaint.clearShadowLayer();}canvas.drawColor(Color.WHITE);canvas.drawText("文字阴影", 100, 100, mPaint);canvas.drawCircle(300, 200, 50, mPaint);Rect rect = new Rect(300, 300, bitmap.getWidth(), bitmap.getHeight());canvas.drawBitmap(bitmap, null, rect, mPaint);}}
public class MainActivity extends BaseActivity<ActivityMainBinding> {private boolean isShow = false;@Overrideprotected int getLayoutId() {return R.layout.activity_main;}@Overrideprotected void getBundleExtras(Bundle extras) {}@Overrideprotected void initView() {mViewBinding.tv.setOnClickListener(new View.OnClickListener() {@Overridepublic void onClick(View v) {mViewBinding.myview.setShowShadow(isShow);isShow = !isShow;}});}@Overrideprotected void initData() {}@Overrideprotected void initListener() {}}
7.2.3给文字添加阴影
可以直接在XML 里设置
<TextViewandroid:id="@+id/tv"android:layout_width="wrap_content"android:layout_height="wrap_content"android:text="过江千尺浪"android:textSize="30sp"android:shadowColor="@color/black"android:shadowDx="10"android:shadowDy="10"android:shadowRadius="10"/>代码
mViewBinding.tv.setShadowLayer(10, 10, 10, Color.BLACK);这个是textview 的set 方法里有这个参数
7.3BlurMaskFilter 发光效果与图片阴影
定义:发光效果只能算是高斯模糊效果,只会影响边缘效果,不会影响内部
发光颜色不能指定,边缘啥颜色就是就是啥颜色

@SuppressLint("AppCompatCustomView")
public class MyTextView extends TextView {private Paint mPaint;public MyTextView(Context context) {this(context, null);}public MyTextView(Context context, @Nullable AttributeSet attrs) {this(context, attrs, 0);}public MyTextView(Context context, @Nullable AttributeSet attrs, int defStyleAttr) {super(context, attrs, defStyleAttr);mPaint = new Paint();mPaint.setAntiAlias(true);mPaint.setDither(true);mPaint.setStyle(Paint.Style.FILL);mPaint.setColor(Color.BLACK);}@SuppressLint("DrawAllocation")@Overrideprotected void onDraw(Canvas canvas) {super.onDraw(canvas);//设置发光//radius用来定义模糊半径//style 发光样式//      BlurMaskFilter.Blur.INNER  :内发光//      BlurMaskFilter.Blur.SOLID  :外发光//      BlurMaskFilter.Blur.NORMAL :内外发光//      BlurMaskFilter.Blur.OUTER  :仅显示发光效果float radius = 50;mPaint.setMaskFilter(new BlurMaskFilter(radius, BlurMaskFilter.Blur.INNER));canvas.drawCircle(200, 200, 100, mPaint);mPaint.setMaskFilter(new BlurMaskFilter(radius, BlurMaskFilter.Blur.SOLID));canvas.drawCircle(420, 200, 100, mPaint);mPaint.setMaskFilter(new BlurMaskFilter(radius, BlurMaskFilter.Blur.NORMAL));canvas.drawCircle(620, 200, 100, mPaint);mPaint.setMaskFilter(new BlurMaskFilter(radius, BlurMaskFilter.Blur.OUTER));canvas.drawCircle(820, 200, 100, mPaint);}}
7.3.2给图片添加纯色阴影

@SuppressLint("AppCompatCustomView")
public class MyTextView extends TextView {private Paint mPaint;private Bitmap bitmap;private Bitmap alphaBitmap;public MyTextView(Context context) {this(context, null);}public MyTextView(Context context, @Nullable AttributeSet attrs) {this(context, attrs, 0);}public MyTextView(Context context, @Nullable AttributeSet attrs, int defStyleAttr) {super(context, attrs, defStyleAttr);setLayerType(LAYER_TYPE_SOFTWARE, null);mPaint = new Paint();//        mPaint.setAntiAlias(true);
//        mPaint.setDither(true);
//        mPaint.setStyle(Paint.Style.FILL);
//        mPaint.setColor(Color.BLACK);bitmap = BitmapFactory.decodeResource(getResources(), R.drawable.bikabika);alphaBitmap = this.bitmap.extractAlpha();}@SuppressLint("DrawAllocation")@Overrideprotected void onDraw(Canvas canvas) {super.onDraw(canvas);int width = bitmap.getWidth();int height = width * alphaBitmap.getWidth() / alphaBitmap.getHeight();//绘制灰色阴影mPaint.setColor(Color.GRAY);canvas.drawBitmap(alphaBitmap, null, new Rect(10, 10, width, height), mPaint);//绘制黑色阴影canvas.translate(0, height);mPaint.setColor(Color.BLACK);canvas.drawBitmap(alphaBitmap, null, new Rect(10, 10, width, height), mPaint);//黑色再加上发光canvas.translate(0, height);mPaint.setMaskFilter(new BlurMaskFilter(50, BlurMaskFilter.Blur.SOLID));canvas.drawBitmap(alphaBitmap, null, new Rect(10, 10, width, height), mPaint);}}
给图片画上影子的效果

public class MyTextView extends TextView {private Paint mPaint;private Bitmap bitmap;private Bitmap alphaBitmap;public MyTextView(Context context) {this(context, null);}public MyTextView(Context context, @Nullable AttributeSet attrs) {this(context, attrs, 0);}public MyTextView(Context context, @Nullable AttributeSet attrs, int defStyleAttr) {super(context, attrs, defStyleAttr);setLayerType(LAYER_TYPE_SOFTWARE, null);mPaint = new Paint();//        mPaint.setAntiAlias(true);
//        mPaint.setDither(true);
//        mPaint.setStyle(Paint.Style.FILL);
//        mPaint.setColor(Color.BLACK);bitmap = BitmapFactory.decodeResource(getResources(), R.drawable.bikabika);alphaBitmap = this.bitmap.extractAlpha();}@SuppressLint("DrawAllocation")@Overrideprotected void onDraw(Canvas canvas) {super.onDraw(canvas);int width = bitmap.getWidth();int height = width * alphaBitmap.getWidth() / alphaBitmap.getHeight();//绘制阴影mPaint.setColor(Color.GRAY);mPaint.setMaskFilter(new BlurMaskFilter(10, BlurMaskFilter.Blur.NORMAL));canvas.drawBitmap(alphaBitmap, null, new RectF(20, 20, width, height), mPaint);//绘制原图像  也就是盖在阴影上 向左偏移一点canvas.translate(-10, -10);mPaint.setMaskFilter(null);canvas.drawBitmap(bitmap, null, new Rect(20, 20 , width, height), mPaint);}}
7.4Shader 与 BitmapShader
着色器
TileMode
Clamp:用边缘颜色来填充多余空间
Repeat:重复原图像来填充多余空间
Mirror:重复使用镜像模式的图像 来填充多余空间
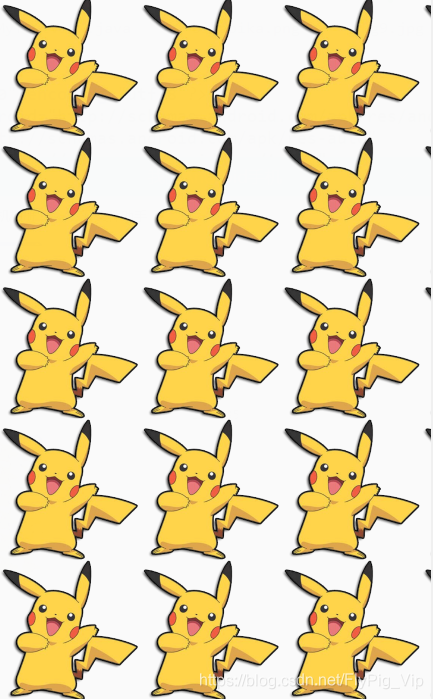
public class MyTextView extends TextView {private Paint mPaint;private Bitmap bitmap;public MyTextView(Context context) {this(context, null);}public MyTextView(Context context, @Nullable AttributeSet attrs) {this(context, attrs, 0);}public MyTextView(Context context, @Nullable AttributeSet attrs, int defStyleAttr) {super(context, attrs, defStyleAttr);setLayerType(LAYER_TYPE_SOFTWARE, null);mPaint = new Paint();bitmap = BitmapFactory.decodeResource(getResources(), R.drawable.bikabika);mPaint.setShader(new BitmapShader(bitmap, Shader.TileMode.REPEAT, Shader.TileMode.REPEAT));}@SuppressLint("DrawAllocation")@Overrideprotected void onDraw(Canvas canvas) {super.onDraw(canvas);//canvas.drawRect(0, 0, getWidth(), getHeight(), mPaint);}}
Repeat:
CLAMP
MIRROR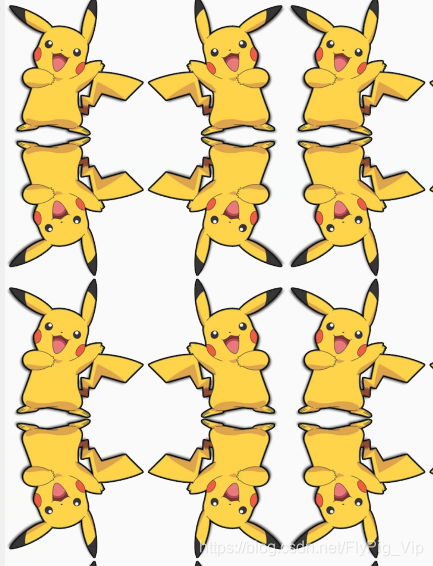
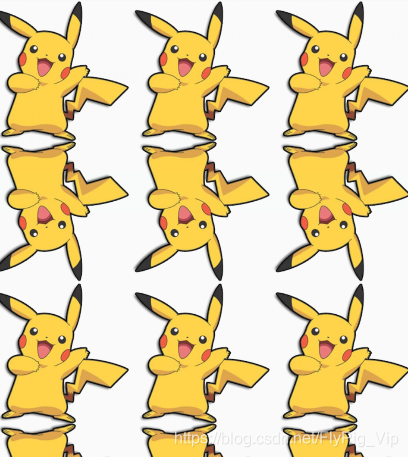
Repeat + Mirror 结合
如果可以固定他的宽高那就好了
需要拿原图尺寸进行设置
canvas.drawRect(0, 0, bitmap.getWidth(), bitmap.getHeight()*2, mPaint);
MIRROR+Repeatcanvas.drawRect(0, 0, bitmap.getWidth()*2, bitmap.getHeight(), mPaint);

只画图片的一部分
@SuppressLint("DrawAllocation")@Overrideprotected void onDraw(Canvas canvas) {super.onDraw(canvas);int width = bitmap.getWidth();int height = bitmap.getHeight();int left = width / 3;int top = height / 3;int right = width * 2 / 3;int bottom = height * 2 / 3;//使用原图尺寸canvas.drawRect(left, top, right, bottom, mPaint);}望远镜效果:
因为书上和百度各种效果都是重复的所以,我设置了图片只有一个
xml 设置 wrap

public class MyTextView extends TextView {private Paint mPaint;private Bitmap bitmap;private int mDx;private int mDy;private Bitmap mBitmapBg;public MyTextView(Context context) {this(context, null);}public MyTextView(Context context, @Nullable AttributeSet attrs) {this(context, attrs, 0);}public MyTextView(Context context, @Nullable AttributeSet attrs, int defStyleAttr) {super(context, attrs, defStyleAttr);setLayerType(LAYER_TYPE_SOFTWARE, null);mPaint = new Paint();bitmap = BitmapFactory.decodeResource(getResources(), R.drawable.dog);}@Overrideprotected void onMeasure(int widthMeasureSpec, int heightMeasureSpec) {setMeasuredDimension(bitmap.getWidth(),bitmap.getHeight());}@SuppressLint("DrawAllocation")@Overrideprotected void onDraw(Canvas canvas) {super.onDraw(canvas);if (mBitmapBg == null) {//背景  也就是原图mBitmapBg = Bitmap.createBitmap(getWidth(), getHeight(), Bitmap.Config.ARGB_8888);//第二画笔Canvas canvasBg = new Canvas(mBitmapBg);canvasBg.drawBitmap(mBitmapBg, null, new RectF(0, 0, getWidth(), getHeight()), mPaint);}if (mDx != -1 && mDy != -1) {//利用上一次的shader 阴影花一部分来实现望远镜的效果mPaint.setShader(new BitmapShader(bitmap, Shader.TileMode.REPEAT, Shader.TileMode.REPEAT));canvas.drawCircle(mDx, mDy, 150, mPaint);}}@Overridepublic boolean onTouchEvent(MotionEvent event) {int action = event.getAction();switch (action) {case MotionEvent.ACTION_DOWN:mDx = (int) event.getX();mDy = (int) event.getY();postInvalidate();return true;case MotionEvent.ACTION_MOVE:mDx = (int) event.getX();mDy = (int) event.getY();break;case MotionEvent.ACTION_CANCEL:case MotionEvent.ACTION_UP:mDx = -1;mDy = -1;break;default:}postInvalidate();return super.onTouchEvent(event);}
}
看到后边才知道有方法
xml随便写
@SuppressLint("AppCompatCustomView")
public class MyTextView extends TextView {private Paint mPaint;private Bitmap bitmap;private int mDx;private int mDy;private Bitmap mBitmapBg;public MyTextView(Context context) {this(context, null);}public MyTextView(Context context, @Nullable AttributeSet attrs) {this(context, attrs, 0);}public MyTextView(Context context, @Nullable AttributeSet attrs, int defStyleAttr) {super(context, attrs, defStyleAttr);setLayerType(LAYER_TYPE_SOFTWARE, null);mPaint = new Paint();bitmap = BitmapFactory.decodeResource(getResources(), R.drawable.dog);}//    @Override
//    protected void onMeasure(int widthMeasureSpec, int heightMeasureSpec) {
//        setMeasuredDimension(bitmap.getWidth(),bitmap.getHeight());
//    }@SuppressLint("DrawAllocation")@Overrideprotected void onDraw(Canvas canvas) {super.onDraw(canvas);if (mBitmapBg == null) {//背景  也就是原图mBitmapBg = Bitmap.createBitmap(getWidth(), getHeight(), Bitmap.Config.ARGB_8888);//第二画笔Canvas canvasBg = new Canvas(mBitmapBg);canvasBg.drawBitmap(mBitmapBg, null, new RectF(0, 0, getWidth(), getHeight()), mPaint);}if (mDx != -1 && mDy != -1) {//利用上一次的shader 阴影花一部分来实现望远镜的效果Matrix matrix = new Matrix();float scaleW = (float) getWidth() / bitmap.getWidth();float scaleH = (float) getHeight() / bitmap.getHeight();matrix.setScale(scaleW,scaleH);BitmapShader bitmapShader = new BitmapShader(bitmap, Shader.TileMode.CLAMP, Shader.TileMode.CLAMP);bitmapShader.setLocalMatrix(matrix);mPaint.setShader(bitmapShader);canvas.drawCircle(mDx, mDy, 150, mPaint);}}@Overridepublic boolean onTouchEvent(MotionEvent event) {int action = event.getAction();switch (action) {case MotionEvent.ACTION_DOWN:mDx = (int) event.getX();mDy = (int) event.getY();postInvalidate();return true;case MotionEvent.ACTION_MOVE:mDx = (int) event.getX();mDy = (int) event.getY();break;case MotionEvent.ACTION_CANCEL:case MotionEvent.ACTION_UP:mDx = -1;mDy = -1;break;default:}postInvalidate();return super.onTouchEvent(event);}
}
不规则头像
圆形圆角带框


 @Overrideprotected void onDraw(Canvas canvas) {super.onDraw(canvas);Matrix matrix = new Matrix();float scaleWidth = (float) getWidth() / (bitmap.getWidth());float scaleHeight = (float) getHeight() / bitmap.getHeight();matrix.setScale(scaleWidth, scaleHeight);bitmapShader.setLocalMatrix(matrix);mPaint.setShader(bitmapShader);
//        int half = getWidth() / 2;
//        canvas.drawCircle(half, half, half, mPaint);//        RectF rect = new RectF(30, 30, getWidth() - 30, getHeight() - 30);
//        canvas.drawRoundRect(rect, 30, 30, mPaint);//需要边框就加上这个
//        Paint borderpaint = new Paint();
//        borderpaint.setStyle(Paint.Style.STROKE);
//        borderpaint.setStrokeWidth(5);
//        borderpaint.setColor(Color.BLACK);
//
//        canvas.drawRoundRect(rect, 30, 30, borderpaint);}
我想加个网络请求的来着,后来做不出来,就是我们现在使用的Bitmap 可以在View:Extends ImageView 的时候,通过getDrawable()获得,需要先判空,然后在转成bitmap 拿着用就行了,总之是做不出来,既然是网络传的图片了,那就用框架把,glide还有结合的Transform
7.5.Shader 之LinearGradient

float x0 y0 起始渐变坐标
float x1 y1 结束渐变坐标
colors[] 用于指定渐变的颜色值数组
positions[] 取值0-1 float 表示每种颜色在整条渐变线中的百分比位置
最后一个填充模式 和 上边一样
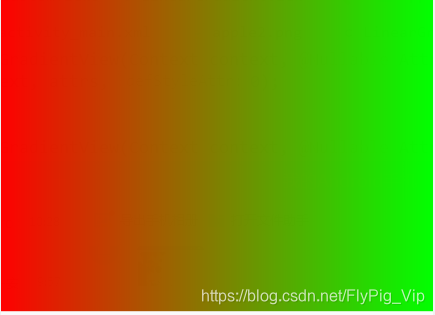
public class LinearGradientView extends View {private Paint mPaint;public LinearGradientView(Context context) {this(context, null);}public LinearGradientView(Context context, @Nullable AttributeSet attrs) {this(context, attrs, 0);}public LinearGradientView(Context context, @Nullable AttributeSet attrs, int defStyleAttr) {super(context, attrs, defStyleAttr);setLayerType(LAYER_TYPE_SOFTWARE, null);mPaint = new Paint();}@Overrideprotected void onDraw(Canvas canvas) {super.onDraw(canvas);mPaint.setShader(new LinearGradient(0, getHeight() / 2,getWidth(), getHeight() / 2,0xffff0000, 0xff00ff00,Shader.TileMode.CLAMP));canvas.drawRect(0, 0, getWidth(), getHeight(), mPaint);}
}
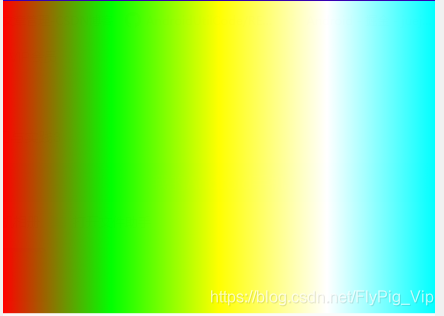
int[] colors = {0xffff0000, 0xff00ff00, 0xffffff00, 0xffffffff, 0xff00ffff};float[] pos = {0.0f, 0.25f, 0.5f, 0.75f, 1.0f};mPaint.setShader(new LinearGradient(0, getHeight() / 2,getWidth(), getHeight() / 2,colors, pos,Shader.TileMode.CLAMP));canvas.drawRect(0, 0, getWidth(), getHeight(), mPaint);如果要斜着那就改起始点和终点
写文字

@Overrideprotected void onDraw(Canvas canvas) {super.onDraw(canvas);int[] colors = {0xffff0000, 0xff00ff00, 0xffffff00, 0xffffffff, 0xff00ffff};float[] pos = {0.0f, 0.25f, 0.5f, 0.75f, 1.0f};mPaint.setShader(new LinearGradient(0, getHeight() / 2,getWidth(), getHeight() / 2,colors, pos,Shader.TileMode.CLAMP));mPaint.setTextSize(ConvertUtils.sp2px(24));Paint.FontMetrics fm = mPaint.getFontMetrics();//文字基准线的下部距离-文字基准线的上部距离 = 文字高度float height= fm.descent - fm.ascent;canvas.drawText("张无敌嘤嘤嘤", 0, height, mPaint);}从上到下

int[] colors = {0xffff0000, 0xff00ff00, 0xffffff00, 0xffffffff, 0xff00ffff};float[] pos = {0.0f, 0.25f, 0.5f, 0.75f, 1.0f};mPaint.setTextSize(ConvertUtils.sp2px(24));mPaint.setShader(new LinearGradient(getWidth() / 2, 0,getWidth() / 2, mPaint.descent() - mPaint.ascent(),colors, pos,Shader.TileMode.CLAMP));canvas.drawText("张无敌嘤嘤嘤", 0, mPaint.descent() - mPaint.ascent(), mPaint);这俩种都有填充模式

public class LinearGradientView extends View {private Paint mPaint;public LinearGradientView(Context context) {this(context, null);}public LinearGradientView(Context context, @Nullable AttributeSet attrs) {this(context, attrs, 0);}public LinearGradientView(Context context, @Nullable AttributeSet attrs, int defStyleAttr) {super(context, attrs, defStyleAttr);setLayerType(LAYER_TYPE_SOFTWARE, null);mPaint = new Paint();}@Overrideprotected void onDraw(Canvas canvas) {super.onDraw(canvas);int[] colors = {0xffff0000, 0xff00ff00, 0xffffff00, 0xffffffff, 0xff00ffff};float[] pos = {0.0f, 0.25f, 0.5f, 0.75f, 1.0f};mPaint.setTextSize(ConvertUtils.sp2px(24));Rect minRect = new Rect();//通过这个方法得到的位置在上方 需要重新设置YmPaint.getTextBounds("张无敌嘤嘤嘤", 0, "张无敌嘤嘤嘤".length(), minRect);int baseLineY = minRect.bottom - minRect.top;int minTop = minRect.top + baseLineY;int minBottom = minRect.bottom + baseLineY;mPaint.setShader(new LinearGradient(getWidth() / 2, minTop,getWidth() / 2, minBottom,colors, pos,Shader.TileMode.REPEAT));canvas.drawText("张无敌嘤嘤嘤", 0, baseLineY, mPaint);}
}
这个可能有点问题,专门搞了一篇新的,粘的别人的
闪光文字效果

@SuppressLint("AppCompatCustomView")
public class ShimmerTextView extends TextView {private Paint mPaint;private int mLength;/*** 位移的变化*/private int mDx;private LinearGradient mLinearGradient;public ShimmerTextView(Context context) {this(context, null);}public ShimmerTextView(Context context, @Nullable AttributeSet attrs) {this(context, attrs, 0);}public ShimmerTextView(Context context, @Nullable AttributeSet attrs, int defStyleAttr) {super(context, attrs, defStyleAttr);mPaint = getPaint();
//        mPaint.setAntiAlias(true);
//        mPaint.setDither(true);mLength = (int) mPaint.measureText(getText().toString());createAnim(mLength);creatLinearGradient(mLength);}/*** 着色** @param mLength*/private void creatLinearGradient(int mLength) {// 需要注意的  : 开始的颜色 和结束的颜色 最好是一个颜色int[] colors = {0xffff0000, 0xff00ff00, 0xffffff00, 0xffffffff, 0xffff0000};float[] pos = {0.0f, 0.25f, 0.5f, 0.75f, 1.0f};mLinearGradient = new LinearGradient(-mLength, 0, 0, 0, colors, pos, Shader.TileMode.CLAMP);}/*** 绘制路径 文字长度 动画** @param mLength*/private void createAnim(int mLength) {ValueAnimator mValueAnimator = ValueAnimator.ofInt(0, mLength * 2);mValueAnimator.addUpdateListener(new ValueAnimator.AnimatorUpdateListener() {@Overridepublic void onAnimationUpdate(ValueAnimator animation) {mDx = (int) animation.getAnimatedValue();postInvalidate();}});mValueAnimator.setRepeatMode(ValueAnimator.RESTART);mValueAnimator.setRepeatCount(ValueAnimator.INFINITE);mValueAnimator.setDuration(2000);mValueAnimator.start();}@Overrideprotected void onDraw(Canvas canvas) {Matrix mMatrix = new Matrix();mMatrix.setTranslate(mDx, 0);mLinearGradient.setLocalMatrix(mMatrix);mPaint.setShader(mLinearGradient);super.onDraw(canvas);}
}
双色渐变
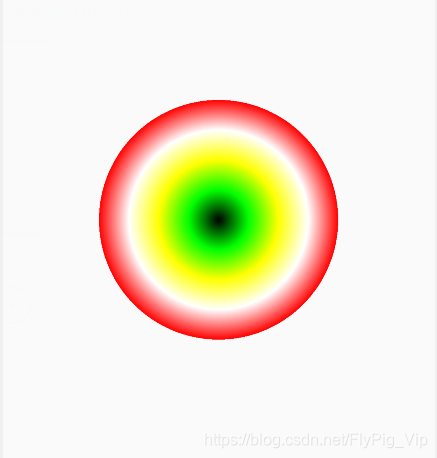
public class RadialGradientView extends View {private Paint mPaint;private RadialGradient mRadialGradient;public RadialGradientView(Context context) {this(context, null);}public RadialGradientView(Context context, @Nullable AttributeSet attrs) {this(context, attrs, 0);}public RadialGradientView(Context context, @Nullable AttributeSet attrs, int defStyleAttr) {super(context, attrs, defStyleAttr);setLayerType(LAYER_TYPE_SOFTWARE, null);mPaint = new Paint();}@SuppressLint("DrawAllocation")@Overrideprotected void onDraw(Canvas canvas) {super.onDraw(canvas);if (mRadialGradient == null) {int mRadius = getWidth() / 2;int[] colors = {0xff000000, 0xff00ff00, 0xffffff00, 0xffffffff, 0xffff0000};float[] pos = {0.0f, 0.25f, 0.5f, 0.75f, 1.0f};mRadialGradient = new RadialGradient(getWidth() / 2,getHeight() / 2,mRadius,colors,pos,Shader.TileMode.REPEAT);mPaint.setShader(mRadialGradient);canvas.drawCircle(getWidth() / 2, getHeight() / 2, mRadius, mPaint);}}
}
if (mRadialGradient == null) {int mRadius = getWidth() / 2;int[] colors = {0xff000000, 0xff00ff00, 0xffffff00, 0xffffffff, 0xffff0000};float[] pos = {0.0f, 0.25f, 0.5f, 0.75f, 1.0f};mRadialGradient = new RadialGradient(getWidth() / 2,getHeight() / 2,mRadius,colors,pos,Shader.TileMode.MIRROR);mPaint.setShader(mRadialGradient);canvas.drawRect(0,0,getWidth(),getHeight(), mPaint);}CLAMP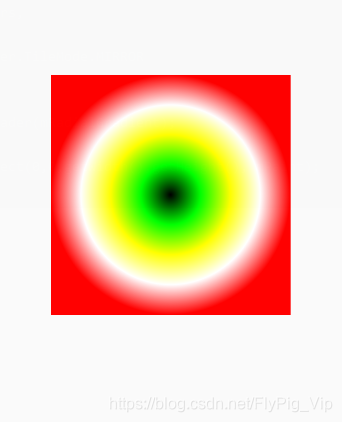
这篇关于Android 自定义View 开发 入门与实践3 shadowlayer 阴影 BlurMaskFilter 发光 LinearGradient的文章就介绍到这儿,希望我们推荐的文章对编程师们有所帮助!


