本文主要是介绍Arduino框架下ESP32/ESP8266+合宙1.54“ 电子墨水屏(e-paper)驱动显示示例,希望对大家解决编程问题提供一定的参考价值,需要的开发者们随着小编来一起学习吧!
Arduino框架下ESP32/ESP8266+合宙1.54" 电子墨水屏(e-paper)驱动显示示例
- 🌼显示效果展示;

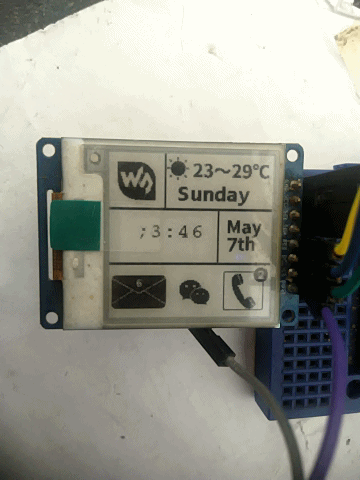
📓合宙1.54" 电子墨水屏
- 有关合宙1.54"电子墨水屏的介绍资料:
https://wiki.luatos.com/peripherals/eink_1.54/hardware.html
合宙给出的驱动示例有2个,不过都是基于Lua语言的示例程序代码,对于
Arduino框架下的驱动显示只能另外找资料,目前有关电子墨水屏资料可以找到的只有两个地点:
- GooDisplay
https://www.good-display.cn/product/92/- waveshare(微雪)
https://www.waveshare.net/wiki/1.54inch_e-Paper_Module
在官方所提供的资料当中并未看到我想要的esp32的驱动示例代码,本以为修改一下引脚定义即可现实驱动。实际上是不行的,编译这一关都过不了。只能另辟蹊径了。
在GitHub上找到一个贡献者提供了一个有关waveshare1.54"给ESP32和esp8266显示的项目。
-
GitHub:
https://github.com/Bodmer,项目仓库位置:https://github.com/Bodmer/EPD_Libraries -
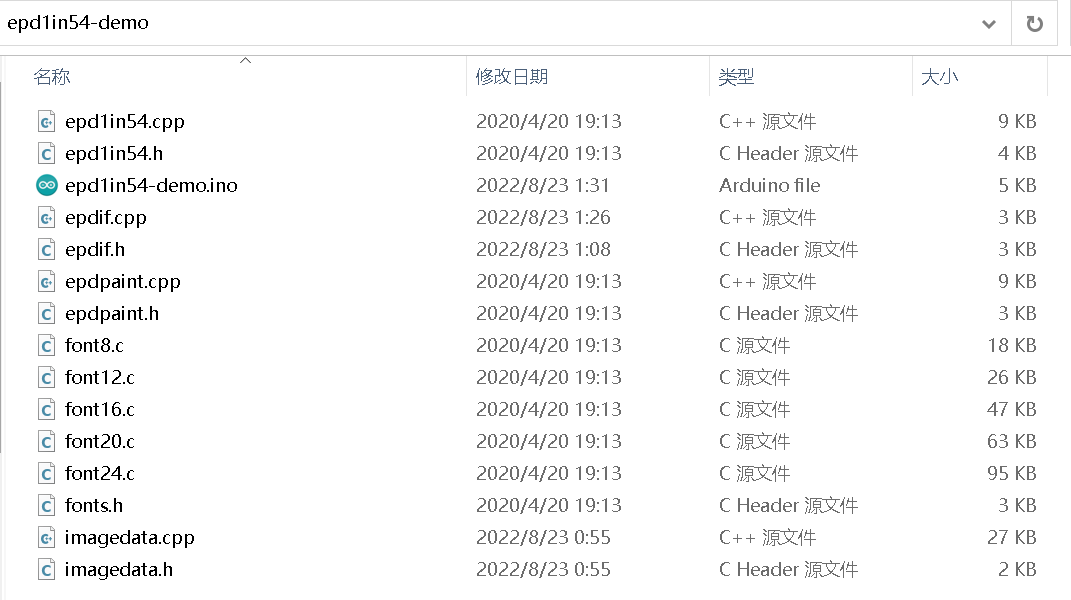
驱动demo位置:
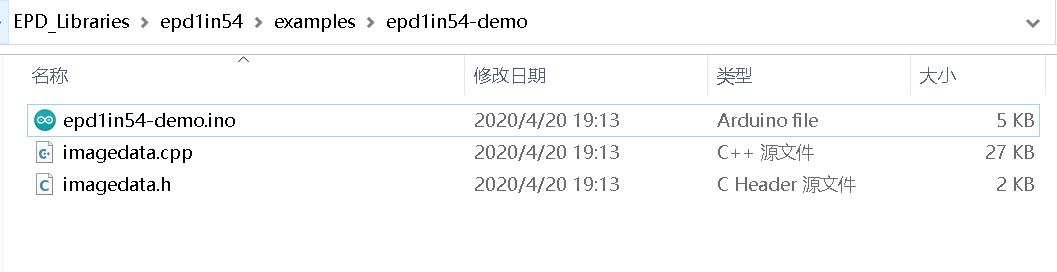
直接编译还不行,会报找不到头文件,需要将
epdlin54目录下方的文件拷贝到项目文件夹下面:

🔨修改引脚定义
- 🔧
epdif.h文件内找到有关引脚定义的地方,ESP32如下修改:
//      Display       GPIO   ESP32 pin
#define BUSY_PIN        25 // D1
#define RST_PIN         26 // D2
#define DC_PIN          27 // D3
#define CS_PIN         15 // D4
- 🌿ESP82666默认无需修改:
// Pin definition for ESP8266 (e.g. NodeMCU)
// Connect display CLK signal to GPIO 14 (Node MCU pin D5)
// Connect display DIN signal to GPIO 13 (Node MCU pin D7)
// Connect display 3.3V to NodeMCU 3V3
// Connect display GND to NodeMCU GND
#define BUSY_PIN        5 // D1
#define RST_PIN         4 // D2
#define DC_PIN          0 // D3
#define CS_PIN          2 // D4
📗接线说明
- 🌿针对
ESP32接线说明:
 ESP32引脚定义:
BUSY -> 25 || RES -> 26 || DC -> 27 || CS -> 15 || SCL -> 18 || SDA -> 23 ||
epd1in54 demo
SCL_PIN--18
MOSI(SDA)_PIN--23
CS_PIN--15
RST(RES)_PIN-- 26
DC_PIN--27
BUSY_PIN--25
- 🌿针对
ESP8266接线说明,参考上面的宏定义内容接线即可。
📝主程序代码
/***  @filename   :   epd1in54-demo.ino*  @brief      :   1.54inch e-paper display demo*  @author     :   Yehui from Waveshare**  Copyright (C) Waveshare     September 5 2017** Permission is hereby granted, free of charge, to any person obtaining a copy* of this software and associated documnetation files (the "Software"), to deal* in the Software without restriction, including without limitation the rights* to use, copy, modify, merge, publish, distribute, sublicense, and/or sell* copies of the Software, and to permit persons to  whom the Software is* furished to do so, subject to the following conditions:** The above copyright notice and this permission notice shall be included in* all copies or substantial portions of the Software.** ESP32引脚定义:* BUSY -> 25 || RES -> 26 || DC -> 27 || CS -> 15 || SCL -> 18 || SDA -> 23 ||**/#include <SPI.h>
#include "epd1in54.h"
#include "epdpaint.h"
#include "imagedata.h"#define COLORED     0
#define UNCOLORED   1/*** Due to RAM not enough in Arduino UNO, a frame buffer is not allowed.* In this case, a smaller image buffer is allocated and you have to * update a partial display several times.* 1 byte = 8 pixels, therefore you have to set 8*N pixels at a time.*/
unsigned char image[1024];
Paint paint(image, 0, 0);    // width should be the multiple of 8
Epd epd;
unsigned long time_start_ms;
unsigned long time_now_s;void setup() {// put your setup code here, to run once:Serial.begin(9600);if (epd.Init(lut_full_update) != 0) {Serial.print("e-Paper init failed");return;}/** *  there are 2 memory areas embedded in the e-paper display*  and once the display is refreshed, the memory area will be auto-toggled,*  i.e. the next action of SetFrameMemory will set the other memory area*  therefore you have to clear the frame memory twice.*/epd.ClearFrameMemory(0xFF);   // bit set = white, bit reset = blackepd.DisplayFrame();epd.ClearFrameMemory(0xff);   // bit set = white, bit reset = blackepd.DisplayFrame();paint.SetRotate(ROTATE_0);//指定显示区域paint.SetWidth(200);paint.SetHeight(28);/* For simplicity, the arguments are explicit numerical coordinates */paint.Clear(COLORED);paint.DrawStringAt(30, 2, "Perseverance", &Font16, UNCOLORED);//位置,内容epd.SetFrameMemory(paint.GetImage(), 0, 0, paint.GetWidth(), paint.GetHeight());paint.Clear(UNCOLORED);//白色区域内容显示paint.DrawStringAt(30, 2, "e-Paper Demo", &Font16, COLORED);epd.SetFrameMemory(paint.GetImage(), 0, 16, paint.GetWidth(), paint.GetHeight());paint.Clear(COLORED);paint.DrawStringAt(20, 2, "Hello world!", &Font16, UNCOLORED);//位置,内容epd.SetFrameMemory(paint.GetImage(), 0, 32, paint.GetWidth(), paint.GetHeight());paint.SetWidth(64);//指定显示区域paint.SetHeight(64);paint.Clear(UNCOLORED);paint.DrawRectangle(0, 0, 40, 50, COLORED);//绘制矩形paint.DrawLine(0, 0, 40, 50, COLORED);//绘制线条paint.DrawLine(40, 0, 0, 50, COLORED);epd.SetFrameMemory(paint.GetImage(), 16, 60, paint.GetWidth(), paint.GetHeight());//显示位置paint.Clear(UNCOLORED);paint.DrawCircle(32, 32, 30, COLORED);//绘制圆epd.SetFrameMemory(paint.GetImage(), 120, 60, paint.GetWidth(), paint.GetHeight());//显示位置paint.Clear(UNCOLORED);paint.DrawFilledRectangle(0, 0, 40, 50, COLORED);//填充矩形epd.SetFrameMemory(paint.GetImage(), 16, 130, paint.GetWidth(), paint.GetHeight());//显示位置paint.Clear(UNCOLORED);paint.DrawFilledCircle(32, 32, 30, COLORED);//填充圆epd.SetFrameMemory(paint.GetImage(), 120, 130, paint.GetWidth(), paint.GetHeight());//显示位置epd.DisplayFrame();//显示内容delay(2000);if (epd.Init(lut_partial_update) != 0) {Serial.print("e-Paper init failed");return;}/** *  there are 2 memory areas embedded in the e-paper display*  and once the display is refreshed, the memory area will be auto-toggled,*  i.e. the next action of SetFrameMemory will set the other memory area*  therefore you have to set the frame memory and refresh the display twice.*/epd.SetFrameMemory(IMAGE_DATA);epd.DisplayFrame();epd.SetFrameMemory(IMAGE_DATA);epd.DisplayFrame();time_start_ms = millis();
}void loop() {// put your main code here, to run repeatedly:time_now_s = (millis() - time_start_ms) / 1000;char time_string[] = {'0', '0', ':', '0', '0', '\0'};time_string[0] = time_now_s / 60 / 10 + '0';time_string[1] = time_now_s / 60 % 10 + '0';time_string[3] = time_now_s % 60 / 10 + '0';time_string[4] = time_now_s % 60 % 10 + '0';paint.SetWidth(32);paint.SetHeight(96);paint.SetRotate(ROTATE_270);paint.Clear(UNCOLORED);paint.DrawStringAt(0, 4, time_string, &Font24, COLORED);epd.SetFrameMemory(paint.GetImage(), 80, 72, paint.GetWidth(), paint.GetHeight());epd.DisplayFrame();delay(500);
}
📚驱动示例源码
- 🌿针对已修改的ESP32驱动代码:
链接:https://pan.baidu.com/s/1mCCXOVrYkKJfQXeAonkz7Q
提取码:55dh
- 🌿针对ESP8266驱动代码:
链接:https://pan.baidu.com/s/1ODbJHVzT7i2fVYRhcVDyDg
提取码:qqbr
这篇关于Arduino框架下ESP32/ESP8266+合宙1.54“ 电子墨水屏(e-paper)驱动显示示例的文章就介绍到这儿,希望我们推荐的文章对编程师们有所帮助!


