本文主要是介绍centos7 PaddleHub人像分割模型:AI人像抠图及图像合成,希望对大家解决编程问题提供一定的参考价值,需要的开发者们随着小编来一起学习吧!
centos 安装抠图环境:
#复制下面命令一条一条的在windows的命令行窗口里面执行,需要一些时间
#执行安装paddlehub第三步后可能会出现一些问题,解决方式在文章下方
pip install -i https://pypi.tuna.tsinghua.edu.cn/simple matplotlib
pip install -i https://pypi.tuna.tsinghua.edu.cn/simple pillow
pip install -i https://pypi.tuna.tsinghua.edu.cn/simple PaddlePaddle
pip install paddlehub==1.6.0 -i https://pypi.tuna.tsinghua.edu.cn/simple
hub install deeplabv3p_xception65_humanseg==1.0.0
问题1:在安装pip install -i https://pypi.tuna.tsinghua.edu.cn/simple PaddlePaddle 这一步之后,会自动安装opencv-python,这时候如果在centos环境下进入python,输入impot cv2会报错,windows环境应该没问题
ImportError: libSM.so.6: cannot open shared object file: No such file or directory
ImportError: libXrender.so.1: cannot open shared object file: No such file or directory
ImportError: libXext.so.6: cannot open shared object file: No such file or directory
原因是:缺少共享库,我们直接通过yum来安装libSM解决不了问题, 那是因为yum源默认提供的库是i686的, 如果我们的服务器系统是64位的,应该要安装的是x86_64版而非i686.
解决方式:
来查看一下yum默认提供的libSM, 结果如下
yum whatprovides libSM.so.6
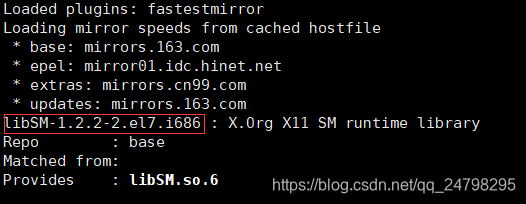
可以看到默认提供的是i686的, 但是我们需要x86_64, 所以安装的时候把i686改成x86_64, 如下
sudo yum install libSM-1.2.2-2.el7.x86_64 --setopt=protected_multilib=false
剩下的就直接输入吧
sudo yum install libXrender-0.9.10-1.el7.x86_64 --setopt=protected_multilib=false
sudo yum install libXext-1.3.3-3.el7.x86_64 --setopt=protected_multilib=false
问题2:如果安装过程又出现问题,提示【SyntaxError: invalid syntax 由于用户取消而退出】
解决方式:
必须修改的两个yum配置文件
因为yum使用python2,因此替换为python3后可能无法正常工作,继续使用这个python2.7.5,因此需要修改yum相关配置文件。
(1)vi /usr/bin/yum
第一行:#!/usr/bin/python --> #!/usr/bin/python2.7
(2) vi /usr/libexec/urlgrabber-ext-down
第一行:#!/usr/bin/python --> #!/usr/bin/python2.7
完成上面两步,现在使用yum命令基本不会出现这样的错误:SyntaxError: invalid syntax 由于用户取消而退出
安装完成后,试一下可以成功导入cv2了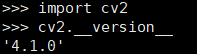
问题3: 执行 hub install deeplabv3p_xception65_humanseg==1.0.0 的时候可能会出现hub: command not found
解决方式:配置python3的环境变量,在 /etc/profile加入python的安装路径配置环境变量,具体操作可以看我的另一篇文章https://blog.csdn.net/clz979991314/article/details/107842982
代码片段:
import matplotlib.pyplot as plt
import matplotlib.image as mpimg
from matplotlib import animation
import paddlehub as hub
from PIL import Image, ImageSequence
import numpy as np
import os
import flask, json
from flask import request# 创建一个服务,把当前这个python文件当做一个服务
server = flask.Flask(__name__)# 合成函数
def blend_images(fore_image, output_path, base_size, color):"""将抠出的人物图像换背景fore_image: 前景图片,抠出的人物图片base_size: 图片尺寸"""# 制作指定大小的背景色base_image = Image.new("RGBA", base_size, color)# 读入图片base_image = base_image.convert('RGB')fore_image = Image.open(fore_image).resize(base_image.size)# 图片加权合成scope_map = np.array(fore_image)[:,:,-1] / 255scope_map = scope_map[:,:,np.newaxis]scope_map = np.repeat(scope_map, repeats=3, axis=2)res_image = np.multiply(scope_map, np.array(fore_image)[:,:,:3]) + np.multiply((1-scope_map), np.array(base_image))#保存图片res_image = Image.fromarray(np.uint8(res_image))print(res_image)res_image.save(output_path)# 抠图@server.route('/matting', methods=['get', 'post'])
def matting():# 测试图片路径test_path = 'D:\\image\\'# 输出路径output_path = 'D:\\image\\test\\'# 背景图片地址base_image = (295, 413)# 白色(255,255,255) 红色(182,38,38) 蓝色(67,142,219)color = (67,142,219)# 待预测图片名称test_file_name = "5"# 待预测图片后缀test_file_suffix = ".jpg"# 输入文件名称output_file_name = test_file_name + test_file_suffixtest_img_path = [test_file_name + test_file_suffix]test_img_path = [test_path + img for img in test_img_path]img = mpimg.imread(test_img_path[0]) module = hub.Module(name="deeplabv3p_xception65_humanseg")input_dict = {"image": test_img_path}# execute predict and print the resultresults = module.segmentation(data=input_dict)print(results)output_path_img = output_path + output_file_nameblend_images('humanseg_output/'+test_file_name+'.png', output_path_img, base_image, color)return output_path_imgif __name__ == '__main__':server.run(debug=True, port=8888, host='0.0.0.0')# 指定端口、host,0.0.0.0代表不管几个网卡,任何ip都可以访问
如果安装的deeplabv3p_xception65_humanseg版本不是1.0.0,而是1.1.0或1.1.1
则使用下面的代码:
import matplotlib.pyplot as plt
import matplotlib.image as mpimg
from matplotlib import animation
import paddlehub as hub
from PIL import Image, ImageSequence
import numpy as np
import os
import flask, json
from flask import request
import cv2# 创建一个服务,把当前这个python文件当做一个服务
server = flask.Flask(__name__)# 合成函数
def blend_images(fore_image, output_path, base_size, color):"""将抠出的人物图像换背景fore_image: 前景图片,抠出的人物图片base_size: 图片尺寸"""# 制作指定大小的背景色base_image = Image.new("RGBA", base_size, color)# 读入图片base_image = base_image.convert('RGB')fore_image = Image.open(fore_image).resize(base_image.size)# 图片加权合成scope_map = np.array(fore_image)[:,:,-1] / 255scope_map = scope_map[:,:,np.newaxis]scope_map = np.repeat(scope_map, repeats=3, axis=2)res_image = np.multiply(scope_map, np.array(fore_image)[:,:,:3]) + np.multiply((1-scope_map), np.array(base_image))#保存图片res_image = Image.fromarray(np.uint8(res_image))print(res_image)res_image.save(output_path)# 抠图@server.route('/matting', methods=['get', 'post'])
def matting():# 测试图片路径test_path = 'D:/image/'# 输出路径output_path = 'D:/image/test/'# 背景图片地址base_image = (295, 413)# 白色(255,255,255) 红色(182,38,38) 蓝色(67,142,219)color = (255,255,255)colorType = flask.request.values.get('color_type')if colorType == '1':color = (182,38,38)if colorType == '2':color = (67,142,219)# 待预测图片名称# test_file_name = "5"test_file_name = flask.request.values.get('test_file_name')# 待预测图片后缀# test_file_suffix = ".jpg"test_file_suffix = flask.request.values.get('test_file_suffix')print(color)# 输入文件名称output_file_name = test_file_name + test_file_suffixtest_img_path = [test_file_name + test_file_suffix]test_img_path = [test_path + img for img in test_img_path]human_seg = hub.Module(name="deeplabv3p_xception65_humanseg")results = human_seg.segmentation(images=[cv2.imread(test_img_path[0])], visualization=True)print(results[0]['save_path'])save_path = results[0]['save_path']output_path_img = output_path + output_file_nameblend_images(save_path, output_path_img, base_image, color)return output_path_imgif __name__ == '__main__':server.run(debug=True, port=18778, host='0.0.0.0')# 指定端口、host,0.0.0.0代表不管几个网卡,任何ip都可以访问
通过请求访问: http://127.0.0.1:18778/matting?color_type=1&test_file_name=1&test_file_suffix=.jpg
这篇关于centos7 PaddleHub人像分割模型:AI人像抠图及图像合成的文章就介绍到这儿,希望我们推荐的文章对编程师们有所帮助!


