本文主要是介绍《数据结构、算法与应用C++语言描述》-队列的应用-图元识别问题,希望对大家解决编程问题提供一定的参考价值,需要的开发者们随着小编来一起学习吧!
《数据结构、算法与应用C++语言描述》-队列的应用-图元识别问题
图元识别
问题描述
数字化图像是一个 mxm 的像素矩阵。在单色图像中,每一个像素要么为0,要么为 1。值为0的像素表示图像的背景。值为1的像素表示图元上的一个点,称其为图元像素。两个像素是相邻的,是指它们左右相邻或上下相邻。两个相邻的图元像素是同一个图元的像素。图元识别的目的就是给图元像素做标记,使得两个像素标记相同,当且仅当它们是同一个图元的像素。
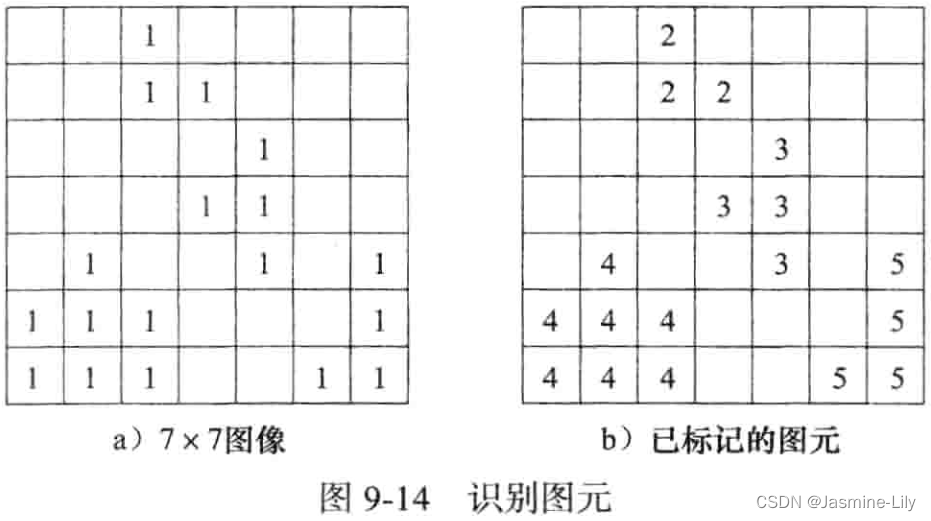
考察图 9-14a,它是一个7×7 图像。空白方格表示背景像素,标记为1 的方格表示图元像素。像素(1,3)和(2,3)是同一个图元的像素,因为它们是相邻的。像素(2,4)与(2,3)是相邻的,它们也属于同一图元。因此,三个像素(1,3)、(2,3)和(2,4)属于同一个图元。由于没有其他的像素与这三个像素相邻,因此这三个像素定义了一个图元。图 9-14a 的图像有 4 个图元。第一个图元是像素集合{(1,3),(2,3),(2,4)};第二个是{(3,5),(4,4),(4,5),(5,5)};第三个是{(5,2),(6,1),(6,2),(6,3),(7,1),(7,2),(7,3)};第四个是{(5,7),(6,7),(7,6),(7,7))。在图9-14b中,图元像素都做了标记,两个像素标记相同,当且仅当它们属于同一个图元。我们用数字 2,3,4,…作为图元标记。这里我们没有用数字1 做图元标记,是因为我们用1表示未做标记的图元像素。
求解策略
通过扫描像素来识别图元。扫描的方式是逐行扫描,每一行逐列扫描。当扫描到一个未标记的图元像素时,给它一个图元标记。然后把这个图元像素作为一个新图元的种子,通过识别和标记所有与该种子相邻的图元像素,来寻找新图元剩余的像素。与种子相邻的图元像素称为1-间距像素。然后,识别和标记与1-间距像素相邻的所有未标记的图元像素,这些像素被称为2-间距像素。接下来识别和标记与2-间距像素相邻的未标记的图元像素。这个过程一直持续到没有新的、未标记的、相邻的图元像素为止。
代码
#include <iostream>
#include <queue>
using namespace std;/*用于存储迷宫地址的结构体*/
struct position
{int row,  //行col;  //列position() {}position(int prow, int pcol):row(prow),col(pcol){}operator int() const { return row; }friend ostream& operator<<(ostream& out, const position x){out << "(" << x.row << "," << x.col << ")";return out;}
};
/*创建二维数组*/
template <class T>
bool make2dArray(T**& x, int numberOfRows, int numberOfColumns)
{try {//行指针x = new T * [numberOfRows];//为每一行分配内存for (int i = 0; i < numberOfRows; i++)x[i] = new int[numberOfColumns];return true;}catch (bad_alloc) { return false; }
}/*遍历二维数组*/
template<class T>
void traverse2dArray(T**& x, int numberOfRows, int numberOfColumns)
{for (int i = 0; i < numberOfRows; i++){for (int j = 0; j < numberOfColumns; j++){cout.width(4);cout << x[i][j] << "  ";}cout << endl;}
}/*图元识别问题全局变量*/
int** pixel;//二维方阵
int pixelSize;//方阵大小/*图元识别*/
/*方格元素为1表示为有像素,方格元素为0表示无像素*/
/*标记为n(n>1)表示为第n个图元*/
void inputPixelQueue()//输入像素矩阵
{cout << "Please enter the size of pixel-Matrix:";while (!(cin >> pixelSize)){cin.clear();//清空标志位while (cin.get() != '\n')//删除无效的输入continue;cout << "Please enter the size of pixel-Matrix:";}//+2的原因是为了避免在处理内部位置和边界位置时存在差别make2dArray<int>(pixel, pixelSize + 2, pixelSize + 2);//初始化边界位置的数值for (int i = 0; i <= pixelSize + 1; i++){pixel[i][0] = 0;pixel[0][i] = 0;pixel[i][pixelSize + 1] = 0;pixel[pixelSize + 1][i] = 0;}//初始化像素for (int i = 1; i <= pixelSize; i++)for (int j = 1; j <= pixelSize; j++){int positionij;cout << "Please enter pixel[" << i << "," << j << "]:";while (!(cin >> positionij)){cin.clear();//清空标志位while (cin.get() != '\n')//删除无效的输入continue;cout << "Please enter pixel[" << i << "," << j << "]:";}pixel[i][j] = positionij;}cout << "The pixel = " << endl;traverse2dArray<int>(pixel, pixelSize + 2, pixelSize + 2);
}
void labelComponents()
{inputPixelQueue();//输入迷宫,Grid二维数组和数组大小GridSize和电路布线共享//初始化偏移量position offset[4];offset[0].row = 0; offset[0].col = 1;//右offset[1].row = 1; offset[1].col = 0;//下offset[2].row = 0; offset[2].col = -1;//左offset[3].row = -1; offset[3].col = 0;//上int numberOfNbrs = 4;//一个像素的相邻位置数//扫描所有像素,标记图元queue<position> q;int id = 1;position here, nbr;for(int i = 1;i <= pixelSize;i++)for (int j = 1; j <= pixelSize; j++){if (pixel[i][j] == 1)//新图元{pixel[i][j] = ++id;here.row = i;here.col = j;while (true){for (int k = 0; k < numberOfNbrs; k++){nbr.row = here.row + offset[k].row;nbr.col = here.col + offset[k].col;if (pixel[nbr.row][nbr.col] == 1){pixel[nbr.row][nbr.col] = id;q.push(nbr);}}//图元中无未考察的像素if (q.empty()) break;here = q.front();q.pop();}}}cout << "The pixel = " << endl;traverse2dArray<int>(pixel, pixelSize+1, pixelSize+2);
}int main()
{cout << "图元识别问题********************" << endl;labelComponents();return 0;
}
运行结果
C:\Users\15495\Documents\Jasmine\Work\coding\cmake-build-debug\coding.exe
鍥惧厓璇嗗埆闂********************
Please enter the size of pixel-Matrix:7
Please enter pixel[1,1]:0
Please enter pixel[1,2]:0
Please enter pixel[1,3]:1
Please enter pixel[1,4]:0
Please enter pixel[1,5]:0
Please enter pixel[1,6]:0
Please enter pixel[1,7]:0
Please enter pixel[2,1]:0
Please enter pixel[2,2]:0
Please enter pixel[2,3]:1
Please enter pixel[2,4]:1
Please enter pixel[2,5]:0
Please enter pixel[2,6]:0
Please enter pixel[2,7]:0
Please enter pixel[3,1]:0
Please enter pixel[3,2]:0
Please enter pixel[3,3]:0
Please enter pixel[3,4]:0
Please enter pixel[3,5]:1
Please enter pixel[3,6]:0
Please enter pixel[3,7]:0
Please enter pixel[4,1]:0
Please enter pixel[4,2]:0
Please enter pixel[4,3]:0
Please enter pixel[4,4]:1
Please enter pixel[4,5]:1
Please enter pixel[4,6]:0
Please enter pixel[4,7]:0
Please enter pixel[5,1]:0
Please enter pixel[5,2]:1
Please enter pixel[5,3]:0
Please enter pixel[5,4]:0
Please enter pixel[5,5]:1
Please enter pixel[5,6]:0
Please enter pixel[5,7]:1
Please enter pixel[6,1]:1
Please enter pixel[6,2]:1
Please enter pixel[6,3]:1
Please enter pixel[6,4]:0
Please enter pixel[6,5]:0
Please enter pixel[6,6]:0
Please enter pixel[6,7]:1
Please enter pixel[7,1]:1
Please enter pixel[7,2]:1
Please enter pixel[7,3]:1
Please enter pixel[7,4]:0
Please enter pixel[7,5]:0
Please enter pixel[7,6]:1
Please enter pixel[7,7]:1
The pixel =0 0 0 0 0 0 0 0 00 0 0 1 0 0 0 0 00 0 0 1 1 0 0 0 00 0 0 0 0 1 0 0 00 0 0 0 1 1 0 0 00 0 1 0 0 1 0 1 00 1 1 1 0 0 0 1 00 1 1 1 0 0 1 1 00 0 0 0 0 0 0 0 0
The pixel =0 0 0 0 0 0 0 0 00 0 0 2 0 0 0 0 00 0 0 2 2 0 0 0 00 0 0 0 0 3 0 0 00 0 0 0 3 3 0 0 00 0 4 0 0 3 0 5 00 4 4 4 0 0 0 5 00 4 4 4 0 0 5 5 0Process finished with exit code 0
这篇关于《数据结构、算法与应用C++语言描述》-队列的应用-图元识别问题的文章就介绍到这儿,希望我们推荐的文章对编程师们有所帮助!


