本文主要是介绍intel的realsense2安装对齐,希望对大家解决编程问题提供一定的参考价值,需要的开发者们随着小编来一起学习吧!
安装步骤:
参考:
https://blog.csdn.net/z17816876284/article/details/79159518
https://blog.csdn.net/qq_28467367/article/details/93381035
https://github.com/IntelRealSense/librealsense/blob/master/doc/distribution_linux.md
https://blog.csdn.net/Sparta_117/article/details/77851876 在ROS Kinetic环境下使用RealSense
关于pyrealsense2 2.30.0.1177
看这个
https://www.zhihu.com/question/298545345/answer/515573083
测试系统Ubuntu16.04
运行代码
uname -r
如果>=4.4.0-50的版本则ok,否则需要升级内核。
内核更新步骤:
https://blog.csdn.net/z17816876284/article/details/79159518
依赖:
sudo apt-get install git libssl-dev libusb-1.0-0-dev pkg-config libglfw3-dev
sudo apt-get install libgtk-3-dev
sudo apt-get install libglew-dev
apt-get安装方式:
第1步:
sudo apt-key adv --keyserver keys.gnupg.net --recv-key F6E65AC044F831AC80A06380C8B3A55A6F3EFCDE || sudo apt-key adv --keyserver hkp://keyserver.ubuntu.com:80 --recv-key F6E65AC044F831AC80A06380C8B3A55A6F3EFCDE第2步:
sudo add-apt-repository "deb http://realsense-hw-public.s3.amazonaws.com/Debian/apt-repo xenial main" -u第3步:很慢,不知道为啥
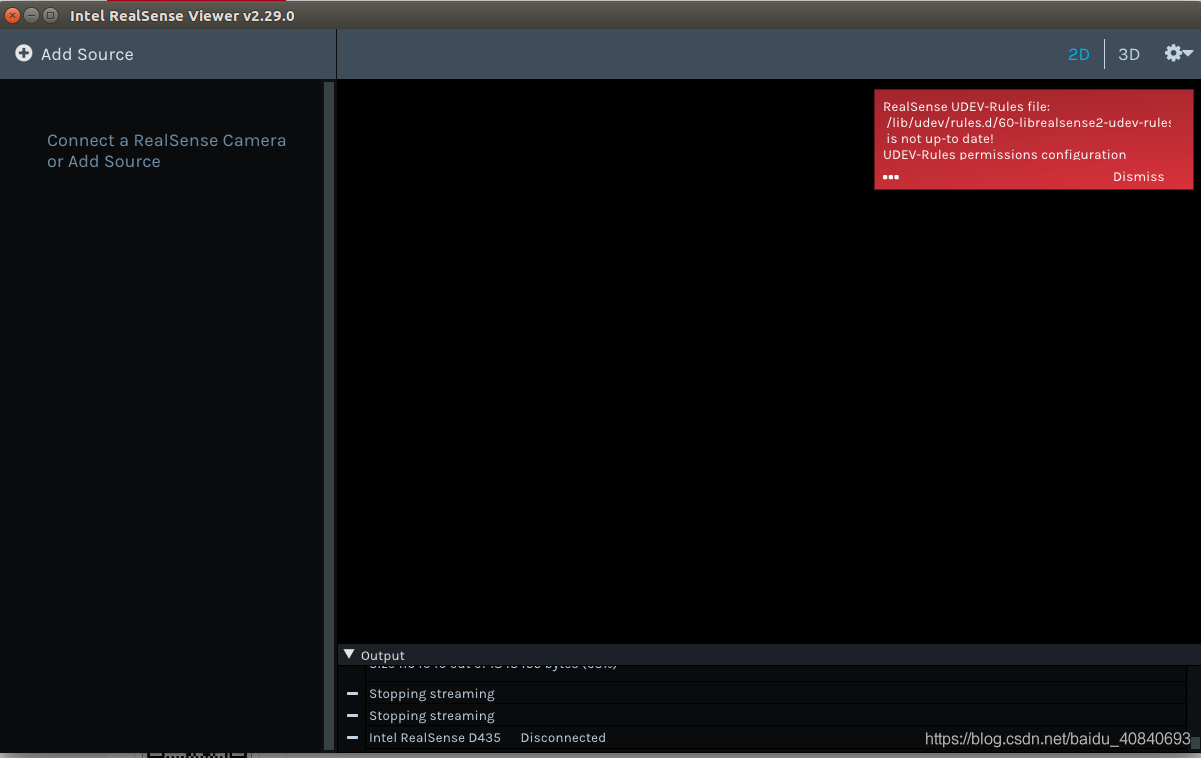
sudo apt-get install librealsense2-dkms
sudo apt-get install librealsense2-utils
测试:
打开终端输入:realsense-viewer
此时并没有安装开发包,无法编程
第4步:这一步我没尝试,太慢了。。。。。
sudo apt-get install librealsense2-dev
sudo apt-get install librealsense2-dbg
第4步我采样自己编译的方式:
https://github.com/IntelRealSense/librealsense/blob/master/doc/installation.md
下载:
https://github.com/IntelRealSense/librealsense
sudo cp config/99-realsense-libusb.rules /etc/udev/rules.d/
sudo udevadm control --reload-rules && udevadm trigger
./scripts/setup_udev_rules.sh
./scripts/patch-realsense-ubuntu-lts.sh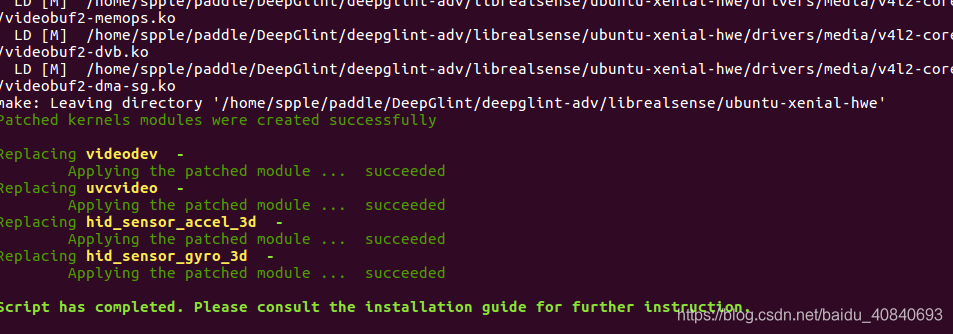
查看是否成功:
lsmod | grep videobuf2_core
sudo dmesg | tail -n 50
编译:
mkdir build && cd build
cmake ../ -DBUILD_EXAMPLES=true
sudo make uninstall && make clean && make -j8 && sudo make install
一直卡在了:
Building with TM2

https://github.com/IntelRealSense/librealsense/issues/3125
https://github.com/IntelRealSense/librealsense/issues/3182
https://github.com/IntelRealSense/librealsense/issues/2737
https://github.com/IntelRealSense/librealsense/issues/2719#issuecomment-474823042
打开cmakelist.txt
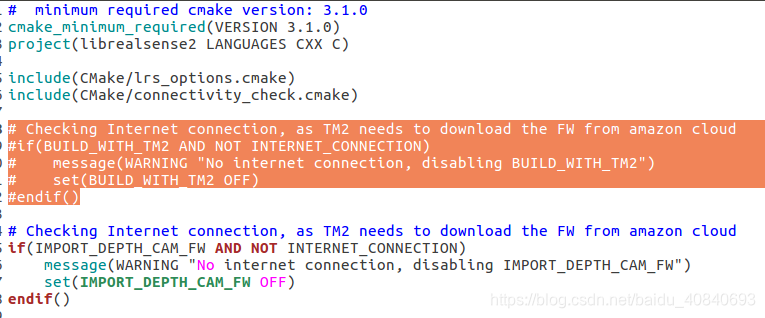
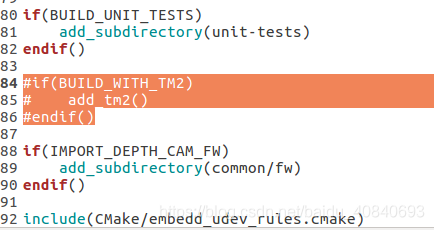
显示
Internet connection identified
Info: REALSENSE_VERSION_STRING=2.29.0
Setting Unix configurations
using RS2_USE_V4L2_BACKEND
GLFW 3.3 not found; using internal version
Could NOT find Vulkan (missing:  VULKAN_LIBRARY VULKAN_INCLUDE_DIR)
Using X11 for window creation
Could NOT find apriltag (missing:  APRILTAG_INC APRILTAG_LIB)
Unable to find apriltag library, skipping pose-apriltag example
Fetching recommended firmwares:
D4XX_RC_VERSION: 5.11.15.0
D4XX_FW_VERSION: 5.11.15.0
SR3XX_FW_VERSION: 3.26.1.0
Download firmware 0;"returning early; file already exists with expected SHA1 hash" for D4XX_FW_Image-5.11.15.0.bin
Download firmware 0;"returning early; file already exists with expected SHA1 hash" for D4XX_RC_Image-5.11.15.0.bin
Download firmware 0;"returning early; file already exists with expected SHA1 hash" for SR3XX_FW_Image-3.26.1.0.bin
Configuring done
Generating done
这里会有一点慢
Download firmware 0;"returning early; file already exists with expected SHA1 hash" for D4XX_FW_Image-5.11.15.0.bin
Download firmware 0;"returning early; file already exists with expected SHA1 hash" for D4XX_RC_Image-5.11.15.0.bin
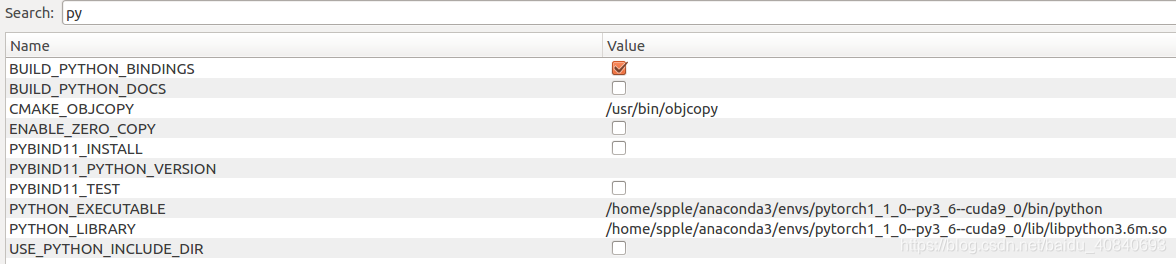
Download firmware 0;"returning early; file already exists with expected SHA1 hash" for SR3XX_FW_Image-3.26.1.0.bin勾选Python选项

换成其他Python,带有torch环境的,后续检测+深度
https://blog.csdn.net/qq_22598167/article/details/89948089
https://www.cnblogs.com/z1141000271/p/10554341.html

勾选example
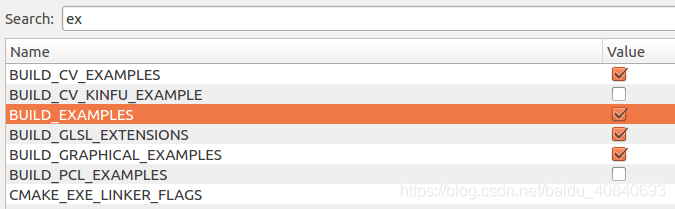
mkdir build && cd build
cmake ../ -DBUILD_EXAMPLES=true
sudo make uninstall && make clean && make -j8 && sudo make install
测试一下,打开install
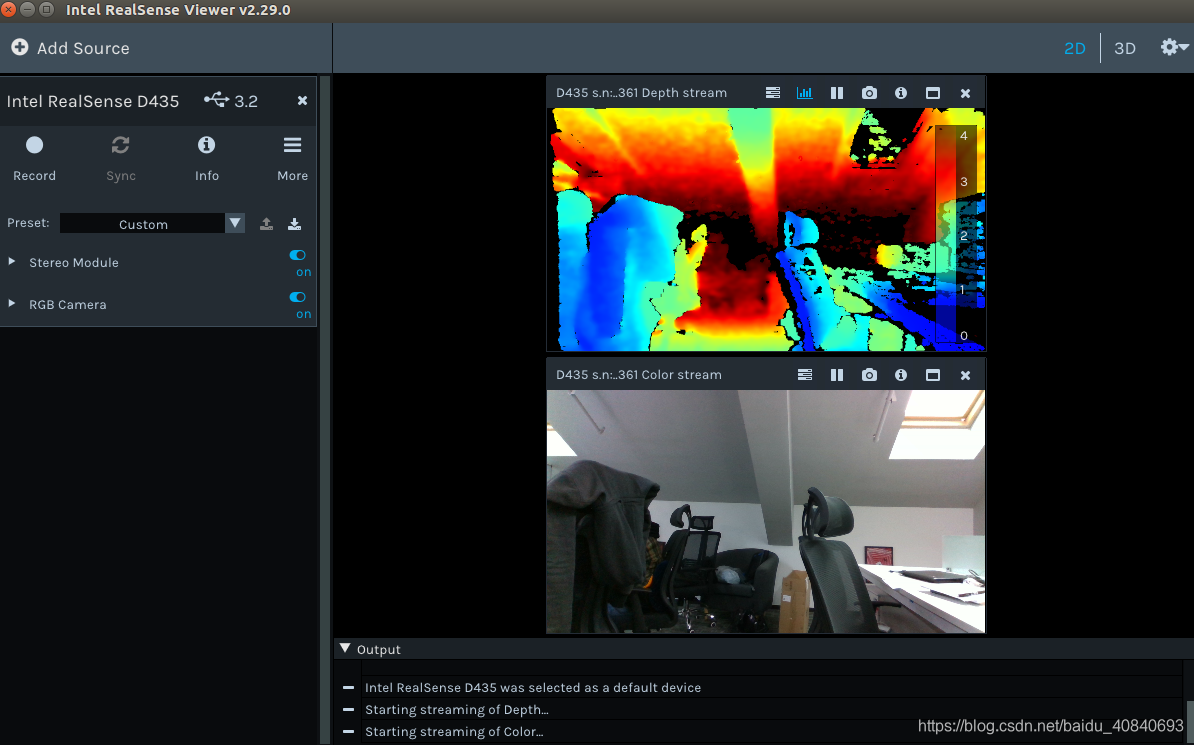
./realsense-viewer
进行深度图对齐:
CMakeLists.txt
cmake_minimum_required(VERSION 3.1.0)#demo_realsense
project(realsense_example)set(CMAKE_CXX_STANDARD 11)set(DEPENDENCIES realsense2)
find_package(OpenCV REQUIRED)
INCLUDE_DIRECTORIES(/usr/local/include/librealsense2/
)
INCLUDE_DIRECTORIES(${OpenCV_INCLUDE_DIRS}
)
include_directories(${OpenCV_INCLUDE_DIRS})
add_executable(realsense_example realsense_example.cpp)
target_link_libraries(realsense_example ${DEPENDENCIES})
target_link_libraries(realsense_example ${OpenCV_LIBS})
realsense_example.cpp
#include <iostream>
using namespace std;
#include <sstream>
#include <iostream>
#include <fstream>
#include <algorithm>
#include <cstring>#include<opencv2/imgproc/imgproc.hpp>
#include<opencv2/core/core.hpp>
#include<opencv2/highgui/highgui.hpp>
using namespace cv;#include<librealsense2/rs.hpp>//获取深度像素对应长度单位转换
float get_depth_scale(rs2::device dev);//检查摄像头数据管道设置是否改变
bool profile_changed(const std::vector<rs2::stream_profile>& current, const std::vector<rs2::stream_profile>& prev);int main(int argc, char * argv[]) try
{// Create and initialize GUI related objects//创建gui窗口//window app(1280, 720, "CPP - Align Example"); // Simple window handling//ImGui_ImplGlfw_Init(app, false);      // ImGui library intializitionconst char* depth_win="depth_Image";namedWindow(depth_win,WINDOW_AUTOSIZE);const char* color_win="color_Image";namedWindow(color_win,WINDOW_AUTOSIZE);//深度图像颜色maprs2::colorizer c;                          // Helper to colorize depth images//helper用于渲染图片//texture renderer;                     // Helper for renderig images// Create a pipeline to easily configure and start the camera//创建数据管道rs2::pipeline pipe;rs2::config pipe_config;pipe_config.enable_stream(RS2_STREAM_DEPTH,640,480,RS2_FORMAT_Z16,30);pipe_config.enable_stream(RS2_STREAM_COLOR,640,480,RS2_FORMAT_BGR8,30);//Calling pipeline's start() without any additional parameters will start the first device//直接start(),不添加配置参数,则默认打开第一个设备// with its default streams.//以及以默认的配置进行流输出//The start function returns the pipeline profile which the pipeline used to start the device//start()函数返回数据管道的profilers2::pipeline_profile profile = pipe.start(pipe_config);// Each depth camera might have different units for depth pixels, so we get it here//每个深度摄像头有不同单元的像素,我们这里获取// Using the pipeline's profile, we can retrieve the device that the pipeline uses//使用数据管道的profile获取深度图像像素对应于长度单位(米)的转换比例float depth_scale = get_depth_scale(profile.get_device());//Pipeline could choose a device that does not have a color stream//数据管道可以选择一个没有彩色图像数据流的设备//If there is no color stream, choose to align depth to another stream//选择彩色图像数据流来作为对齐对象rs2_stream align_to = RS2_STREAM_COLOR;//find_stream_to_align(profile.get_stream());/*@这里的对齐是改变深度图,而不改变color图*/// Create a rs2::align object.//创建一个rs2::align的对象// rs2::align allows us to perform alignment of depth frames to others frames//rs2::align 允许我们去实现深度图像对齐其他图像//The "align_to" is the stream type to which we plan to align depth frames.// "align_to"是我们打算用深度图像对齐的图像流rs2::align align(align_to);// Define a variable for controlling the distance to clip//定义一个变量去转换深度到距离float depth_clipping_distance = 1.f;while (cvGetWindowHandle(depth_win)&&cvGetWindowHandle(color_win)) // Application still alive?{// Using the align object, we block the application until a frameset is available//堵塞程序直到新的一帧捕获rs2::frameset frameset = pipe.wait_for_frames();// rs2::pipeline::wait_for_frames() can replace the device it uses in case of device error or disconnection.// Since rs2::align is aligning depth to some other stream, we need to make sure that the stream was not changed//因为rs2::align 正在对齐深度图像到其他图像流,我们要确保对齐的图像流不发生改变//  after the call to wait_for_frames();if (profile_changed(pipe.get_active_profile().get_streams(), profile.get_streams())){//If the profile was changed, update the align object, and also get the new device's depth scale//如果profile发生改变,则更新align对象,重新获取深度图像像素到长度单位的转换比例profile = pipe.get_active_profile();align = rs2::align(align_to);depth_scale = get_depth_scale(profile.get_device());}//Get processed aligned frame//获取对齐后的帧auto processed = align.process(frameset);// Trying to get both other and aligned depth frames//尝试获取对齐后的深度图像帧和其他帧rs2::frame aligned_color_frame = processed.get_color_frame();//processed.first(align_to);rs2::frame aligned_depth_frame = processed.get_depth_frame().apply_filter(c);;//获取对齐之前的color图像rs2::frame before_depth_frame=frameset.get_depth_frame().apply_filter(c);//获取宽高const int depth_w=aligned_depth_frame.as<rs2::video_frame>().get_width();const int depth_h=aligned_depth_frame.as<rs2::video_frame>().get_height();const int color_w=aligned_color_frame.as<rs2::video_frame>().get_width();const int color_h=aligned_color_frame.as<rs2::video_frame>().get_height();const int b_color_w=before_depth_frame.as<rs2::video_frame>().get_width();const int b_color_h=before_depth_frame.as<rs2::video_frame>().get_height();//If one of them is unavailable, continue iterationif (!aligned_depth_frame || !aligned_color_frame){continue;}//创建OPENCV类型 并传入数据Mat aligned_depth_image(Size(depth_w,depth_h),CV_8UC3,(void*)aligned_depth_frame.get_data(),Mat::AUTO_STEP);Mat aligned_color_image(Size(color_w,color_h),CV_8UC3,(void*)aligned_color_frame.get_data(),Mat::AUTO_STEP);Mat before_color_image(Size(b_color_w,b_color_h),CV_8UC3,(void*)before_depth_frame.get_data(),Mat::AUTO_STEP);//显示imshow(depth_win,aligned_depth_image);imshow(color_win,aligned_color_image);imshow("before aligned",before_color_image);waitKey(10);}return EXIT_SUCCESS;
}
catch (const rs2::error & e)
{std::cerr << "RealSense error calling " << e.get_failed_function() << "(" << e.get_failed_args() << "):\n    " << e.what() << std::endl;return EXIT_FAILURE;
}
catch (const std::exception & e)
{std::cerr << e.what() << std::endl;return EXIT_FAILURE;
}float get_depth_scale(rs2::device dev)
{// Go over the device's sensorsfor (rs2::sensor& sensor : dev.query_sensors()){// Check if the sensor if a depth sensorif (rs2::depth_sensor dpt = sensor.as<rs2::depth_sensor>()){return dpt.get_depth_scale();}}throw std::runtime_error("Device does not have a depth sensor");
}bool profile_changed(const std::vector<rs2::stream_profile>& current, const std::vector<rs2::stream_profile>& prev)
{for (auto&& sp : prev){//If previous profile is in current (maybe just added another)auto itr = std::find_if(std::begin(current), std::end(current), [&sp](const rs2::stream_profile& current_sp) { return sp.unique_id() == current_sp.unique_id(); });if (itr == std::end(current)) //If it previous stream wasn't found in current{return true;}}return false;
}
安装完python版本后可以使用python的例子:
官方:
https://github.com/IntelRealSense/librealsense/tree/master/wrappers/python/examples
python -mpip install pyglet==1.3.0
python -mpip install pyrealsense2
python -mpip install pyntcloud
# -*-coding:utf-8-*-
# 首先导入库
from ctypes import *
import os
import pyrealsense2 as rs
# 导入Numpy以便于数组操作
import numpy as np
# 导入OpenCV以便于图像渲染
import cv2# 创建一个管道
pipeline = rs.pipeline()# Create a config并配置要流式传输的管道
# 颜色和深度流的不同分辨率
config = rs.config()
config.enable_stream(rs.stream.depth, 640, 360, rs.format.z16, 30)
config.enable_stream(rs.stream.color, 640, 480, rs.format.bgr8, 30)# 开始流式传输
profile = pipeline.start(config)# 获取深度传感器的深度标尺(参见rs-align示例进行说明)
depth_sensor = profile.get_device().first_depth_sensor()
depth_scale = depth_sensor.get_depth_scale()
print("Depth Scale is: ", depth_scale)# 我们将删除对象的背景
# clipping_distance_in_meters meters away
clipping_distance_in_meters = 1 # 1 meter
clipping_distance = clipping_distance_in_meters / depth_scale# 创建对齐对象
# rs.align允许我们执行深度帧与其他帧的对齐
# “align_to”是我们计划对齐深度帧的流类型。
align_to = rs.stream.color
align = rs.align(align_to)# Streaming循环
try:while True:# 获取颜色和深度的框架集frames = pipeline.wait_for_frames()# frames.get_depth_frame()是640x360深度图像# 将深度框与颜色框对齐aligned_frames = align.process(frames)# 获取对齐的帧aligned_depth_frame = aligned_frames.get_depth_frame()# aligned_depth_frame是640x480深度图像color_frame = aligned_frames.get_color_frame()# 验证两个帧是否有效if not aligned_depth_frame or not color_frame:continuedepth_image = np.asanyarray(aligned_depth_frame.get_data())color_image = np.asanyarray(color_frame.get_data())# # remove background - 将clips_distance以外的像素设置为灰色grey_color = 153depth_image_3d = np.dstack((depth_image, depth_image, depth_image)) # depth image is 1 channel, color is 3 channelsbg_removed = np.where((depth_image_3d > clipping_distance) | (depth_image_3d <= 0), grey_color, color_image)# 渲染图像depth_colormap = cv2.applyColorMap(cv2.convertScaleAbs(depth_image, alpha=0.03), cv2.COLORMAP_JET)images = np.hstack((bg_removed, depth_colormap))cv2.namedWindow('Align Example', cv2.WINDOW_AUTOSIZE)cv2.imshow('Align Example', images)key = cv2.waitKey(1)# 按esc或'q'关闭图像窗口if key & 0xFF == ord('q') or key == 27:cv2.destroyAllWindows()break
finally:pipeline.stop()
这篇关于intel的realsense2安装对齐的文章就介绍到这儿,希望我们推荐的文章对编程师们有所帮助!


