本文主要是介绍卷积神经网络文本句子分类CNN-text (Yoon Kim)复现实践,希望对大家解决编程问题提供一定的参考价值,需要的开发者们随着小编来一起学习吧!
软件:
1.在运行代码时,python环境换为python3.6,我用的是Anaconda3-4.0.0恰好满足;
2.TensorFlow版本最好换为1.5以下,本人就换为1.4.1了,否则,在进行测试时会报错;
1.简介
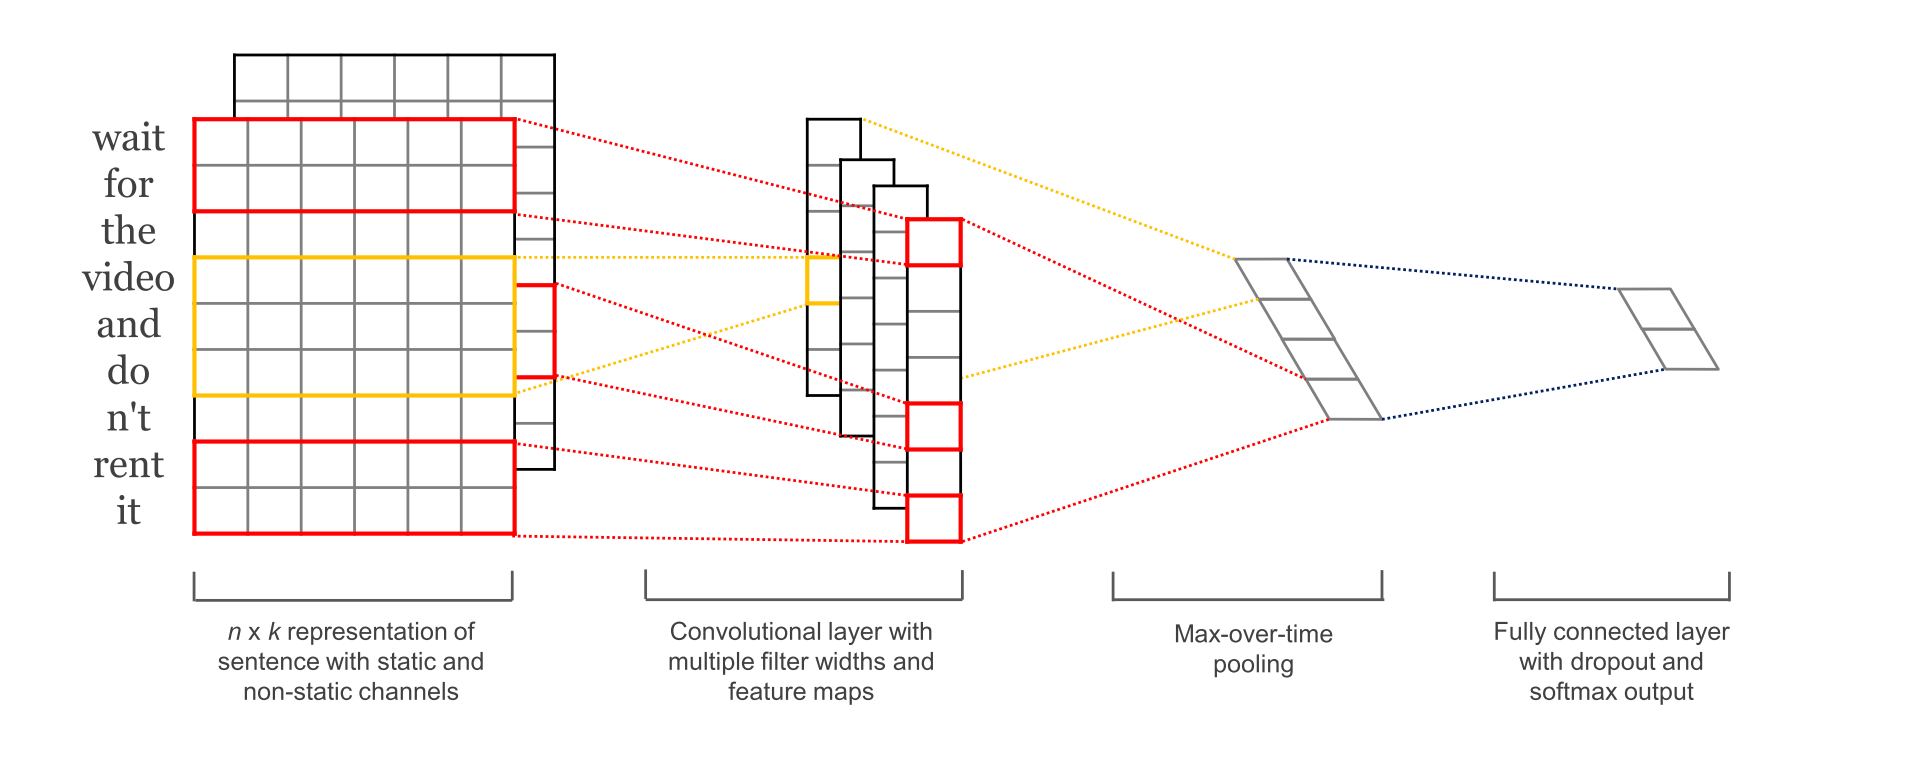
TextCNN 是利用卷积神经网络对文本进行分类的算法,由 Yoon Kim 在 “Convolutional Neural Networks for Sentence Classification” 一文 (见参考[1]) 中提出. 是2014年的算法.
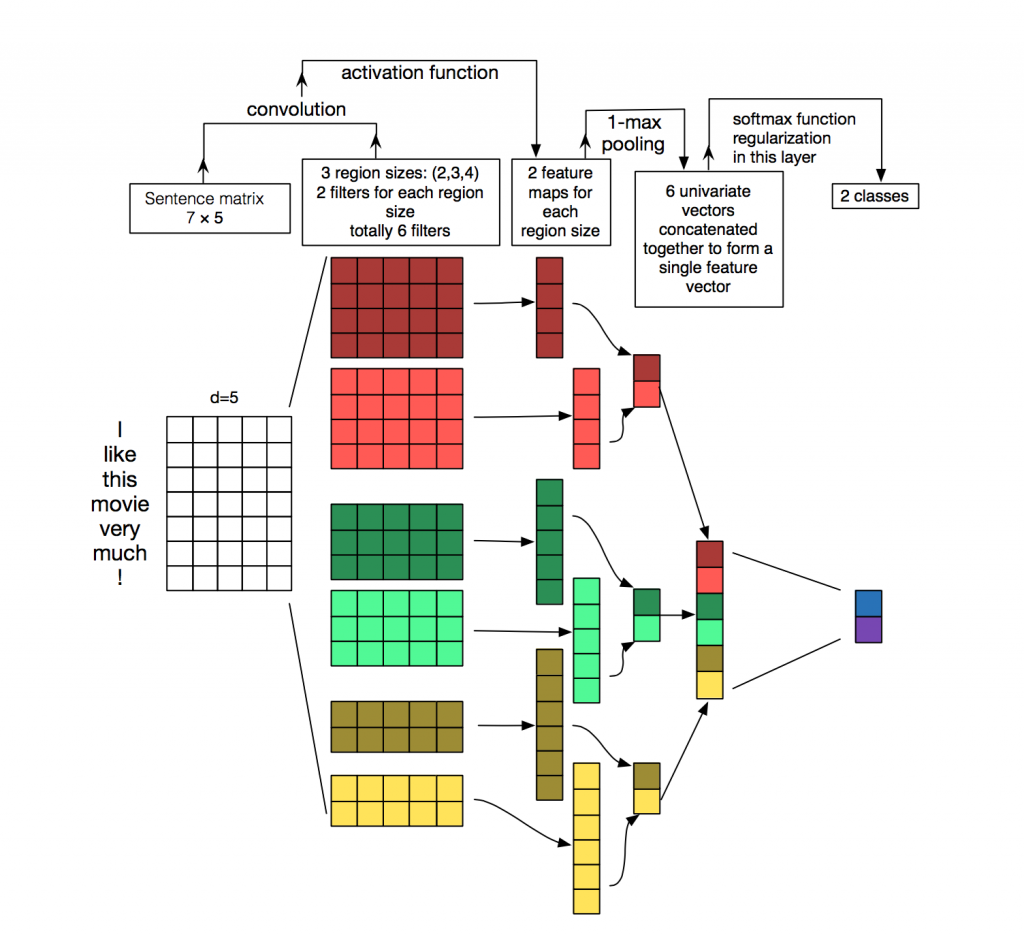
2.参数与超参数
sequence_length
Q: 对于CNN, 输入与输出都是固定的,可每个句子长短不一, 怎么处理?
A: 需要做定长处理, 比如定为n, 超过的截断, 不足的补0. 注意补充的0对后面的结果没有影响,因为后面的max-pooling只会输出最大值,补零的项会被过滤掉.
num_classes
多分类, 分为几类.
vocabulary_size
语料库的词典大小, 记为|D|.
embedding_size
将词向量的维度, 由原始的 |D| 降维到 embedding_size.
filter_size_arr
多个不同size的filter.
3.Embedding Layer
通过一个隐藏层, 将 one-hot 编码的词 投影 到一个低维空间中.
本质上是特征提取器,在指定维度中编码语义特征. 这样, 语义相近的词, 它们的欧氏距离或余弦距离也比较近.
4.Convolution Layer
为不同尺寸的 filter 都建立一个卷积层. 所以会有多个 feature map.
图像是像素点组成的二维数据, 有时还会有RGB三个通道, 所以它们的卷积核至少是二维的.
从某种程度上讲, word is to text as pixel is to image, 所以这个卷积核的 size 与 stride 会有些不一样.
xixi
xi∈Rkxi∈Rk, 一个长度为n的句子中, 第 i 个词语的词向量, 维度为k.
xi:jxi:j
xi:j=xi⊕xi+1⊕...⊕xjxi:j=xi⊕xi+1⊕...⊕xj
表示在长度为n的句子中, 第 [i,j] 个词语的词向量的拼接.
hh
卷积核所围窗口中单词的个数, 卷积核的尺寸其实就是 hkhk.
ww
w∈Rhkw∈Rhk, 卷积核的权重矩阵.
cici
ci=f(w⋅xi:i+h−1+b)ci=f(w⋅xi:i+h−1+b), 卷积核在单词i位置上的输出. b∈RKb∈RK, 是 bias. ff 是双曲正切之类的激活函数.
c=[c1,c2,...,cn−h+1]c=[c1,c2,...,cn−h+1]
filter在句中单词上进行所有可能的滑动, 得到的 feature mapfeature map.
5.Max-Pooling Layer
max-pooling只会输出最大值, 对输入中的补0 做过滤.
6.SoftMax 分类 Layer
最后接一层全连接的 softmax 层,输出每个类别的概率。
3. 环境搭建
1) 安装Visual Studio 2019
下载Visual Studio 社区版
下载链接:https://visualstudio.microsoft.com/zh-hans/downloads/

注意:安装时勾选“Python开发”和“C++桌面开发”
2) 下载和安装nvidia显卡驱动
首先要在设备管理器中查看你的显卡型号,比如在这里可以看到我的显卡型号为Titan XP。

NVIDIA 驱动下载:https://www.nvidia.cn/Download/index.aspx?lang=cn下载对应你的英伟达显卡驱动。

下载之后就是简单的下一步直到完成。完成之后,在cmd中输入执行:
nvidia-smi
如果有错误:
'nvidia-smi' 不是内部或外部命令,也不是可运行的程序
或批处理文件。
把C:\Program Files\NVIDIA Corporation\NVSMI添加到环境变量的path中。再重新打开cmd窗口。如果输出下图所示的显卡信息,说明你的驱动安装成功。
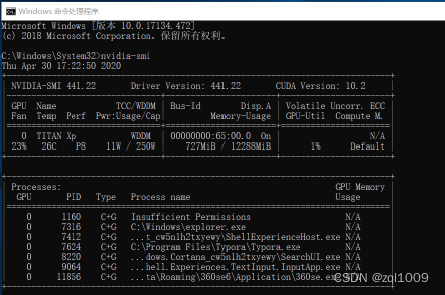
注:图中的 CUDA Version是当前Driver版本能支持的最高的CUDA版本
3) 下载CUDA
CUDA用的是10.2版本
cuda下载链接:https://developer.nvidia.com/cuda-downloads? target_os=Windows&target_arch=x86_64&target_version=10&target_type=exelocal
https://developer.nvidia.com/cuda-downloads?
target_os=Windows&target_arch=x86_64&target_version=10&target_type=exelocal

载后得到文件:cuda_10.2.89_441.22_win10.exe
4) 下载cuDNN
cudnn下载地址:https://developer.nvidia.com/cudnn需要有账号
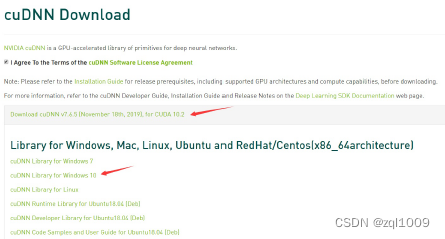
下载后得到文件:cudnn-10.2-windows10-x64-v7.6.5.32.zip
5) 安装cuda
(1) 将cuda运行安装,建议默认路径


安装时可以勾选Visual Studio Integration
(2) 安装完成后设置环境变量
计算机上点右键,打开属性->高级系统设置->环境变量,可以看到系统中多了CUDA_PATH和CUDA_PATH_V10_2两个环境变量。
接下来,还要在系统中添加以下几个环境变量:
这是默认安装位置的路径: C:\ProgramData\NVIDIA Corporation\CUDA Samples\v10.2
CUDA_SDK_PATH = C:\ProgramData\NVIDIA Corporation\CUDA Samples\v10.2 CUDA_LIB_PATH = %CUDA_PATH%\lib\x64
CUDA_BIN_PATH = %CUDA_PATH%\bin
CUDA_SDK_BIN_PATH = %CUDA_SDK_PATH%\bin\win64
CUDA_SDK_LIB_PATH = %CUDA_SDK_PATH%\common\lib\x64

C:\Program Files\NVIDIA GPU Computing Toolkit\CUDA\v10.2\lib\x64
C:\Program Files\NVIDIA GPU Computing Toolkit\CUDA\v10.2\include
C:\Program Files\NVIDIA GPU Computing Toolkit\CUDA\v10.2\extras\CUPTI\lib64 C:\ProgramData\NVIDIA Corporation\CUDA Samples\v10.2\bin\win64
C:\ProgramData\NVIDIA Corporation\CUDA Samples\v10.2\common\lib\x64
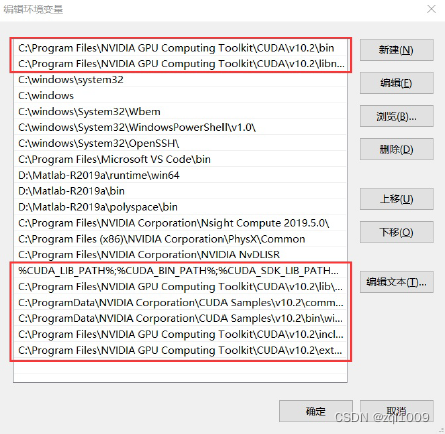
注:与CUDA Samples相关的几个路径也可以不设置
6) 安装cuDNN
复制cudnn文件
对于cudnn直接将其解开压缩包,然后需要将bin,include,lib中的文件复制粘贴到cuda的文件夹下C:\Program Files\NVIDIA GPU Computing Toolkit\CUDA\v10.2
注意:对整个文件夹bin,include,lib复制粘贴
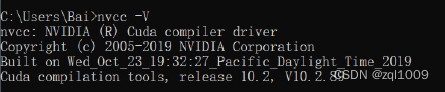
7)CUDA安装测试
最后测试cuda是否配置成功:打开CMD执行:
nvcc -V
可看到cuda的信息
8) 安装Anaconda
Anaconda 是一个用于科学计算的 Python 发行版,支持 Linux, Mac, Windows, 包含了众多流行的科学计算、数据分析的 Python 包。
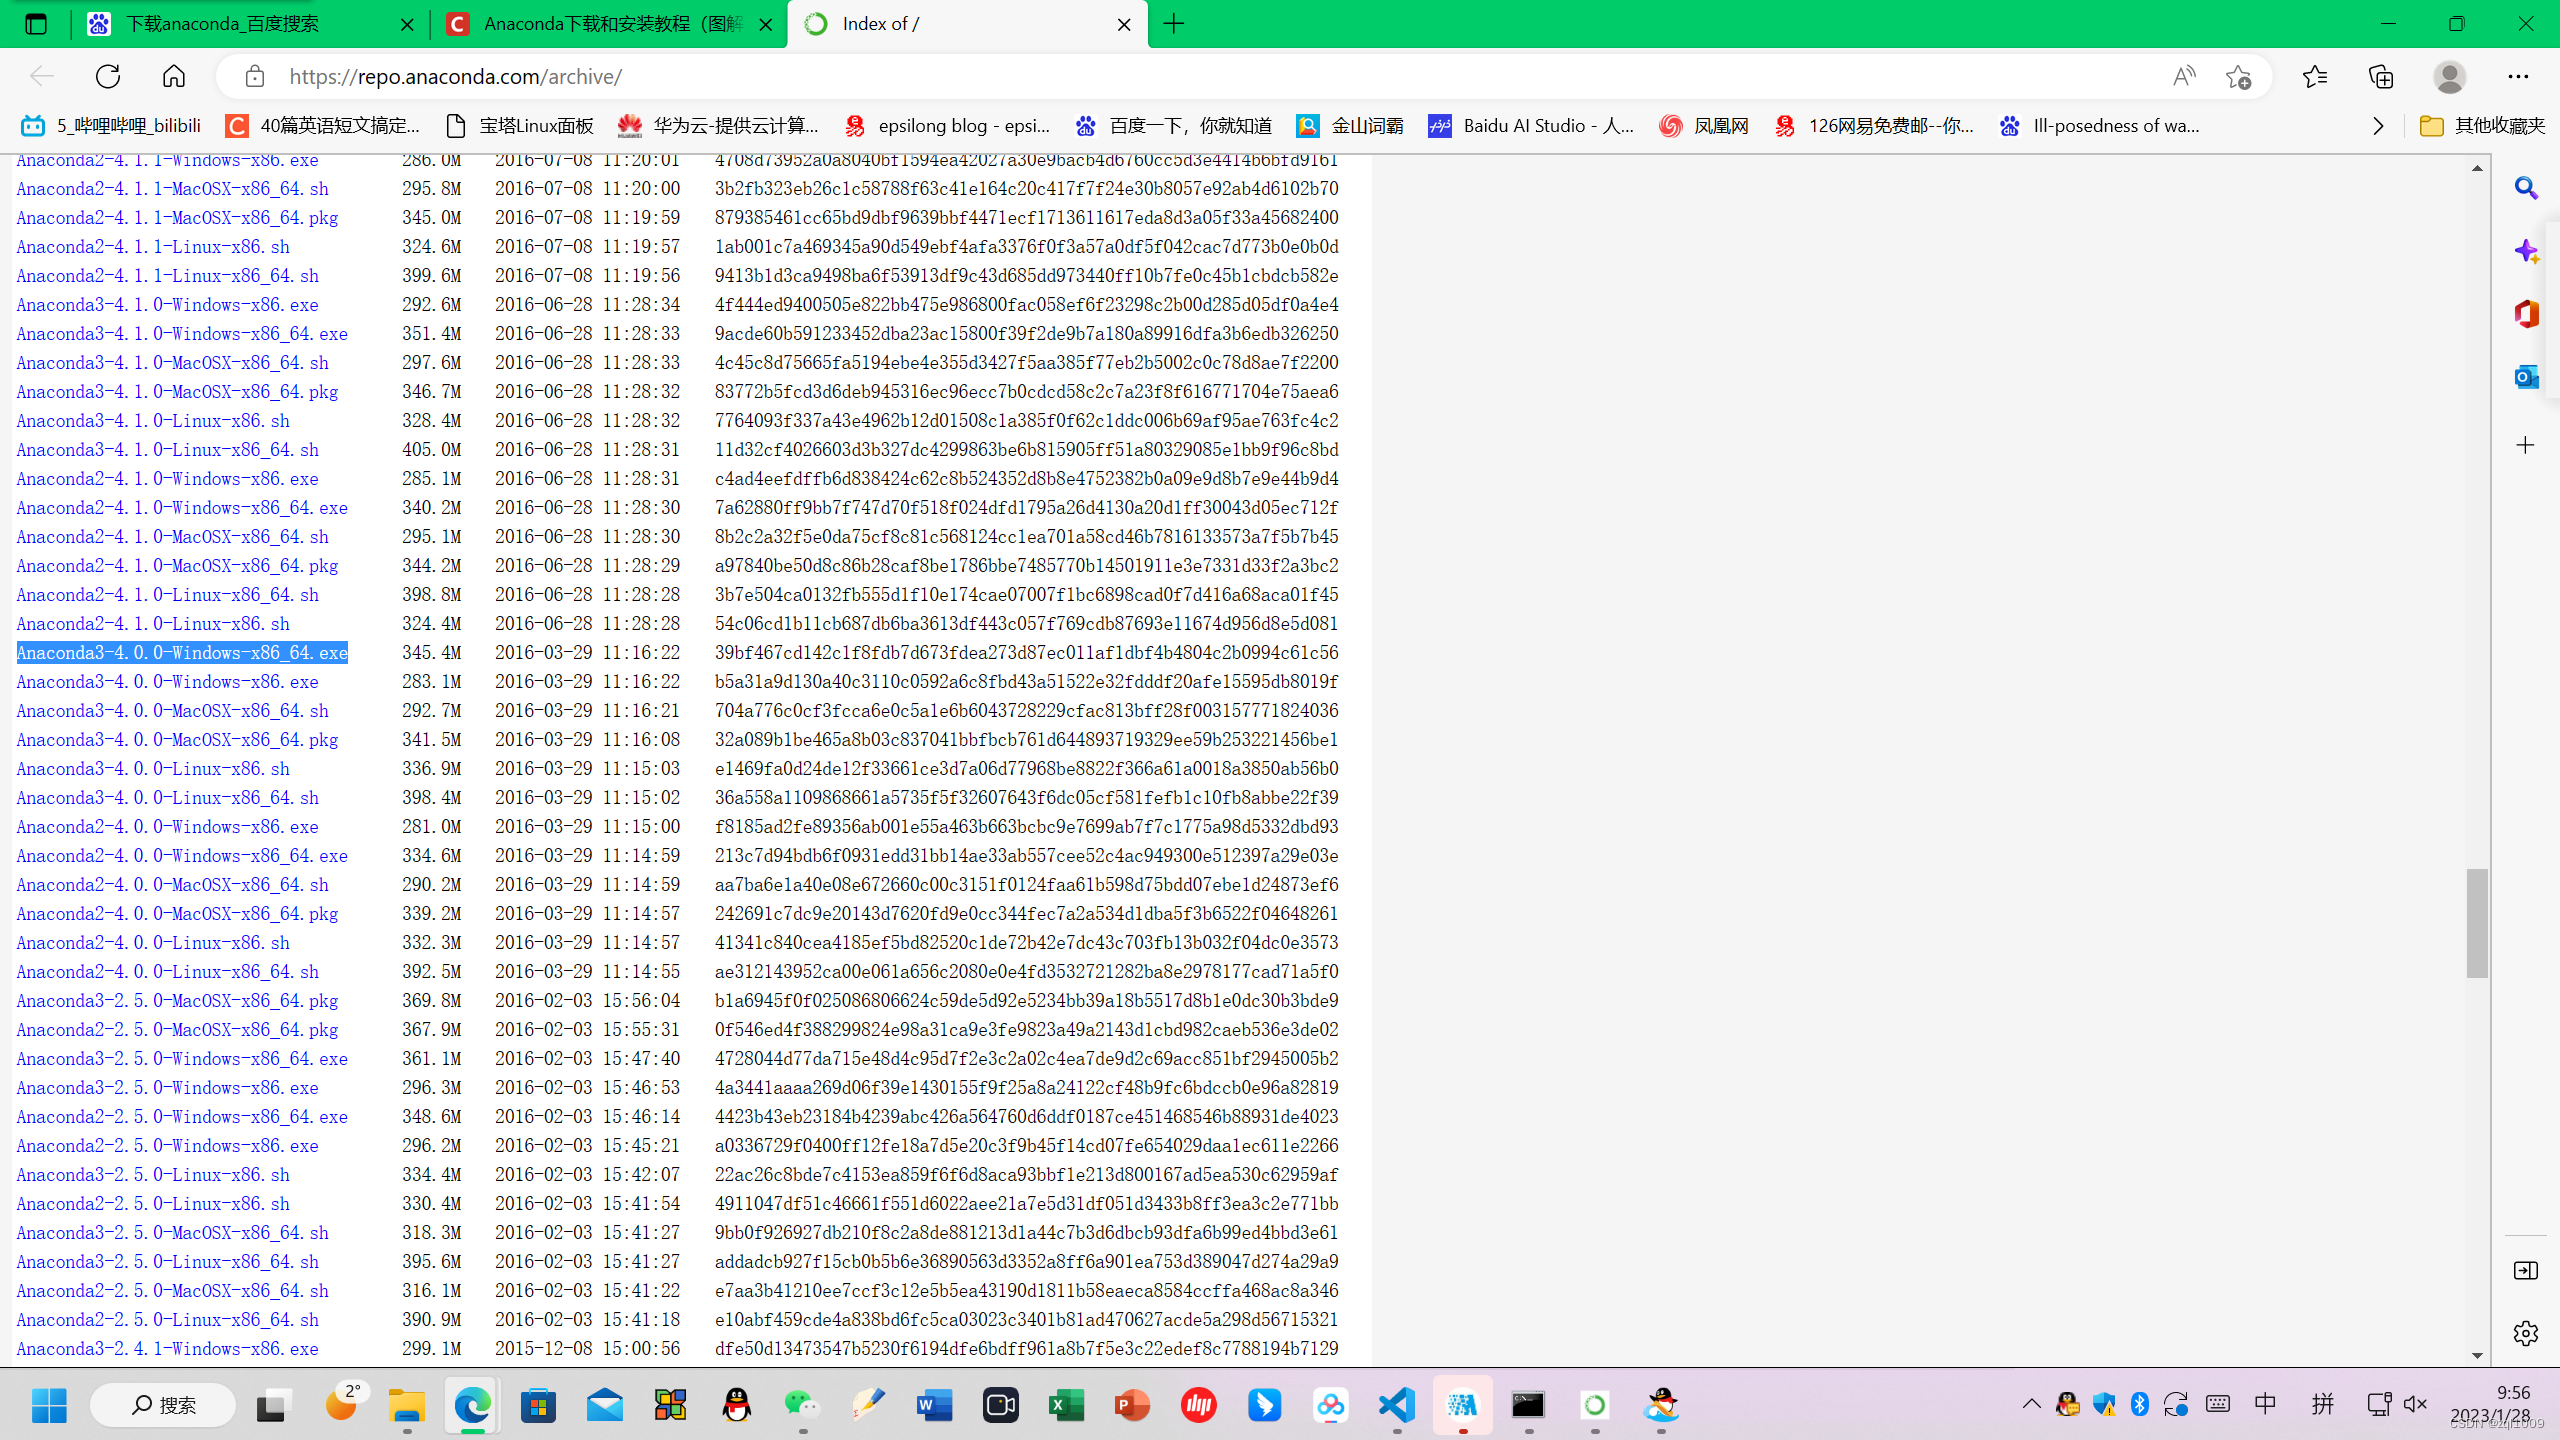
1) 下载安装包
Anaconda下载Windows版:https://www.anaconda.com/products/individual
官网历史版本下载:(Index of / (anaconda.com)
2) 然后安装anaconda
3) 添加Aanaconda国内镜像配置
清华TUNA提供了 Anaconda 仓库的镜像,运行以下命令:
conda config --add channels https://mirrors.tuna.tsinghua.edu.cn/anaconda/pkgs/free/
conda config --add channels
https://mirrors.tuna.tsinghua.edu.cn/anaconda/pkgs/main/
conda config --set show_channel_urls yes
9)安装tensorflow=1.4(pytorch)
创建虚拟环境,环境名字可自己确定,这里本人使用mypytorch作为环境名:
(查看虚拟环境:conda info --env,删除虚拟环境:第一步:首先退出环境 conda deactivate # 第二步:删除环境 conda remove -n 需要删除的环境名 --all)
conda create -n tensorflow35 python=3.5
(或者:conda create -c https://conda.anaconda.org/conda-forge -n nlp-book python=3.8.5)
安装成功后激活tensorflow35环境:此时低版本必须用此命令激活环境activate tensorflow35
conda activate tensorflow35
在所创建的tensorflow35环境下安装tensorflow, 执行命令:
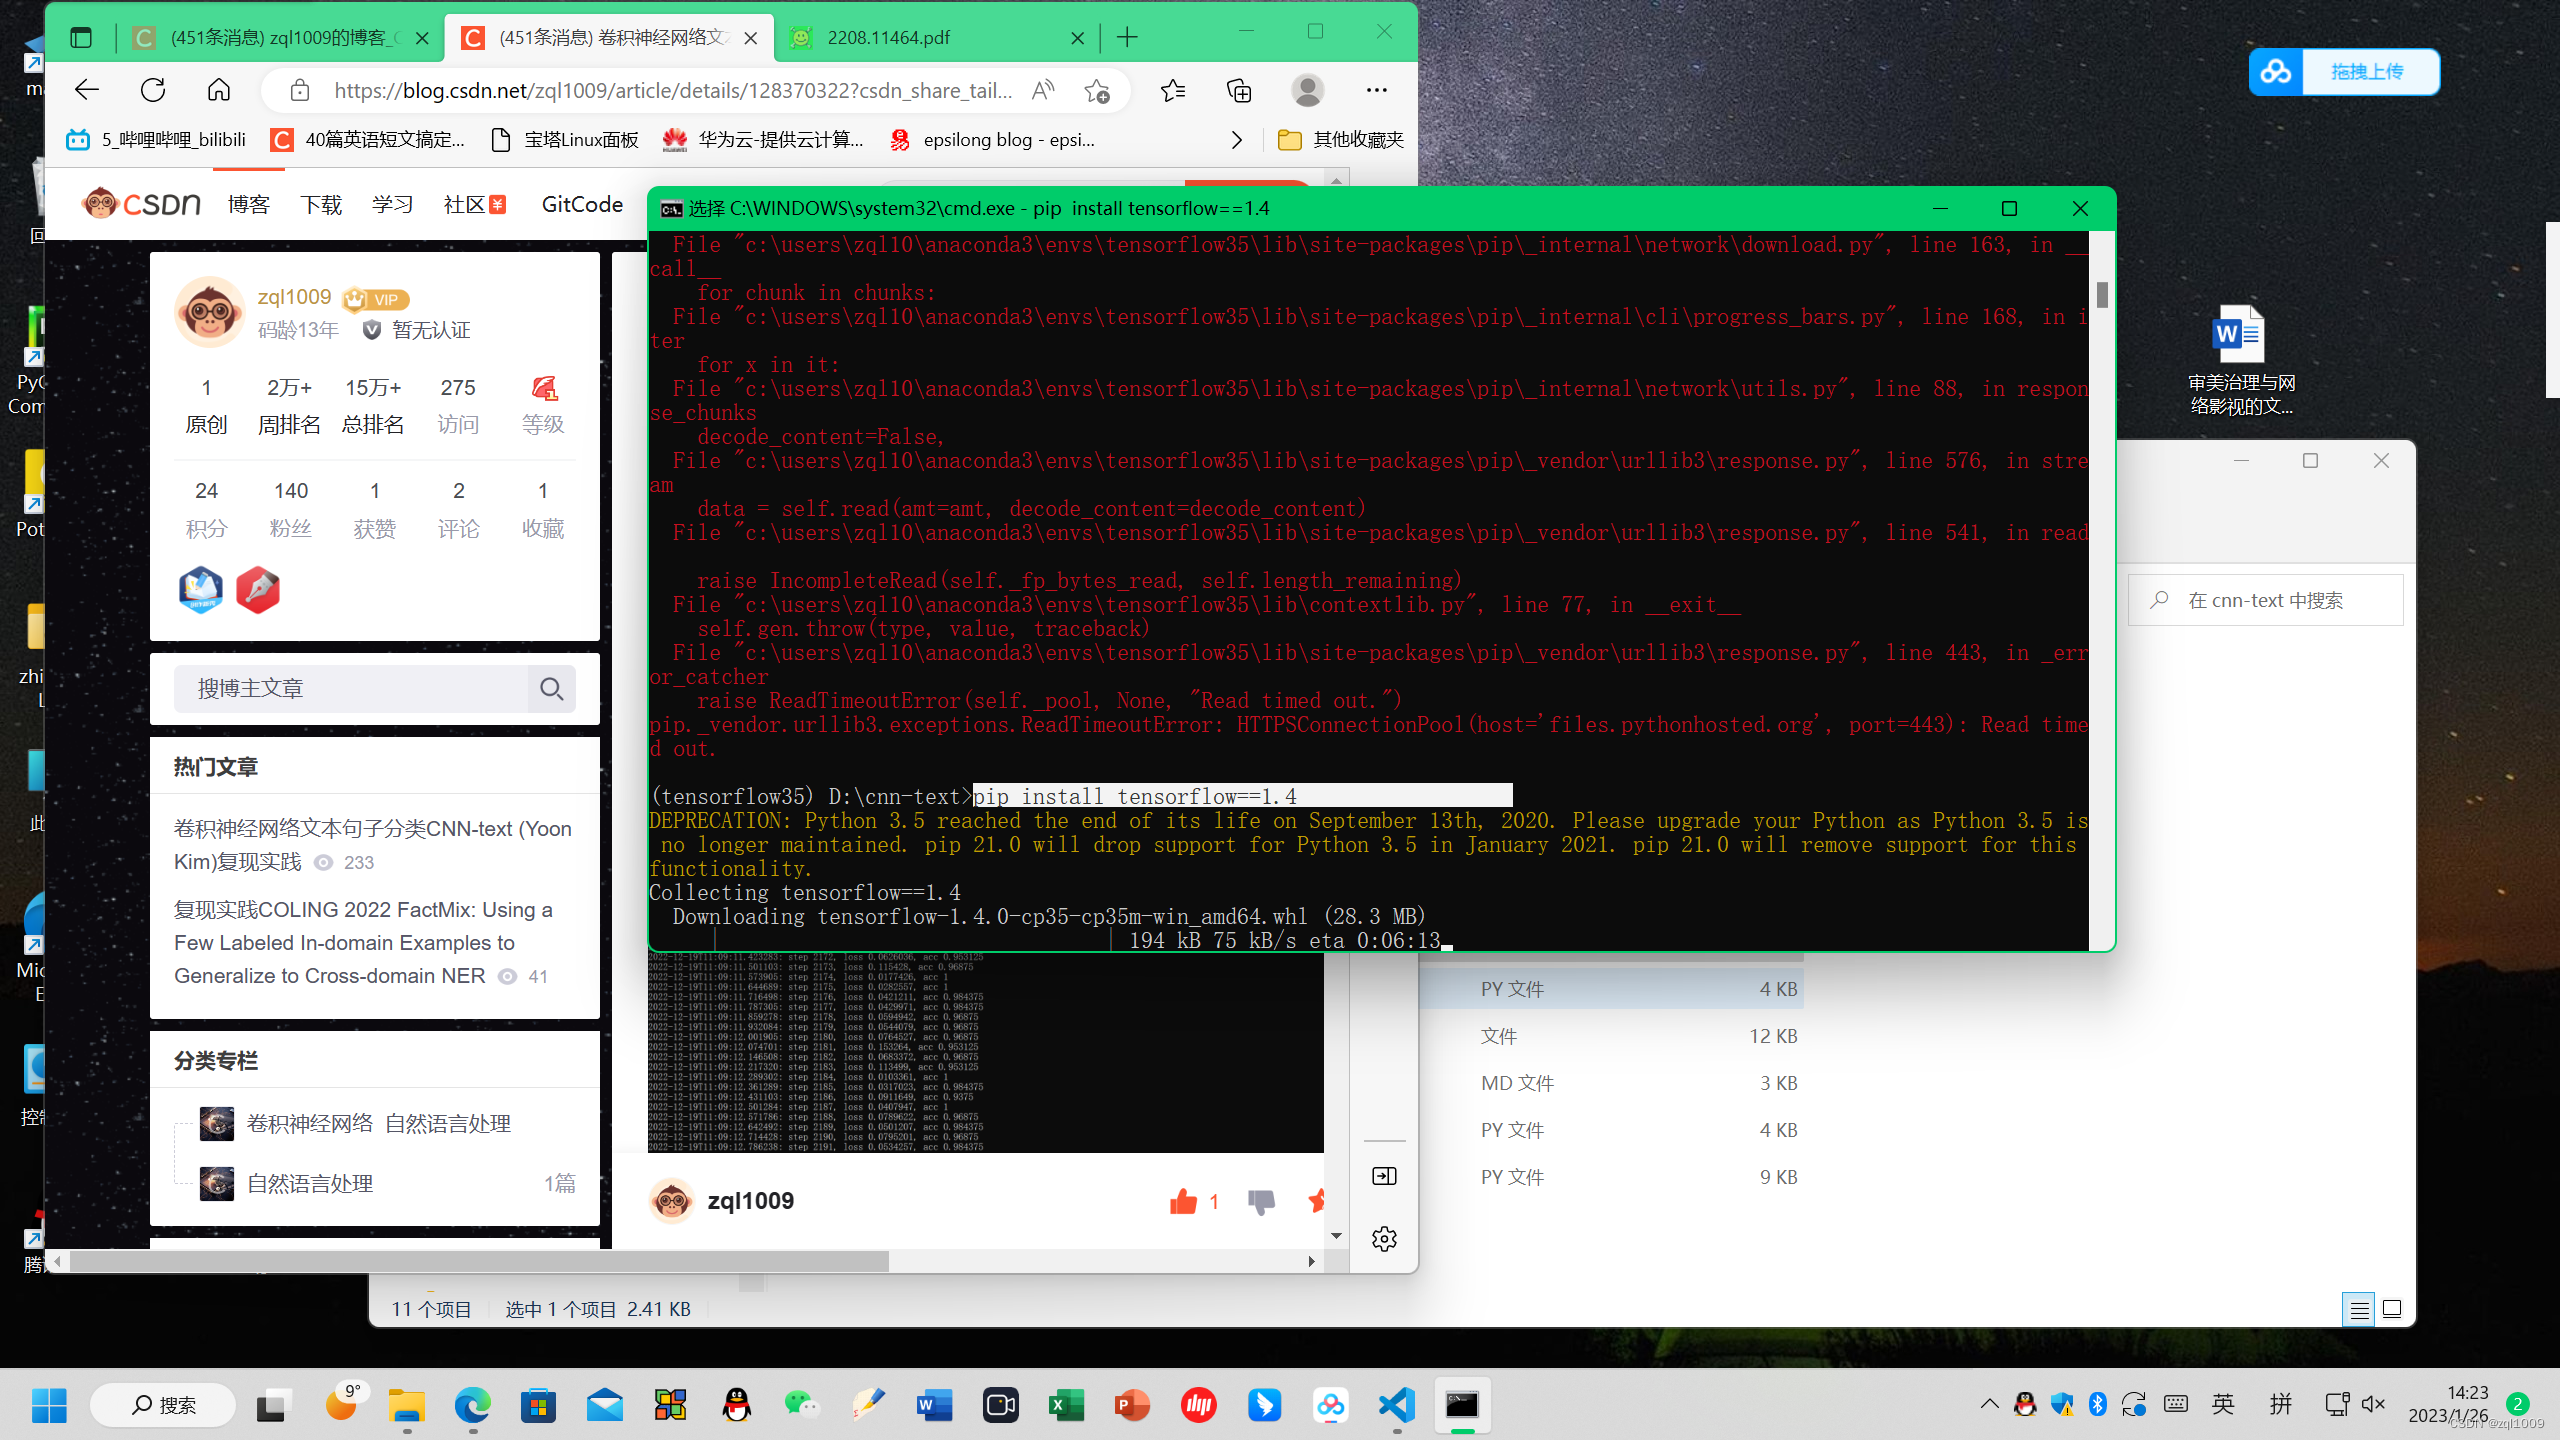
conda install tensorflow==1.4 或 pip install tensorflow==1.4
pip install tensorflow==1.4,安装tensorflow时,出现timeout,多次安装即可成功
注释:python的版本3.5,tensorflow的版本1.4.
4. 数据预处理
在windows窗口执行
(tensorflow35) D:\cnn-text>python data_helpers.py
(tensorflow35) D:\cnn-text>
查看结果:
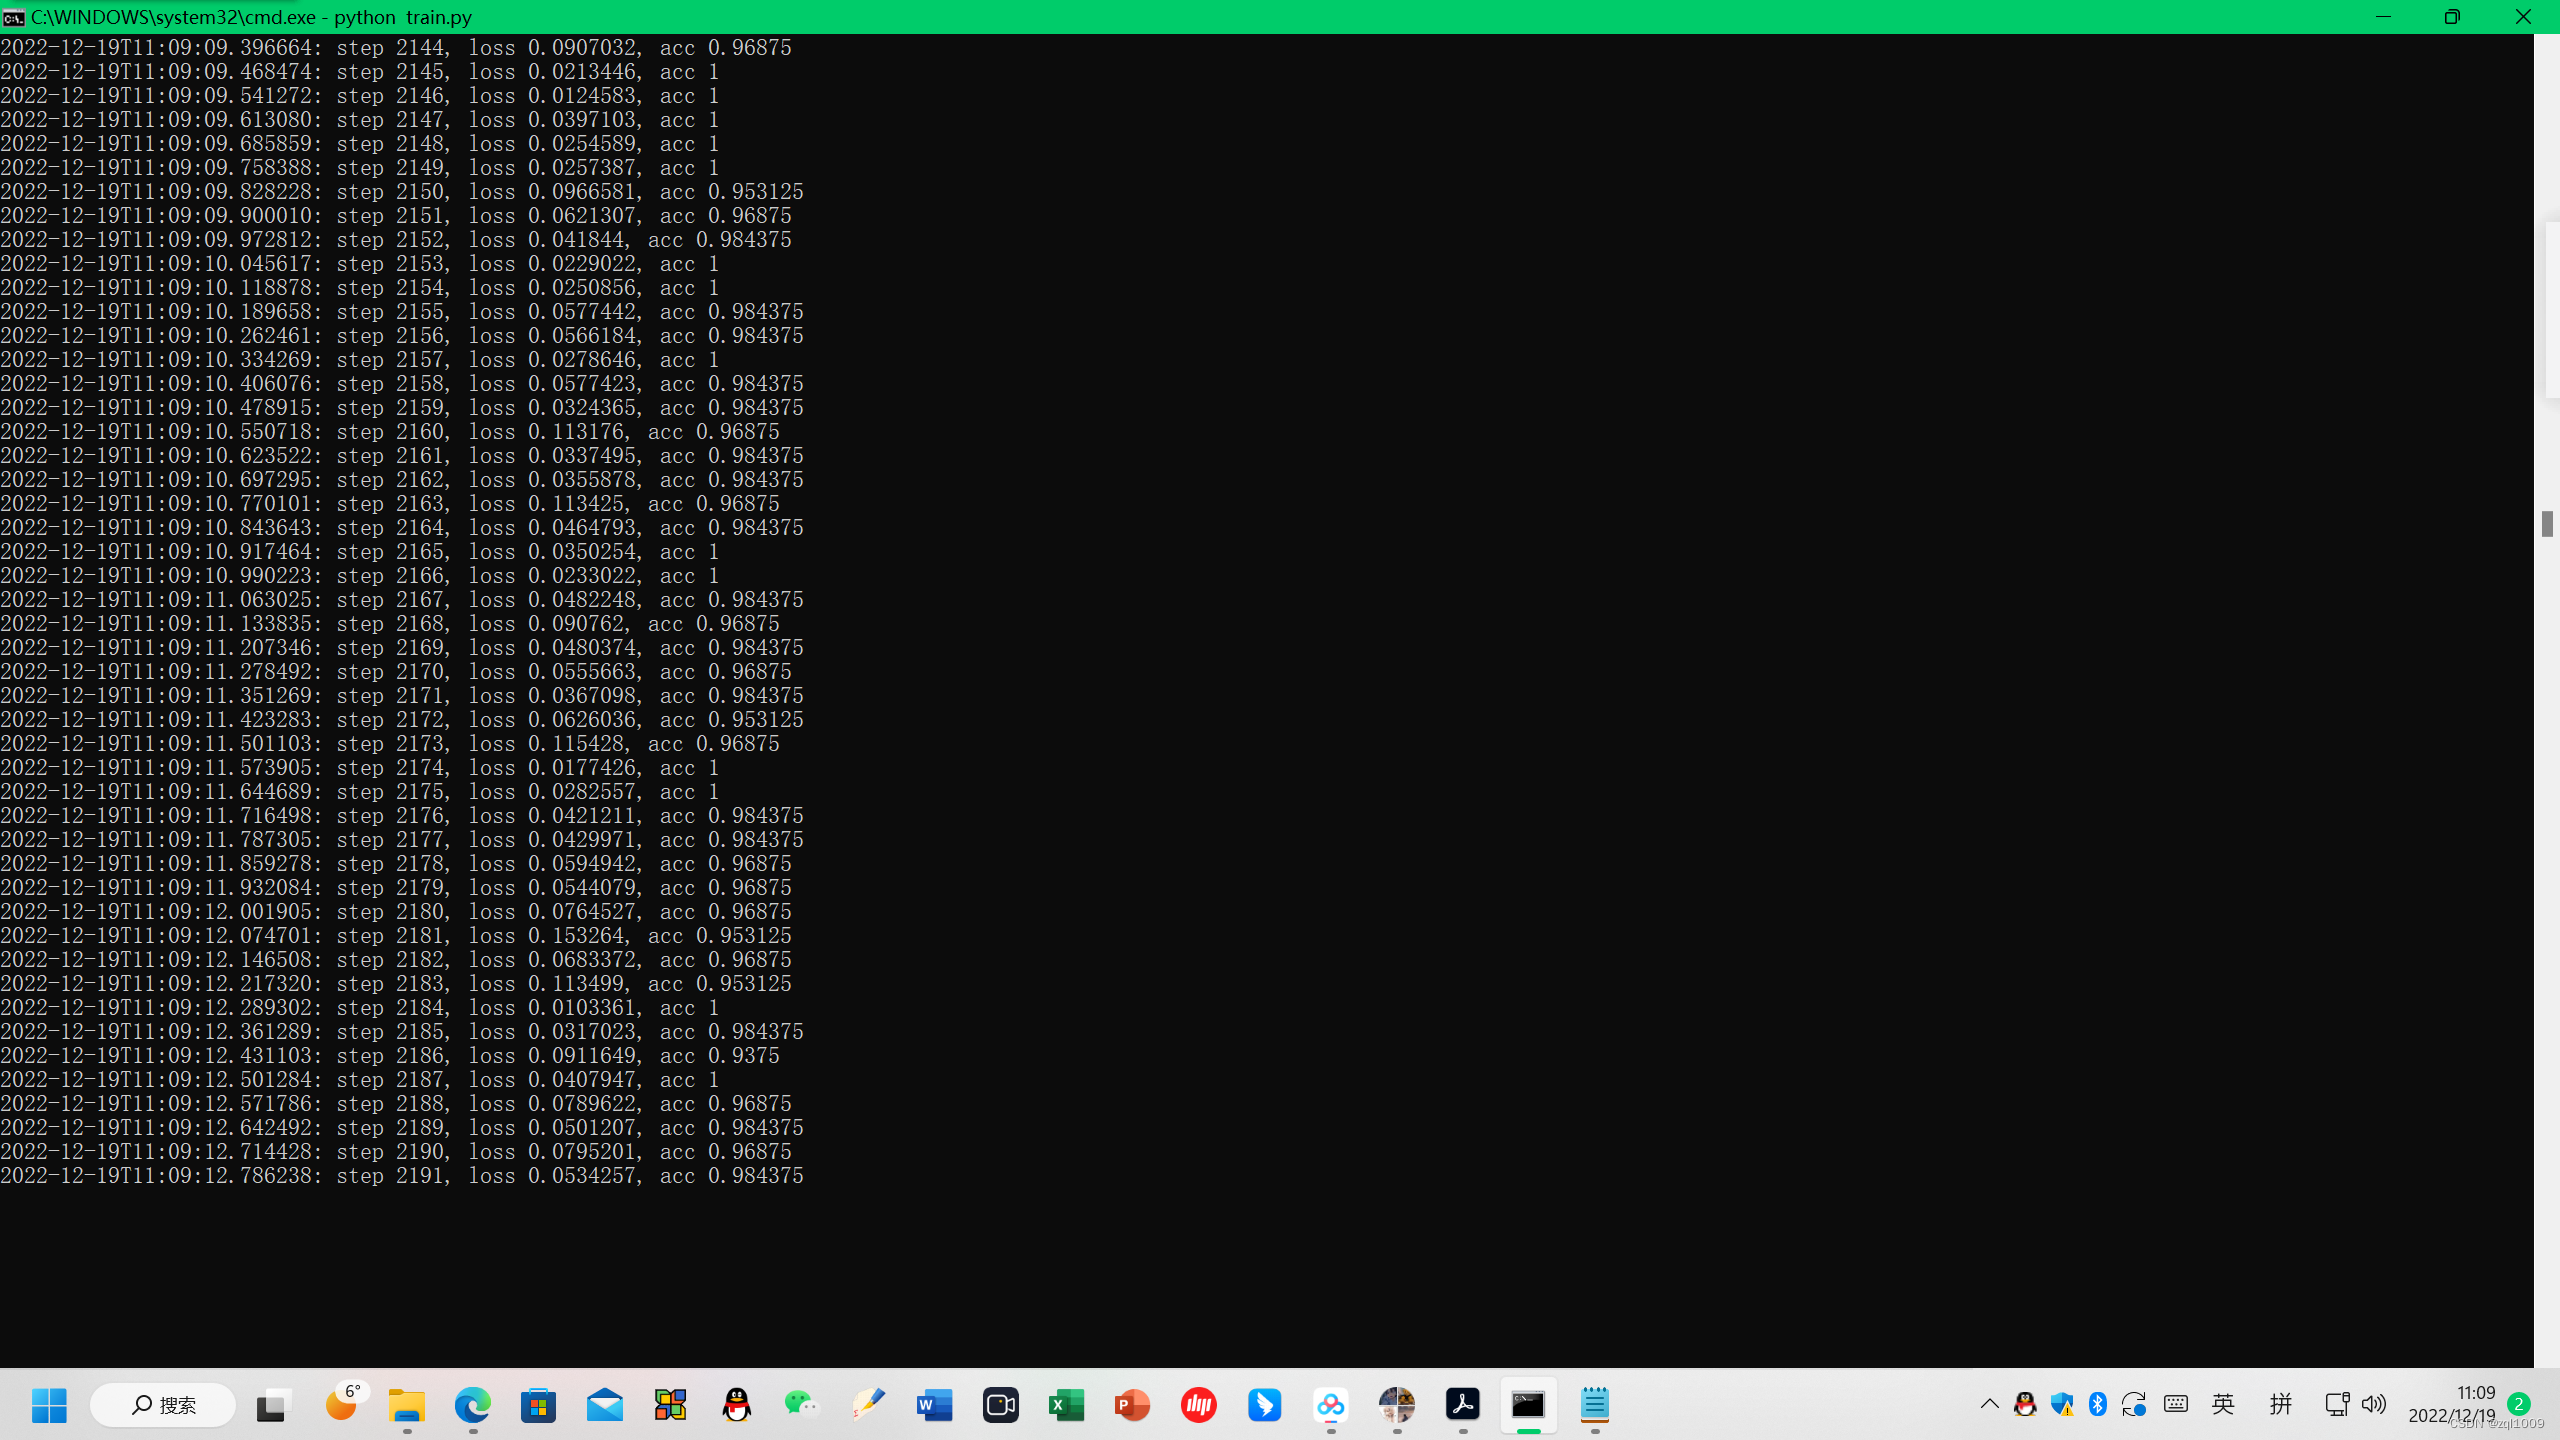
5. 训练cnn-text
进入虚拟环境tensorflow35, 进入D盘下的cnn-text目录,
执行:python train.py
但是在windows报错:
tensorflow.python.framework.errors_impl.PermissionDeniedError
于是发现自己建立的文件夹cnn-text没有权限。于是点击该文件右击,属性,安全 增加完全控制权限。重新操作就可以启动gpu训练 。

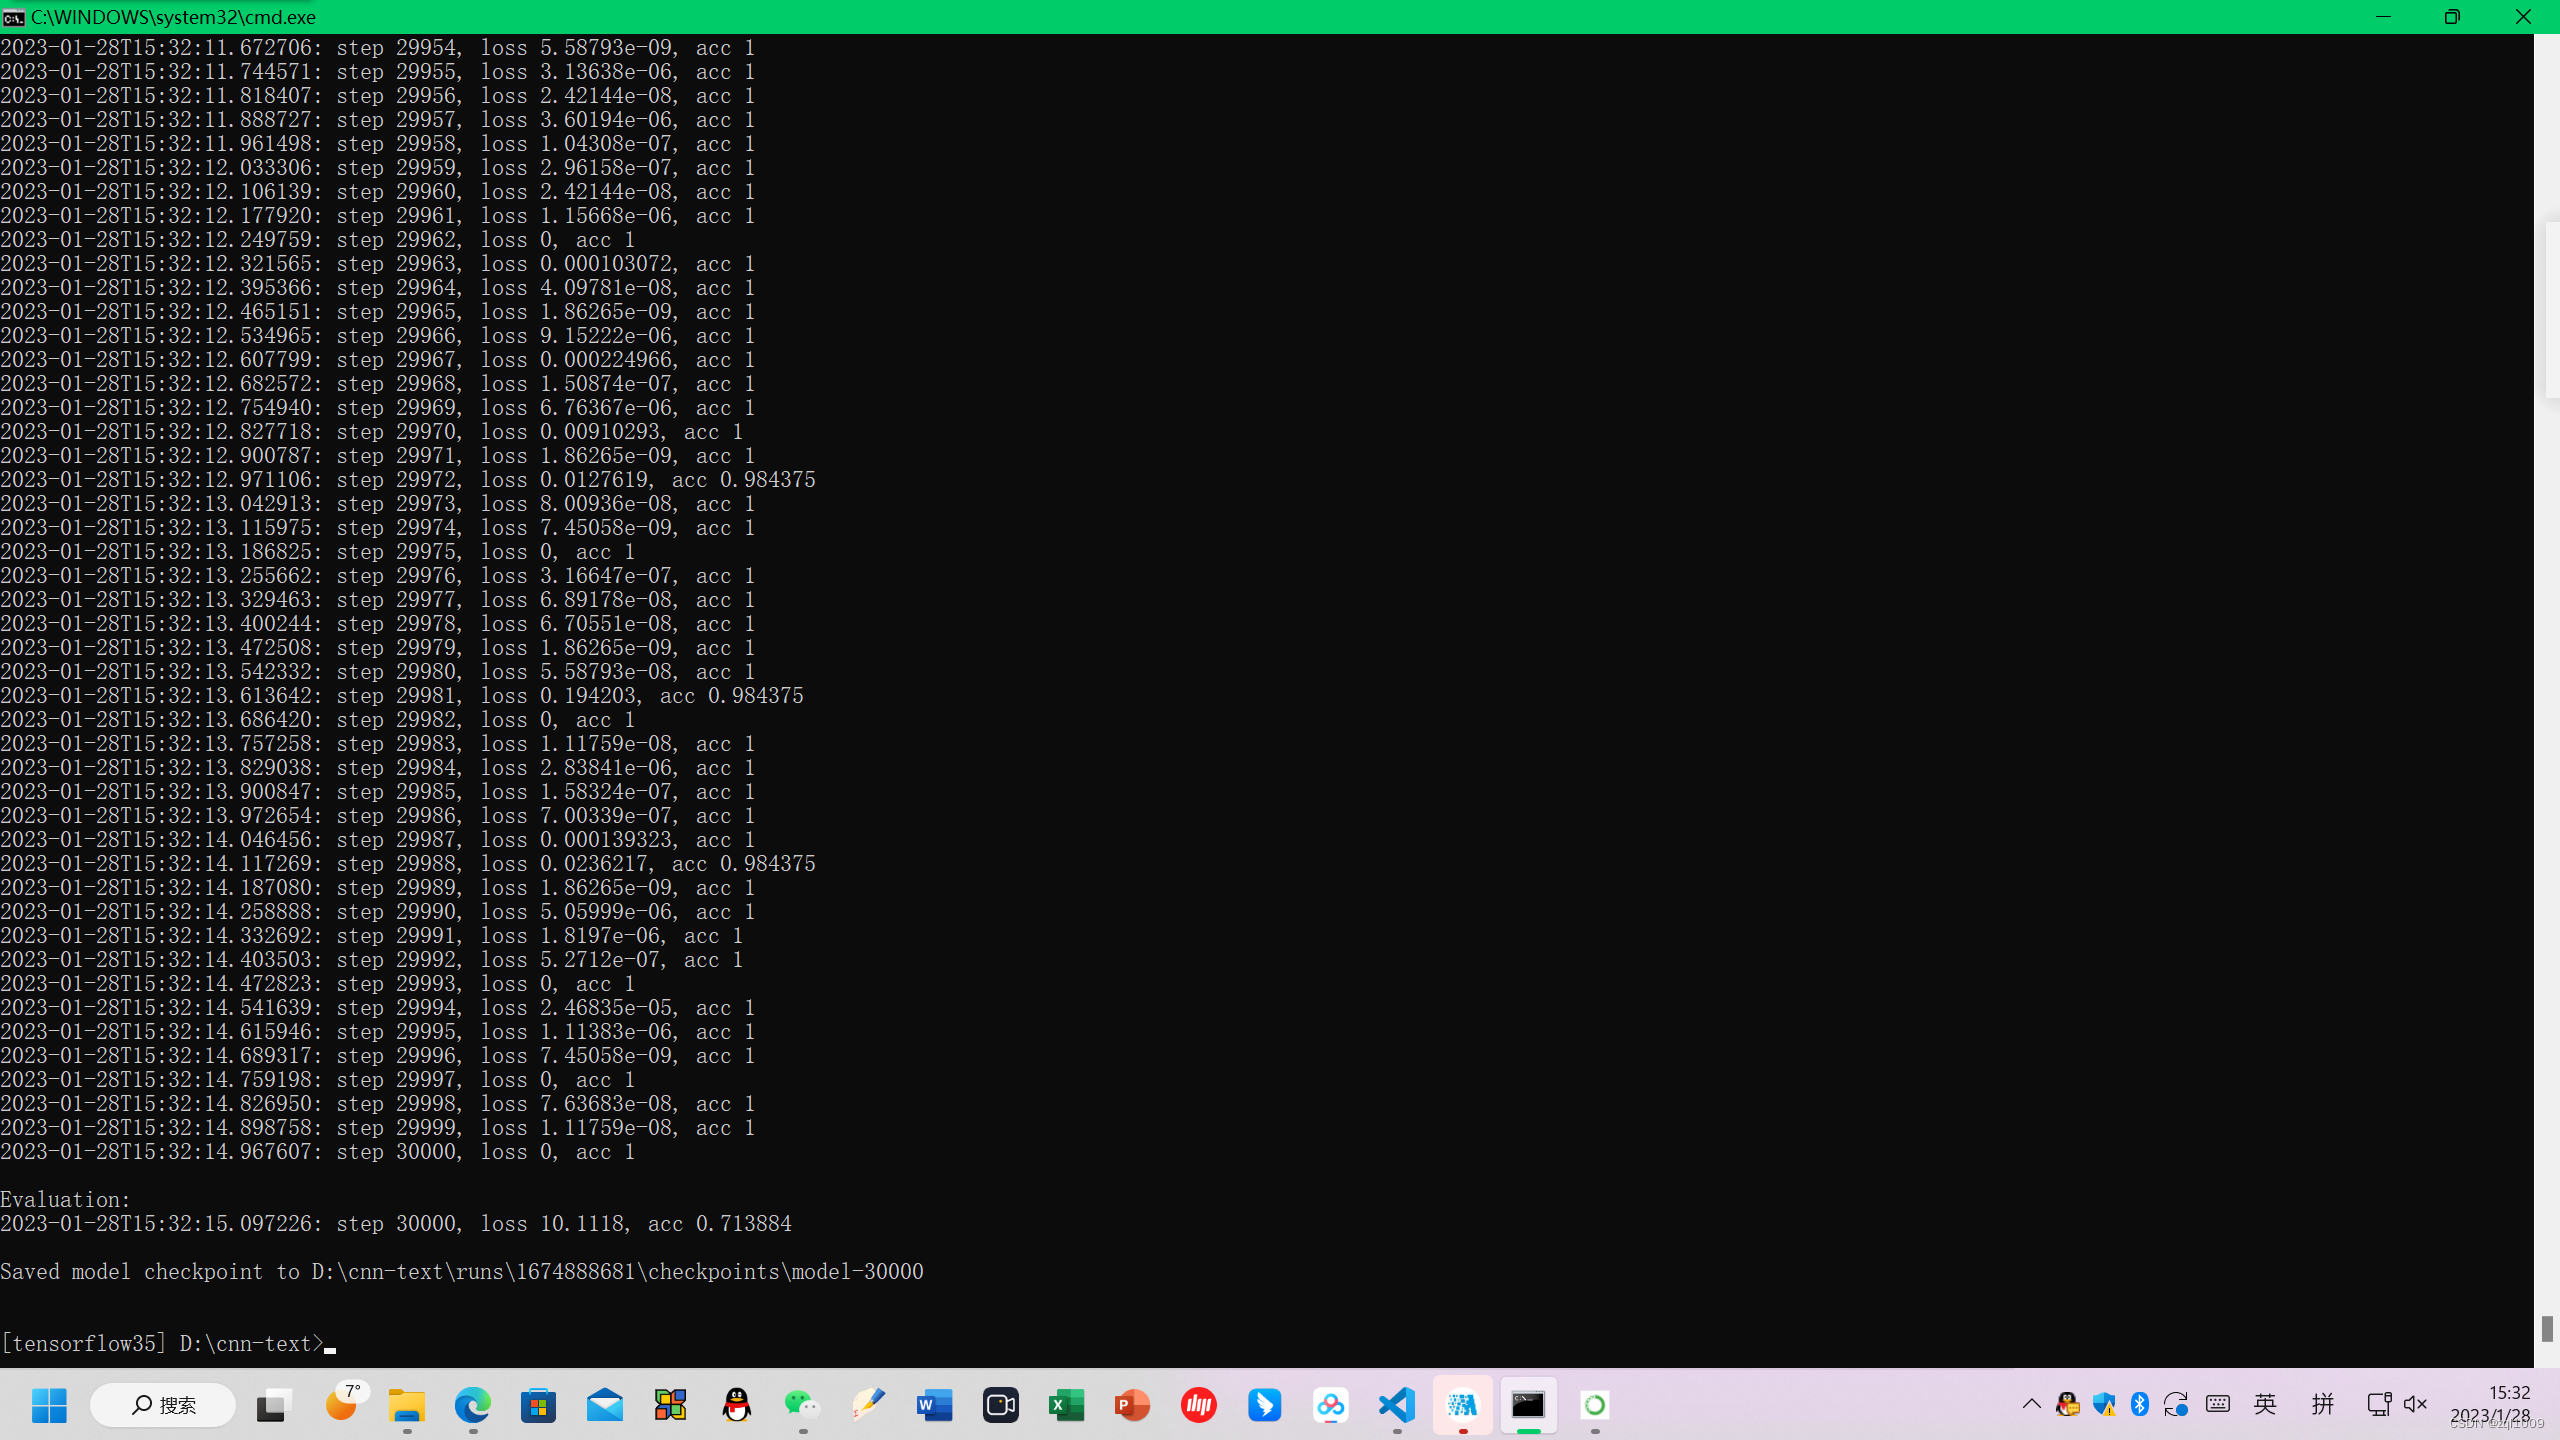
训练数据后,训练的结果,保存在run文件夹下面

6. 测试数据 eval.py
执行python eval.py 会报错
报错
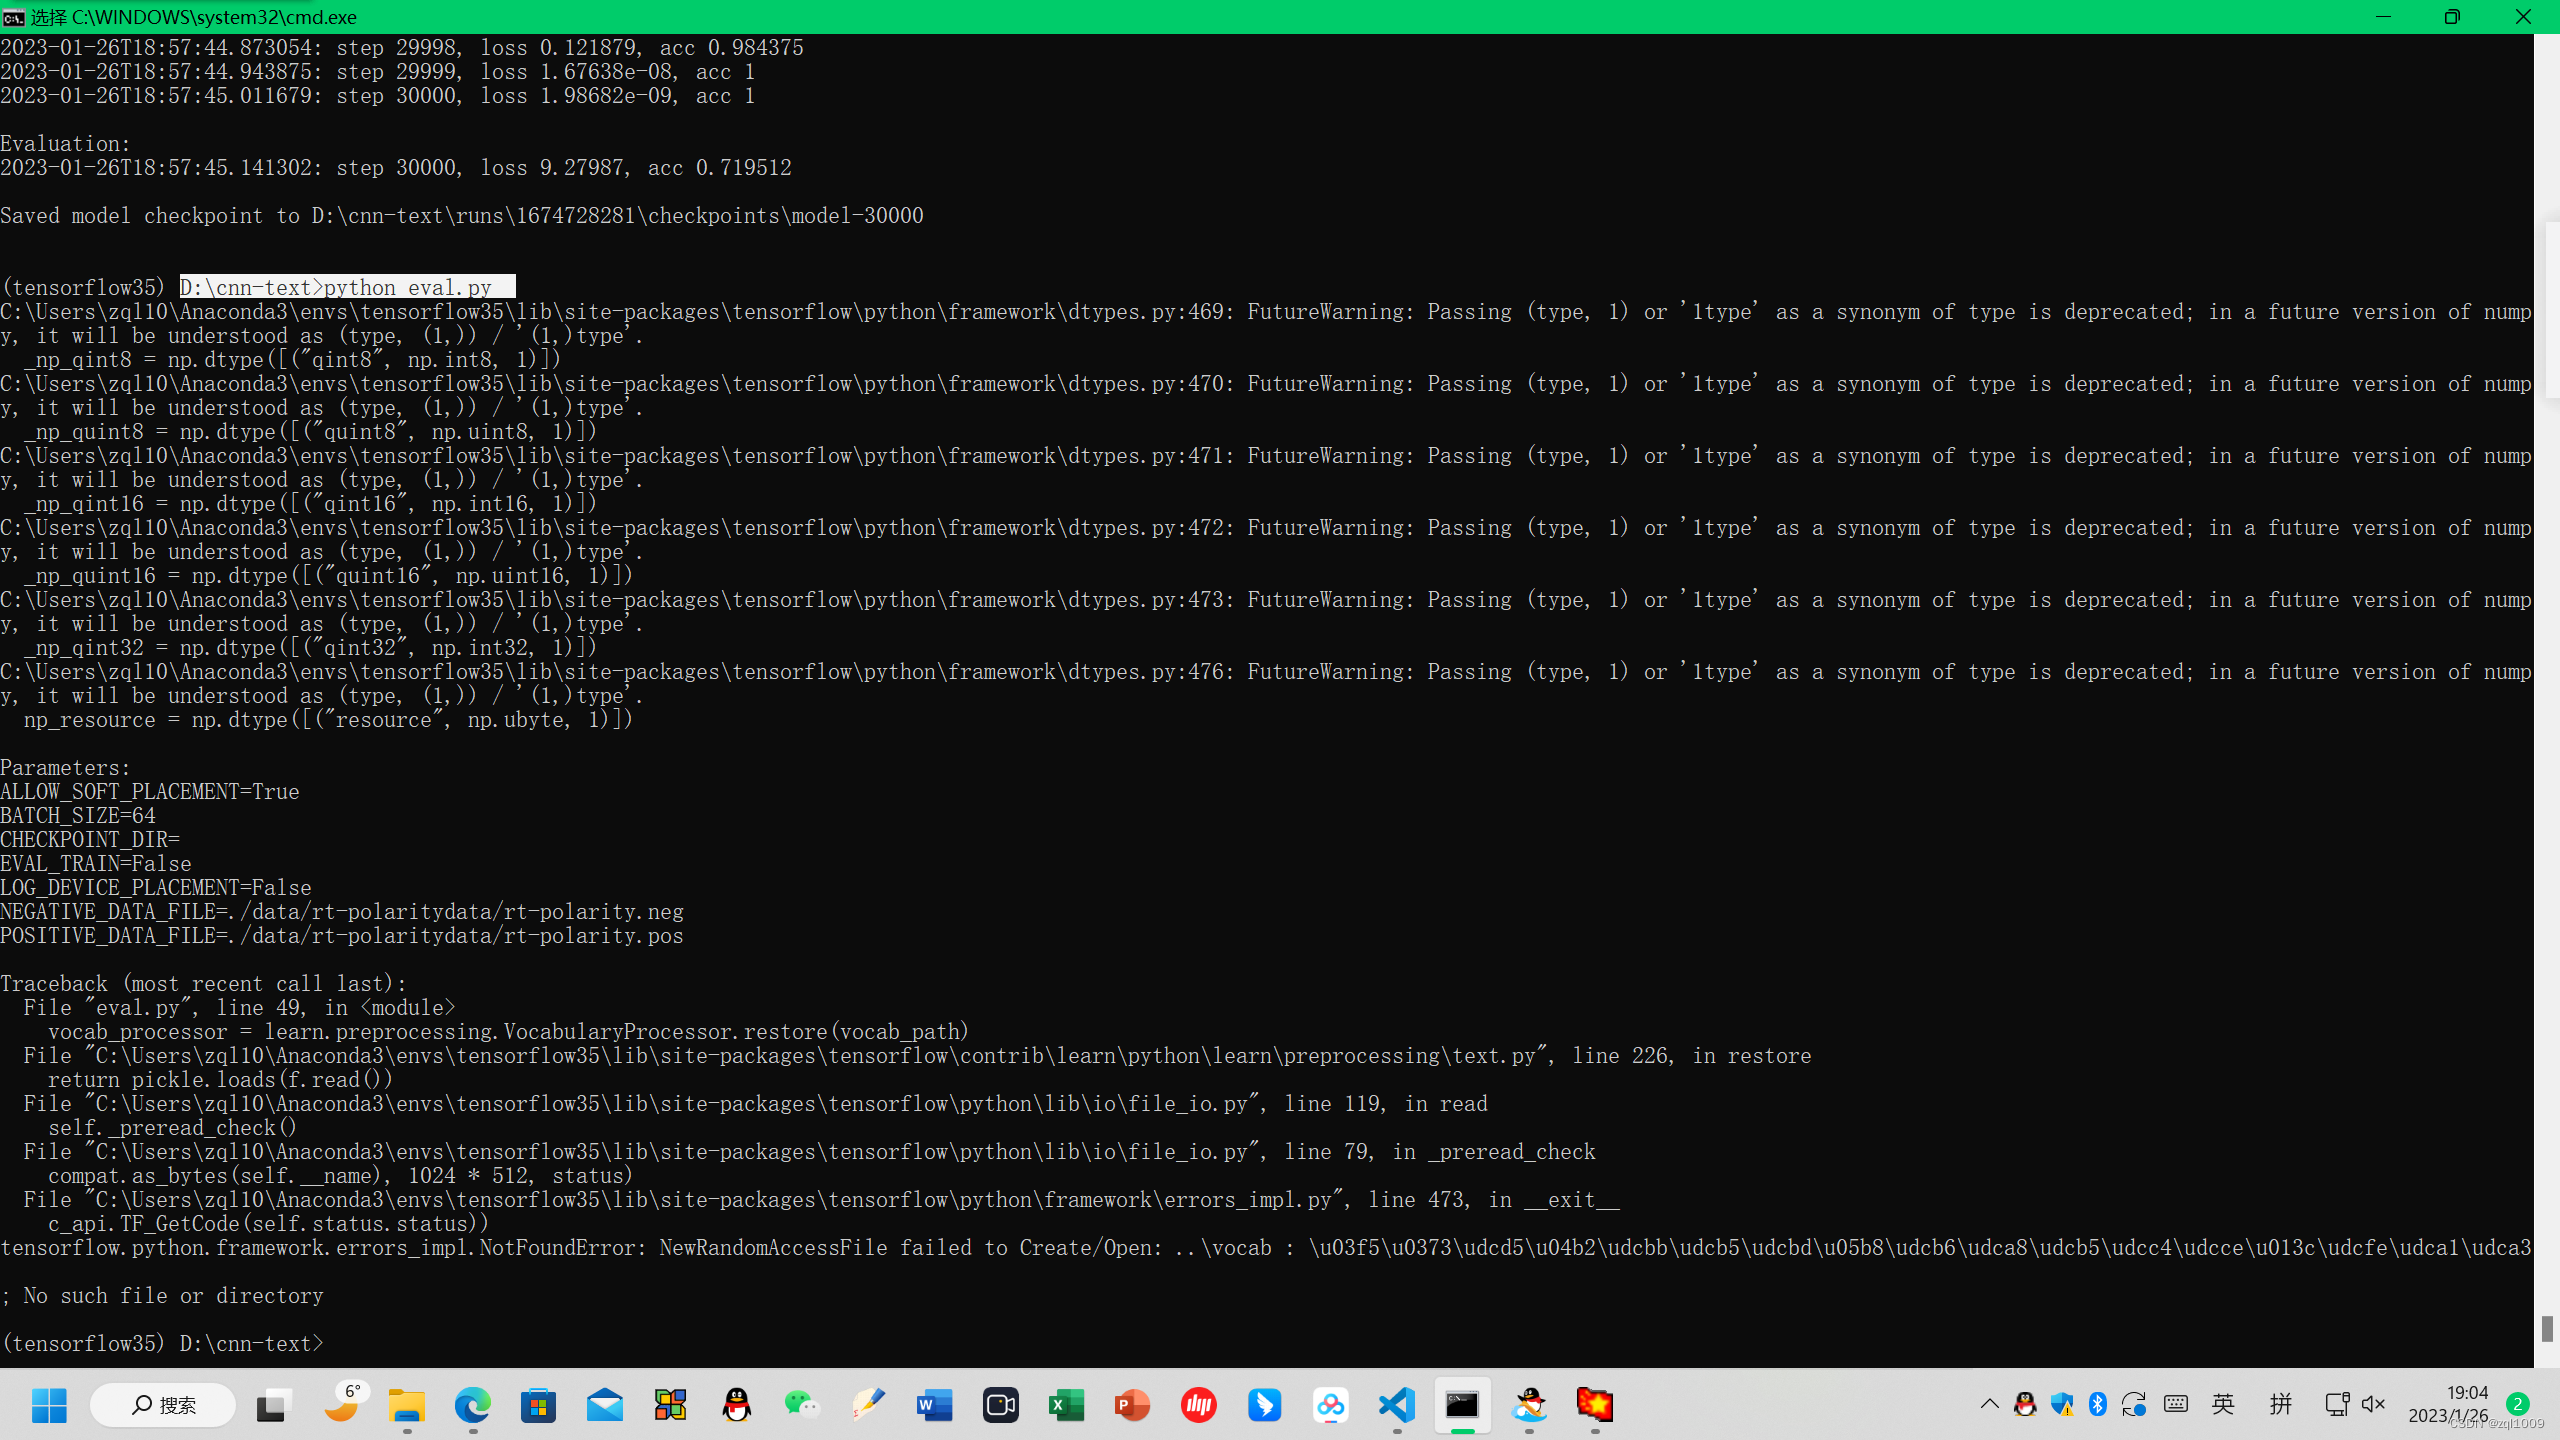
NewRandomAccessFile failed to Create/Open: ..\vocab : \u03f5\u0373\udcd5\u04b2\udcbb\udcb5\udcbd\u05b8\udcb6\udca8\udcb5\udcc4\udcce\u013c\udcfe\udca1\udca3
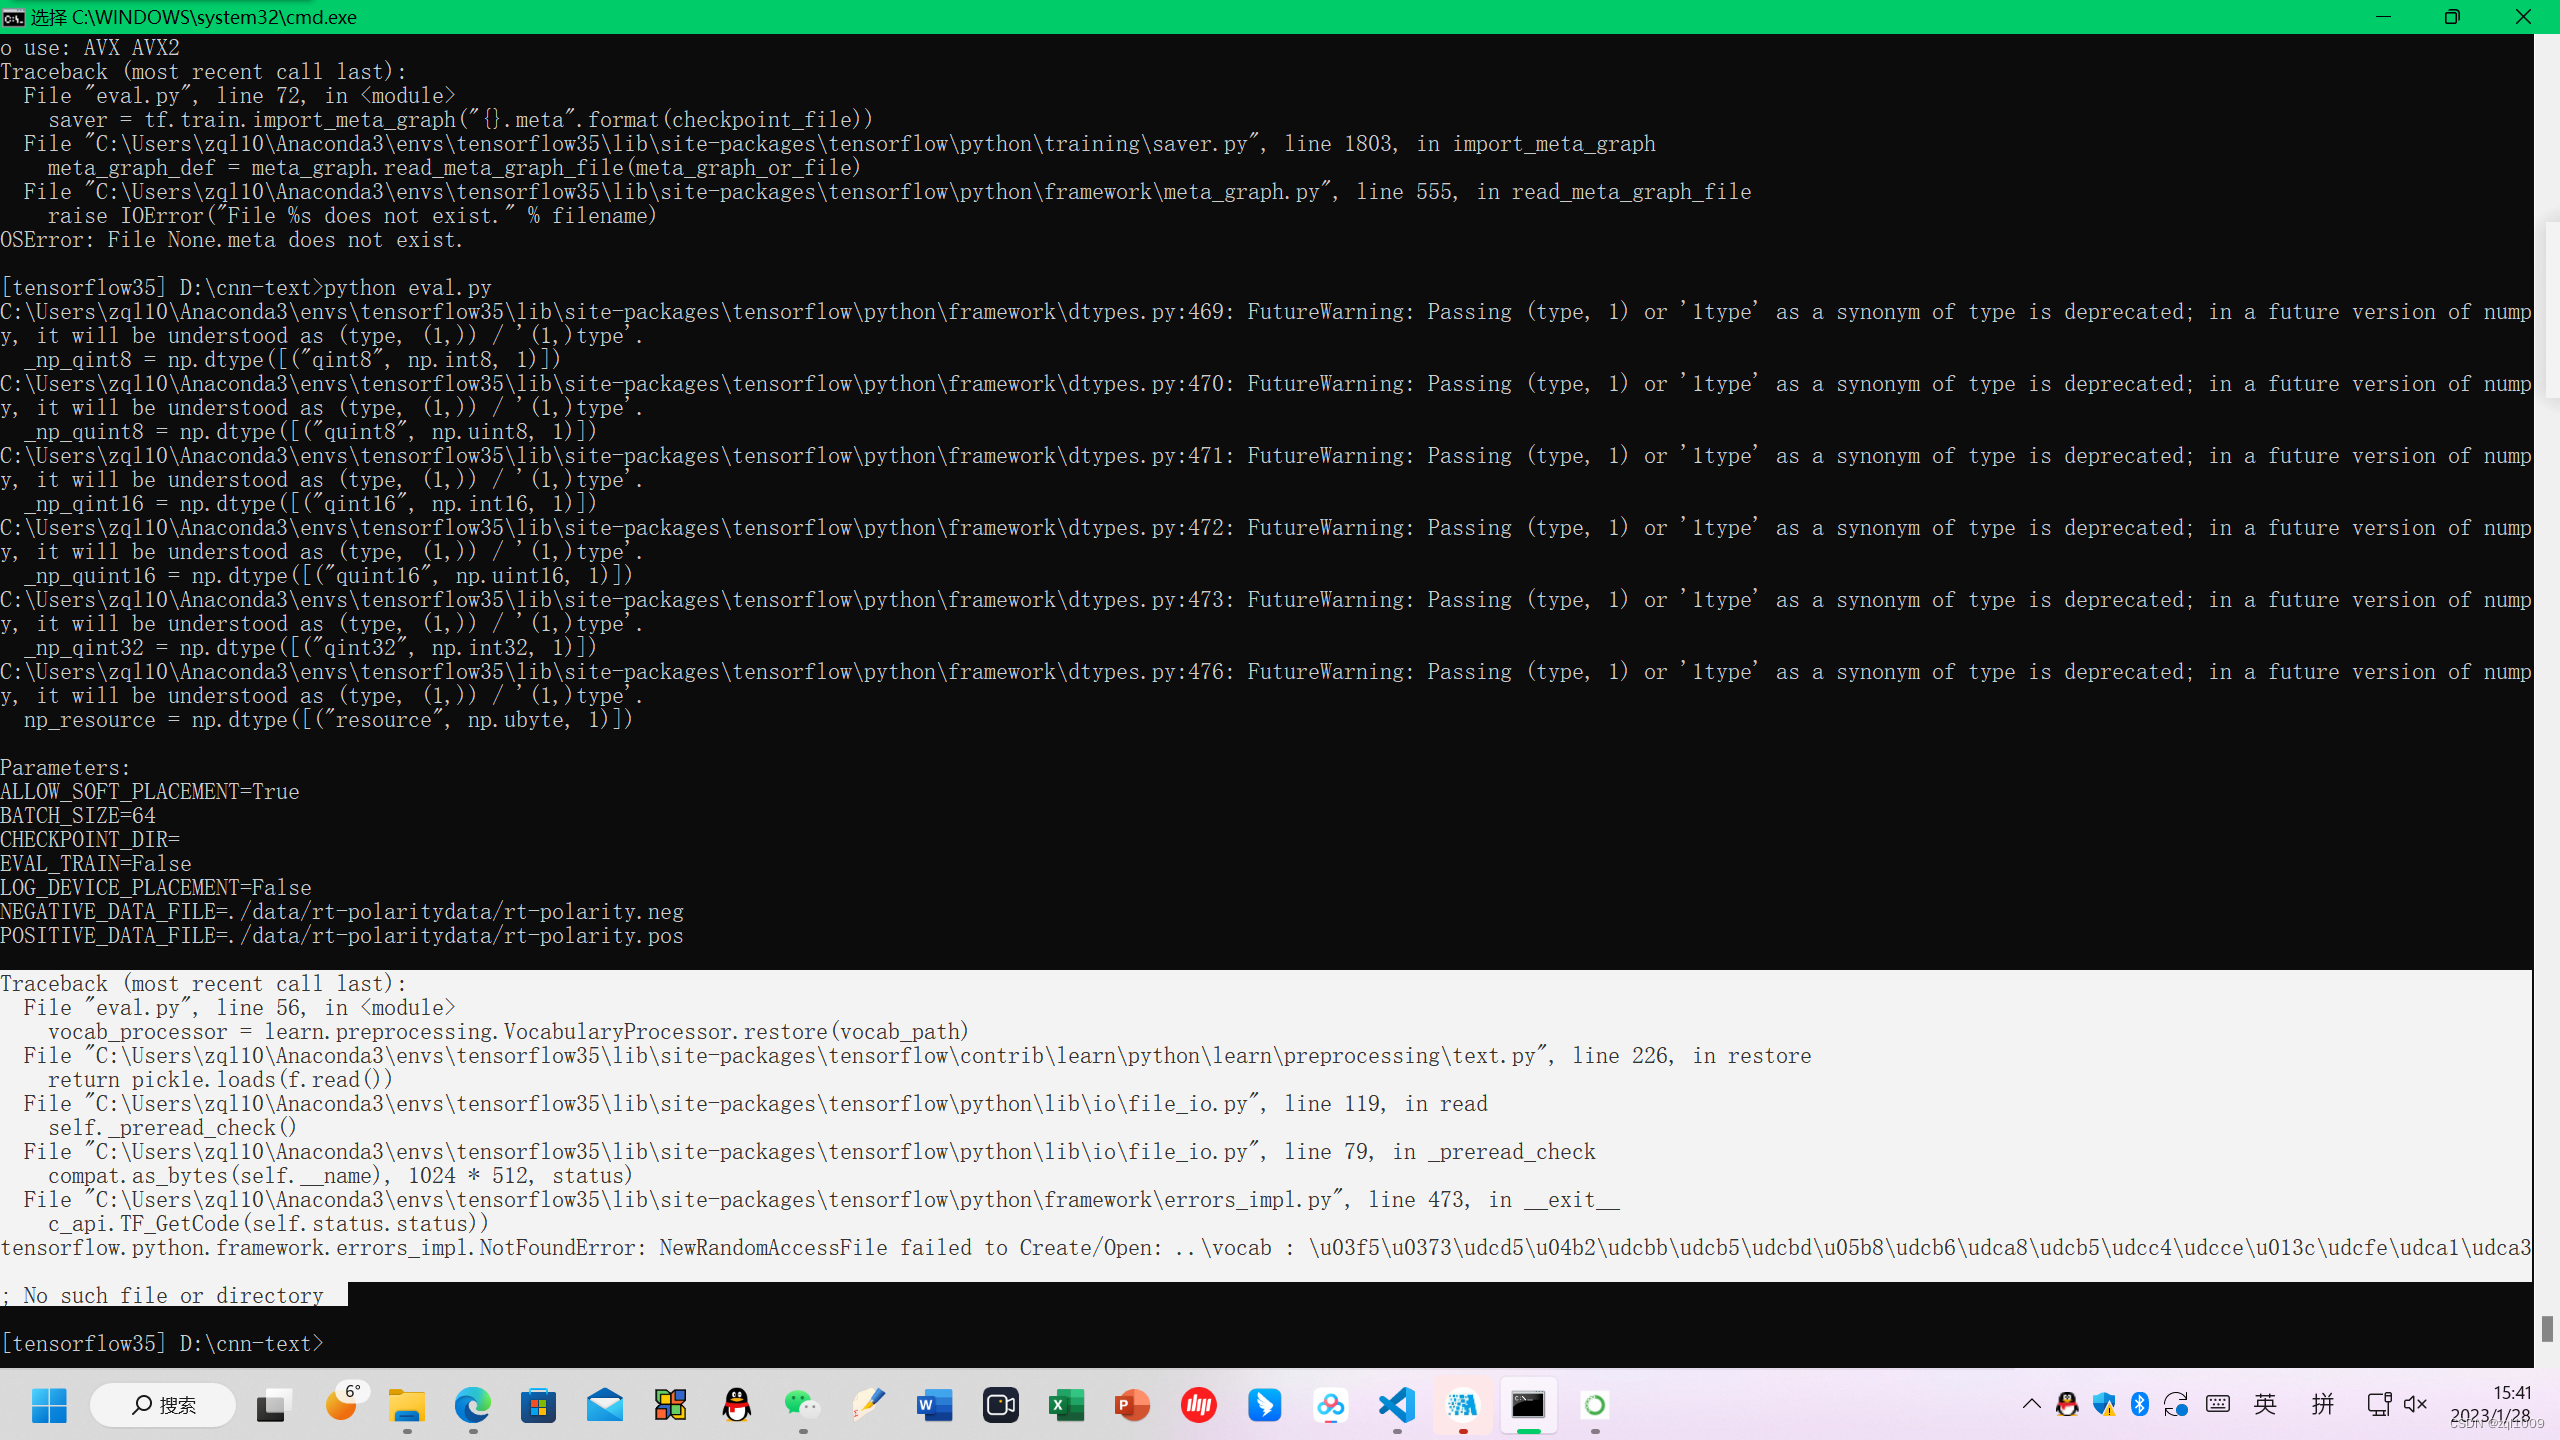
报错,没有文件vocab,读取不到。
Traceback (most recent call last):
File "eval.py", line 56, in <module>
vocab_processor = learn.preprocessing.VocabularyProcessor.restore(vocab_path)
File "C:\Users\zql10\Anaconda3\envs\tensorflow35\lib\site-packages\tensorflow\contrib\learn\python\learn\preprocessing\text.py", line 226, in restore
return pickle.loads(f.read())
File "C:\Users\zql10\Anaconda3\envs\tensorflow35\lib\site-packages\tensorflow\python\lib\io\file_io.py", line 119, in read
self._preread_check()
File "C:\Users\zql10\Anaconda3\envs\tensorflow35\lib\site-packages\tensorflow\python\lib\io\file_io.py", line 79, in _preread_check
compat.as_bytes(self.__name), 1024 * 512, status)
File "C:\Users\zql10\Anaconda3\envs\tensorflow35\lib\site-packages\tensorflow\python\framework\errors_impl.py", line 473, in __exit__
c_api.TF_GetCode(self.status.status))
tensorflow.python.framework.errors_impl.NotFoundError: NewRandomAccessFile failed to Create/Open: ..\vocab : \u03f5\u0373\udcd5\u04b2\udcbb\udcb5\udcbd\u05b8\udcb6\udca8\udcb5\udcc4\udcce\u013c\udcfe\udca1\udca3
; No such file or directory
修改代码:
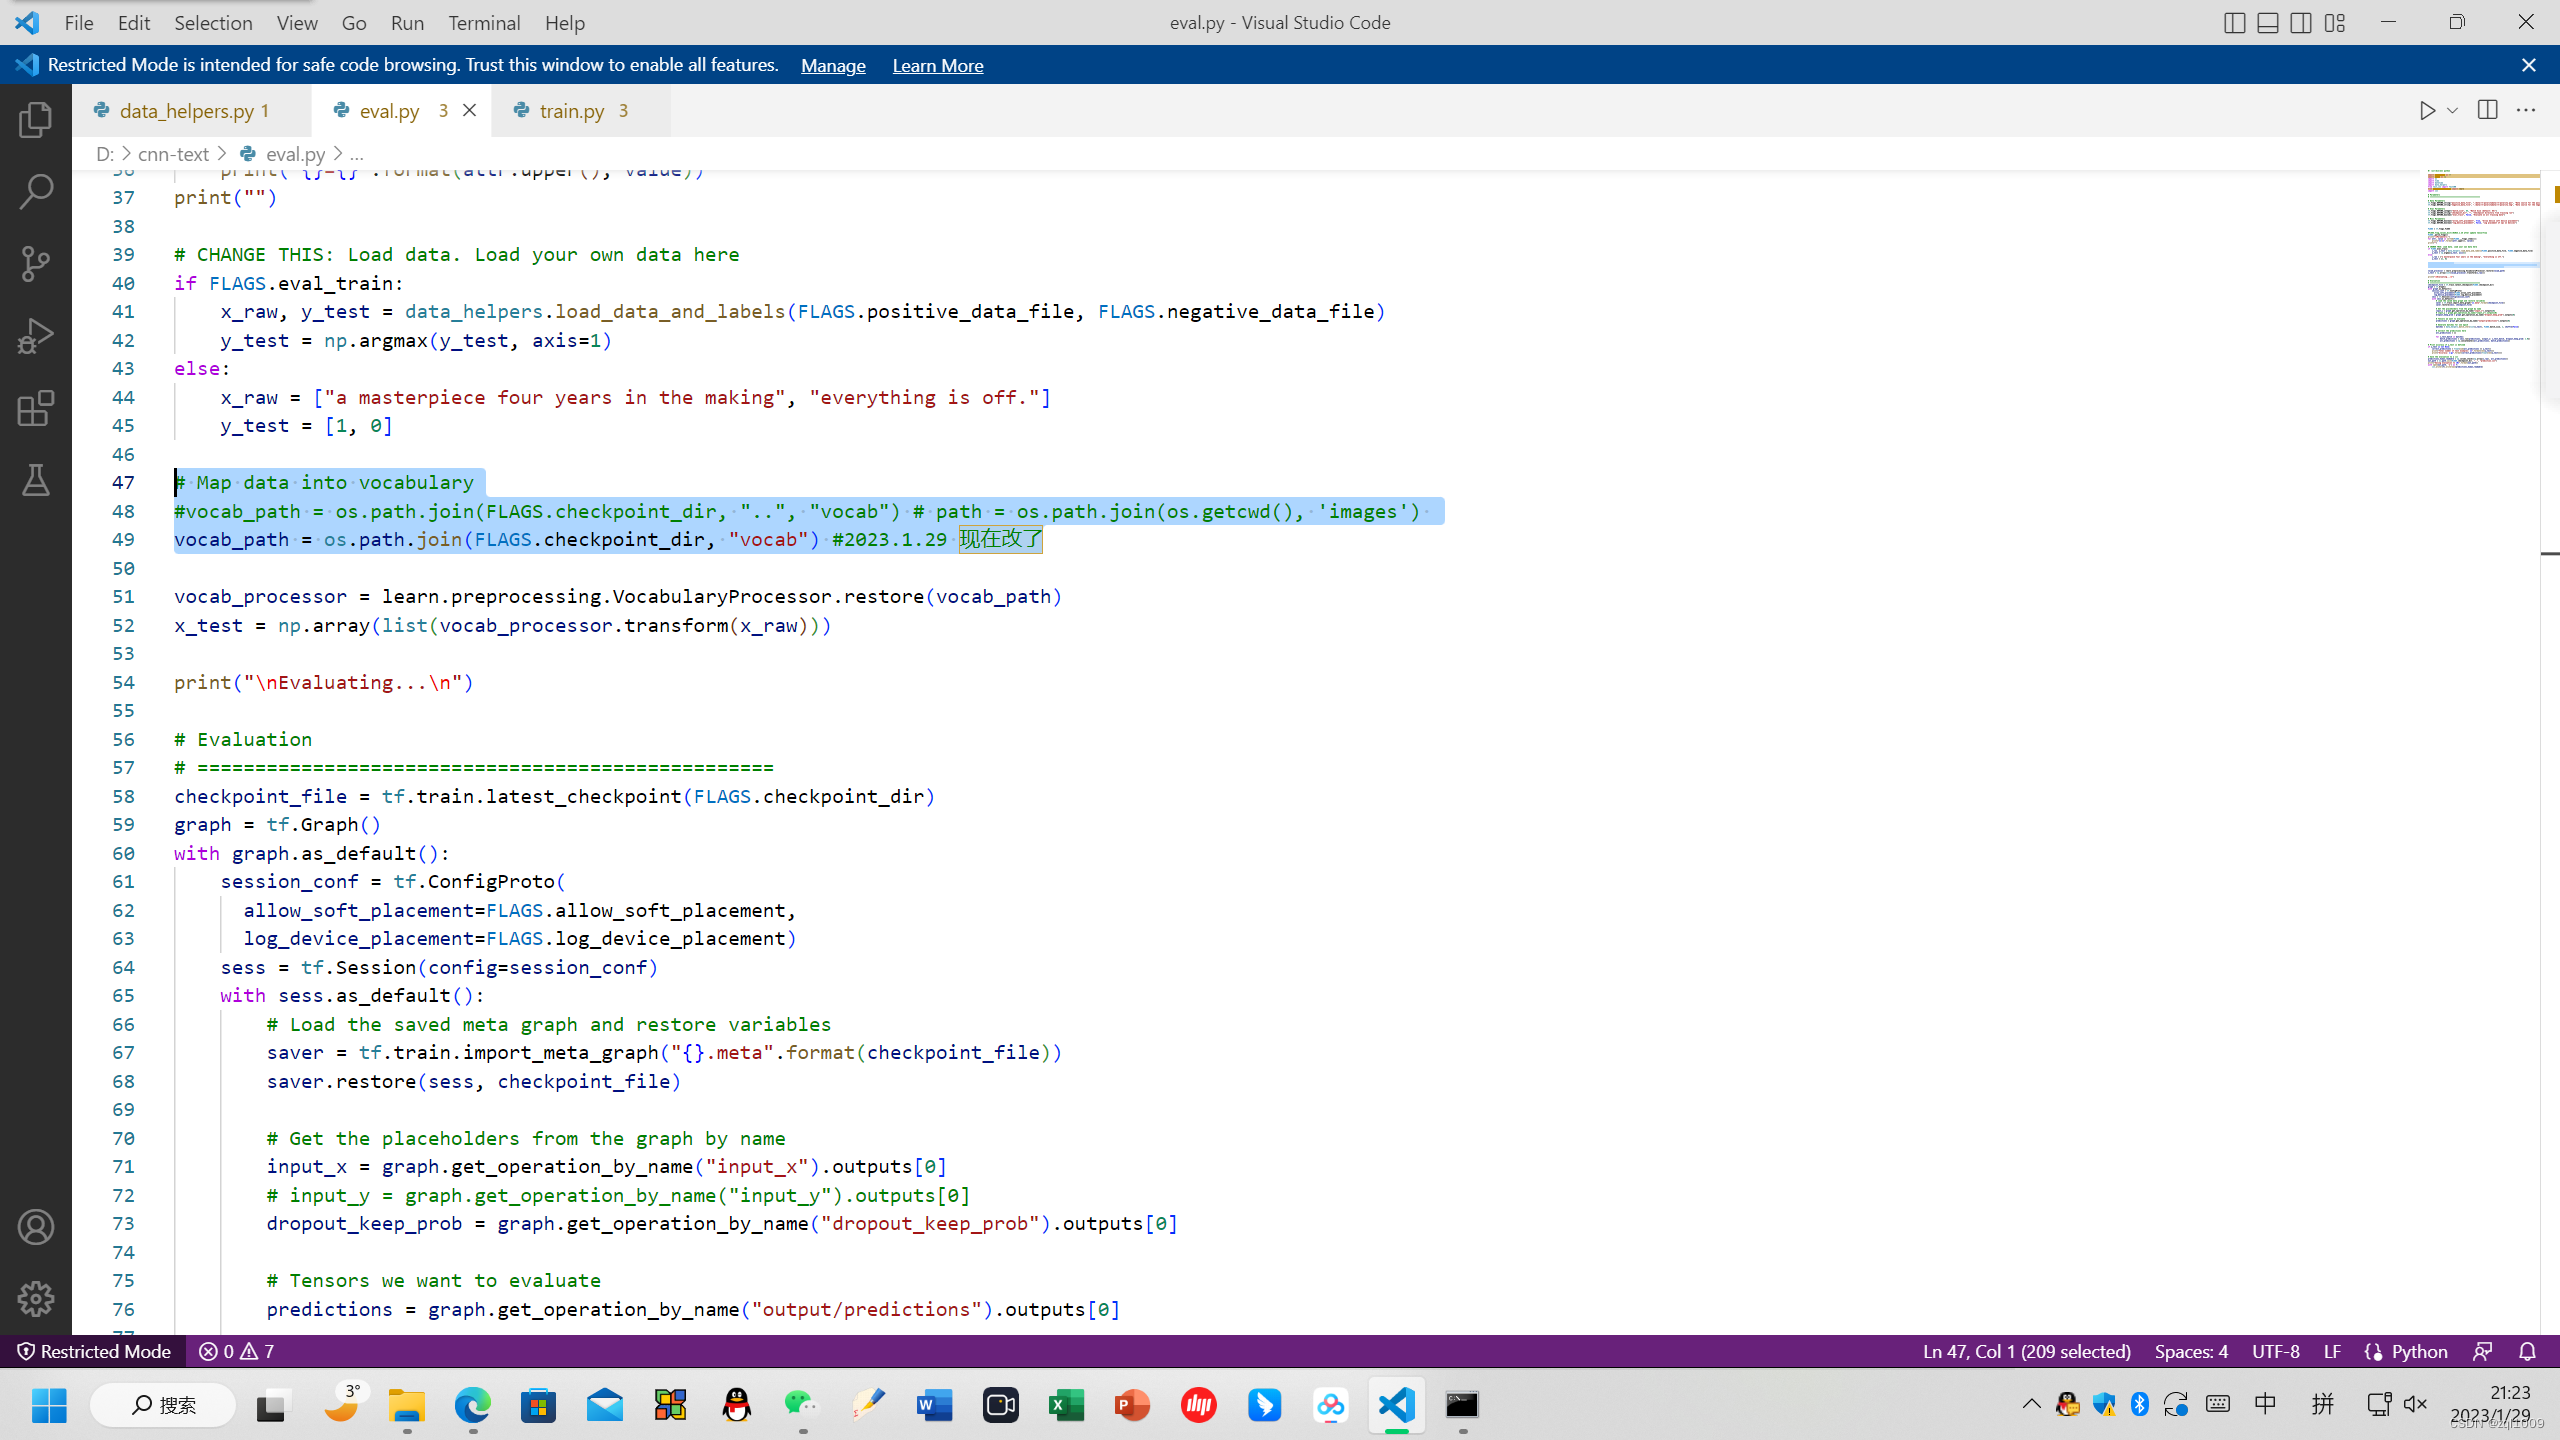
# Map data into vocabulary
#vocab_path = os.path.join(FLAGS.checkpoint_dir, "..", "vocab")
# path = os.path.join(os.getcwd(), 'images')
vocab_path = os.path.join(FLAGS.checkpoint_dir, "vocab") #2023.1.29 现在改了
同时修改了路径:

tf.flags.DEFINE_string("checkpoint_dir", "runs/1674888681", "Checkpoint directory from training run")
如果还是无法执行,那么我们就可以使用pycharm这个强大的平台来执行:
在虚拟环境tensorflow35下(windows)
直接打开pycharm,然后打开项目cnn-text, 选择好解释器也就是虚拟环境tensorflow35下的解释器,然后就可以执行
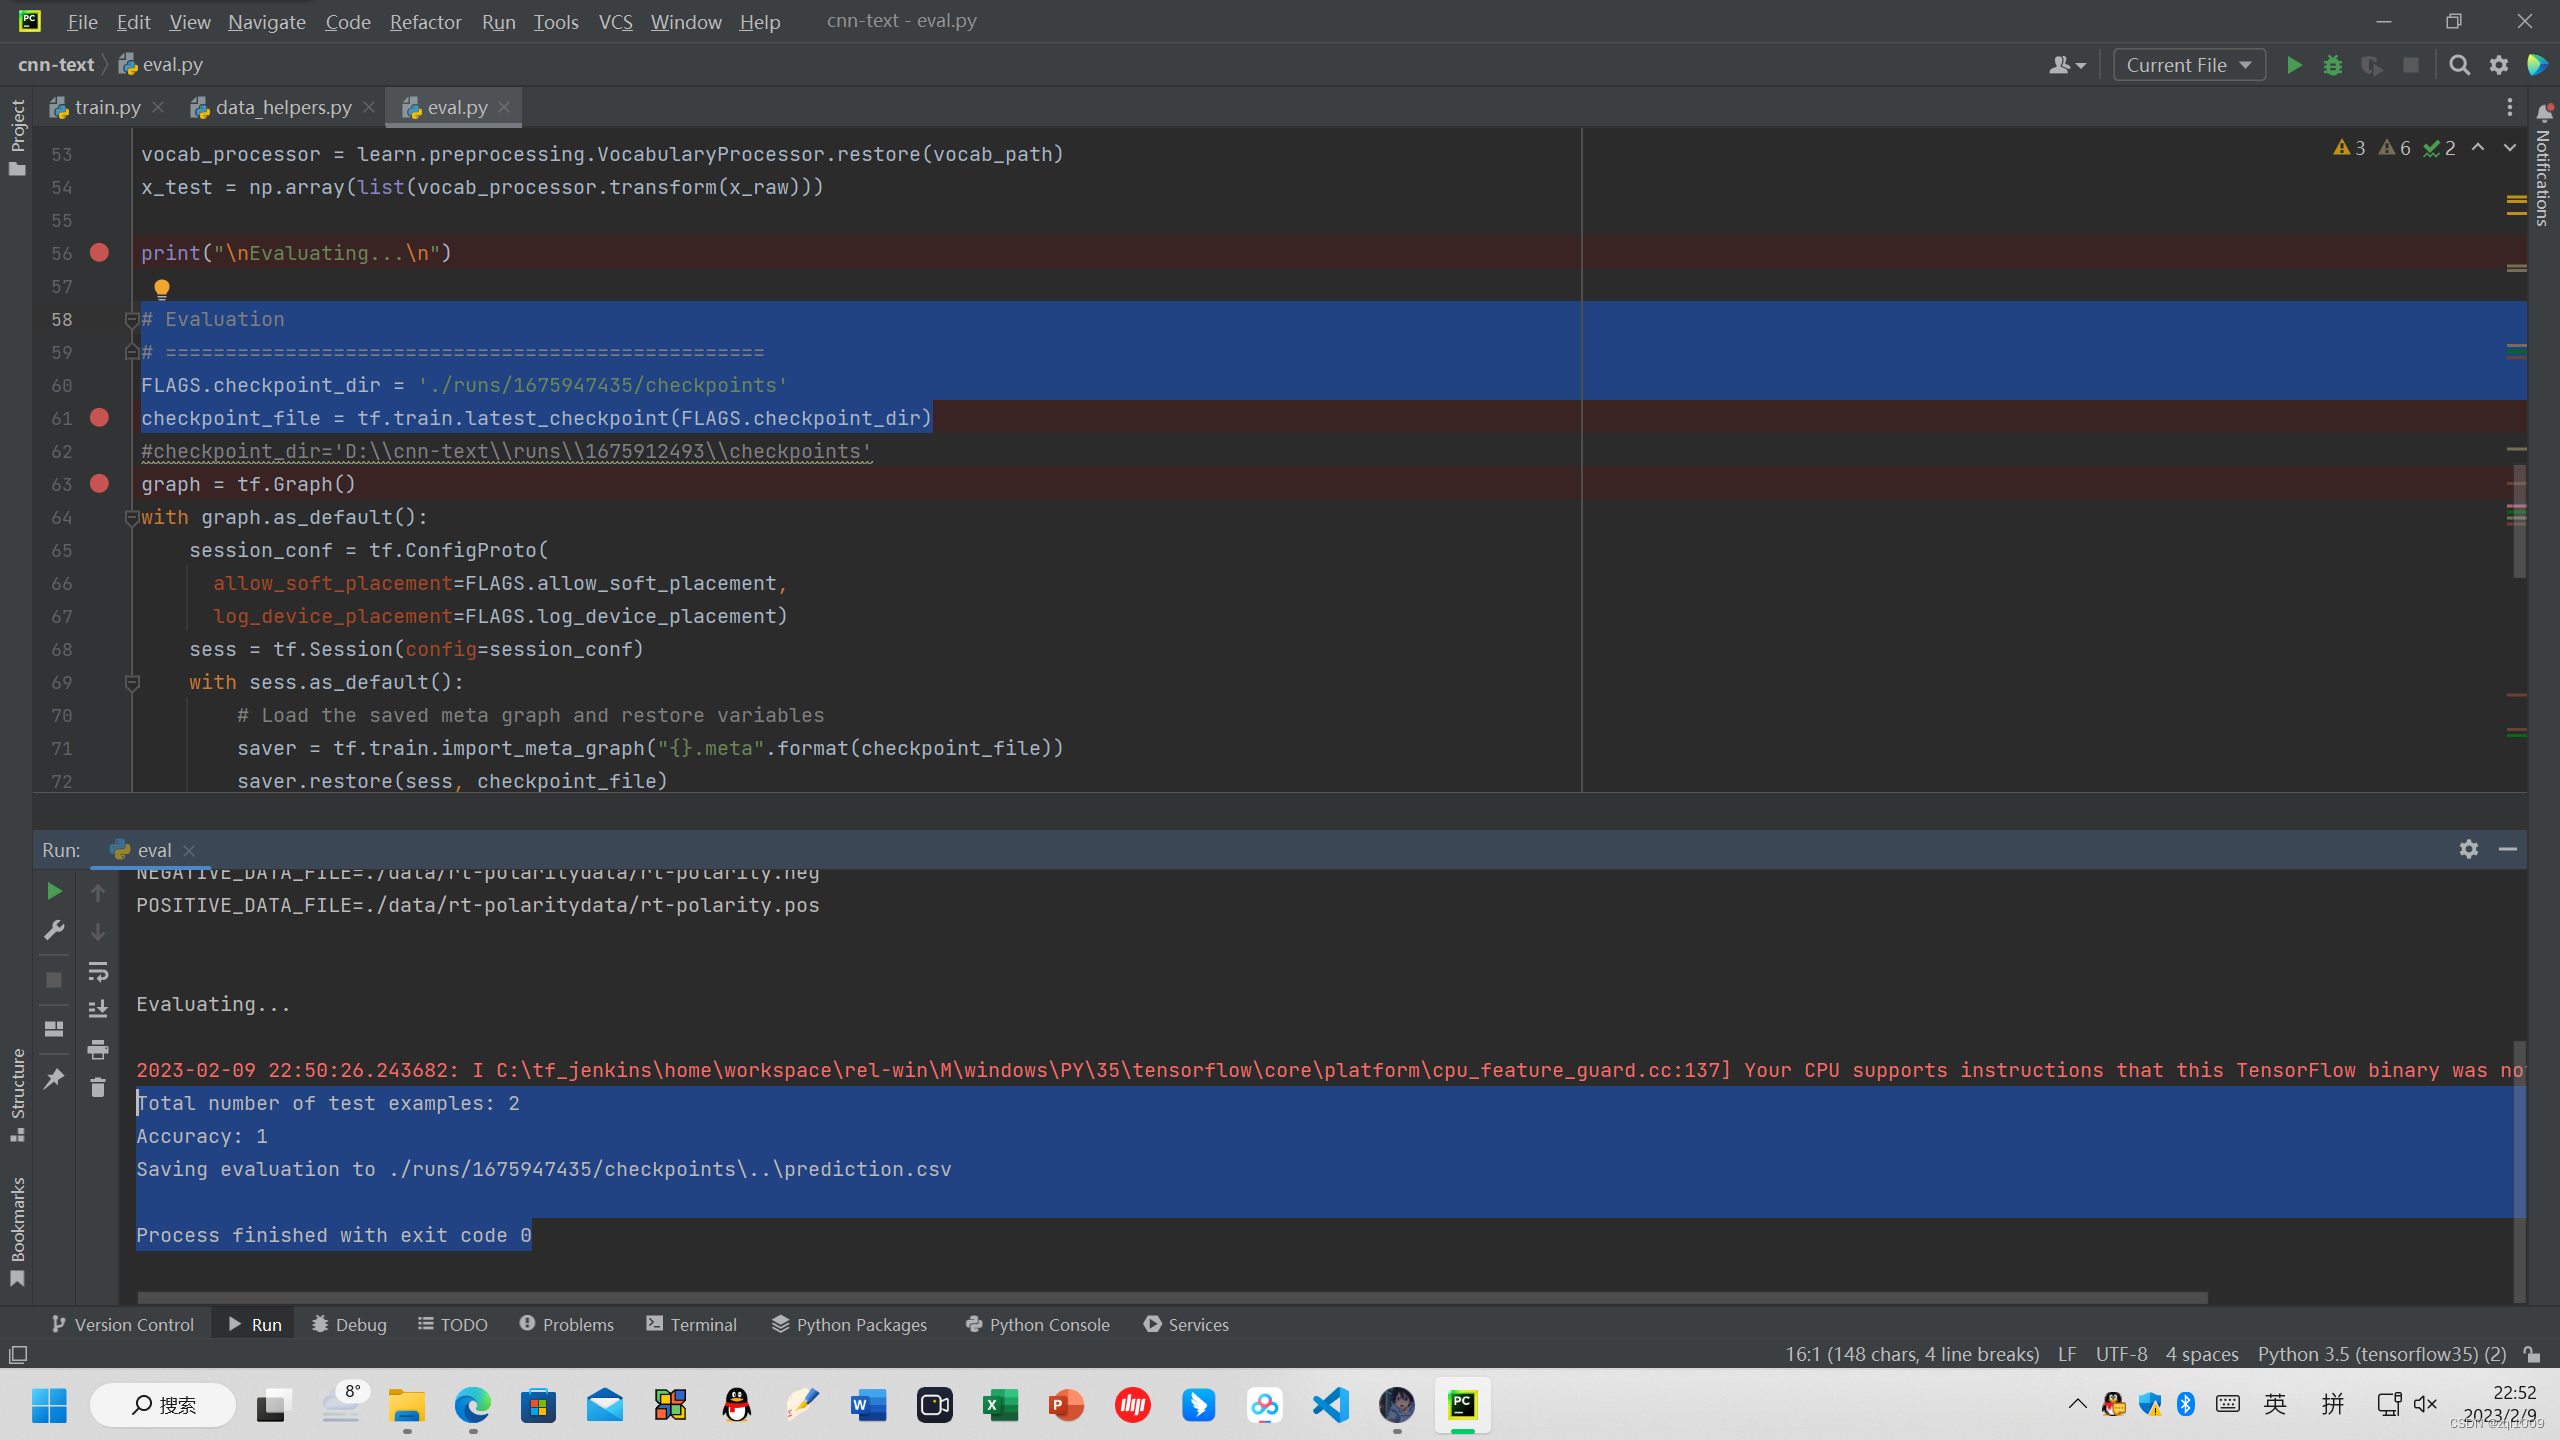
修改路径
# Evaluation
# ==================================================
FLAGS.checkpoint_dir = './runs/1675947435/checkpoints'
checkpoint_file = tf.train.latest_checkpoint(FLAGS.checkpoint_dir)
直接点击运行 eval.py
#指定是否在训练集和测试集上进行验证,反之使用给出的两条数据,这里选择True
tf.flags.DEFINE_boolean("eval_train", True, "Evaluate on all training data")
得到验证数据集的结果:
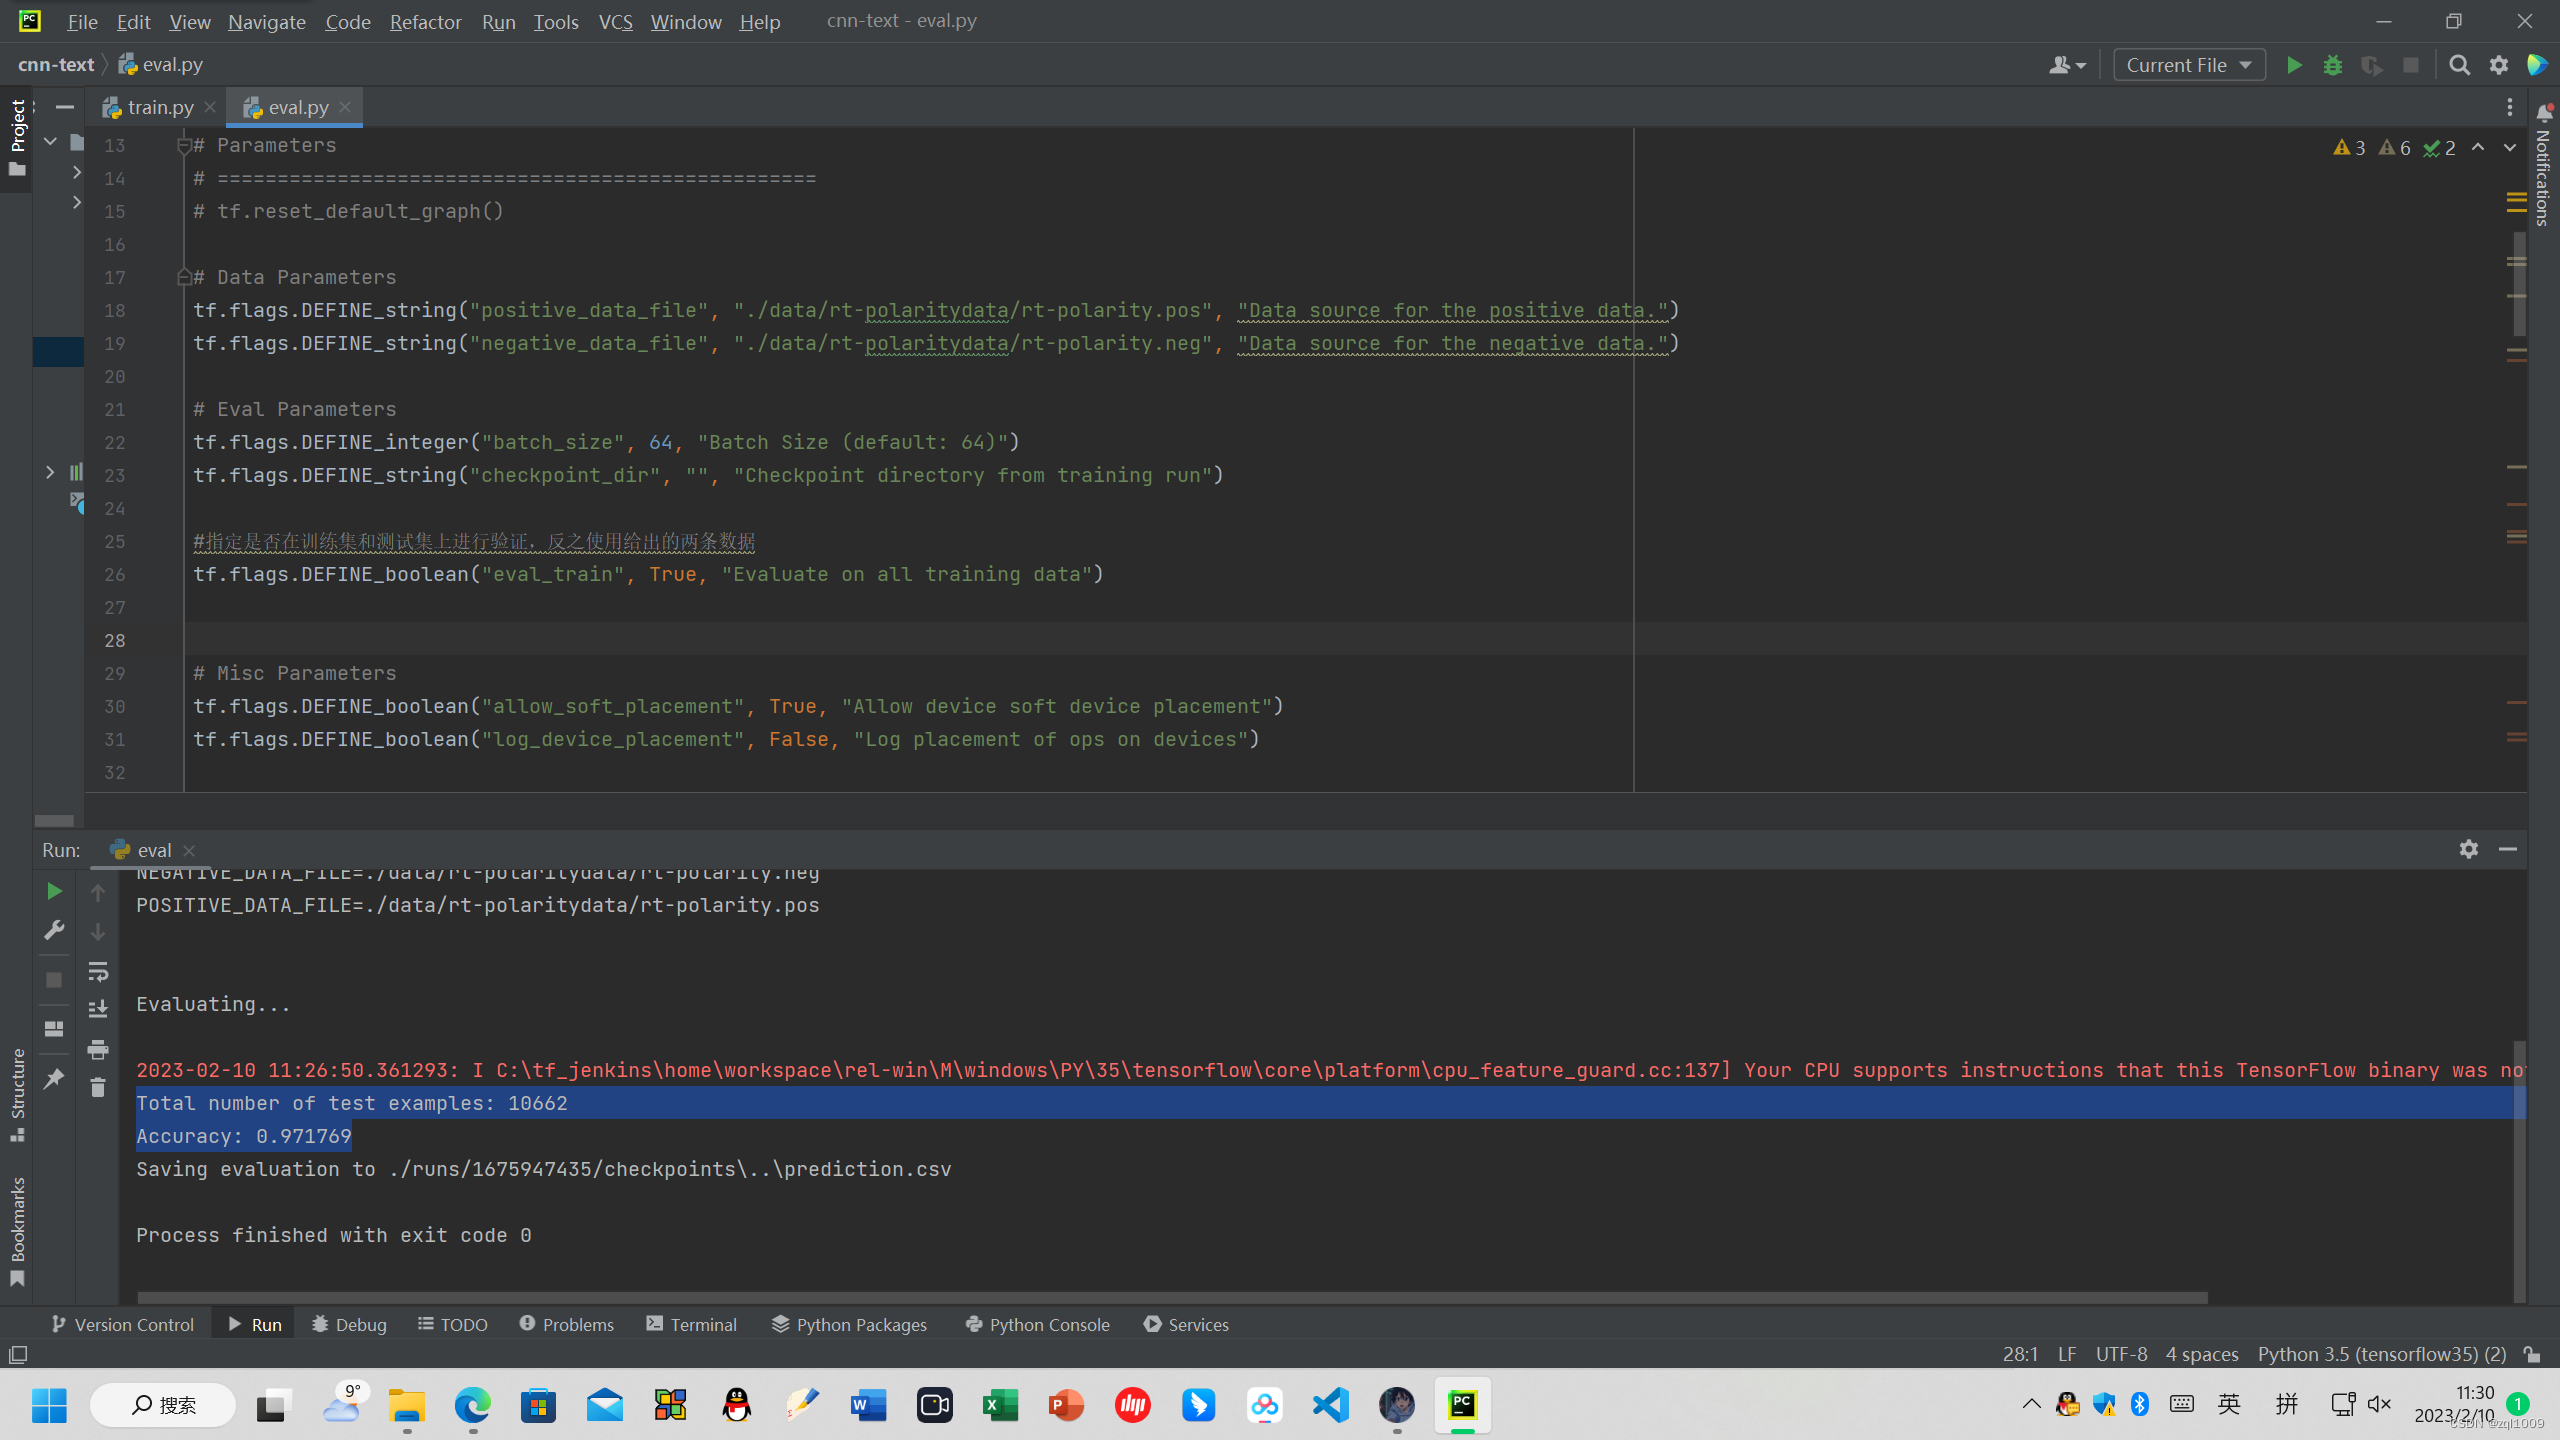
Total number of test examples: 10662
Accuracy: 0.971769
并将结果保存在
Saving evaluation to ./runs/1675947435/checkpoints\..\prediction.csv
完美复现!!!!!
完成测试代码的整个过程。
附录代码:
train.py
#! /usr/bin/env pythonimport tensorflow as tf
import numpy as np
import os
import time
import datetime
import data_helpers
from text_cnn import TextCNN
from tensorflow.contrib import learn# Parameters
# ==================================================# Data loading params
tf.flags.DEFINE_float("dev_sample_percentage", .1, "Percentage of the training data to use for validation")
tf.flags.DEFINE_string("positive_data_file", "./data/rt-polaritydata/rt-polarity.pos", "Data source for the positive data.")
tf.flags.DEFINE_string("negative_data_file", "./data/rt-polaritydata/rt-polarity.neg", "Data source for the negative data.")# Model Hyperparameters
tf.flags.DEFINE_integer("embedding_dim", 128, "Dimensionality of character embedding (default: 128)")
tf.flags.DEFINE_string("filter_sizes", "3,4,5", "Comma-separated filter sizes (default: '3,4,5')")
tf.flags.DEFINE_integer("num_filters", 128, "Number of filters per filter size (default: 128)")
tf.flags.DEFINE_float("dropout_keep_prob", 0.5, "Dropout keep probability (default: 0.5)")
tf.flags.DEFINE_float("l2_reg_lambda", 0.0, "L2 regularization lambda (default: 0.0)")# Training parameters
tf.flags.DEFINE_integer("batch_size", 64, "Batch Size (default: 64)")
tf.flags.DEFINE_integer("num_epochs", 200, "Number of training epochs (default: 200)")
tf.flags.DEFINE_integer("evaluate_every", 100, "Evaluate model on dev set after this many steps (default: 100)")
tf.flags.DEFINE_integer("checkpoint_every", 100, "Save model after this many steps (default: 100)")
tf.flags.DEFINE_integer("num_checkpoints", 5, "Number of checkpoints to store (default: 5)")
# Misc Parameters
tf.flags.DEFINE_boolean("allow_soft_placement", True, "Allow device soft device placement")
tf.flags.DEFINE_boolean("log_device_placement", False, "Log placement of ops on devices")FLAGS = tf.flags.FLAGS
# FLAGS._parse_flags()
# print("\nParameters:")
# for attr, value in sorted(FLAGS.__flags.items()):
#     print("{}={}".format(attr.upper(), value))
# print("")def preprocess():# Data Preparation# ==================================================# Load dataprint("Loading data...")x_text, y = data_helpers.load_data_and_labels(FLAGS.positive_data_file, FLAGS.negative_data_file)# Build vocabularymax_document_length = max([len(x.split(" ")) for x in x_text])vocab_processor = learn.preprocessing.VocabularyProcessor(max_document_length)x = np.array(list(vocab_processor.fit_transform(x_text)))# Randomly shuffle datanp.random.seed(10)shuffle_indices = np.random.permutation(np.arange(len(y)))x_shuffled = x[shuffle_indices]y_shuffled = y[shuffle_indices]# Split train/test set# TODO: This is very crude, should use cross-validationdev_sample_index = -1 * int(FLAGS.dev_sample_percentage * float(len(y)))x_train, x_dev = x_shuffled[:dev_sample_index], x_shuffled[dev_sample_index:]y_train, y_dev = y_shuffled[:dev_sample_index], y_shuffled[dev_sample_index:]del x, y, x_shuffled, y_shuffledprint("Vocabulary Size: {:d}".format(len(vocab_processor.vocabulary_)))print("Train/Dev split: {:d}/{:d}".format(len(y_train), len(y_dev)))return x_train, y_train, vocab_processor, x_dev, y_devdef train(x_train, y_train, vocab_processor, x_dev, y_dev):# Training# ==================================================with tf.Graph().as_default():session_conf = tf.ConfigProto(allow_soft_placement=FLAGS.allow_soft_placement,log_device_placement=FLAGS.log_device_placement)sess = tf.Session(config=session_conf)with sess.as_default():cnn = TextCNN(sequence_length=x_train.shape[1],num_classes=y_train.shape[1],vocab_size=len(vocab_processor.vocabulary_),embedding_size=FLAGS.embedding_dim,filter_sizes=list(map(int, FLAGS.filter_sizes.split(","))),num_filters=FLAGS.num_filters,l2_reg_lambda=FLAGS.l2_reg_lambda)# Define Training procedureglobal_step = tf.Variable(0, name="global_step", trainable=False)optimizer = tf.train.AdamOptimizer(1e-3)grads_and_vars = optimizer.compute_gradients(cnn.loss)train_op = optimizer.apply_gradients(grads_and_vars, global_step=global_step)# Keep track of gradient values and sparsity (optional)grad_summaries = []for g, v in grads_and_vars:if g is not None:grad_hist_summary = tf.summary.histogram("{}/grad/hist".format(v.name), g)sparsity_summary = tf.summary.scalar("{}/grad/sparsity".format(v.name), tf.nn.zero_fraction(g))grad_summaries.append(grad_hist_summary)grad_summaries.append(sparsity_summary)grad_summaries_merged = tf.summary.merge(grad_summaries)# Output directory for models and summariestimestamp = str(int(time.time()))out_dir = os.path.abspath(os.path.join(os.path.curdir, "runs", timestamp))print("Writing to {}\n".format(out_dir))file = open('model_dir.txt', 'w') #2023.2.3file.write(out_dir)file.close()# Summaries for loss and accuracyloss_summary = tf.summary.scalar("loss", cnn.loss)acc_summary = tf.summary.scalar("accuracy", cnn.accuracy)# Train Summariestrain_summary_op = tf.summary.merge([loss_summary, acc_summary, grad_summaries_merged])train_summary_dir = os.path.join(out_dir, "summaries", "train")train_summary_writer = tf.summary.FileWriter(train_summary_dir, sess.graph)# Dev summariesdev_summary_op = tf.summary.merge([loss_summary, acc_summary])dev_summary_dir = os.path.join(out_dir, "summaries", "dev")dev_summary_writer = tf.summary.FileWriter(dev_summary_dir, sess.graph)# Checkpoint directory. Tensorflow assumes this directory already exists so we need to create itmodel_dir = open('model_dir.txt').readline()  # 2023.2.3vocab_path = model_dir + "\\vocab"checkpoint_dir = os.path.abspath(os.path.join(out_dir, "checkpoints"))#'D:\\cnn-text\\runs\\1675912493\\checkpoints'#checkpoint_dir='D:\\cnn-text\\runs\\1675912493\\checkpoints'checkpoint_prefix = os.path.join(checkpoint_dir, "model")if not os.path.exists(checkpoint_dir):os.makedirs(checkpoint_dir)saver = tf.train.Saver(tf.global_variables(), max_to_keep=FLAGS.num_checkpoints)# Write vocabularyvocab_processor.save(os.path.join(out_dir, "vocab"))# Initialize all variablessess.run(tf.global_variables_initializer())def train_step(x_batch, y_batch):"""A single training step"""feed_dict = {cnn.input_x: x_batch,cnn.input_y: y_batch,cnn.dropout_keep_prob: FLAGS.dropout_keep_prob}_, step, summaries, loss, accuracy = sess.run([train_op, global_step, train_summary_op, cnn.loss, cnn.accuracy],feed_dict)time_str = datetime.datetime.now().isoformat()print("{}: step {}, loss {:g}, acc {:g}".format(time_str, step, loss, accuracy))train_summary_writer.add_summary(summaries, step)def dev_step(x_batch, y_batch, writer=None):"""Evaluates model on a dev set"""feed_dict = {cnn.input_x: x_batch,cnn.input_y: y_batch,cnn.dropout_keep_prob: 1.0}step, summaries, loss, accuracy = sess.run([global_step, dev_summary_op, cnn.loss, cnn.accuracy],feed_dict)time_str = datetime.datetime.now().isoformat()print("{}: step {}, loss {:g}, acc {:g}".format(time_str, step, loss, accuracy))if writer:writer.add_summary(summaries, step)# Generate batchesbatches = data_helpers.batch_iter(list(zip(x_train, y_train)), FLAGS.batch_size, FLAGS.num_epochs)# Training loop. For each batch...for batch in batches:x_batch, y_batch = zip(*batch)train_step(x_batch, y_batch)current_step = tf.train.global_step(sess, global_step)if current_step % FLAGS.evaluate_every == 0:print("\nEvaluation:")dev_step(x_dev, y_dev, writer=dev_summary_writer)print("")if current_step % FLAGS.checkpoint_every == 0:path = saver.save(sess, checkpoint_prefix, global_step=current_step)print("Saved model checkpoint to {}\n".format(path))def main(argv=None):x_train, y_train, vocab_processor, x_dev, y_dev = preprocess()train(x_train, y_train, vocab_processor, x_dev, y_dev)if __name__ == '__main__':tf.app.run()
eval.py:
#! /usr/bin/env pythonimport tensorflow as tf
import numpy as np
import os
import time
import datetime
import data_helpers
from text_cnn import TextCNN
from tensorflow.contrib import learn
import csv# Parameters
# ==================================================
# tf.reset_default_graph()# Data Parameters
tf.flags.DEFINE_string("positive_data_file", "./data/rt-polaritydata/rt-polarity.pos", "Data source for the positive data.")
tf.flags.DEFINE_string("negative_data_file", "./data/rt-polaritydata/rt-polarity.neg", "Data source for the negative data.")# Eval Parameters
tf.flags.DEFINE_integer("batch_size", 64, "Batch Size (default: 64)")
tf.flags.DEFINE_string("checkpoint_dir", "", "Checkpoint directory from training run")#指定是否在训练集和测试集上进行验证,反之使用给出的两条数据
tf.flags.DEFINE_boolean("eval_train", True, "Evaluate on all training data") #测试数据集上所有句子
# tf.flags.DEFINE_boolean("eval_train", False, "Evaluate on all training data") #测试两个句子# Misc Parameters设备参数
tf.flags.DEFINE_boolean("allow_soft_placement", True, "Allow device soft device placement")
tf.flags.DEFINE_boolean("log_device_placement", False, "Log placement of ops on devices")FLAGS = tf.flags.FLAGS
FLAGS._parse_flags()
x = FLAGS.checkpoint_dir
print("\nParameters:")
for attr, value in sorted(FLAGS.__flags.items()):print("{}={}".format(attr.upper(), value))
print("")# CHANGE THIS: Load data. Load your own data here
if FLAGS.eval_train:x_raw, y_test = data_helpers.load_data_and_labels(FLAGS.positive_data_file, FLAGS.negative_data_file)y_test = np.argmax(y_test, axis=1)
else:x_raw = ["a masterpiece four years in the making", "everything is off."]y_test = [1, 0]# Map data into vocabulary# model_dir = open('model_dir.txt').readline() #2023.2.3
# vocab_path = model_dir + "/vocab"# Map data into vocabulary
#vocab_path = "./runs/1516092210/vocab"FLAGS.checkpoint_dir = './runs/1675947435/checkpoints'
vocab_path = os.path.join(FLAGS.checkpoint_dir, "..", "vocab")
vocab_processor = learn.preprocessing.VocabularyProcessor.restore(vocab_path)
x_test = np.array(list(vocab_processor.transform(x_raw)))print("\nEvaluating...\n")# Evaluation
# ==================================================最新保存的模型FLAGS.checkpoint_dir = './runs/1675947435/checkpoints'
checkpoint_file = tf.train.latest_checkpoint(FLAGS.checkpoint_dir)
#checkpoint_dir='D:\\cnn-text\\runs\\1675912493\\checkpoints'graph = tf.Graph()
with graph.as_default():session_conf = tf.ConfigProto(allow_soft_placement=FLAGS.allow_soft_placement,log_device_placement=FLAGS.log_device_placement)sess = tf.Session(config=session_conf)with sess.as_default():# Load the saved meta graph and restore variablessaver = tf.train.import_meta_graph("{}.meta".format(checkpoint_file))saver.restore(sess, checkpoint_file)# Get the placeholders from the graph by nameinput_x = graph.get_operation_by_name("input_x").outputs[0]# input_y = graph.get_operation_by_name("input_y").outputs[0]dropout_keep_prob = graph.get_operation_by_name("dropout_keep_prob").outputs[0]# Tensors we want to evaluatepredictions = graph.get_operation_by_name("output/predictions").outputs[0]# Generate batches for one epochbatches = data_helpers.batch_iter(list(x_test), FLAGS.batch_size, 1, shuffle=False)# Collect the predictions hereall_predictions = []for x_test_batch in batches:batch_predictions = sess.run(predictions, {input_x: x_test_batch, dropout_keep_prob: 1.0})all_predictions = np.concatenate([all_predictions, batch_predictions])# Print accuracy if y_test is defined
if y_test is not None:correct_predictions = float(sum(all_predictions == y_test))print("Total number of test examples: {}".format(len(y_test)))print("Accuracy: {:g}".format(correct_predictions/float(len(y_test))))# Save the evaluation to a csv
predictions_human_readable = np.column_stack((np.array(x_raw), all_predictions))
out_path = os.path.join(FLAGS.checkpoint_dir, "..", "prediction.csv")
print("Saving evaluation to {0}".format(out_path))
with open(out_path, 'w') as f:csv.writer(f).writerows(predictions_human_readable)
主程序类:cnn-text:
import tensorflow as tf
import numpy as npclass TextCNN(object):"""A CNN for text classification.Uses an embedding layer, followed by a convolutional, max-pooling and softmax layer."""def __init__(self, sequence_length, num_classes, vocab_size,embedding_size, filter_sizes, num_filters, l2_reg_lambda=0.0):# Placeholders for input, output and dropoutself.input_x = tf.placeholder(tf.int32, [None, sequence_length], name="input_x")self.input_y = tf.placeholder(tf.float32, [None, num_classes], name="input_y")self.dropout_keep_prob = tf.placeholder(tf.float32, name="dropout_keep_prob")# Keeping track of l2 regularization loss (optional)l2_loss = tf.constant(0.0)# 构建中间层,单词转化成向量的形式,在-1,1之间生产均匀分布数
# Embedding layer
with tf.device('/cpu:0'), tf.name_scope("embedding"): #vocab_size:词库大小;embedding_size:词向量维度.#self.W可以理解为词向量词典,存储vocab_size个大小为embedding_size的词向量,随机初始化为-1~1之间的值;#self.embedded_chars是输入input_x对应的词向量表示;size:[句子数量, sequence_length, embedding_size]self.W = tf.Variable(tf.random_uniform([vocab_size, embedding_size], -1.0, 1.0),#构建中间层,单词转化成向量的形式,在-1,1之间生产均匀分布数name="W")self.embedded_chars = tf.nn.embedding_lookup(self.W, self.input_x) #输入词向量表示self.embedded_chars_expanded = tf.expand_dims(self.embedded_chars, -1) #将词向量表示扩充一个维度(embedded_chars * 1)#self.embedded_chars_expanded是,将词向量表示扩充一个维度(embedded_chars * 1),扩充为维度变为[句子数量, sequence_length, embedding_size, 1]方便进行卷积。
# Create a convolution + maxpool layer for each filter sizepooled_outputs = []for i, filter_size in enumerate(filter_sizes):with tf.name_scope("conv-maxpool-%s" % filter_size):# Convolution Layerfilter_shape = [filter_size, embedding_size, 1, num_filters]W = tf.Variable(tf.truncated_normal(filter_shape, stddev=0.1), name="W")b = tf.Variable(tf.constant(0.1, shape=[num_filters]), name="b") # b表示变量维度为卷积核个数,数值为0.1的张量conv = tf.nn.conv2d(self.embedded_chars_expanded,W,strides=[1, 1, 1, 1],padding="VALID",name="conv")# Apply nonlinearityh = tf.nn.relu(tf.nn.bias_add(conv, b), name="relu")# Maxpooling over the outputspooled = tf.nn.max_pool(h,ksize=[1, sequence_length - filter_size + 1, 1, 1],strides=[1, 1, 1, 1],padding='VALID',name="pool")pooled_outputs.append(pooled)# Combine all the pooled features# 将三种filtersize的output拼接并拉平,用以全连接层num_filters_total = num_filters * len(filter_sizes)self.h_pool = tf.concat(pooled_outputs, 3)self.h_pool_flat = tf.reshape(self.h_pool, [-1, num_filters_total])# Add dropoutwith tf.name_scope("dropout"):self.h_drop = tf.nn.dropout(self.h_pool_flat, self.dropout_keep_prob)# Final (unnormalized) scores and predictions#全连接层(output)with tf.name_scope("output"):W = tf.get_variable("W",shape=[num_filters_total, num_classes],initializer=tf.contrib.layers.xavier_initializer())b = tf.Variable(tf.constant(0.1, shape=[num_classes]), name="b")l2_loss += tf.nn.l2_loss(W)l2_loss += tf.nn.l2_loss(b)self.scores = tf.nn.xw_plus_b(self.h_drop, W, b, name="scores")self.predictions = tf.argmax(self.scores, 1, name="predictions")# Calculate mean cross-entropy losswith tf.name_scope("loss"):losses = tf.nn.softmax_cross_entropy_with_logits(logits=self.scores, labels=self.input_y)self.loss = tf.reduce_mean(losses) + l2_reg_lambda * l2_loss# Accuracy#计算准确率with tf.name_scope("accuracy"):correct_predictions = tf.equal(self.predictions, tf.argmax(self.input_y, 1))self.accuracy = tf.reduce_mean(tf.cast(correct_predictions, "float"), name="accuracy")结束
复现文献:
Convolutional Neural Networks for Sentence Classification
Yoon Kim
[1408.5882] Convolutional Neural Networks for Sentence Classification (arxiv.org)
参考文献:
Convolutional Neural Networks for Sentence Classification
Tensorflow版TextCNN主要代码解析
Recurrent Neural Network for Text Classification with Multi-Task Learning
implementing-a-cnn-for-text-classification-in-tensorflow
understanding-convolutional-neural-networks-for-nlp
textcnn实现-github
项目地址:https://github.com/finisky/TextCNN
这里的实现基于: https://github.com/Shawn1993/cn
这篇关于卷积神经网络文本句子分类CNN-text (Yoon Kim)复现实践的文章就介绍到这儿,希望我们推荐的文章对编程师们有所帮助!


