本文主要是介绍Web Bluetooth 与点对点连接,希望对大家解决编程问题提供一定的参考价值,需要的开发者们随着小编来一起学习吧!
前言
需求需要实现手持终端设备与 web 网页的点对点数据传输,不希望有服务器参与,想到了 web 的 USB 与 Bluetooth API,对 Web Bluetooth API 进行了研究。
蓝牙 GATT 基础知识
GATT(通用属性配置文件,蓝牙低功耗(BLE)中定义的一种规范)定义了如何在蓝牙低功耗设备之间进行数据的传输和交互。它规定了蓝牙设备之间的数据格式、通信协议以及数据的组织方式。通过 GATT,不同的蓝牙设备可以交换各种类型的数据,如传感器数据、设备状态信息等。
GATT 采用分层的组织结构,分为 Service(服务)、Characteristic(特性)、Property(属性)三层:
- Service: 一个蓝牙设备可以有一个或多个服务,这些服务提供不同的功能,如
battery_service(电池服务)、heart_rate(心率服务) - Characteristic: 提供与服务相关的功能,比如
battery_service服务的battery_level特征提供电池电量的数据 - Property: 特性上的属性,用于操作特性值,比如
write、read用于读写特性值
Service、Characteristic 都有一个 UUID 用于标识服务、特性,Service 的 UUID 格式固定为 0x0000[xxxx]-0000-1000-8000-00805F9B34FB,其中 [xxxx] 是可变部分,其余固定,比如电池服务的 UUID 为 0000180F-0000-1000-8000-00805f9b34fb,可简写为 0x180F,当自定义蓝牙 GATT 服务时定义的 UUID 需要采用相同的格式。
在使用 Web Bluetooth API 时,我们通过服务名称或服务 UUID 来找到我们需要的蓝牙服务。
Web Bluetooth API
Web Bluetooth 所有接口构建在 Promise 之上,只支持在可信来源中使用(localhost 或 https),主要有以下接口(完整接口查看 MDN 文档):
Bluetooth:提供查询蓝牙可用性和请求访问设备的方法getAvailability:返回用户代理的蓝牙可用性requestDevice:请求蓝牙设备,返回一个BluetoothDevice实例;必须由用户手势触发,一般会弹出蓝牙选择器,如果没有可用的蓝牙选择器则默认选择匹配的第一个
BluetoothDevice:蓝牙设备相关接口,具有一个gatt属性是对BluetoothRemoteGATTServer实例的引用BluetoothRemoteGATTServer:可以理解为对 gatt 服务器的引用,通过 gatt 服务器可以获取到他所拥有的 Serviceconnected:脚本执行环境是否已与设备连接connect:脚本执行环境连接到 BluetoothDevicedisconnect:脚本执行环境断开与 BluetoothDevice 的连接getPrimaryService:通过服务别名或 UUID 获取到对应的 Service,是一个BluetoothRemoteGATTService实例getPrimaryServices:获取多个 Service
BluetoothRemoteGATTService:对 Service 的引用isPrimary:指示这是一个主要还是次要的服务getCharacteristic:获取指定 UUID 的 Characteristic 特性,是一个BluetoothRemoteGATTCharacteristic实例getCharacteristics:获取多个特性
BluetoothRemoteGATTCharacteristic:对特性的引用readValue:读取特性值writeValueWithResponse:写入特性值
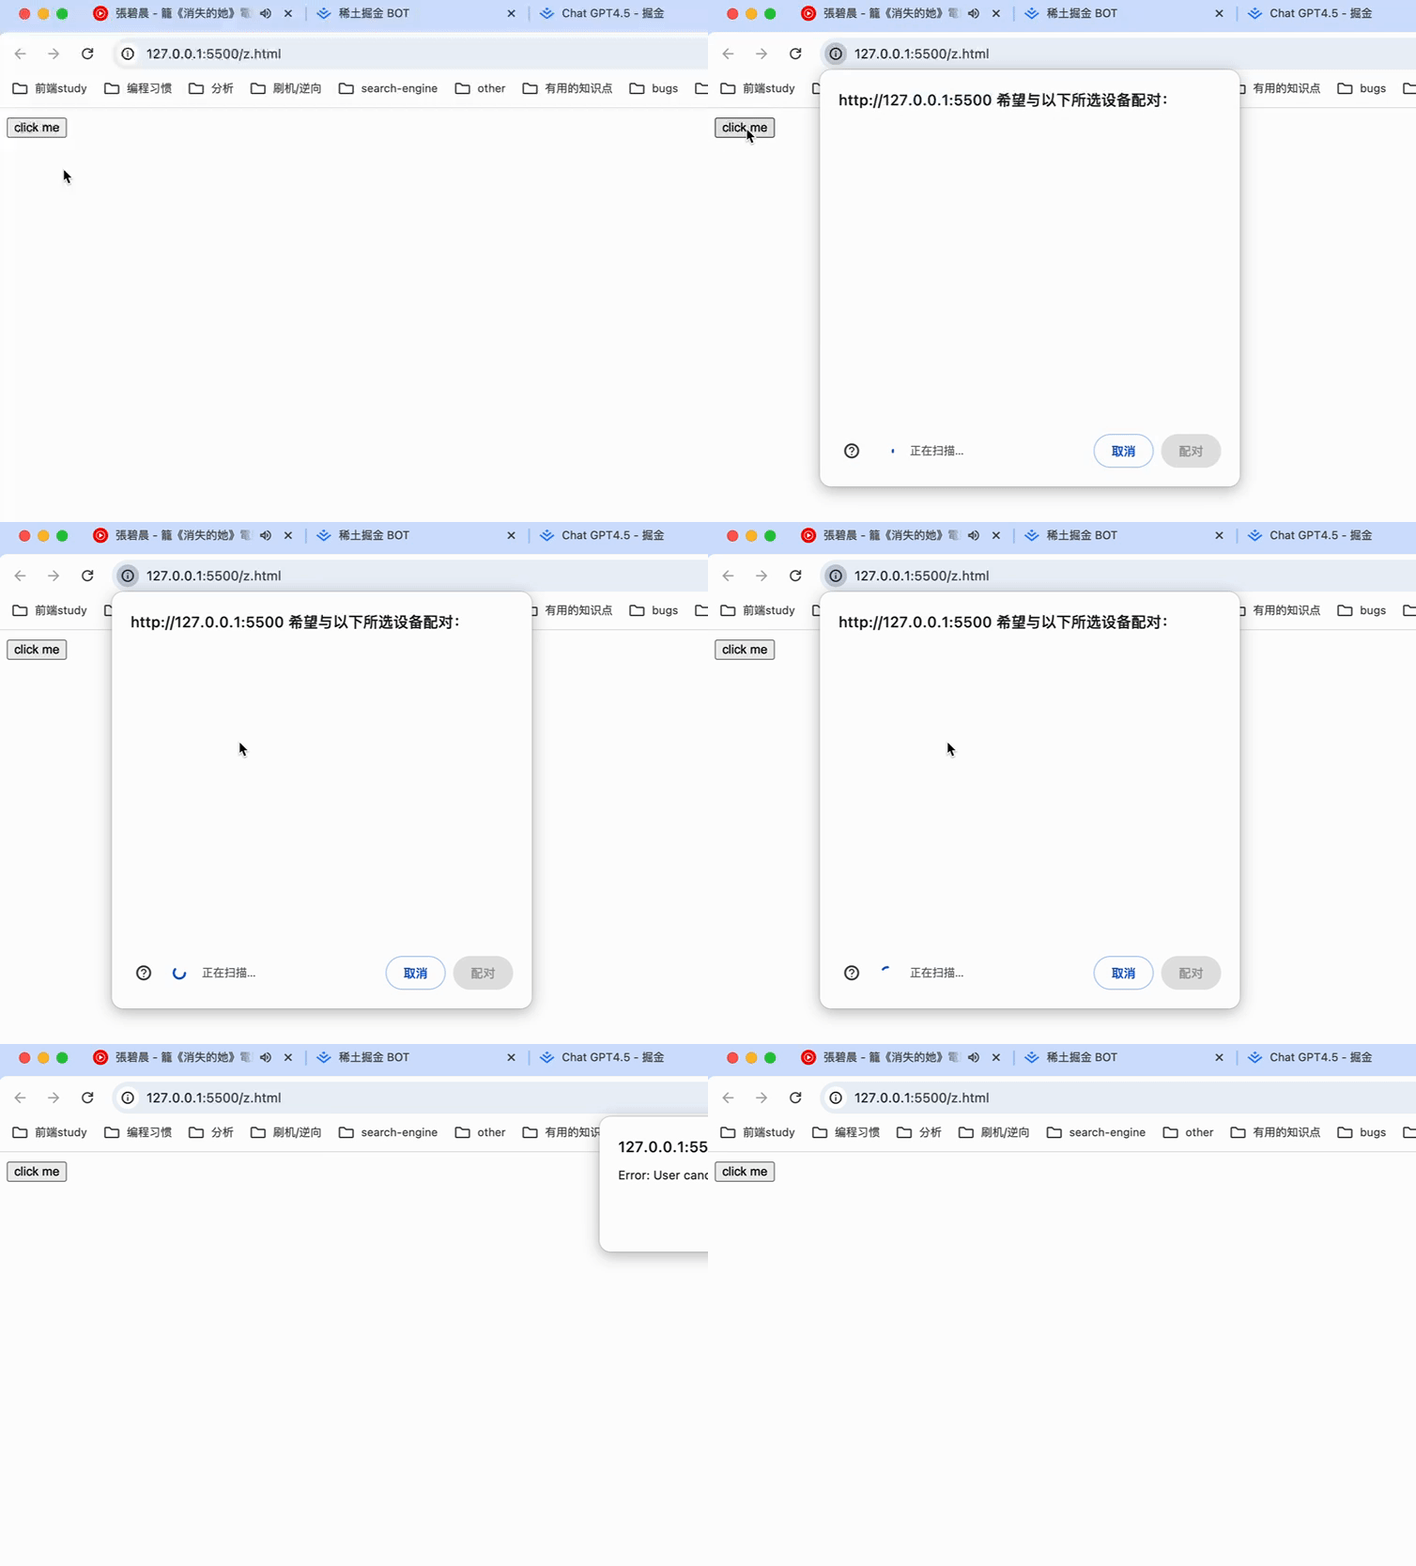
看一个简单的示例:
<!doctype html>
<html lang="en"><head><meta charset="UTF-8" /><meta name="viewport" content="width=device-width, initial-scale=1.0" /><title>Document</title></head><body><button class="request">click me</button><script>const request = window.document.querySelector('.request');request.addEventListener('click', async function () {const bluetooth = window.navigator.bluetooth;try {// 检查用户代理是否支持const isSupport = await bluetooth.getAvailability();if (!isSupport) {return window.alert('用户代理不支持蓝牙请求');}// 请求蓝牙设备const bluetoothDevice = await bluetooth.requestDevice({/** 过滤器选项 */filters: [{/** 过滤拥有 battery_service | 0x1101 | 0000180D-0000-1000-8000-00805f9b34fb 服务的设备 */services: ['battery_service', 0x1101, '0000180D-0000-1000-8000-00805f9b34fb'],/** 过滤名称为 RedMi Note13Pro 的设备 */name: 'RedMi Note13Pro',/** 过滤名称前缀为 RedMi 的设备 */namePrefix: 'RedMi'}],/** 排除项,选项与 filters 相同 */exclusionFilters: [],/*** 服务选项,通常需要包含此项,告诉浏览器你随后想要访问的蓝牙服务;* 如果其他选项中没有指定服务,则必须在此处指定,否则随后访问服务时抛出异常* */optionalServices: ['battery_service'],/** 匹配所有设备,一般不建议使用 */acceptAllDevices: false});// gatt 服务器const server = bluetoothDevice.gatt;if (!server.connected) {// 创建连接await server.connect();}/** 获取电池 Service */const batteryService = await server.getPrimaryService('battery_service');/** 获取电池电量的 Characteristic */const batteryLevelCharacteristic =await batteryService.getCharacteristic('battery_level');/** 读取 Characteristic 值,这里是电池剩余电量 */const batteryLevelValue = await batteryLevelCharacteristic.readValue();/** 打印剩余电量百分比 */console.log(`Battery percentage is ${batteryLevelValue.getUint8(0)}`);} catch (err) {window.alert('Error: ' + err.message);}});</script></body>
</html>
得到的效果为:

Android 自定义 GATT 服务
简单通过上述代码搜索设备并尝试建立连接进行通讯,会发现无法达到自己想要的效果;为了更好的理解 Web Bluetooth,自定义一个 GATT 服务实现通讯是很好的方法:
package com.example.myapplicationimport android.Manifest
import android.bluetooth.BluetoothDevice
import android.bluetooth.BluetoothGatt
import android.bluetooth.BluetoothGattCharacteristic
import android.bluetooth.BluetoothGattServer
import android.bluetooth.BluetoothGattServerCallback
import android.bluetooth.BluetoothGattService
import android.bluetooth.BluetoothManager
import android.bluetooth.BluetoothProfile
import android.bluetooth.le.AdvertiseCallback
import android.bluetooth.le.AdvertiseData
import android.bluetooth.le.AdvertiseSettings
import android.content.Context
import android.content.pm.PackageManager
import android.os.Build
import android.os.Bundle
import android.os.ParcelUuid
import android.util.Log
import android.widget.Toast
import androidx.activity.ComponentActivity
import androidx.annotation.RequiresApi
import java.util.UUIDclass MainActivity : ComponentActivity() {@RequiresApi(Build.VERSION_CODES.S)override fun onCreate(savedInstanceState: Bundle?) {super.onCreate(savedInstanceState)initBluetoothGATT()}// 初始化蓝牙 GATT 服务并开始广播@RequiresApi(Build.VERSION_CODES.S)private fun initBluetoothGATT() {// 获取蓝牙管理器val bluetoothManager = getSystemService(Context.BLUETOOTH_SERVICE) as BluetoothManager// 获取蓝牙适配器val bluetoothAdapter = bluetoothManager.adapter// 定义 gatt 服务器var bluetoothGattServer: BluetoothGattServer? = null// 检查权限if (checkSelfPermission(Manifest.permission.BLUETOOTH_CONNECT) == PackageManager.PERMISSION_GRANTED) {// 定义 gatt 服务器的回调val bluetoothGattServerCallback = object : BluetoothGattServerCallback() {// 与蓝牙设备的连接状态变更override fun onConnectionStateChange(device: BluetoothDevice,status: Int,newState: Int) {if (newState == BluetoothProfile.STATE_CONNECTED) {Log.d(TAG, "Device connected")} else if (newState == BluetoothProfile.STATE_DISCONNECTED) {Log.d(TAG, "Device disconnected")}}// Service 被添加override fun onServiceAdded(status: Int, service: BluetoothGattService) {if (service.uuid == SERVICE_UUID) {Log.d(TAG, "Service added successfully.")}}// 特性读取请求override fun onCharacteristicReadRequest(device: BluetoothDevice,requestId: Int,offset: Int,characteristic: BluetoothGattCharacteristic) {// 判断是否指定特性请求if (characteristic.uuid == CHARACTERISTIC_UUID) {// 处理读取请求,这里可以设置返回的数据val dataToSend = "Hello from custom characteristic!".toByteArray()// 设置特性值characteristic.setValue(dataToSend)// 检查权限,这里是避免编辑器警告if (checkSelfPermission(Manifest.permission.BLUETOOTH_CONNECT) == PackageManager.PERMISSION_GRANTED) {// 发送响应,必须调用此方法,web 端的 readValue 方法才能继续执行bluetoothGattServer!!.sendResponse(device,requestId,BluetoothGatt.GATT_SUCCESS,offset,dataToSend)}}}// 特性写入请求override fun onCharacteristicWriteRequest(device: BluetoothDevice,requestId: Int,  // 请求的特性 idcharacteristic: BluetoothGattCharacteristic,  // 特性preparedWrite: Boolean,responseNeeded: Boolean,  // 是否需要响应offset: Int,  // 数据偏移,数据可能是分段发送的value: ByteArray // 数据值) {// 判断是否指定特性if (characteristic.uuid == CHARACTERISTIC_UUID) {characteristic.setValue(value)}}}// 打开一个 gatt 服务器bluetoothGattServer = bluetoothManager.openGattServer(this, bluetoothGattServerCallback)// 获取蓝牙广播器val bluetoothLeAdvertiser = bluetoothAdapter.bluetoothLeAdvertiser// 判断是否支持蓝牙if (bluetoothLeAdvertiser != null) {// 蓝牙广播设置val settings = AdvertiseSettings.Builder().setAdvertiseMode(AdvertiseSettings.ADVERTISE_MODE_LOW_LATENCY) // 设置低延迟模式.setConnectable(true) // 设置可连接.setTimeout(0) // 不超时关闭,除非手动关闭.build()// 蓝牙广播数据val data = AdvertiseData.Builder().setIncludeDeviceName(true) // 设置广播时的数据包含设备名称.addServiceUuid(ParcelUuid(SERVICE_UUID)) // 添加自定义服务的 UUID 到广播数据中.build()// 开始广播bluetoothLeAdvertiser.startAdvertising(settings,data,object : AdvertiseCallback() {// 正常开始广播override fun onStartSuccess(settingsInEffect: AdvertiseSettings) {Log.d(TAG, "Advertising started successfully.")}// 无法开启广播override fun onStartFailure(errorCode: Int) {Log.e(TAG, "Advertising failed with error code: $errorCode")}})// 构造一个自定义 UUID 的 Service,指定为主要 Serviceval service =BluetoothGattService(SERVICE_UUID, BluetoothGattService.SERVICE_TYPE_PRIMARY)// 构造一个自定义 UUID 的 Characteristicval characteristic = BluetoothGattCharacteristic(CHARACTERISTIC_UUID,// 设置读写属性BluetoothGattCharacteristic.PROPERTY_READ or BluetoothGattCharacteristic.PROPERTY_WRITE,// 设置读写权限BluetoothGattCharacteristic.PERMISSION_READ or BluetoothGattCharacteristic.PERMISSION_WRITE)// 将 Characteristic 添加至 Serviceservice.addCharacteristic(characteristic)// 将 Service 添加至打开的 GATT 服务器bluetoothGattServer.addService(service)}} else {// 没有权限请求权限requestPermissions(arrayOf(Manifest.permission.BLUETOOTH_CONNECT),REQUEST_BLUETOOTH_PERMISSION_CODE)}}@Deprecated("Deprecated in Java")@RequiresApi(Build.VERSION_CODES.S)override fun onRequestPermissionsResult(requestCode: Int,permissions: Array<out String>,grantResults: IntArray) {super.onRequestPermissionsResult(requestCode, permissions, grantResults)if (requestCode == REQUEST_BLUETOOTH_PERMISSION_CODE) {if (grantResults.isNotEmpty() && grantResults[0] == PackageManager.PERMISSION_GRANTED) {// 权限被授予,可以进行蓝牙连接操作initBluetoothGATT()} else {// 权限被拒绝Toast.makeText(this, "蓝牙连接权限被拒绝", Toast.LENGTH_SHORT).show()}}}companion object {private const val TAG = "BluetoothService"// 请求权限 codeprivate const val REQUEST_BLUETOOTH_PERMISSION_CODE = 1001// 定义服务 UUIDprivate val SERVICE_UUID: UUID = UUID.fromString("00009527-0000-1000-8000-00805f9b34fb")// 定义特性 UUIDprivate val CHARACTERISTIC_UUID: UUID =UUID.fromString("11009527-1100-1100-1100-110011001100")}
}
上述代码是 Android 应用主 Activity 的代码,配合上述代码需要在 Android 应用配置清单中添加对应的权限:
<!-- AndroidManifest.xml --><uses-permission android:name="android.permission.BLUETOOTH_ADVERTISE" />
<!-- 蓝牙搜索配对 -->
<uses-permission android:name="android.permission.BLUETOOTH" />
<uses-permission android:name="android.permission.ACCESS_COARSE_LOCATION" />
<uses-permission android:name="android.permission.ACCESS_FINE_LOCATION" />
<uses-permission android:name="android.permission.BLUETOOTH_ADMIN" />
<uses-permission android:name="android.permission.BLUETOOTH_SCAN" />
<!-- 操纵蓝牙的开启-->
<uses-permission android:name="android.permission.BLUETOOTH_CONNECT" />
<!-- 如果应用必须安装在支持蓝牙的设备上,可以将下面的required的值设置为true。-->
<uses-featureandroid:name="android.hardware.bluetooth_le"android:required="false" />
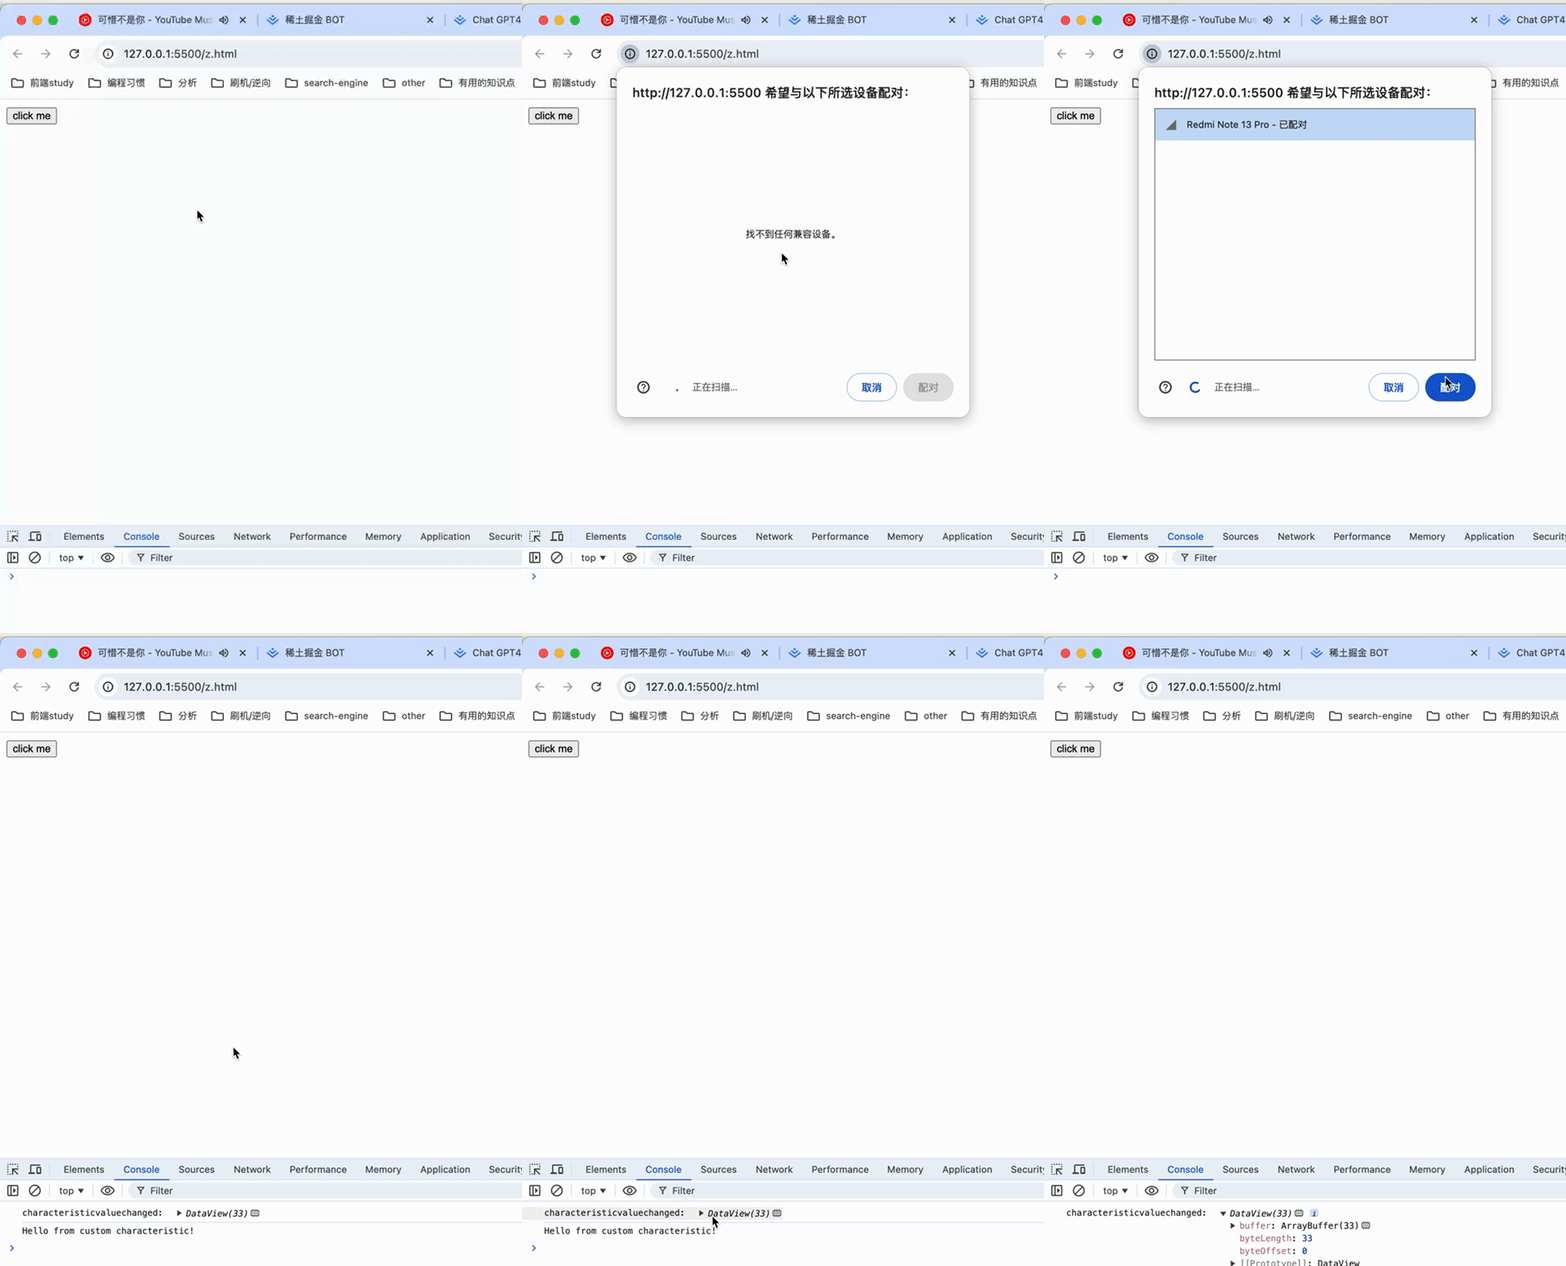
在编译打开这个 Android 应用后,会开启一个 UUID 为 0x9527 的蓝牙服务,包含一个 UUID 为 11009527-1100-1100-1100-110011001100 的特性,这个特性会在被读取时,将特性值设置为 “Hello from custom characteristic!”,并发送响应到调用方。我们用以下 web 端的代码来测试一下:
<!doctype html>
<html lang="en"><head><meta charset="UTF-8" /><meta name="viewport" content="width=device-width, initial-scale=1.0" /><title>Document</title></head><body><button class="request">click me</button><script>const request = window.document.querySelector('.request');request.addEventListener('click', async function () {const bluetooth = window.navigator.bluetooth;try {const isSupport = await bluetooth.getAvailability();if (!isSupport) {return window.alert('用户代理不支持蓝牙请求');}const bluetoothDevice = await bluetooth.requestDevice({filters: [{services: [0x9527] // 过滤蓝牙服务 UUID 为 9527 的设备}],optionalServices: [0x9527] // 稍后需要操作此服务});const server = bluetoothDevice.gatt; // 获取对蓝牙服务器的引用if (!server.connected) {await server.connect(); // 连接服务器}const service = await server.getPrimaryService(0x9527); // 获取 9527 的蓝牙服务const characteristic = await service.getCharacteristic('11009527-1100-1100-1100-110011001100'); // 获取 11009527-1100-1100-1100-110011001100 的特性// 侦听特性值变更characteristic.addEventListener('characteristicvaluechanged', (e) => {console.log('characteristicvaluechanged: ', e.target.value);});// 读取特性值const value = await characteristic.readValue();// 编码响应console.log(new TextDecoder().decode(value));} catch (err) {window.alert('Error: ' + err.message);}});</script></body>
</html>
查看效果:

除了被动读写外,Android 端的 gatt 服务器还支持 notifyCharacteristicChanged 方法,此方法会触发 web 端 characteristic 实例的 characteristicvaluechanged 事件获取最新的特性值,通过这种方式可以做到主动通知 web 端的效果。
通过自定义终端应用实现自定义 GATT 服务器的方式可以完成与 web 端的点对点连接,但是 web bluetooth 的兼容性还不足以支持完成大型的项目,稳定性也无法考证。
原文地址:https://yuanyxh.com/articles/web_bluetooth_and_point_to_point_connection.html
参考资料
- MDN: https://developer.mozilla.org/en-US/docs/Web/API/Web_Bluetooth_API
- 通过 JavaScript 与蓝牙设备通信: https://developer.chrome.com/docs/capabilities/bluetooth?hl=zh-cn
- 一文带你认识蓝牙 GATT 协议: https://juejin.cn/post/7160308393503113247
– end
这篇关于Web Bluetooth 与点对点连接的文章就介绍到这儿,希望我们推荐的文章对编程师们有所帮助!


