本文主要是介绍RadioButton使用方法,希望对大家解决编程问题提供一定的参考价值,需要的开发者们随着小编来一起学习吧!
学一点,记一点。
要点
- 一组Radio Button放到一个Radio Group中;
- 如果Radio Button很多,就考虑是否Spinner更合适
- 事件处理有多种方式,如RadioGroup的OnCheckedChangeListener。
示例
效果
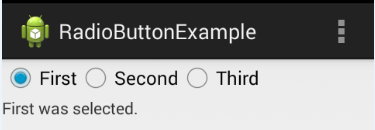
功能
选择某一个Radio Button之后,下面一个TextView显示选择结果。
布局文件 my_layout.xml
<?xml version="1.0" encoding="utf-8"?>
<LinearLayout xmlns:android="http://schemas.android.com/apk/res/android"android:layout_width="match_parent"android:layout_height="match_parent"android:orientation="vertical" ><RadioGroupandroid:id="@+id/radio_group"android:layout_width="457dp"android:layout_height="wrap_content"android:orientation="horizontal" ><RadioButtonandroid:id="@+id/radio_first"android:layout_width="wrap_content"android:layout_height="wrap_content"android:checked="true"android:text="@string/first" /><RadioButtonandroid:id="@+id/radio_second"android:layout_width="wrap_content"android:layout_height="wrap_content"android:text="@string/second" /><RadioButtonandroid:id="@+id/radio_third"android:layout_width="wrap_content"android:layout_height="wrap_content"android:text="@string/third" /></RadioGroup><TextViewandroid:id="@+id/select_result"android:layout_width="match_parent"android:layout_height="wrap_content"/></LinearLayout>
代码
省略掉自动生成的代码。
private RadioGroup radioGroup = null;
private TextView textView = null;@Override
protected void onCreate(Bundle savedInstanceState) {super.onCreate(savedInstanceState);setContentView(R.layout.my_layout);radioGroup = (RadioGroup) this.findViewById(R.id.radio_group);textView = (TextView) this.findViewById(R.id.select_result);textView.setText(getSelectedInfo());radioGroup.setOnCheckedChangeListener(new OnCheckedChangeListener() {public void onCheckedChanged(RadioGroup group, int checkedId) {textView.setText(getSelectedInfo(checkedId));}});}private String getSelectedInfo() {int checkedId = radioGroup.getCheckedRadioButtonId();return getSelectedInfo(checkedId);
}private String getSelectedInfo(int checkedId) {String selected = "Unknown selection!";switch (checkedId) {case R.id.radio_first:selected = "First was selected.";break;case R.id.radio_second:selected = "Second was selected.";break;case R.id.radio_third:selected = "Third was selected.";break;default:break;}return selected;
}
事件处理
上面的示例是为RadioGroup对象注册OnCheckedChangeListener。此外,还可以直接为每个Radio Button注册listener。接下来详细描述。
RadioButton事件处理
可以为Radio Button注册CompoundButton.OnCheckedChangeListener。
代码一
private RadioButton firstRadio = null;
private RadioButton secondRadio = null;
private RadioButton thirdRadio = null;@Override
protected void onCreate(Bundle savedInstanceState) {super.onCreate(savedInstanceState);setContentView(R.layout.my_layout);firstRadio = (RadioButton) this.findViewById(R.id.radio_first);secondRadio = (RadioButton) this.findViewById(R.id.radio_second);thirdRadio = (RadioButton) this.findViewById(R.id.radio_third);firstRadio.setOnCheckedChangeListener(new MyListener("First"));secondRadio.setOnCheckedChangeListener(new MyListener("Second"));thirdRadio.setOnCheckedChangeListener(new MyListener("Third"));
}private class MyListener implements CompoundButton.OnCheckedChangeListener {private String radioName = null;public MyListener(String theRadioName) {radioName = theRadioName;}public void onCheckedChanged(CompoundButton buttonView,boolean isChecked) {Toast.makeText(MainActivity.this, radioName + " checked:" + isChecked, Toast.LENGTH_SHORT).show();}
}
实际运行发现,被选中的Radio Button会先处理,显示:xxx checked: true;失去焦点的Radio Button之后处理,显示:xxx checked: false。
注意到,这里通过ctor传入一个标识符,说明当前的事件处理是哪个Radio Button的。显然,这种方式的通用性并不好。
代码二
下面是等价的一种方式:
private RadioButton firstRadio = null;
private RadioButton secondRadio = null;
private RadioButton thirdRadio = null;@Override
protected void onCreate(Bundle savedInstanceState) {super.onCreate(savedInstanceState);setContentView(R.layout.my_layout);firstRadio = (RadioButton) this.findViewById(R.id.radio_first);secondRadio = (RadioButton) this.findViewById(R.id.radio_second);thirdRadio = (RadioButton) this.findViewById(R.id.radio_third);MyListener listener = new MyListener();firstRadio.setOnCheckedChangeListener(listener);secondRadio.setOnCheckedChangeListener(listener);thirdRadio.setOnCheckedChangeListener(listener);
}private String getRadioName(int id) {switch (id) {case R.id.radio_first: return "First";case R.id.radio_second: return "Second";case R.id.radio_third: return "Third";default: return "Unknown";}
}private class MyListener implements CompoundButton.OnCheckedChangeListener {public void onCheckedChanged(CompoundButton buttonView,boolean isChecked) {String radioName = getRadioName(buttonView.getId());Toast.makeText(MainActivity.this, radioName + " checked:" + isChecked, Toast.LENGTH_SHORT).show();}
}
xml中定义事件
在docs/guide/topics/ui/controls/radiobutton.html中提到在xml中定义Radio Button的事件处理。
xml
在每个RadioButton中增加一个属性:
android:onClick="onRadioButtonClicked"
即变成下面的样子:
<RadioGroupandroid:id="@+id/radio_group"android:layout_width="457dp"android:layout_height="wrap_content"android:orientation="horizontal" ><RadioButtonandroid:id="@+id/radio_first"android:layout_width="wrap_content"android:layout_height="wrap_content"android:checked="true"android:text="@string/first"android:onClick="onRadioButtonClicked" /><RadioButtonandroid:id="@+id/radio_second"android:layout_width="wrap_content"android:layout_height="wrap_content"android:text="@string/second"android:onClick="onRadioButtonClicked" /><RadioButtonandroid:id="@+id/radio_third"android:layout_width="wrap_content"android:layout_height="wrap_content"android:text="@string/third"android:onClick="onRadioButtonClicked" />
</RadioGroup>
代码
@Override
protected void onCreate(Bundle savedInstanceState) {super.onCreate(savedInstanceState);setContentView(R.layout.my_layout);
}private String getRadioName(int id) {switch (id) {case R.id.radio_first: return "First";case R.id.radio_second: return "Second";case R.id.radio_third: return "Third";default: return "Unknown";}
}public void onRadioButtonClicked(View view) {boolean checked = ((RadioButton) view).isChecked();String radioName = getRadioName(view.getId());Toast.makeText(this, radioName + " checked:" + checked, Toast.LENGTH_SHORT).show();
}
运行效果
当选中某个Radio Button的时候,会触发事件。失去焦点的不会触发事件,——因为是OnClick类型的事件,而不是OnCheckedChanged。
所以,这种方法比前一种要简洁得多。
在代码中注册OnClickListener
另外一种等价方式就是直接在代码中为RadioButton注册OnClickListener对象。
为此,在xml中删除前面添加的属性,然后代码改成如下的样子:
private RadioButton firstRadio = null;
private RadioButton secondRadio = null;
private RadioButton thirdRadio = null;@Override
protected void onCreate(Bundle savedInstanceState) {super.onCreate(savedInstanceState);setContentView(R.layout.my_layout);OnClickListener listener = new OnClickListener() {public void onClick(View view) {boolean checked = ((RadioButton) view).isChecked();String radioName = getRadioName(view.getId());Toast.makeText(MainActivity.this, radioName + " checked:" + checked, Toast.LENGTH_SHORT).show();}};firstRadio = (RadioButton) this.findViewById(R.id.radio_first);secondRadio = (RadioButton) this.findViewById(R.id.radio_second);thirdRadio = (RadioButton) this.findViewById(R.id.radio_third);firstRadio.setOnClickListener(listener);secondRadio.setOnClickListener(listener);thirdRadio.setOnClickListener(listener);
}private String getRadioName(int id) {switch (id) {case R.id.radio_first: return "First";case R.id.radio_second: return "Second";case R.id.radio_third: return "Third";default: return "Unknown";}
}
对比分析
以下两种方法比较好:
- 为Radio Group注册OnCheckedChangeListener
- 为Radio Button注册OnClickListener
注意点:OnXyzListener会在不同的class中存在,有时候需要认真区分,必要情况下用ClassName.OnXyzListener的方式来引用。
这篇关于RadioButton使用方法的文章就介绍到这儿,希望我们推荐的文章对编程师们有所帮助!


