本文主要是介绍IOS 20 发现界面(UITableView)歌单列表(UICollectionView)实现,希望对大家解决编程问题提供一定的参考价值,需要的开发者们随着小编来一起学习吧!
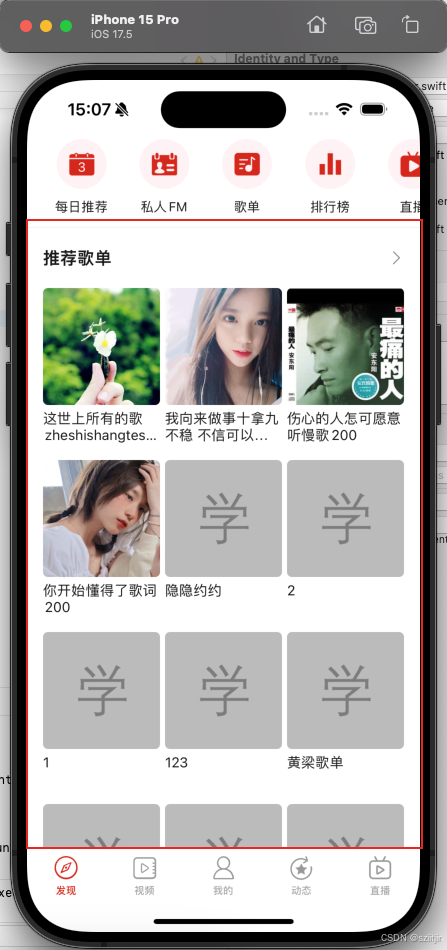
发现界面完整效果


本文实现歌单列表效果
文章基于 IOS 19 发现界面(UITableView)快捷按钮实现 继续实现发现界面歌单列表效果
歌单列表Cell实现
实现流程:
1.创建Cell,及在使用UITableView的Controller控制器上注册Cell;
2.获取data列表数据,并调用UITableView的reloadData(),将数据更新到列表;
3.将data的Item数据绑定UITableView的每一个Cell。
1)创建和注册Cell
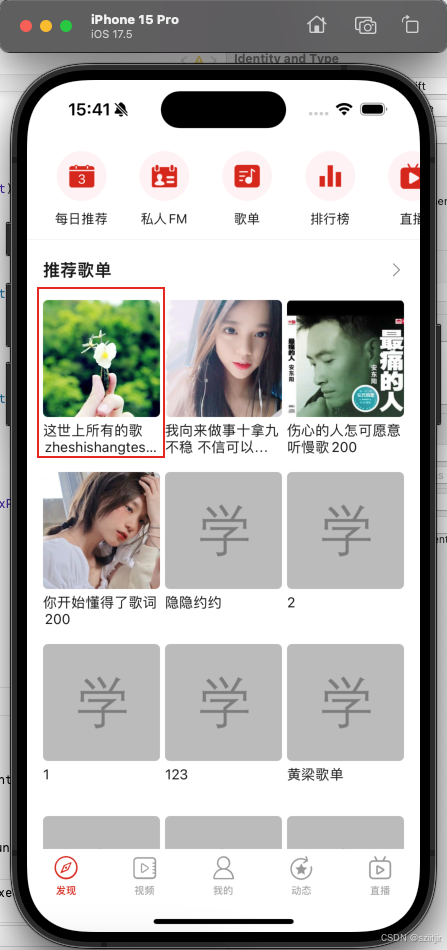
从效果图上面可以看出,歌单列表Cell由一个title + 宫格列表View来实现的,这里宫格列表使用UICollectionView来实现。需要注意的是,UICollectionView本身也是一个可滑动的控件,把UICollectionView内嵌到UITableView中,且需要显示UICollectionView的全部Item;那么就需要设置UICollectionView不允许滑动,且UICollectionView高度 == Item高度*行数。
通过懒加载创建ItemTitleView 和 UICollectionView,自定义ItemTitleView,就是TGRelativeLayout包含title和右边的icon,并封装UICollectionView到ViewFactoryUtil.collectionView()中。
/// 标题控件lazy var titleView: ItemTitleView = {let r = ItemTitleView()r.titleView.text = R.string.localizable.recommendSheet()return r}()lazy var collectionView: UICollectionView = {let r = ViewFactoryUtil.collectionView()r.delegate = selfr.dataSource = selfr.isScrollEnabled = falsereturn r}()//
// ItemTitleView.swift
// 首页-发现界面-歌单组/推荐单曲组 标题view
//
// Created by jin on 2024/8/29.
//import UIKitimport TangramKitclass ItemTitleView : TGRelativeLayout{init(){super.init(frame: CGRect.zero)initViews()}required init?(coder: NSCoder) {super.init(coder: coder)initViews()}func initViews(){tg_width.equal(.fill)tg_height.equal(.wrap)tg_padding = UIEdgeInsets(top: PADDING_MEDDLE, left: PADDING_OUTER, bottom: PADDING_MEDDLE, right: PADDING_OUTER)addSubview(titleView)addSubview(moreIconView)}lazy var titleView: UILabel = {let r = UILabel()r.tg_width.equal(.wrap)r.tg_height.equal(.wrap)r.tg_centerY.equal(0)r.numberOfLines = 1r.font = UIFont.boldSystemFont(ofSize: TEXT_LARGE2)r.textColor = .colorOnSurfacereturn r}()lazy var moreIconView: UIImageView = {let r = UIImageView()r.tg_width.equal(15)r.tg_height.equal(15)r.image = R.image.superChevronRight()?.withTintColor()r.tintColor = .black80r.tg_right.equal(0)r.tg_centerY.equal(0)//图片完全显示到控件里面r.contentMode = .scaleAspectFitreturn r}()
}
/// 创建CollectionViewstatic func collectionView() -> UICollectionView {let r = UICollectionView(frame: CGRect.zero, collectionViewLayout: collectionViewFlowLayout())r.backgroundColor = .clear//不显示滚动条r.showsVerticalScrollIndicator = falser.showsHorizontalScrollIndicator = false//collectionView的内容从collectionView顶部距离开始显示,不要自动偏移状态栏尺寸r.contentInsetAdjustmentBehavior = .neverr.tg_width.equal(.fill)r.tg_height.equal(.fill)return r}重写,添加ItemTitleView 和 UICollectionView到SheetGroupCell
class SheetGroupCell:BaseTableViewCell{static let NAME = "SheetGroupCell"var datum:Array<Sheet> = []override func initViews() {super.initViews()//分割线container.addSubview(ViewFactoryUtil.smallDivider())//标题container.addSubview(titleView)container.addSubview(collectionView)}override func getContainerOrientation() -> TGOrientation {return .vert}
}
绑定宫格列表数据,动态计算Item宽高。
func bind(_ data:SheetData) {//计算每个cell宽度//屏幕宽度-外边距16*2-(self.spanCount-1)*5cellWidth = (SCREEN_WIDTH-PADDING_OUTER*CGFloat(2) - (spanCount - CGFloat(1))*PADDING_SMALL)/spanCount//cell高度,5:图片和标题边距,40:2行文字高度cellHeight = cellWidth + PADDING_SMALL + 40//计算可以显示几行let rows = ceil(CGFloat(data.datum.count) / spanCount)//CollectionView高度等于,行数*行高,10:垂直方向每个cell间距let viewHeight = rows * (cellHeight + PADDING_MEDDLE)collectionView.tg_height.equal(viewHeight)datum.removeAll()datum = data.datumcollectionView.reloadData()}注册SheetGroupCell
class DiscoveryController: BaseLogicController {override func initViews() {super.initViews()setBackgroundColor(.colorBackgroundLight)//初始化TableView结构initTableViewSafeArea()//注册celltableView.register(BannerCell.self, forCellReuseIdentifier: Constant.CELL)tableView.register(ButtonCell.self, forCellReuseIdentifier: ButtonCell.NAME)tableView.register(SheetGroupCell.self, forCellReuseIdentifier: SheetGroupCell.NAME)}
}
2)获取data列表数据
定义宫格列表数据模型SheetData
//
//  SheetData.swift
//  发现界面歌单数据
//
//  Created by jin on 2024/8/29.
//import Foundationclass SheetData{var datum:[Sheet]!init(_ datum: [Sheet]!) {self.datum = datum}
}
请求接口获取歌单列表数据,更新tableView.reloadData()
class DiscoveryController: BaseLogicController {override func initViews() {super.initViews()setBackgroundColor(.colorBackgroundLight)//初始化TableView结构initTableViewSafeArea()//注册celltableView.register(BannerCell.self, forCellReuseIdentifier: Constant.CELL)tableView.register(ButtonCell.self, forCellReuseIdentifier: ButtonCell.NAME)tableView.register(SheetGroupCell.self, forCellReuseIdentifier: SheetGroupCell.NAME)}override func initDatum() {super.initDatum()loadData()}func loadData() {DefaultRepository.shared.bannerAds().subscribeSuccess { [weak self] data in//清除原来的数据self?.datum.removeAll()//添加轮播图self?.datum.append(BannerData(data:data.data!.data!))//添加快捷按钮self?.datum.append(ButtonData())//请求歌单数据self?.loadSheetsData()}.disposed(by: rx.disposeBag)}/// 请求歌单数据func loadSheetsData() {DefaultRepository.shared.sheets(size: VALUE12).subscribeSuccess { [weak self] data in//添加歌单数据self?.datum.append(SheetData(data.data!.data!))self?.tableView.reloadData()}.disposed(by: rx.disposeBag)}
}
3)Item数据绑定Cell
DiscoveryController控制器重写父类的扩展 cellForRowAt方法,创建对应的Cell,并将Item数据绑定到Cell。
extension DiscoveryController{// 返回当前位置cell/// - Parameters:///   - tableView: <#tableView description#>///   - indexPath: <#indexPath description#>/// - Returns: <#description#>override func tableView(_ tableView: UITableView, cellForRowAt indexPath: IndexPath) -> UITableViewCell {let data = datum[indexPath.row]//获取当前Cell的类型let type = typeForItemAtData(data)switch(type){case .button://按钮let cell = tableView.dequeueReusableCell(withIdentifier:  ButtonCell.NAME, for: indexPath) as! ButtonCellcell.bind(data as! ButtonData)return cellcase .sheet://歌单let cell = tableView.dequeueReusableCell(withIdentifier:  SheetGroupCell.NAME, for: indexPath) as! SheetGroupCellcell.bind(data as! SheetData)return celldefault://banner//取出一个Celllet cell = tableView.dequeueReusableCell(withIdentifier:  Constant.CELL, for: indexPath) as! BannerCell//绑定数据cell.bind(data as! BannerData)cell.bannerClick = {[weak self] data inprint("bannerClick \(data)")}return cell}}
}
歌单UICollectionView Cell实现
由于UICollectionView也是一个列表控件,实现UICollectionView的Cell的流程跟 实现UITableView的Cell的流程基本类似。
实现流程:
1.创建Cell,及在使用UICollectionView的View上注册Cell;
2.获取data列表数据,并调用UICollectionView的reloadData(),将数据更新到列表;
3.将data的Item数据绑定UICollectionView的每一个Cell;
4.重写UICollectionViewDelegateFlowLayout,计算Cell的尺寸。
1)创建和注册Cell
从效果图上面可以看出,歌单列表Item的Cell由一个垂直TGLinearLayout包含UIImageView + UILabel来实现的。布局比较简单,实现代码如下:
//
//  SheetCell.swift
//  歌单cell
//
//  Created by jin on 2024/8/29.
//import Foundationclass SheetCell : BaseCollectionViewCell{override func initViews() {super.initViews()container.tg_space = PADDING_SMALLcontainer.addSubview(iconView)container.addSubview(titleView)}func bind(_ data:Sheet) {//OC库显示图片
//        if let r = data.icon {
//            let r = ResourceUtil.resourceUri(r)
//            iconView.sd_setImage(with: URL(string: r), placeholderImage: R.image.placeholder())
//        }iconView.show(data.icon)titleView.text = data.title}lazy var iconView: UIImageView = {let r = UIImageView()r.tg_width.equal(.fill)r.tg_height.equal(r.tg_width)r.image = R.image.placeholder()//图片从中心等比向外面填充,控件没有黑边,但图片可能被裁剪r.contentMode = .scaleAspectFill//小圆角r.smallCorner()return r}()/// 标题lazy var titleView: UILabel = {let r = UILabel()r.tg_width.equal(.fill)r.tg_height.equal(.wrap)r.numberOfLines = 2r.font = UIFont.systemFont(ofSize:TEXT_MEDDLE)r.textColor = .colorOnSurfacereturn r}()
}
2)获取data列表数据
定义宫格列表Item数据模型Sheet
//
//  Sheet.swift
//  歌单对象
//
//  Created by jin on 2024/8/23.
//import Foundation//导入JSON解析框架
import HandyJSONclass Sheet : HandyJSON{/// 歌单标题var title:String!/// 歌单封面var icon:String?/// 点击数var clicksCount:Int=0/// 收藏数var collectsCount:Int=0/// 评论数var commentsCount:Int=0/// 音乐数量var songsCount:Int=0/// 歌单创建者
//    var user:User!
//
//    /// 歌曲列表
//    var songs:Array<Song>?var detail:String?required init() {}
}
从SheetGroupCell bind()中获取歌单宫格列表Item数据,更新collectionView.reloadData()
class SheetGroupCell:BaseTableViewCell{static let NAME = "SheetGroupCell"var datum:Array<Sheet> = []var cellWidth:CGFloat!var cellHeight:CGFloat!var spanCount:CGFloat = 3override func initViews() {super.initViews()//分割线container.addSubview(ViewFactoryUtil.smallDivider())//标题container.addSubview(titleView)container.addSubview(collectionView)collectionView.register(SheetCell.self, forCellWithReuseIdentifier: Constant.CELL)}override func getContainerOrientation() -> TGOrientation {return .vert}func bind(_ data:SheetData) {//计算每个cell宽度//屏幕宽度-外边距16*2-(self.spanCount-1)*5cellWidth = (SCREEN_WIDTH-PADDING_OUTER*CGFloat(2) - (spanCount - CGFloat(1))*PADDING_SMALL)/spanCount//cell高度,5:图片和标题边距,40:2行文字高度cellHeight = cellWidth + PADDING_SMALL + 40//计算可以显示几行let rows = ceil(CGFloat(data.datum.count) / spanCount)//CollectionView高度等于,行数*行高,10:垂直方向每个cell间距let viewHeight = rows * (cellHeight + PADDING_MEDDLE)collectionView.tg_height.equal(viewHeight)datum.removeAll()datum = data.datumcollectionView.reloadData()}
}
3)Item数据绑定Cell
SheetGroupCell 重写父类的扩展 cellForItemAt方法,创建对应的Cell,并将Item数据绑定到Cell。
/// CollectionView数据源和代理
extension SheetGroupCell:UICollectionViewDataSource,UICollectionViewDelegate{/// 有多少个func collectionView(_ collectionView: UICollectionView, numberOfItemsInSection section: Int) -> Int {return datum.count}/// 返回cellfunc collectionView(_ collectionView: UICollectionView, cellForItemAt indexPath: IndexPath) -> UICollectionViewCell {let data = datum[indexPath.row]let cell = collectionView.dequeueReusableCell(withReuseIdentifier: Constant.CELL, for: indexPath) as! SheetCellcell.bind(data)return cell}func collectionView(_ collectionView: UICollectionView, didSelectItemAt indexPath: IndexPath) {if let d = delegate {d.sheetCLick(data: datum[indexPath.row])}}
}
4)计算Cell尺寸
重写UICollectionViewDelegateFlowLayout,返回Cell的尺寸
/// UICollectionViewDelegateFlowLayout
extension SheetGroupCell:UICollectionViewDelegateFlowLayout{/// 返回CollectionView里面的Cell到CollectionView的间距func collectionView(_ collectionView: UICollectionView, layout collectionViewLayout: UICollectionViewLayout, insetForSectionAt section: Int) -> UIEdgeInsets {return UIEdgeInsets(top: 0, left: PADDING_OUTER, bottom: PADDING_OUTER, right: PADDING_OUTER)}/// 返回每个Cell的行间距func collectionView(_ collectionView: UICollectionView, layout collectionViewLayout: UICollectionViewLayout, minimumLineSpacingForSectionAt section: Int) -> CGFloat {return PADDING_MEDDLE}/// 返回每个Cell的列间距func collectionView(_ collectionView: UICollectionView, layout collectionViewLayout: UICollectionViewLayout, minimumInteritemSpacingForSectionAt section: Int) -> CGFloat {return PADDING_SMALL}/// cell尺寸func collectionView(_ collectionView: UICollectionView, layout collectionViewLayout: UICollectionViewLayout, sizeForItemAt indexPath: IndexPath) -> CGSize {return CGSize(width: cellWidth, height: cellHeight)}
}
至此完成歌单列表的实现。
这篇关于IOS 20 发现界面(UITableView)歌单列表(UICollectionView)实现的文章就介绍到这儿,希望我们推荐的文章对编程师们有所帮助!


