本文主要是介绍[星瞳科技]OpenMV如何进行串口通信?,希望对大家解决编程问题提供一定的参考价值,需要的开发者们随着小编来一起学习吧!
串口通信上
视频教程27 - 串口通信发送数据:OpenMV串口发送数据 | 星瞳科技
视频教程28 - 串口通信接收数据:OpenMV串口接收数据 | 星瞳科技
介绍
为什么要用串口呢?因为要时候需要把信息传给其他MCU,串口简单,通用,基本每一个MCU都会有串口。
TTL串口至少需要3根线:TXD,RXD,GND。TXD是发送端,RXD是接收端,GND是地线。 连线的时候,需要把OpenMV的RXD连到另一个MCU的TXD,TXD连到RXD。图示:
import time
from machine import UART
#from pyb import UART# OpenMV4 H7 Plus, OpenMV4 H7, OpenMV3 M7, OpenMV2 M4 的UART(3)是P4-TX P5-RX
uart = UART(3, 19200)   #OpenMV RT 注释掉这一行,用下一行UART(1)
#uart = UART(1, 19200)  #OpenMV RT 用UART(1)这行,注释掉上一行UART(3)
# OpenMV RT 只有串口UART(1),对应P4-TX P5-RX; OpenMV4 H7 Plus, OpenMV4 H7, OpenMV3 M7 的UART(1)是P0-RX P1-TXwhile(True):uart.write("Hello World!\r")time.sleep_ms(1000)
先实例化一个19200波特率的串口,然后调用write方法就可以了。
注意:OpenMV RT 只有串口UART(1),对应P4-TX P5-RX。
OpenMV4 H7 Plus, OpenMV4 H7, OpenMV3 M7 的串口UART(1)是P0-RX P1-TX。
OpenMV4 H7 Plus, OpenMV4 H7, OpenMV3 M7, OpenMV2 M4 的串口UART(3)是P4-TX P5-RX
传输复杂的数据
json字符串。
# Blob Detection and uart transport
import sensor, image, time
#from pyb import UART
from machine import UART
import json
# For color tracking to work really well you should ideally be in a very, very,
# very, controlled enviroment where the lighting is constant...
yellow_threshold   = (65, 100, -10, 6, 24, 51)
# You may need to tweak the above settings for tracking green things...
# Select an area in the Framebuffer to copy the color settings.sensor.reset() # Initialize the camera sensor.
sensor.set_pixformat(sensor.RGB565) # use RGB565.
sensor.set_framesize(sensor.QQVGA) # use QQVGA for speed.
sensor.skip_frames(10) # Let new settings take affect.
sensor.set_auto_whitebal(False) # turn this off.
clock = time.clock() # Tracks FPS.# OpenMV4 H7 Plus, OpenMV4 H7, OpenMV3 M7, OpenMV2 M4 的UART(3)是P4-TX P5-RX
uart = UART(3, 115200)   #OpenMV RT 注释掉这一行,用下一行UART(1)
#uart = UART(1, 115200)  #OpenMV RT 用UART(1)这行,注释掉上一行UART(3)
# OpenMV RT 只有串口UART(1),对应P4-TX P5-RX; OpenMV4 H7 Plus, OpenMV4 H7, OpenMV3 M7 的UART(1)是P0-RX P1-TXwhile(True):img = sensor.snapshot() # Take a picture and return the image.blobs = img.find_blobs([yellow_threshold])if blobs:print('sum :', len(blobs))output_str = json.dumps(blobs)for b in blobs:# Draw a rect around the blob.img.draw_rectangle(b.rect()) # rectimg.draw_cross(b.cx(), b.cy()) # cx, cyprint('you send:',output_str)uart.write(output_str+'\n')else:print('not found!')
结果的输出为:
sum : 1
you send: [{x:17, y:23, w:37, h:12, pixels:178, cx:40, cy:29, rotation:3.060313, code:1, count:1}]
sum : 2
you send: [{x:34, y:24, w:19, h:13, pixels:149, cx:45, cy:30, rotation:3.120370, code:1, count:1}, {x:23, y:30, w:8, h:2, pixels:17, cx:27, cy:30, rotation:0.046378, code:1, count:1}]
这样就把整个blobs全部发送出去了。
精简数据
但是有时候不想传输一大堆的数据。比如:我只想传输面积最大的色块的x,y中心坐标。
想传输什么数据,就构造一个什么数据。
写一个for循环,再写一个find_max()函数。
# Blob Detection and uart transport
import sensor, image, time
#from pyb import UART
from machine import UART
import json
# For color tracking to work really well you should ideally be in a very, very,
# very, controlled enviroment where the lighting is constant...
yellow_threshold   = (65, 100, -10, 6, 24, 51)
# You may need to tweak the above settings for tracking green things...
# Select an area in the Framebuffer to copy the color settings.sensor.reset() # Initialize the camera sensor.
sensor.set_pixformat(sensor.RGB565) # use RGB565.
sensor.set_framesize(sensor.QQVGA) # use QQVGA for speed.
sensor.skip_frames(10) # Let new settings take affect.
sensor.set_auto_whitebal(False) # turn this off.
clock = time.clock() # Tracks FPS.# OpenMV4 H7 Plus, OpenMV4 H7, OpenMV3 M7, OpenMV2 M4 的UART(3)是P4-TX P5-RX
uart = UART(3, 115200)   #OpenMV RT 注释掉这一行,用下一行UART(1)
#uart = UART(1, 115200)  #OpenMV RT 用UART(1)这行,注释掉上一行UART(3)
# OpenMV RT 只有串口UART(1),对应P4-TX P5-RX; OpenMV4 H7 Plus, OpenMV4 H7, OpenMV3 M7 的UART(1)是P0-RX P1-TXdef find_max(blobs):max_size=0for blob in blobs:if blob.pixels() > max_size:max_blob=blobmax_size = blob.pixels()return max_blobwhile(True):img = sensor.snapshot() # Take a picture and return the image.blobs = img.find_blobs([yellow_threshold])if blobs:max_blob=find_max(blobs)print('sum :', len(blobs))img.draw_rectangle(max_blob.rect())img.draw_cross(max_blob.cx(), max_blob.cy())output_str="[%d,%d]" % (max_blob.cx(),max_blob.cy()) #方式1#output_str=json.dumps([max_blob.cx(),max_blob.cy()]) #方式2print('you send:',output_str)uart.write(output_str+'\r\n')else:print('not found!')
结果:
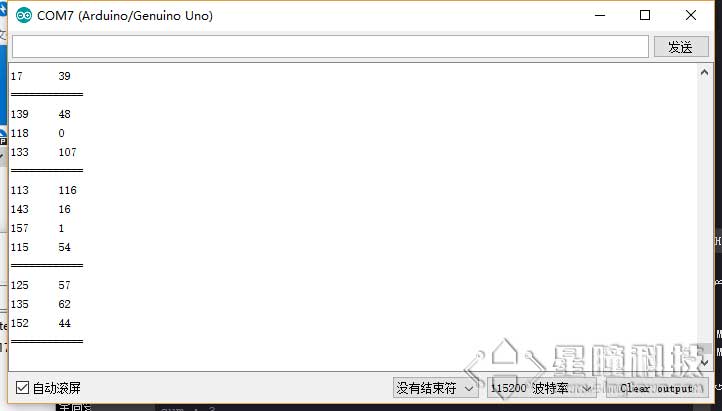
sum : 6
you send: [63,45]
sum : 2
you send: [60,50]
sum : 1
you send: [61,51]
在上面的代码中,
output_str="[%d,%d]" % (max_blob.cx(),max_blob.cy()) #方式1与
output_str=json.dumps([max_blob.cx(),max_blob.cy()]) #方式2结果是一样的,因为结构简单,可以使用python的字符串格式化的功能,或者json的转换功能,都可以。
结果中,即使找到了多个色块,也只发送最大的色块的坐标。
OpenMV串口调试扩展板
OpenMV串口调试扩展板将OpenMV的串口UART3,通过cp2104芯片连接到电脑,通过USB连接到串口调试扩展板,可以看到OpenMV的串口UART3上发送的数据。
OpenMV和串口调试扩展板,通过2条USB线,都连接到电脑。
使用TTL-USB模块
如果没有OpenMV串口调试扩展板,也可以使用TTL-USB模块,他的作用和OpenMV串口调试扩展板一样。
首先我们要了解的是:各种单片机(包括Arduino, OpenMV, esp8266, stm32, 51)使用的串口都是TTL串口!不是rs485,不是rs232!
TTL串口的电压是3.3V或者5V,RS232的电压是+-15V,RS485的电压是5V,但是两根数据线是差分线,协议不一样,不能通用的。
我们使用的模块是TTL转USB模块(推荐使用cp2104模块,稍微贵一点,但是质量好):

连接图(注意共地和RXTX交错连接):
| OpenMV | FTDI |
|---|---|
| P4(TX) | RX |
| P5(RX) | TX |
| GND | GND |
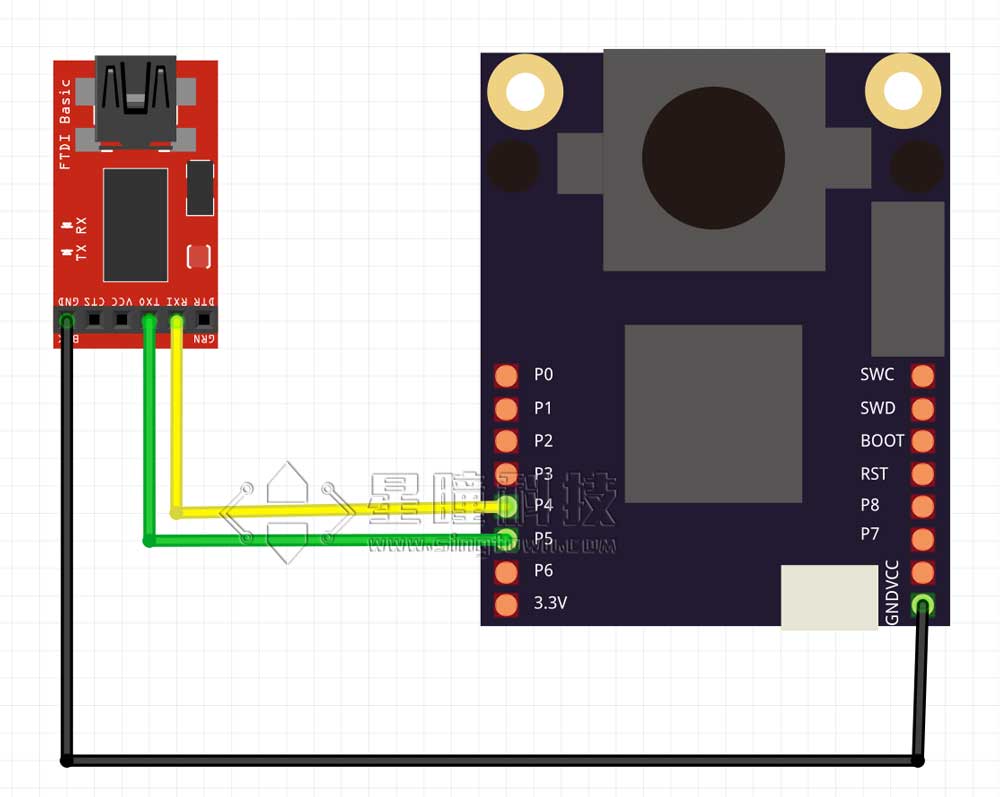
将TTL模块的USB端插入电脑,会出现一个串口。
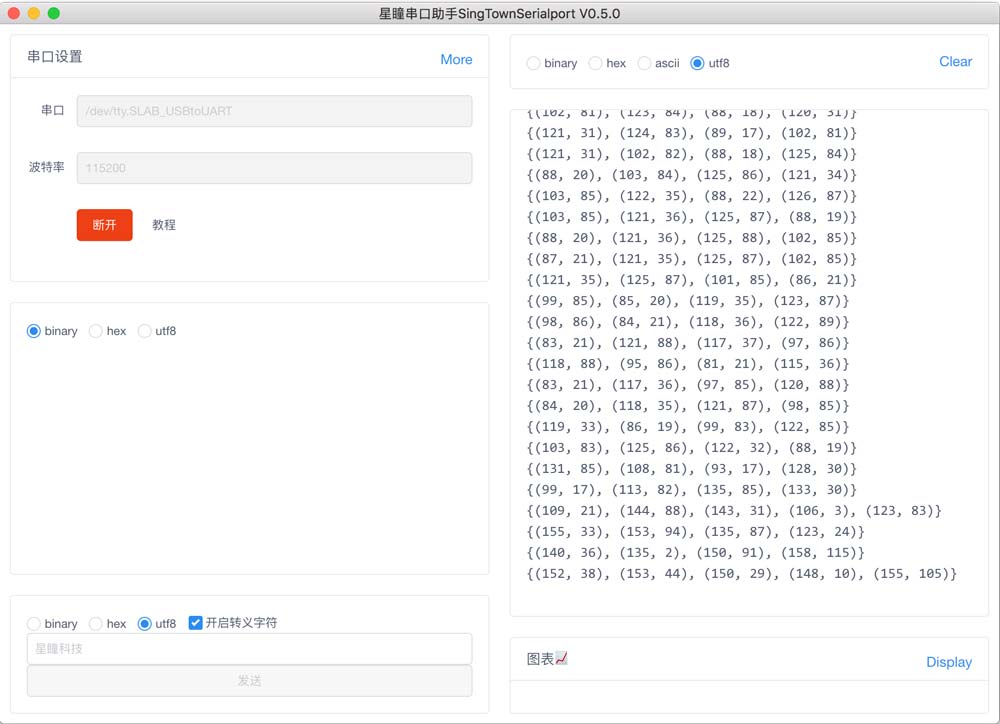
星瞳串口助手
星瞳串口助手是一款,简洁易用,支持Windows,MacOS,Linux的开源的串口助手。
运行程序
注意,有些软件是可以选择HEX(16进制)或者ASC(ascii),要选择ASC,才能显示字符串。
OpenMV上运行uart.write("hello world!")的程序(见上节)。
在串口助手会显示Hello world!字符。
如果运行下面的程序:
import sensor, image, time
import json
from machine import UART
#from pyb import UART
# For color tracking to work really well you should ideally be in a very, very,
# very, controlled enviroment where the lighting is constant...
yellow_threshold   = ( 46,  100,  -68,   72,   58,   92)
# You may need to tweak the above settings for tracking green things...
# Select an area in the Framebuffer to copy the color settings.sensor.reset() # Initialize the camera sensor.
sensor.set_pixformat(sensor.RGB565) # use RGB565.
sensor.set_framesize(sensor.QQVGA) # use QQVGA for speed.
sensor.skip_frames(10) # Let new settings take affect.
sensor.set_auto_whitebal(False) # turn this off.
clock = time.clock() # Tracks FPS.# OpenMV4 H7 Plus, OpenMV4 H7, OpenMV3 M7, OpenMV2 M4 的UART(3)是P4-TX P5-RX
uart = UART(3, 115200)   #OpenMV RT 注释掉这一行,用下一行UART(1)
#uart = UART(1, 115200)  #OpenMV RT 用UART(1)这行,注释掉上一行UART(3)
# OpenMV RT 只有串口UART(1),对应P4-TX P5-RX; OpenMV4 H7 Plus, OpenMV4 H7, OpenMV3 M7 的UART(1)是P0-RX P1-TXwhile(True):clock.tick() # Track elapsed milliseconds between snapshots().img = sensor.snapshot() # Take a picture and return the image.blobs = img.find_blobs([yellow_threshold])if blobs:#print('sum : %d'% len(blobs))data=[]for b in blobs:# Draw a rect around the blob.img.draw_rectangle(b.rect()) # rectimg.draw_cross(b.cx(), b.cy()) # cx, cydata.append((b.cx(),b.cy()))#{(1,22),(-3,33),(22222,0),(9999,12),(0,0)}data_out = json.dumps(set(data))uart.write(data_out +'\n')print('you send:',data_out)else:print("not found!")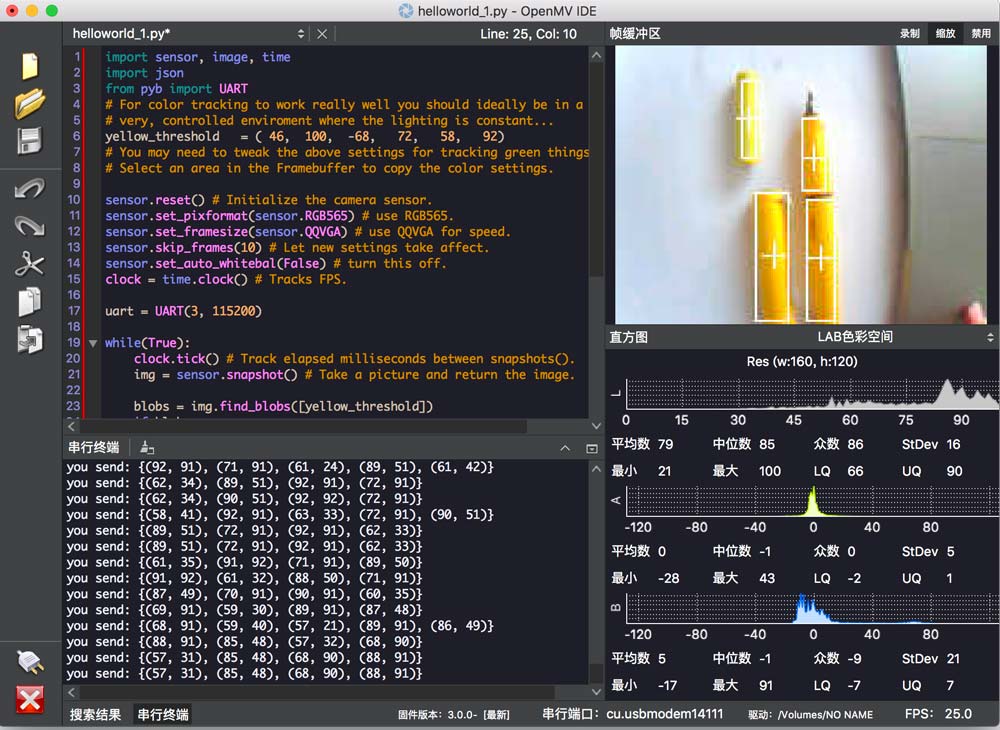
会将所有的色块的中心坐标发出去。
星瞳串口助手会显示接收到的数据:
Arduino解析程序
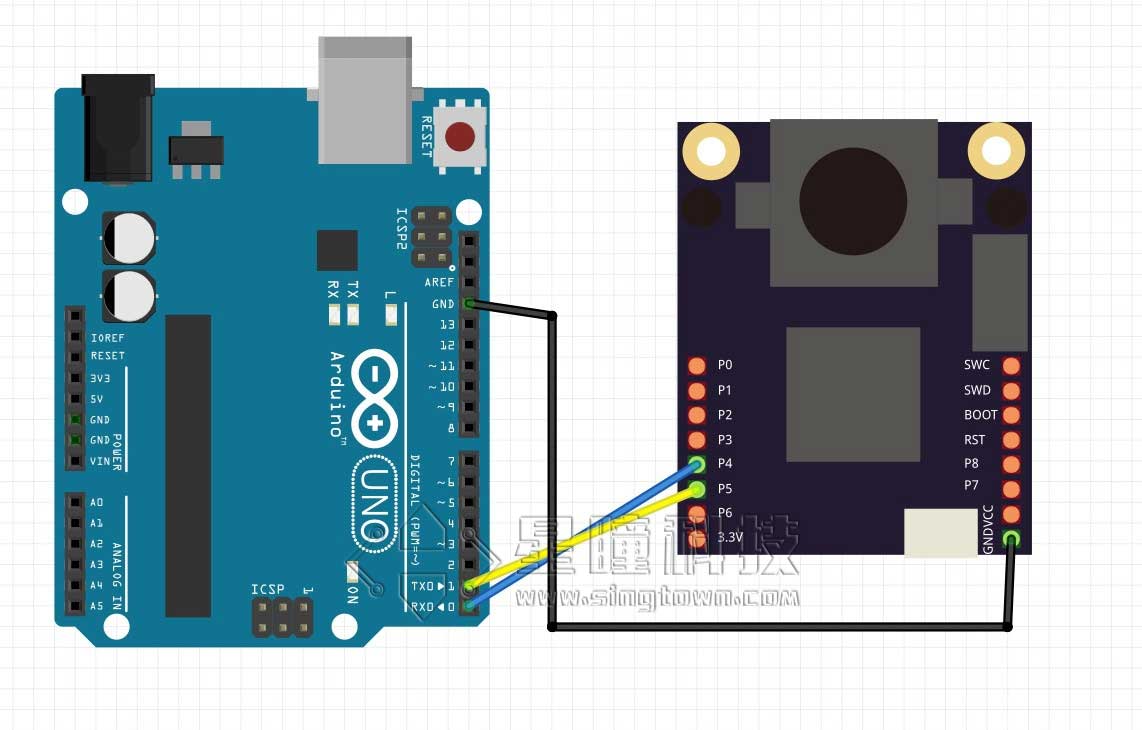
因为Arduino Uno只有一个串口,一个用来接受,就没办法发送给电脑显示了。所以我们使用软件模拟串口,来进行串口转发程序。
| OpenMV | Arduino |
|---|---|
| P4(TX) | 10(RX) |
| P5(RX) | 11(TX) |
| GND | GND |
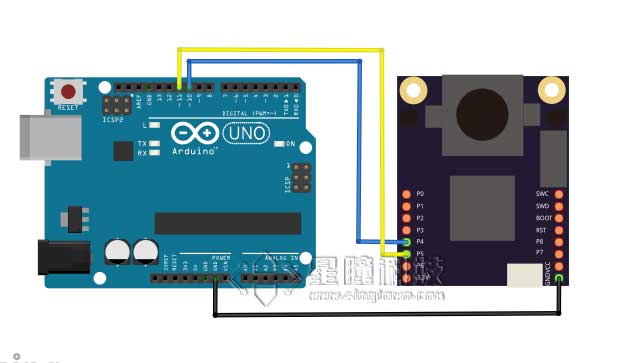
转发逻辑是这样的:OpenMV的数据发送给Arduino Uno的软串口,Arduino的串口连接到电脑并显示结果的。
所以,在ArduinoMega的逻辑就是:读softSerial的数据(json),然后解析成数组,发送给Serial(电脑)。
代码
#include <SoftwareSerial.h>SoftwareSerial softSerial(10, 11); // RX, TX
typedef struct
{int data[50][2] = {{0,0}};int len = 0;
}List;
List list;void setup() {// put your setup code here, to run once:softSerial.begin(115200);Serial.begin(115200);
}void loop() {if(softSerial.available()){getList();for (int i=0; i<list.len; i++){Serial.print(list.data[i][0]);Serial.print('\t');Serial.println(list.data[i][1]);}Serial.println("============");clearList();}}String detectString()
{while(softSerial.read() != '{');return(softSerial.readStringUntil('}'));
}
void clearList()
{memset(list.data, sizeof(list.data),0);list.len = 0;
}
void getList()
{String s = detectString();String numStr = "";for(int i = 0; i<s.length(); i++){if(s[i]=='('){numStr = "";}else if(s[i] == ','){list.data[list.len][0] = numStr.toInt();numStr = "";}else if(s[i]==')'){list.data[list.len][1] = numStr.toInt();numStr = "";list.len++;}else{numStr += s[i];}}
}
这篇关于[星瞳科技]OpenMV如何进行串口通信?的文章就介绍到这儿,希望我们推荐的文章对编程师们有所帮助!


