本文主要是介绍tensorRT C++使用pt转engine模型进行推理,希望对大家解决编程问题提供一定的参考价值,需要的开发者们随着小编来一起学习吧!
目录
- 1. 前言
- 2. 模型转换
- 3. 修改Binding
- 4. 修改后处理
1. 前言
本文不讲tensorRT的推理流程,因为这种文章很多,这里着重讲从标准yolov5的tensort推理代码(模型转pt->wts->engine)改造成TPH-yolov5(pt->onnx->engine)的过程。
2. 模型转换
请查看上一篇文章https://blog.csdn.net/wyw0000/article/details/139737473?spm=1001.2014.3001.5502
3. 修改Binding
如果不修改Binding,会报下图中的错误。
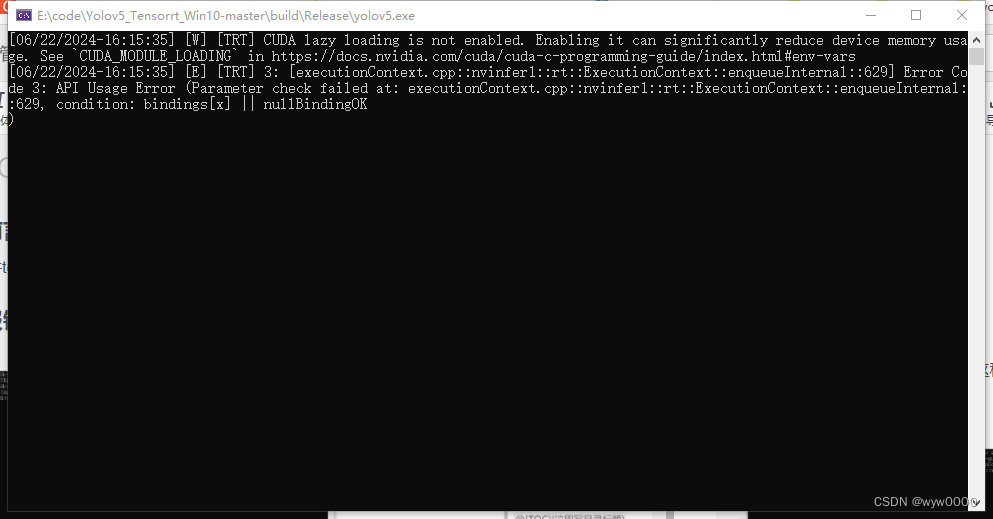
该问题是由于Binding有多个,而代码中只申请了input和output,那么如何查看engine模型有几个Bingding呢?代码如下:
int get_model_info(const string& model_path) {// 创建 loggerLogger gLogger;// 从文件中读取 enginestd::ifstream engineFile(model_path, std::ios::binary);if (!engineFile) {std::cerr << "Failed to open engine file." << std::endl;return -1;}engineFile.seekg(0, engineFile.end);long int fsize = engineFile.tellg();engineFile.seekg(0, engineFile.beg);std::vector<char> engineData(fsize);engineFile.read(engineData.data(), fsize);if (!engineFile) {std::cerr << "Failed to read engine file." << std::endl;return -1;}// 反序列化 engineauto runtime = nvinfer1::createInferRuntime(gLogger);auto engine = runtime->deserializeCudaEngine(engineData.data(), fsize, nullptr);// 获取并打印输入和输出绑定信息for (int i = 0; i < engine->getNbBindings(); ++i) {nvinfer1::Dims dims = engine->getBindingDimensions(i);nvinfer1::DataType type = engine->getBindingDataType(i);std::cout << "Binding " << i << " (" << engine->getBindingName(i) << "):" << std::endl;std::cout << "  Type: " << (int)type << std::endl;std::cout << "  Dimensions: ";for (int j = 0; j < dims.nbDims; ++j) {std::cout << (j ? "x" : "") << dims.d[j];}std::cout << std::endl;std::cout << "  Is Input: " << (engine->bindingIsInput(i) ? "Yes" : "No") << std::endl;}// 清理资源engine->destroy();runtime->destroy();return 0;
}
下图是我的tph-yolov5的Binding,可以看到有5个Binding,因此在doInference推理之前,要给5个Binding都申请空间,同时要注意获取BindingIndex时,名称和dimension与查询出来的对应。

//for tph-yolov5int Sigmoid_921_index = trt->engine->getBindingIndex("onnx::Sigmoid_921");int Sigmoid_1183_index = trt->engine->getBindingIndex("onnx::Sigmoid_1183");int Sigmoid_1367_index = trt->engine->getBindingIndex("onnx::Sigmoid_1367");CUDA_CHECK(cudaMalloc(&trt->buffers[Sigmoid_921_index], BATCH_SIZE * 3 * 192 * 192 * 7 * sizeof(float)));CUDA_CHECK(cudaMalloc(&trt->buffers[Sigmoid_1183_index], BATCH_SIZE * 3 * 96 * 96 * 7 * sizeof(float)));CUDA_CHECK(cudaMalloc(&trt->buffers[Sigmoid_1367_index], BATCH_SIZE * 3 * 48 * 48 * 7 * sizeof(float)));trt->data = new float[BATCH_SIZE * 3 * INPUT_H * INPUT_W];trt->prob = new float[BATCH_SIZE * OUTPUT_SIZE];trt->inputIndex = trt->engine->getBindingIndex(INPUT_BLOB_NAME);trt->outputIndex = trt->engine->getBindingIndex(OUTPUT_BLOB_NAME);
还有推理的部分也要做修改,原来只有input和output两个Binding时,那么输出是buffers[1],而目前是有5个Binding那么输出就变成了buffers[4]
void doInference(IExecutionContext& context, cudaStream_t& stream, void **buffers, float* output, int batchSize) {// infer on the batch asynchronously, and DMA output back to hostcontext.enqueueV2(buffers, stream, nullptr);//CUDA_CHECK(cudaMemcpyAsync(output, buffers[1], batchSize * OUTPUT_SIZE * sizeof(float), cudaMemcpyDeviceToHost, stream));CUDA_CHECK(cudaMemcpyAsync(output, buffers[4], batchSize * OUTPUT_SIZE * sizeof(float), cudaMemcpyDeviceToHost, stream));cudaStreamSynchronize(stream);
}
4. 修改后处理
之前的yolov5推理代码是将pt模型转为wts再转为engine的,输出维度只有一维,而TPH输出维度为145152*7,因此要对原来的后处理代码进行修改。
struct BoundingBox {//bbox[0],bbox[1],bbox[2],bbox[3],conf, class_idfloat x1, y1, x2, y2, score, index;
};float iou(const BoundingBox&  box1, const BoundingBox& box2) {float max_x = max(box1.x1, box2.x1);  // 找出左上角坐标哪个大float min_x = min(box1.x2, box2.x2);  // 找出右上角坐标哪个小float max_y = max(box1.y1, box2.y1);float min_y = min(box1.y2, box2.y2);if (min_x <= max_x || min_y <= max_y) // 如果没有重叠return 0;float over_area = (min_x - max_x) * (min_y - max_y);  // 计算重叠面积float area_a = (box1.x2 - box1.x1) * (box1.y2 - box1.y1);float area_b = (box2.x2 - box2.x1) * (box2.y2 - box2.y1);float iou = over_area / (area_a + area_b - over_area);return iou;
}std::vector<BoundingBox> nonMaximumSuppression(std::vector<std::vector<float>>& boxes, float overlapThreshold) {std::vector<BoundingBox> convertedBoxes;// 将数据转换为BoundingBox结构体for (const auto&  box: boxes) {if (box.size() == 6) { // Assuming [x1, y1, x2, y2, score]BoundingBox bbox;bbox.x1 = box[0];bbox.y1 = box[1];bbox.x2 = box[2];bbox.y2 = box[3];bbox.score = box[4];bbox.index = box[5];convertedBoxes.push_back(bbox);}else {std::cerr << "Invalid box format!" << std::endl;}}// 对框按照分数降序排序std::sort(convertedBoxes.begin(), convertedBoxes.end(), [](const BoundingBox& a, const BoundingBox&  b) {return a.score > b.score;});// 非最大抑制std::vector<BoundingBox> result;std::vector<bool> isSuppressed(convertedBoxes.size(), false);for (size_t i = 0; i < convertedBoxes.size(); ++i) {if (!isSuppressed[i]) {result.push_back(convertedBoxes[i]);for (size_t j = i + 1; j < convertedBoxes.size(); ++j) {if (!isSuppressed[j]) {float overlap = iou(convertedBoxes[i], convertedBoxes[j]);if (overlap > overlapThreshold) {isSuppressed[j] = true;}}}}}
#if 0// 输出结果std::cout << "NMS Result:" << std::endl;for (const auto& box: result) {std::cout << "x1: " << box.x1 << ", y1: " << box.y1<< ", x2: " << box.x2 << ", y2: " << box.y2<< ", score: " << box.score << ",index:" << box.index << std::endl;}
#endif return result;
}void post_process(float *prob_model, float conf_thres, float overlapThreshold, std::vector<Yolo::Detection> & detResult)
{int cols = 7, rows = 145152;//  ========== 8. 获取推理结果 =========std::vector<std::vector<float>> prediction(rows, std::vector<float>(cols));int index = 0;for (int i = 0; i < rows; ++i) {for (int j = 0; j < cols; ++j) {prediction[i][j] = prob_model[index++];}}//  ========== 9. 大于conf_thres加入xc =========std::vector<std::vector<float>> xc;for (const auto& row : prediction) {if (row[4] > conf_thres) {xc.push_back(row);}}//  ========== 10. 置信度 = obj_conf * cls_conf =========//std::cout << xc[0].size() << std::endl;for (auto& row: xc) {for (int i = 5; i < xc[0].size(); i++) {row[i] *= row[4];}}// ========== 11. 切片取出xywh 转为xyxy=========std::vector<std::vector<float>> xywh;for (const auto& row: xc) {std::vector<float> sliced_row(row.begin(), row.begin() + 4);xywh.push_back(sliced_row);}std::vector<std::vector<float>> box(xywh.size(), std::vector<float>(4, 0.0));xywhtoxxyy(xywh, box);// ========== 12. 获取置信度最高的类别和索引=========std::size_t mi = xc[0].size();std::vector<float> conf(xc.size(), 0.0);std::vector<float> j(xc.size(), 0.0);for (std::size_t i = 0; i < xc.size(); ++i) {// 模拟切片操作 x[:, 5:mi]auto sliced_x = std::vector<float>(xc[i].begin() + 5, xc[i].begin() + mi);// 计算 maxauto max_it = std::max_element(sliced_x.begin(), sliced_x.end());// 获取 max 的索引std::size_t max_index = std::distance(sliced_x.begin(), max_it);// 将 max 的值和索引存储到相应的向量中conf[i] = *max_it;j[i] = max_index;  // 加上切片的起始索引}// ========== 13. concat x1, y1, x2, y2, score, index;======== =for (int i = 0; i < xc.size(); i++) {box[i].push_back(conf[i]);box[i].push_back(j[i]);}std::vector<std::vector<float>> output;for (int i = 0; i < xc.size(); i++) {output.push_back(box[i]); // 创建一个空的 float 向量并}// ==========14 应用非最大抑制 ==========std::vector<BoundingBox>  result = nonMaximumSuppression(output, overlapThreshold);for (const auto& r : result){Yolo::Detection det;det.bbox[0] = r.x1;det.bbox[1] = r.y1;det.bbox[2] = r.x2;det.bbox[3] = r.y2;det.conf = r.score;det.class_id = r.index;detResult.push_back(det);}}
代码参考:
https://blog.csdn.net/rooftopstars/article/details/136771496
https://blog.csdn.net/qq_73794703/article/details/132147879
这篇关于tensorRT C++使用pt转engine模型进行推理的文章就介绍到这儿,希望我们推荐的文章对编程师们有所帮助!


