本文主要是介绍android 彩虹进度条自定义view实现,希望对大家解决编程问题提供一定的参考价值,需要的开发者们随着小编来一起学习吧!

实现一个彩虹色进度条功能,不说明具体用途大家应该能猜到。想找别人造的轮子,但是没有合适的,所以决定自己实现一个。
相关知识
android 自定义view
LinearGradient 线性渐变
实现步骤
自定义view
自定义一个TmcView类继承View
重写两个构造方法。构造方法一共有4个,这里边重写两个
重写ongSizeChanged方法,用来获取控件宽、高,来计算内部组件尺寸。
重写onDraw方法,里边要描画背景drawBackground,分段数据drawSection,和seekbar图片drawImage。
import android.content.Context;
import android.graphics.Canvas;
import android.util.AttributeSet;
import android.view.View;import androidx.annotation.Nullable;import java.util.List;public class TmcView extends View {public TmcView(Context context) {super(context);}public TmcView(Context context, @Nullable AttributeSet attrs) {super(context, attrs);}@Overrideprotected void onSizeChanged(int w, int h, int oldw, int oldh) {super.onSizeChanged(w, h, oldw, oldh);}@Overrideprotected void onDraw(Canvas canvas) {super.onDraw(canvas);drawBackground(canvas);drawSection(canvas);drawImage(canvas);}/*** 画背景* @param canvas 画布*/private void drawBackground(Canvas canvas) {}/*** 画分段数据* @param canvas 画布*/private void drawSection(Canvas canvas) {}/*** 画图片* @param canvas 画布*/private void drawImage(Canvas canvas) {}/*** 更新view* @param total 总长度* @param rest 剩余长度* @param sections 分段数据*/public void updateView(int total, int rest, List<SectionData> sections){}
实现几个重构方法
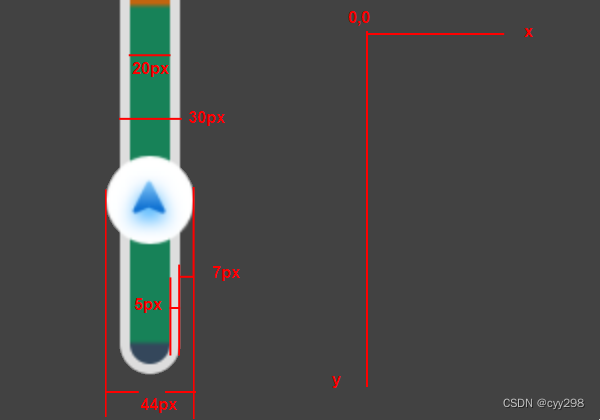
标注:
整体宽度为图片宽度44px
背景条宽度30px,外边距7px,圆角15px
带颜色的条宽度20xp,外边距5px,圆角15px
自定义view的坐标轴是以view的左上角位置为原点,向右为x轴正方向,向下为y轴正方向
在视图中用RectF创建背景,和颜色条,并在onSizeChanged中设置尺寸
public class TmcView extends View {private final RectF backgroundRectF = new RectF();private final RectF colorRectF = new RectF();public TmcView(Context context) {super(context);}public TmcView(Context context, @Nullable AttributeSet attrs) {super(context, attrs);}@Overrideprotected void onSizeChanged(int w, int h, int oldw, int oldh) {super.onSizeChanged(w, h, oldw, oldh);//设置矩形 left top right bottom 左上右下点的值  按照标注计算得出backgroundRectF.set(7, 0, 37, h);colorRectF.set(12, 5, 32, h-5);}...
}
绘制背景条

实现drawBackground方法,画背景需要一根画笔Paint 为了避免重复创建,声明为成员变量
public class TmcView extends View {/*背景画笔*/private final Paint backPaint = new Paint(Paint.ANTI_ALIAS_FLAG);private final RectF backgroundRectF = new RectF();private final RectF colorRectF = new RectF();public TmcView(Context context) {super(context);}public TmcView(Context context, @Nullable AttributeSet attrs) {super(context, attrs);}@Overrideprotected void onSizeChanged(int w, int h, int oldw, int oldh) {super.onSizeChanged(w, h, oldw, oldh);//设置矩形 left top right bottom 左上右下点的值  按照标注计算得出backgroundRectF.set(7, 0, 37, h);colorRectF.set(12, 5, 32, h-5);}@Overrideprotected void onDraw(Canvas canvas) {super.onDraw(canvas);drawBackground(canvas);drawSection(canvas);drawImage(canvas);}/*** 画背景* @param canvas 画布*/private void drawBackground(Canvas canvas) {backPaint.setStyle(Paint.Style.FILL);backPaint.setAntiAlias(true); //抗锯齿backPaint.setColor(Color.parseColor("#FFFFFF"));//画圆角矩形,15为圆角的角度canvas.drawRoundRect(backgroundRectF, 15, 15, backPaint);}
...
}
布局中加入TmcView
<com.bigxuan.tesapp.view.TmcViewandroid:id="@+id/tmc"android:layout_width="44px"android:layout_height="690px"android:layout_marginEnd="1230px"android:layout_marginBottom="100px"app:layout_constraintBottom_toBottomOf="parent"app:layout_constraintEnd_toEndOf="parent"/>绘制颜色条
![]()
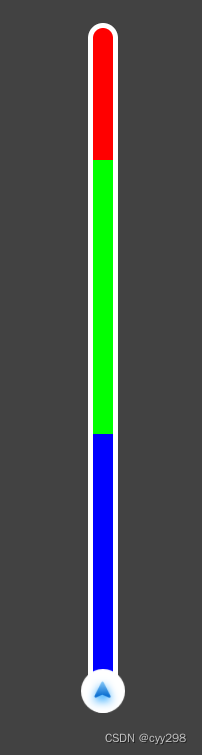
实现drawSection方法,这里要用到线性渐变LinearGradient
LinearGradient 简单说,指定每一段的颜色和位置百分比,就能实现每一段显示不同颜色。
但它默认是渐变色,要想不变就在每一段的开始和结束位置都设置相同的颜色。
再创建一个画笔 Paint,画颜色条
public class TmcView extends View {private final Paint backPaint = new Paint(Paint.ANTI_ALIAS_FLAG);private final Paint colorPaint = new Paint(Paint.ANTI_ALIAS_FLAG);private final RectF backgroundRectF = new RectF();private final RectF colorRectF = new RectF();public TmcView(Context context) {super(context);}public TmcView(Context context, @Nullable AttributeSet attrs) {super(context, attrs);}@Overrideprotected void onSizeChanged(int w, int h, int oldw, int oldh) {super.onSizeChanged(w, h, oldw, oldh);//设置矩形 left top right bottom 左上右下点的值  按照标注计算得出backgroundRectF.set(7, 0, 37, h);colorRectF.set(12, 5, 32, h-5);}@Overrideprotected void onDraw(Canvas canvas) {super.onDraw(canvas);drawBackground(canvas);drawSection(canvas);drawImage(canvas);}/*** 画背景* @param canvas 画布*/private void drawBackground(Canvas canvas) {backPaint.setStyle(Paint.Style.FILL);backPaint.setAntiAlias(true); //抗锯齿backPaint.setColor(Color.parseColor("#FFFFFF"));//画圆角矩形,15为圆角的角度canvas.drawRoundRect(backgroundRectF, 15, 15, backPaint);}/*** 画分段数据* @param canvas 画布*/private void drawSection(Canvas canvas) {int[] colorArray = {Color.parseColor("#FF0000"), Color.parseColor("#FF0000"),Color.parseColor("#00FF00"), Color.parseColor("#00FF00"),Color.parseColor("#0000FF"), Color.parseColor("#0000FF")};float[] positionArray = {0f, 0.2f,0.2f, 0.6f,0.6f, 1f};colorPaint.setStyle(Paint.Style.FILL);colorPaint.setAntiAlias(true);//指定渐变色方向x轴方向不变,沿y方向渐变,渐变范围为 颜色条高度colorPaint.setShader(new LinearGradient(0, 0, 0, colorRectF.bottom, colorArray, positionArray, Shader.TileMode.REPEAT));canvas.drawRoundRect(colorRectF,15, 15, colorPaint);}...
}
绘制进度图片
app加入图片资源,根据资源id获取bitmap对象,绘制。
需要注意的是,坐标轴的顶点在左上角,绘制图片时也是以图片左上顶点位置做定位,图片位置是view的高度减掉图片的高度,才能显示在正确位置。
public class TmcView extends View {private Context context;private final Paint backPaint = new Paint(Paint.ANTI_ALIAS_FLAG);private final Paint colorPaint = new Paint(Paint.ANTI_ALIAS_FLAG);private final RectF backgroundRectF = new RectF();private final RectF colorRectF = new RectF();/*图片资源id*/private int imgResId;/*图片位置*/private int imgPos;public TmcView(Context context) {super(context);}public TmcView(Context context, @Nullable AttributeSet attrs) {super(context, attrs);this.context = context;this.imgResId = R.drawable.icon_seekbar_day;}@Overrideprotected void onSizeChanged(int w, int h, int oldw, int oldh) {super.onSizeChanged(w, h, oldw, oldh);//设置矩形 left top right bottom 左上右下点的值  按照标注计算得出backgroundRectF.set(7, 0, 37, h);colorRectF.set(12, 5, 32, h-5);imgPos = h - 44; // 设置一个初始位置}@Overrideprotected void onDraw(Canvas canvas) {super.onDraw(canvas);drawBackground(canvas);drawSection(canvas);drawImage(canvas);}/*** 画背景* @param canvas 画布*/private void drawBackground(Canvas canvas) {backPaint.setStyle(Paint.Style.FILL);backPaint.setAntiAlias(true); //抗锯齿backPaint.setColor(Color.parseColor("#FFFFFF"));//画圆角矩形,15为圆角的角度canvas.drawRoundRect(backgroundRectF, 15, 15, backPaint);}/*** 画分段数据* @param canvas 画布*/private void drawSection(Canvas canvas) {int[] colorArray = {Color.parseColor("#FF0000"), Color.parseColor("#FF0000"),Color.parseColor("#00FF00"), Color.parseColor("#00FF00"),Color.parseColor("#0000FF"), Color.parseColor("#0000FF")};float[] positionArray = {0f, 0.2f,0.2f, 0.6f,0.6f, 1f};colorPaint.setStyle(Paint.Style.FILL);colorPaint.setAntiAlias(true);//指定渐变色方向x轴方向不变,沿y方向渐变,渐变范围为 颜色条高度colorPaint.setShader(new LinearGradient(0, 0, 0, colorRectF.bottom, colorArray, positionArray, Shader.TileMode.REPEAT));canvas.drawRoundRect(colorRectF,15, 15, colorPaint);}/*** 画图片* @param canvas 画布*/private void drawImage(Canvas canvas) {Bitmap bitmap = initBitmap(imgResId);canvas.save();canvas.translate(0, 0);canvas.drawBitmap(bitmap, 0, imgPos, null);canvas.restore();}/*** 通过资源id 创建bitmap* @param resId 资源id* @return*/private Bitmap initBitmap(int resId) {Bitmap originalBmp = BitmapFactory.decodeResource(context.getResources(), resId);return Bitmap.createScaledBitmap(originalBmp, 44, 44, true);}
...
}
公共方法
暴露方法用来更新进度updateView
定义一个图片有效的运动距离为view高度减掉图片高度,函数参数为总距离和剩余距离,计算百分比后乘以有效运动距离得出图片描画位置。最后调用invalidate方法刷新view
import android.content.Context;
import android.graphics.Bitmap;
import android.graphics.BitmapFactory;
import android.graphics.Canvas;
import android.graphics.Color;
import android.graphics.LinearGradient;
import android.graphics.Paint;
import android.graphics.RectF;
import android.graphics.Shader;
import android.util.AttributeSet;
import android.view.View;import androidx.annotation.Nullable;import com.navinfo.tesapp.R;import java.util.List;public class TmcView extends View {private Context context;private final Paint backPaint = new Paint(Paint.ANTI_ALIAS_FLAG);private final Paint colorPaint = new Paint(Paint.ANTI_ALIAS_FLAG);private final RectF backgroundRectF = new RectF();private final RectF colorRectF = new RectF();/*图片资源id*/private int imgResId;/*图片位置*/private int imgPos;/*图片有效的运动距离*/private int imgValidHeight;public TmcView(Context context) {super(context);}public TmcView(Context context, @Nullable AttributeSet attrs) {super(context, attrs);this.context = context;this.imgResId = R.drawable.icon_seekbar_day;}@Overrideprotected void onSizeChanged(int w, int h, int oldw, int oldh) {super.onSizeChanged(w, h, oldw, oldh);//设置矩形 left top right bottom 左上右下点的值  按照标注计算得出backgroundRectF.set(7, 0, 37, h);colorRectF.set(12, 5, 32, h-5);imgValidHeight = h - 44;imgPos = h - 44; // 设置一个初始位置}@Overrideprotected void onDraw(Canvas canvas) {super.onDraw(canvas);drawBackground(canvas);drawSection(canvas);drawImage(canvas);}/*** 画背景* @param canvas 画布*/private void drawBackground(Canvas canvas) {backPaint.setStyle(Paint.Style.FILL);backPaint.setAntiAlias(true); //抗锯齿backPaint.setColor(Color.parseColor("#FFFFFF"));//画圆角矩形,15为圆角的角度canvas.drawRoundRect(backgroundRectF, 15, 15, backPaint);}/*** 画分段数据* @param canvas 画布*/private void drawSection(Canvas canvas) {int[] colorArray = {Color.parseColor("#FF0000"), Color.parseColor("#FF0000"),Color.parseColor("#00FF00"), Color.parseColor("#00FF00"),Color.parseColor("#0000FF"), Color.parseColor("#0000FF")};float[] positionArray = {0f, 0.2f,0.2f, 0.6f,0.6f, 1f};colorPaint.setStyle(Paint.Style.FILL);colorPaint.setAntiAlias(true);//指定渐变色方向x轴方向不变,沿y方向渐变,渐变范围为 颜色条高度colorPaint.setShader(new LinearGradient(0, 0, 0, colorRectF.bottom, colorArray, positionArray, Shader.TileMode.REPEAT));canvas.drawRoundRect(colorRectF,15, 15, colorPaint);}/*** 画图片* @param canvas 画布*/private void drawImage(Canvas canvas) {Bitmap bitmap = initBitmap(imgResId);canvas.save();canvas.translate(0, 0);canvas.drawBitmap(bitmap, 0, imgPos, null);canvas.restore();}/**** @param resId* @return*/private Bitmap initBitmap(int resId) {Bitmap originalBmp = BitmapFactory.decodeResource(context.getResources(), resId);return Bitmap.createScaledBitmap(originalBmp, 44, 44, true);}/*** 更新view* @param total 总长度* @param rest 剩余长度* @param sections 分段数据*/public void updateView(int total, int rest, List<SectionData> sections){float percent = (1f * rest) / total;//防止溢出if(percent < 0){return;}imgPos = (int)(percent * imgValidHeight);invalidate();}
}
updateView方法还有第三个参数,是用来传出颜色条不同段的颜色和百分比数据的。根据此数据来更新颜色条。这里需要根据业务不同自己实现,我这里就不写了。
总结
大家可能看出来了,这个视图是用来展示导航中不同路段交通情况和当前车辆进度用的。自定义view中可以在构造方法中获取一些自定义属性,像背景条和颜色条的边距、圆角这些都可以定义到xml中,因为只适配一种屏幕尺寸所以也没有做多尺寸适配。以前也没有做过,这次记录下来。
这篇关于android 彩虹进度条自定义view实现的文章就介绍到这儿,希望我们推荐的文章对编程师们有所帮助!


