本文主要是介绍deep-hight-relolution-net.pytorch训练自己的关键点检测数据步骤,希望对大家解决编程问题提供一定的参考价值,需要的开发者们随着小编来一起学习吧!
- 数据集准备
- 标注转为coco格式
-
部署源码(https://github.com/HuangJunJie2017/UDP-Pose/tree/master/deep-high-resolution-net.pytorc
 https://github.com/HuangJunJie2017/UDP-Pose/tree/master/deep-high-resolution-net.pytorch
 - 修改代码适配自己的数据集
- 修改yaml文件
- 开始训练
1、labelme进行数据标注
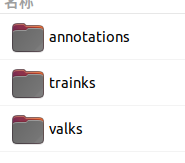
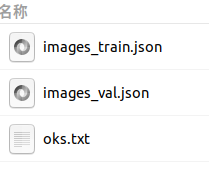
2、分别是data数据组织形式 annotations和trainks文件里的存放形式,.json参考keypoints_coco格式注意area等计算正确

3、部署时注意pytorch gpu版本的安装 conda安装很慢可以离线下载安装
torchvision-0.8.2+cu110-cp36-cp36m-linux_x86_64.whl
torch-1.7.1+cu110-cp36-cp36m-linux_x86_64.whl
cudnn-11.0-linux-x64-v8.0.2.39.tgz
系统我使用的是ubuntu20.04 cuda 11.0 cudnn注意nvidia显卡驱动等安装就绪
下载地址:https://download.pytorch.org/whl/cu110/torch_stable.html
4、源码修改涉及deep-hight-relolution-net.pytorch和pycocotools的修改
cocoeval.py 修改 523行self.kpt_oks_sigmas为自己数据集的,我的是10个点的标注所以长度为10, oks_sigmas的计算如下:
self.kpt_oks_sigmas = np.array([0.049122907658985714, 0.10621929450191409, 0.11158566108333368, 0.09565673656561206, 0.15358307377967345, 0.058919262650392636, 0.13980433515716498, 0.10966226101729055, 0.00814148481761285, 0.154930312361198])
import json
import os
import collections
import numpy as np
oks = []
points = collections.defaultdict(list)
file_path = r'datasets\hand_keypoints_10\annotations'
mean_label_points[label])**2) / area) ** 0.5
points_number = 10
for json_file in os.listdir(file_path):if not json_file.endswith('json'):continuewith open(os.path.join(file_path, json_file),'r',encoding='utf8')as fp:json_data = json.load(fp)# print('这是文件中的json数据:',json_data)print('这是读取到文件数据的数据类型:', type(json_data))shapes = json_data['annotations']for shape in shapes:for i in range(points_number):if shape['keypoints'][i*3: i * 3 + 3] != [0, 0, 0]:points[i].append(shape['keypoints'][i*3: i * 3 + 3])
print(points)
mean_label_points = collections.defaultdict(float)
for label, point in points.items():mean_label_points[label] = sum(np.array(point)) / len(point)
print(mean_label_points)
area = 400 * 400
sigmas_label_points = collections.defaultdict(float)
# sigmas_label_points[label] = 0
for label, point in points.items():sigmas_label_points[label] = 0for p in point:sigmas_label_points[label] += (sum((np.array(p) - mean_label_points[label])**2) / area) ** 0.5sigmas_label_points[label] = sigmas_label_points[label] / len(p)
print(sigmas_label_points.values())
pycocotools coco.py
def loadRes(self, resFile):........# annsImgIds = [ann['image_id'] for ann in anns]annsImgIds = [ann['id'] for ann in res.dataset['images']]assert set(annsImgIds) == (set(annsImgIds) & set(self.getImgIds())), \'Results do not correspond to current coco set'elif 'keypoints' in anns[0]:res.dataset['categories'] = copy.deepcopy(self.dataset['categories'])for id, ann in enumerate(anns):s = ann['keypoints']x = s[0::3]y = s[1::3]x0,x1,y0,y1 = np.min(x), np.max(x), np.min(y), np.max(y)ann['area'] = (x1-x0)*(y1-y0)ann['id'] = id + 1ann['image_id'] = annsImgIds[id]ann['bbox'] = [x0,y0,x1-x0,y1-y0]print('DONE (t={:0.2f}s)'.format(time.time()- tic))res.dataset['annotations'] = annsres.createIndex()return res
deep-hight-relolution-net.pytorch lib dataset coco.py
def _load_coco_keypoint_annotation_kernal(self, index):filename = im_ann['file_name']filename = os.path.join(self.root, 'trainks', filename)rec.append({# 'image': self.image_path_from_index(index),'image': filename,'center': center,'scale': scale,'joints_3d': joints_3d,'joints_3d_vis': joints_3d_vis,'filename': '','imgnum': 0,})deep-hight-relolution-net.pytorch lib dataset coco.py
init部分的修改:# load image file namesself.image_set_index = self._load_image_set_index()self.num_images = len(self.image_set_index)logger.info('=> num_images: {}'.format(self.num_images))self.num_joints = 10# self.flip_pairs = [[1, 2], [3, 4], [5, 6], [7, 8],# [0, 1], [2, 3], [4, 5], [8, 9]]self.flip_pairs = []self.parent_ids = Noneself.upper_body_ids = (0, 1, 2, 3, 4, 5, 6, 7, 8,9, 10)self.lower_body_ids = ()self.joints_weight = np.array([1., 1., 1., 1., 1., 1., 1.5, 1.5, 1.5,1.5],dtype=np.float32).reshape((self.num_joints, 1)) def evaluate(self, cfg, preds, output_dir, all_boxes, img_path,*args, **kwargs):rank = cfg.RANKres_folder = os.path.join(output_dir, 'results')if not os.path.exists(res_folder):try:os.makedirs(res_folder)except Exception:logger.error('Fail to make {}'.format(res_folder))res_file = os.path.join(res_folder, 'keypoints_{}_results_{}.json'.format(self.image_set, rank))# person x (keypoints)_kpts = []for idx, kpt in enumerate(preds):_kpts.append({'keypoints': kpt,'center': all_boxes[idx][0:2],'scale': all_boxes[idx][2:4],'area': all_boxes[idx][4],'score': all_boxes[idx][5],'image': img_path[idx].split(".jpg")[0]})根据我的数据特性不需要使用flip
FLIP_TEST FLIP: False 两个变量都设置为false
NUM_JOINTS
experiments coco hrnet yaml修改为:
AUTO_RESUME: true
CUDNN:BENCHMARK: trueDETERMINISTIC: falseENABLED: true
DATA_DIR: ''
GPUS: (0,)
OUTPUT_DIR: 'output'
LOG_DIR: 'log'
WORKERS: 0
PRINT_FREQ: 100DATASET:COLOR_RGB: trueDATASET: 'mycoco'DATA_FORMAT: jpgFLIP: FalseNUM_JOINTS_HALF_BODY: 10PROB_HALF_BODY: 0.0ROOT: 'data/hand_keypoints_10/'ROT_FACTOR: 45SCALE_FACTOR: 0.35TEST_SET: 'valks'TRAIN_SET: 'trainks'
MODEL:INIT_WEIGHTS: trueNAME: pose_hrnetNUM_JOINTS: 10PRETRAINED: 'models/pytorch/imagenet/hrnet_w32-36af842e.pth'TARGET_TYPE: gaussianIMAGE_SIZE:- 192- 256HEATMAP_SIZE:- 48- 64SIGMA: 2EXTRA:PRETRAINED_LAYERS:- 'conv1'- 'bn1'- 'conv2'- 'bn2'- 'layer1'- 'transition1'- 'stage2'- 'transition2'- 'stage3'- 'transition3'- 'stage4'FINAL_CONV_KERNEL: 1STAGE2:NUM_MODULES: 1NUM_BRANCHES: 2BLOCK: BASICNUM_BLOCKS:- 4- 4NUM_CHANNELS:- 32- 64FUSE_METHOD: SUMSTAGE3:NUM_MODULES: 4NUM_BRANCHES: 3BLOCK: BASICNUM_BLOCKS:- 4- 4- 4NUM_CHANNELS:- 32- 64- 128FUSE_METHOD: SUMSTAGE4:NUM_MODULES: 3NUM_BRANCHES: 4BLOCK: BASICNUM_BLOCKS:- 4- 4- 4- 4NUM_CHANNELS:- 32- 64- 128- 256FUSE_METHOD: SUM
LOSS:USE_TARGET_WEIGHT: true
TRAIN:BATCH_SIZE_PER_GPU: 128SHUFFLE: trueBEGIN_EPOCH: 0END_EPOCH: 2100OPTIMIZER: adamLR: 0.001LR_FACTOR: 0.1LR_STEP:- 170- 200WD: 0.0001GAMMA1: 0.99GAMMA2: 0.0MOMENTUM: 0.9NESTEROV: false
TEST:BATCH_SIZE_PER_GPU: 4COCO_BBOX_FILE: 'data/coco/person_detection_results/COCO_val2017_detections_AP_H_56_person.json'BBOX_THRE: 1.0IMAGE_THRE: 0.0IN_VIS_THRE: 0.2MODEL_FILE: ''NMS_THRE: 1.0OKS_THRE: 0.2USE_GT_BBOX: trueFLIP_TEST: FalsePOST_PROCESS: trueSHIFT_HEATMAP: trueSOFT_NMS: False
DEBUG:DEBUG: trueSAVE_BATCH_IMAGES_GT: trueSAVE_BATCH_IMAGES_PRED: trueSAVE_HEATMAPS_GT: trueSAVE_HEATMAPS_PRED: true
lib nums nums.py
def oks_iou(g, d, a_g, a_d, sigmas=None, in_vis_thre=None):if not isinstance(sigmas, np.ndarray):sigmas = np.array([.26, .25, .25, .35, .35, .79, .79, .72, .72, .62, .62, 1.07, 1.07, .87, .87, .89, .89]) / 10.0.......return ious注意 训练的时候作者提供的是多GPU模型单GPU测试结果可能是错的。自己训练模型测试是OK的。
这篇关于deep-hight-relolution-net.pytorch训练自己的关键点检测数据步骤的文章就介绍到这儿,希望我们推荐的文章对编程师们有所帮助!


