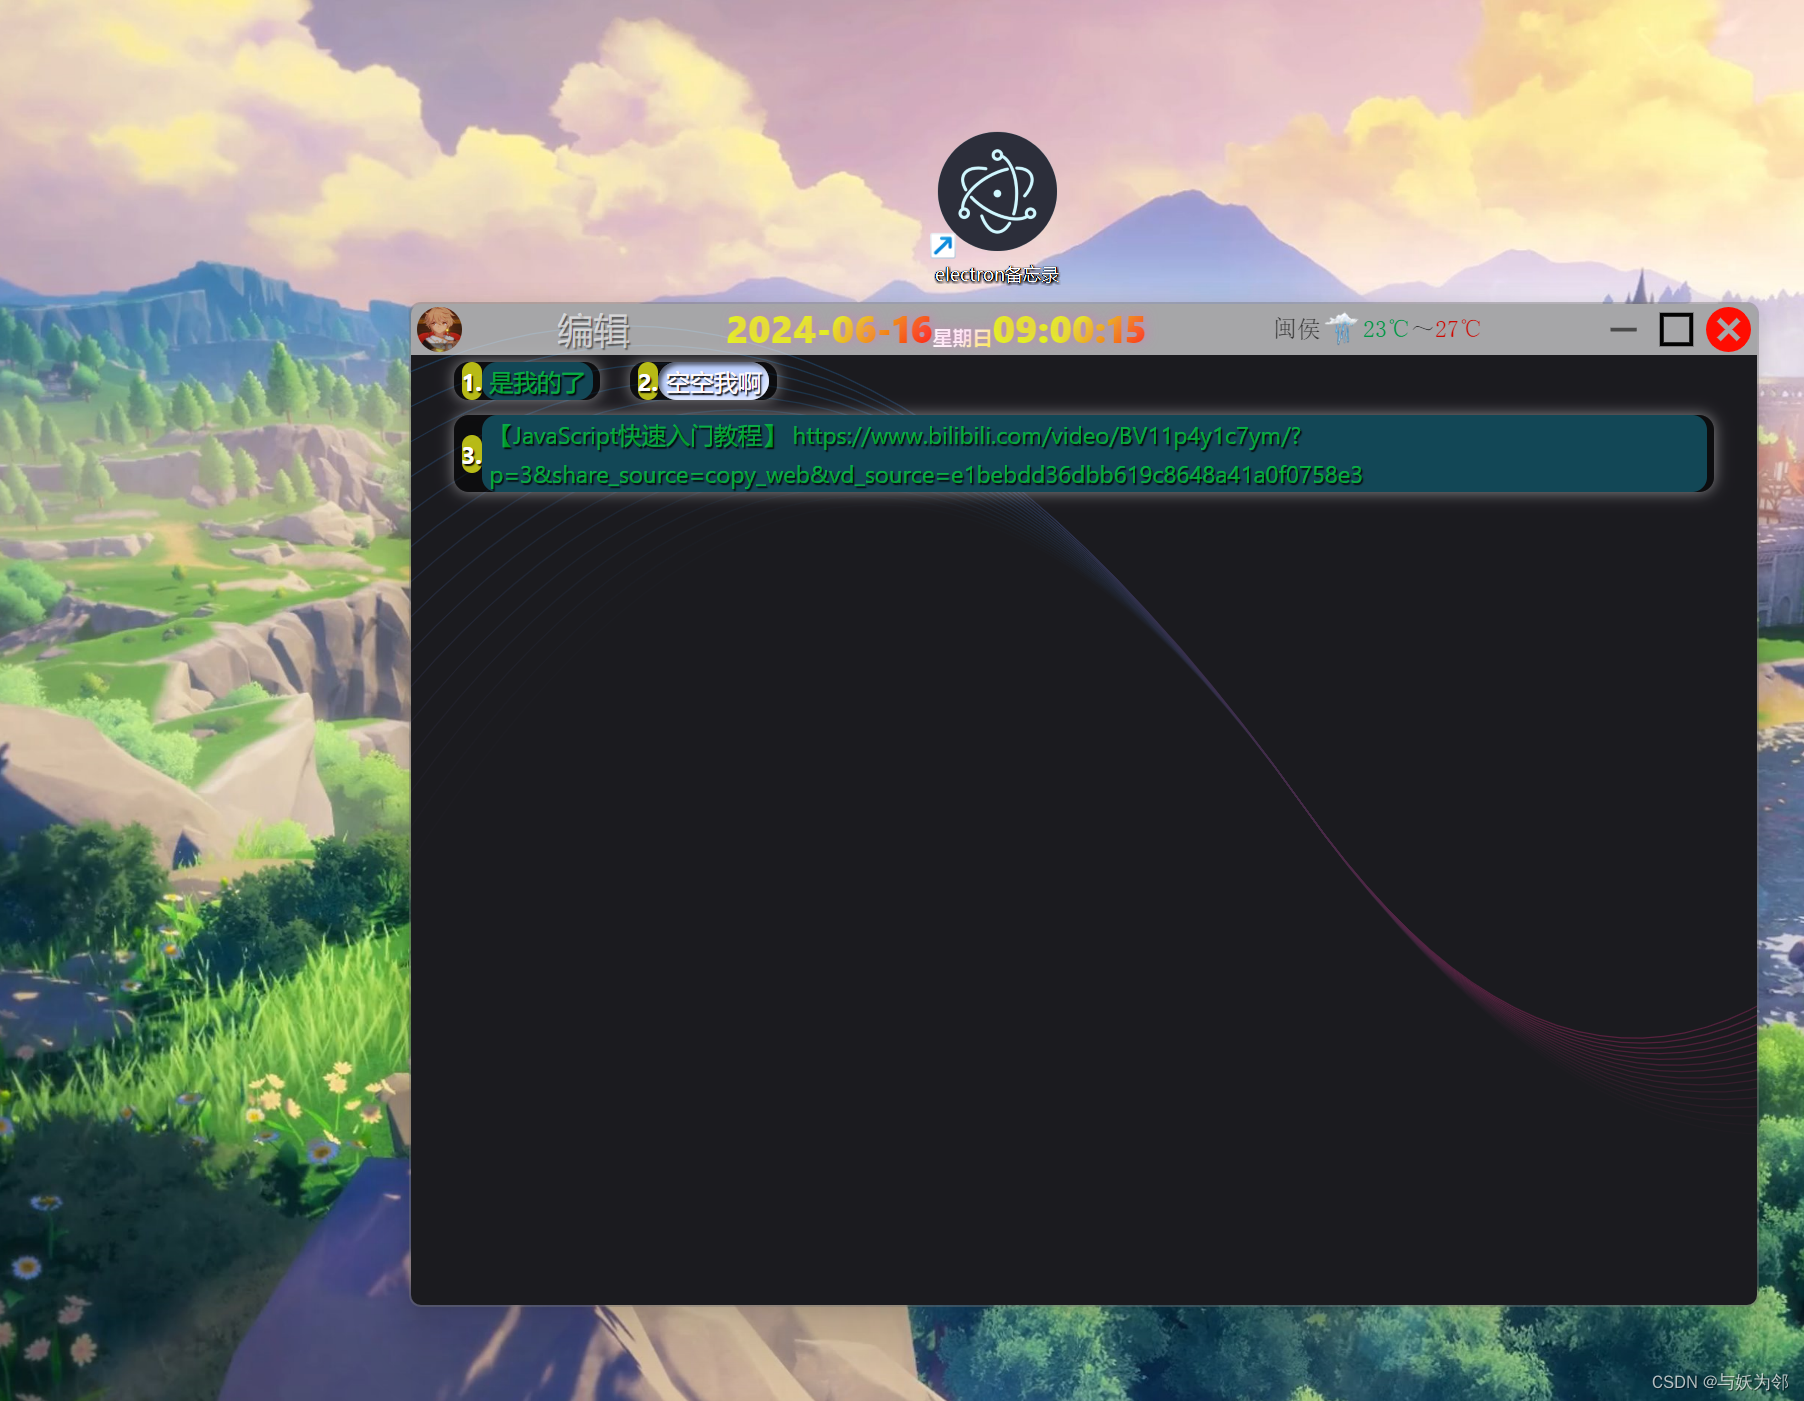
本文主要是介绍创建一个electron桌面备忘录,希望对大家解决编程问题提供一定的参考价值,需要的开发者们随着小编来一起学习吧!
Sound Of Silence
1.创建electron项目命令: npm create @quick-start/electron my-new-project
2选择:√ Select a framework: » vue
√ Add TypeScript? ... No
√ Add Electron updater plugin? ... Yes
√ Enable Electron download mirror proxy? ... Yes
3.命令:cd my-new-project
4.命令:yarn
5.启动命令: yarn dev
6.打包命令:yarn build:win
主进程代码index.js:
import { app, shell, BrowserWindow, ipcMain } from 'electron'
import { join } from 'path'
import { electronApp, optimizer, is } from '@electron-toolkit/utils'
import icon from '../../resources/icon.png?asset'
function createWindow() {// Create the browser window.创建浏览器窗口。const mainWindow = new BrowserWindow({width: 900,height: 670,// 设置窗口的尺寸是否包含窗口边框和标题栏useContentSize: true,// 在创建 Electron 主窗口时禁用窗口外框frame: false,// 控制是否显示的变量show: false,// 设置自动隐藏菜单栏为 trueautoHideMenuBar: true,alwaysOnTop: true,...(process.platform === 'linux' ? { icon } : {}),webPreferences: {preload: join(__dirname, '../preload/index.js'),sandbox: false}})mainWindow.on('ready-to-show', () => {mainWindow.show()})mainWindow.webContents.setWindowOpenHandler((details) => {shell.openExternal(details.url)return { action: 'deny' }})if (is.dev && process.env['ELECTRON_RENDERER_URL']) {mainWindow.loadURL(process.env['ELECTRON_RENDERER_URL'])} else {mainWindow.loadFile(join(__dirname, '../renderer/index.html'))}
}
app.whenReady().then(() => {electronApp.setAppUserModelId('com.electron')app.on('browser-window-created', (_, window) => {optimizer.watchWindowShortcuts(window)})ipcMain.on('ping', () => console.log('pong'))createWindow()app.on('activate', function () {if (BrowserWindow.getAllWindows().length === 0) createWindow()})
})
app.on('window-all-closed', () => {if (process.platform !== 'darwin') {app.quit()}
})
preload预加载的代码index.js:
import { contextBridge } from 'electron'
import { electronAPI } from '@electron-toolkit/preload'// Custom APIs for renderer
const api = {}// Use `contextBridge` APIs to expose Electron APIs to
// renderer only if context isolation is enabled, otherwise
// just add to the DOM global.
if (process.contextIsolated) {try {contextBridge.exposeInMainWorld('electron', electronAPI)contextBridge.exposeInMainWorld('api', api)} catch (error) {console.error(error)}
} else {window.electron = electronAPIwindow.api = api
}
渲染进程的代码main.js:
import './assets/css/main.css'
import { createApp } from 'vue'
import App from './App.vue'
createApp(App).mount('#app')
index.html
<!doctype html>
<html>
<head><meta charset="UTF-8" /><title></title><!-- https://developer.mozilla.org/en-US/docs/Web/HTTP/CSP --><meta http-equiv="Content-Security-Policy" /><!-- content="default-src 'self'; script-src 'self'; style-src 'self' 'unsafe-inline'; img-src 'self' data:"  --><!-- <iframe frameborder="0" width="0" height="0"></iframe> -->
</head>
<body><div id="app"></div><script type="module" src="/src/main.js"></script>
</body>
</html>
App.vue
<template><MyLogs />
</template>
<script setup>
import MyLogs from './components/MyLogs.vue'
</script>
MyLogs.vue
<template><div><div class="header"><a href="https://blog.csdn.net/lulei5153" title="与妖为邻CSDN博客" class="" target="_blank"><img src="../assets/img/kong.jpg" alt="与妖为邻" style="border-radius: 50%" /></a><button v-if="!formVisible" class="openForm" @click="openForm">编辑</button><button v-if="formVisible" @click="closeForm">取消编辑</button><NowTime /><iframeref="weather"frameborder="0"width="150"height="36"scrolling="no"hspace="0"src="https://i.tianqi.com/?c=code&id=99"style="margin-left: 20px"></iframe><span class="windowTool"><i class="minimize"><img src="../assets/img/最小化.svg" alt="最小化" /></i><i class="maximize"><img src="../assets/img/最大化.svg" alt="最大化" /></i><i class="close"><img src="../assets/img/关闭.svg" alt="关闭" /></i></span></div><formv-if="formVisible"class="draggable-form":style="{ top: formPosition.y + 'px', left: formPosition.x + 'px' }"@submit.prevent="addMemo"><div v-drag drag-min-top="50" class="form-title" @mousedown="startDrag">{{ formTitle }}</div><div class="form-content"><input type="reset" value="重置" /><textarea v-model="newItem" rows="10" placeholder="请输入备注内容"></textarea><button type="submit" class="addBtn">添加</button></div></form><div class="memo" @click="handleMemoAction"><div v-for="(memo, index) in memos" :key="index" class="item"><span class="item-number">{{ index + 1 }}.</span><button v-if="showActions && !memo.finished" @click="completeMemo(index)">完成</button><button v-if="showActions && memo.finished" @click="cancelMemo(index)">取消</button><span class="text-content" :class="{ content: true, finish: memo.finished }">{{ memo.name }}</span><button v-if="showActions && memo.finished" @click="reworkMemo(index)">修改</button><buttonv-if="showActions && memo.finished"v-show="noindex == index ? false : true"class="deleteBtn"@click="deleteMemo(index)">删除</button><span v-show="noindex == index ? true : false" class="alter"><textarea v-model="newItem" rows="10"></textarea><button @click="csu">提交</button></span></div></div></div>
</template>
<script setup>
import NowTime from './NowTime.vue'
import { ref } from 'vue'
import '../assets/css/MyLogs.css'
import Drag from '../assets/js/Drag.js'
const { formTitle, formPosition, startDrag } = Drag()
const formVisible = ref(false)
const newItem = ref('')
const memos = ref([])
const showActions = ref(false)
const noindex = ref(-1)
const openForm = () => {formVisible.value = trueshowActions.value = true
}
const closeForm = () => {formVisible.value = falseshowActions.value = false
}
const reworkMemo = (index) => {if (newItem.value === '' || false) {newItem.value = memos.value[index].namenoindex.value = indexformVisible.value = falseshowActions.value = false} else {newItem.value = ''noindex.value = -1}
}
const csu = () => {if (noindex.value === -1) {return}memos.value[noindex.value].name = newItem.value// 取消备忘录的完成状态memos.value[noindex.value].finished = falsenoindex.value = -1newItem.value = ''saveTodo()
}
const addMemo = () => {if (newItem.value.trim() !== '') {memos.value.push({ name: newItem.value, finished: false })newItem.value = ''formVisible.value = falseshowActions.value = falsesaveTodo()}
}
const completeMemo = (index) => {memos.value[index].finished = truesaveTodo()
}
const cancelMemo = (index) => {memos.value[index].finished = falsesaveTodo()
}
const deleteMemo = (index) => {memos.value.splice(index, 1)updateItemNumbers()formVisible.value = falseshowActions.value = falsesaveTodo()
}
const handleMemoAction = (event) => {const target = event.targetif (target.innerHTML === '完成') {// handle complete action} else if (target.innerHTML === '取消') {// handle cancel action} else if (target.innerHTML === '删除') {// handle delete action}
}
const saveTodo = () => {localStorage.myLogs = JSON.stringify(memos.value)
}
const loadTodo = () => {const savedMemos = JSON.parse(localStorage.myLogs ?? '[]')memos.value = savedMemosupdateItemNumbers()
}
const updateItemNumbers = () => {const itemNumbers = document.querySelectorAll('.item-number')itemNumbers.forEach((item, index) => {item.textContent = index + 1})
}
loadTodo()
</script>
<style scoped></style>
NowTime.vue
<template><div><p>{{ dateTime }}</p><sub>{{ dayTime }}</sub><p>{{ currentTime }}</p></div>
</template>
<script setup>
import { ref, onMounted } from 'vue'
const dateTime = ref('')
const dayTime = ref('')
const currentTime = ref('')
const updateTime = () => {const now = new Date()const year = now.getFullYear()let month = now.getMonth() + 1const day = now.getDate()let hour = now.getHours()let min = now.getMinutes()let second = now.getSeconds()const arrWork = ['星期日', '星期一', '星期二', '星期三', '星期四', '星期五', '星期六']const week = arrWork[now.getDay()]month = month < 10 ? '0' + month : monthhour = hour < 10 ? '0' + hour : hourmin = min < 10 ? '0' + min : minsecond = second < 10 ? '0' + second : seconddateTime.value = `${year}-${month}-${day}`dayTime.value = `${week}`currentTime.value = `${hour}:${min}:${second}`
}
onMounted(() => {window.setInterval(updateTime, 1000)updateTime()
})
</script>
<style scoped>
div {display: flex;
}
p {font-size: 25px;background: -webkit-linear-gradient(315deg, #e1ff00 50%, #ff0000);
}
sub {margin: 15px 0 0 0;background: -webkit-linear-gradient(315deg, hsl(0, 0%, 100%) 50%, #fcf401);
}
p,
sub {/*将背景剪切成文字的形状*/background-clip: text;-webkit-background-clip: text;/*文字颜色设为透明,使文字与背景融为一体*/-webkit-text-fill-color: transparent;/* 设置字体粗细 */font-weight: 900;text-shadow: 2px -1px 8px rgba(250, 80, 193, 0.323);
}
</style>
拖拽窗口的代码Drag.js
/* eslint-disable prettier/prettier */
/* 引入 */
import { reactive, onMounted } from 'vue'
export default function () {/*窗口移动事件*/const formTitle = '鼠标事件绑定标题栏实现拖动功能'const formPosition = reactive({ x: 0, y: 0 }) // 记录窗口位置的变量const startDrag = (event) => {event.preventDefault() // 阻止默认拖动行为const offsetX = event.clientX - formPosition.xconst offsetY = event.clientY - formPosition.yconst onDrag = (e) => {let newX = e.clientX - offsetXlet newY = e.clientY - offsetY// 边界检查newX = Math.max(0, Math.min(newX, window.innerWidth - formPosition.x))newY = Math.max(50, Math.min(newY, window.innerHeight - formPosition.y))formPosition.x = newXformPosition.y = newY}const onStopDrag = () => {document.removeEventListener('mousemove', onDrag)document.removeEventListener('mouseup', onStopDrag)}document.addEventListener('mousemove', onDrag)document.addEventListener('mouseup', onStopDrag)}onMounted(() => {const initialX = window.innerWidth / 4 // 窗口水平const initialY = window.innerHeight / 4 // 窗口垂直formPosition.x = initialXformPosition.y = initialY})return {formTitle,formPosition,startDrag}
}
MyLogs.css
button,
input {cursor: pointer;border: none;color: #ffffff94;text-shadow: 1px 1px 1px rgba(0, 0, 0, 0.5);background-color: hsla(160, 100%, 37%, 0.247);&:hover {color: #f6f200;background-color: hsla(160, 100%, 37%, 0.995);box-shadow: 0 0 15px rgba(255, 254, 254, 0.5);}
}
/* 头部样式 */
.header {width: 100%;height: 35px;position: relative;display: flex;align-items: center;justify-content: space-between;background-color: #ffffff9c;-webkit-app-region: drag;z-index: 99;img {width: 30px;height: 30px;/* border-radius: 50%; */margin: 8px 0 0px 5px;-webkit-app-region: no-drag;transition: transform 0.3s ease;&:hover {transform: scale(1.2);}}button {font-size: 1.5rem;-webkit-app-region: no-drag;background-color: hsla(160, 100%, 37%, 0);&:hover {background-color: hsla(160, 100%, 37%, 0.445);}}iframe {-webkit-app-region: no-drag;}span {min-width: 110px;i {cursor: pointer;img {width: 30px;height: 30px;&:hover {background-color: hsla(0, 100%, 50%, 0.489);}}}}
}
/* 拖动窗口的样式 */
.draggable-form {position: absolute;/* 最小宽度 */min-width: 50%;border-radius: 8px;background-color: rgba(0, 0, 0, 0.443);z-index: 199;box-shadow: 0 0 10px rgba(255, 254, 254, 0.5);
}
.form-title {text-align: center;padding: 5px;color: hsla(160, 100%, 37%, 1);box-shadow: 0 0 3px rgba(255, 255, 255, 0.751);border-radius: 5px 5px 0 0;cursor: move;
}
.form-content {display: flex;margin: 2px 5px 5px 5px;box-shadow: 0 0 3px rgba(255, 255, 255, 0.751);border-radius: 0 0 5px 5px;input,button {font-size: 1.5rem;/* 文本竖排 */writing-mode: vertical-rl;/* 文字间距 */letter-spacing: 10px;}input {border-bottom-left-radius: 5px;}button {border-bottom-right-radius: 5px;}textarea {flex: 1;font-size: 1rem;background-color: rgba(0, 0, 0, 0.308);color: rgb(255, 255, 255);text-shadow: 1px 1px 1px rgba(0, 0, 0, 0.5);&::placeholder {text-align: center;}}
}
/* 文本显示区样式 */
.memo {display: flex;align-content: flex-start;flex-wrap: wrap;margin: 0 20px;
}
.item {margin: 5px 10px;padding: 0 5px;border-radius: 10px;box-shadow: 0 0 10px rgba(255, 254, 254, 0.5);display: flex;align-items: center;&:hover {box-shadow: 0 0 15px rgba(255, 254, 254, 0.5);}.alter {position: absolute;min-width: 50%;display: flex;top: 100px;textarea {flex: 1;font-size: 1rem;color: #f85f5faf;text-shadow: 1px 1px 1px #030303;background-color: hsla(160, 96%, 18%, 0.952);box-shadow:inset -2px -2px 3px rgba(255, 255, 255, 0.6),inset 2px 2px 3px rgba(0, 0, 0, 0.6);border-radius: 10px 0 0 10px;}button {font-size: 1.5rem;/* 文本竖排 */writing-mode: vertical-rl;/* 文字间距 */letter-spacing: 10px;border-radius:0 5px  5px 0;}}
}
.item-number {/* 粗字体 */font-weight: bold;color: #fff;text-shadow: 1px 1px 1px #030303;/* 背景颜色 */background-color: #fbff06b6;border-radius: 20px;
}
.text-content {color: #1ded39a0;text-shadow: 1px 1px 1px #030303;background-color: #144756;border-radius: 10px;user-select: text;padding: 0 5px;&:hover {color: rgb(255, 250, 250);text-shadow: 1px 1px 1px #030303;background-color: rgb(191, 210, 255);}
}
/* 点击完成按钮显示.finish样式  */
.finish {/* 文本-装饰:删除线 */text-decoration: line-through;color: #f85f5faf;background-color: hsla(160, 100%, 37%, 0.2);text-shadow: 1px 1px 1px #030303;box-shadow:inset -2px -2px 3px rgba(255, 255, 255, 0.6),inset 2px 2px 3px rgba(0, 0, 0, 0.6);border-radius: 10px;
}
/* 删除按钮样式  */
.deleteBtn {color: #f3d303;text-shadow: 1px 1px 1px rgb(0, 0, 0);background: #ff0000;border-radius: 5px;border: none;margin: 5px;padding: 2px;/* 粗体 */font-weight: bold;&:hover {background-color: #f3d303;color: #ff0505;}
}
main.css
@import './base.css';
/* 全局样式 */
* {margin: 0;padding: 0;box-sizing: border-box;user-select: none;
}
body {min-height: 100vh;color: var(--color-text);background: var(--color-background);background-image: url('../img/wavy-lines.svg');background-size: cover;line-height: 1.6;font-family:Inter,-apple-system,BlinkMacSystemFont,'Segoe UI',Roboto,Oxygen,Ubuntu,Cantarell,'Fira Sans','Droid Sans','Helvetica Neue',sans-serif;text-rendering: optimizeLegibility;-webkit-font-smoothing: antialiased;-moz-osx-font-smoothing: grayscale;
}
base.css
:root {--ev-c-white: #ffffff;--ev-c-white-soft: #f8f8f8;--ev-c-white-mute: #f2f2f2;--ev-c-black: #1b1b1f;--ev-c-black-soft: #222222;--ev-c-black-mute: #282828;--ev-c-gray-1: #515c67;--ev-c-gray-2: #414853;--ev-c-gray-3: #32363f;--ev-c-text-1: rgba(255, 255, 245, 0.86);--ev-c-text-2: rgba(235, 235, 245, 0.6);--ev-c-text-3: rgba(235, 235, 245, 0.38);--ev-button-alt-border: transparent;--ev-button-alt-text: var(--ev-c-text-1);--ev-button-alt-bg: var(--ev-c-gray-3);--ev-button-alt-hover-border: transparent;--ev-button-alt-hover-text: var(--ev-c-text-1);--ev-button-alt-hover-bg: var(--ev-c-gray-2);--color-background: var(--ev-c-black);--color-background-soft: var(--ev-c-black-soft);--color-background-mute: var(--ev-c-black-mute);--color-text: var(--ev-c-text-1);
}
这篇关于创建一个electron桌面备忘录的文章就介绍到这儿,希望我们推荐的文章对编程师们有所帮助!


