本文主要是介绍NLP——电影评论情感分析,希望对大家解决编程问题提供一定的参考价值,需要的开发者们随着小编来一起学习吧!
python-tensorflow2.0
numpy 1.19.1
tensorflow 2.0.0
导入库
数据加载
数据处理
构建模型
训练
评估
预测
1.基于2层dropout神经网络
2.基于LSTM的网络
#导入需要用到的库
import os
import tarfile
import urllib. request
import tensorflow as tf
import numpy as np
import re
import string
from random import randint
数据地址
ur1="http://ai.stanford.edu/~amaas/data/sentiment/aclImdb_v1.tar.gz"
#数据存放路径
filepath="D:\\课程学习\\深度学习\\深度学习应用开发-TensorFlow实践_浙江大学\\data\\aclImdb_v1.tar.gz"
#如果当前目录下不存在data文件夹,则建立
if not os. path.exists("D:\\课程学习\\深度学习\\深度学习应用开发-TensorFlow实践_浙江大学\\data"):os.makedirs("D:\\课程学习\\深度学习\\深度学习应用开发-TensorFlow实践_浙江大学\\data" )
#下载数据,80兆左右
if not os.path.isfile(filepath) :print('downloading...')result=urllib.request.urlretrieve(url, filepath)print('downloaded:',result)
else:print(filepath,'is existed!')
#解压数据
if not os.path.exists('D:\\课程学习\\深度学习\\深度学习应用开发-TensorFlow实践_浙江大学\\data"):tfile=tarfile.open (filepath,"r:gz" )print('extracting...' )result=tfile.extractall("D:\\课程学习\\深度学习\\深度学习应用开发-TensorFlow实践_浙江大学\\data\\")print("extraction completed")
else:print("data/aclImdb is existed!")
#将文本中不需要的字符清除,如html标签<br />
def remove_tags(text) :re_tag = re.compile(r'<[^>]+>')return re_tag.sub ('',text)
#读取文件
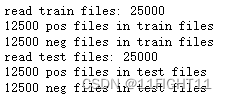
def read_files(filetype) :path ="D:\\课程学习\\深度学习\\深度学习应用开发-TensorFlow实践_浙江大学\\data\\aclImdb\\"file_list=[]#读取正面评价的文件的路径,存到file_list列表里positive_path=path + filetype+"\\pos\\"for f in os.listdir(positive_path):file_list+=[positive_path+f]pos_files_num=len(file_list)#读取负面评价的文件的路径,存到file_ list列表里negative_path=path + filetype+"\\neg\\"for f in os.listdir (negative_path) :file_list+=[negative_path+f]neg_files_num=len(file_list)-pos_files_numprint('read' , filetype,'files:', len(file_list))print(pos_files_num,'pos files in' , filetype,'files')print(neg_files_num,'neg files in' , filetype,'files')#得到所有标签。标签用one hot编码表示, 正面评价标签为[1 0], 负面评价标签为[0 1]all_labels = ([[1,0]] * pos_files_num + [[0,1]] * neg_files_num)#得到所有文本。all_texts=[]for fi in file_list:with open (fi, encoding='utf8' ) as file_input:#文本中有<br />这类html标签, 将文本传入remove_ tags函数#函数里使用正则表达式可以将这样的标签清除掉。all_texts += [remove_tags(" ". join(file_input.readlines()))]return all_labels,all_texts#读取数据集
#得到训练与测试用的标签和文本
train_labels, train_texts=read_files("train" )
test_labels, test_texts=read_files("test" )
#查看数据、标签
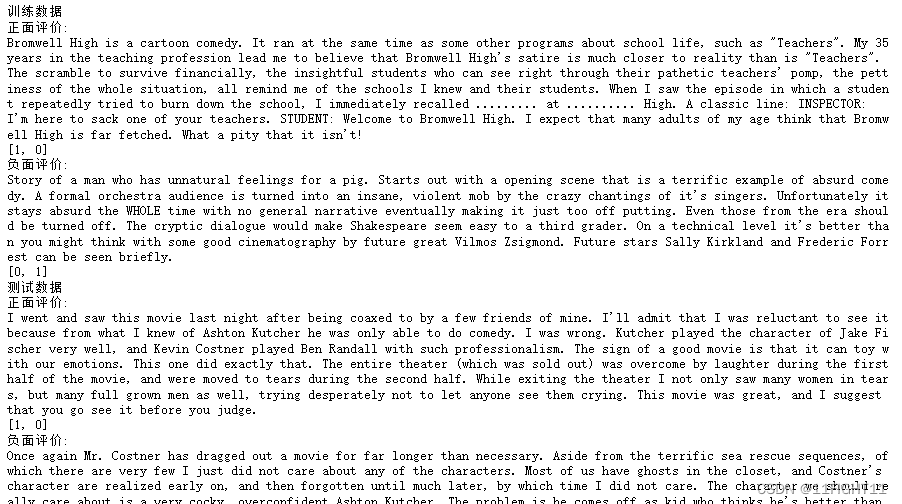
print ("训练数据")
print("正面评价:")
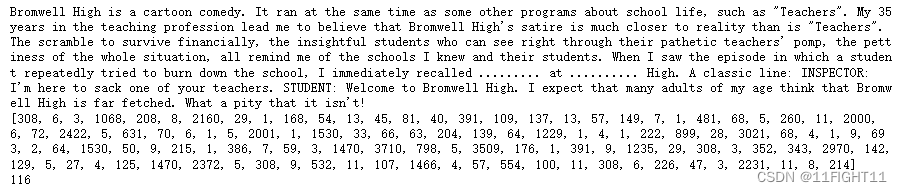
print(train_texts[0])
print (train_labels[0])
print("负面评价:")
print (train_texts[12500])
print (train_labels[12500])
print ("测试数据")
print("正面评价:")
print(test_texts[0])
print (test_labels[0])
print("负面评价:")
print (test_texts[12500])
print (test_labels[12500])
数据处理
#建立词汇词典Token
#建立Token
token =tf.keras.preprocessing.text.Tokenizer(num_words=4000)
token.fit_on_texts(train_texts)
#查看token读取了多少文档
token.document_count

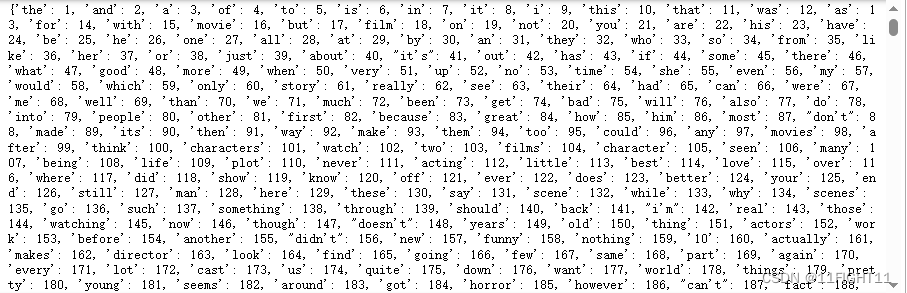
#将单词(字符串)映射为它们的排名或者索引
print(token.word_index)
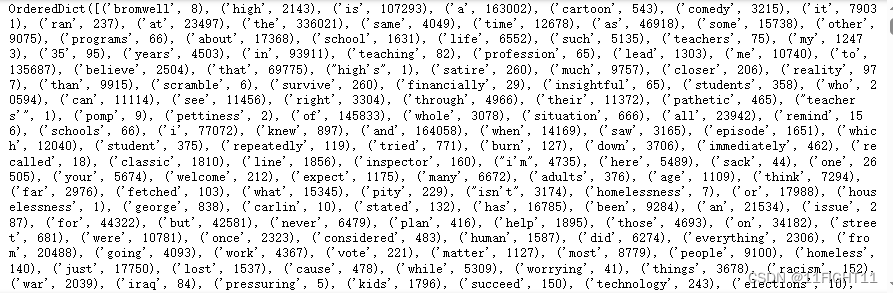
#将单词(字符串)映射为它们在训练期间所出现的文档或文本的数量
token.word_docs
#查看Token中词汇出现的频次排名
print (token.word_counts)
#文字转数字列表
train_sequences = token.texts_to_sequences(train_texts)
test_sequences = token.texts_to_sequences(test_texts)
print (train_texts[0])
print (train_sequences[0])
print (len(train_sequences[0]))
#让转换后的数字列表长度相同
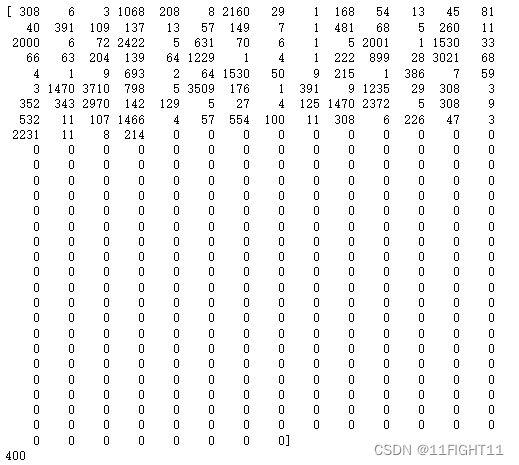
x_train = tf.keras.preprocessing.sequence.pad_sequences (train_sequences,padding='post',truncating='post',maxlen=400)
x_test = tf.keras.preprocessing.sequence.pad_sequences (test_sequences,padding='post',truncating='post',maxlen=400)
x_train.shape

#填充后的数字列表
print(x_train[0])
print(len(x_train[0]))
y_train=np.array(train_labels)
y_test=np.array(test_labels)
print(y_train.shape)
print(y_test.shape)

构建模型
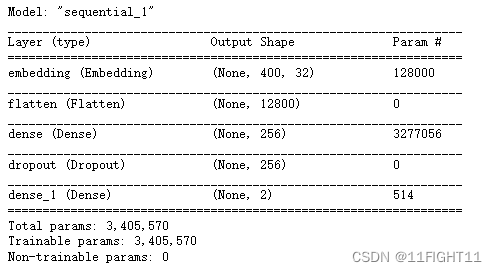
model = tf.keras.models.Sequential()
model.add (tf.keras.layers.Embedding (output_dim=32,## 输出词向量的维度input_dim=4000,## 输入词汇表的长度,最大词汇数+1input_length=400))# 输入Tensor的长度
model.add (tf.keras.layers.Flatten())
#用GlobalAveragePoolingID也起到平坦化的效果
# mode1. add (keras. layers. GlobalAveragePoolingIDO)
model.add (tf.keras.layers.Dense (units=256,activation='relu' ))
model.add (tf.keras.layers.Dropout (0.3))
model.add (tf.keras.layers.Dense (units=2, activation='softmax'))
model.summary()
#模型设置与训练
model.compile (optimizer='adam',loss='categorical_crossentropy',metrics=['accuracy'])
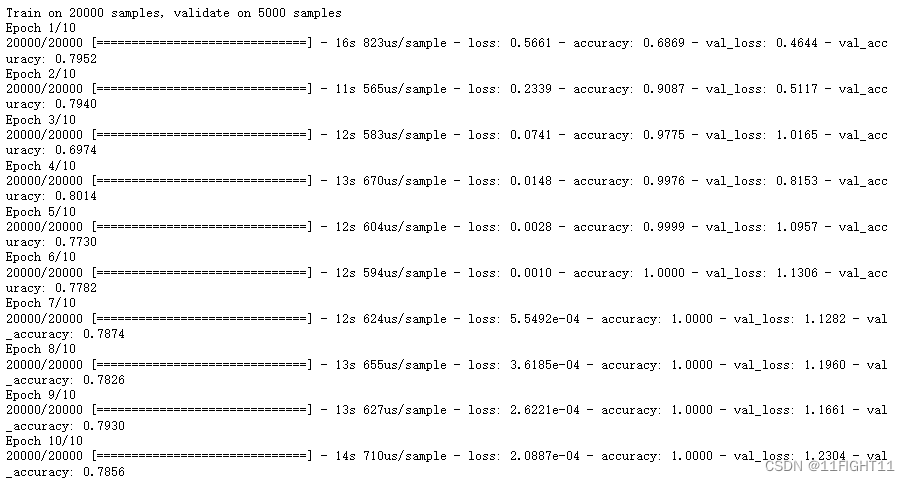
history = model.fit(x_train, y_train,validation_split=0.2,epochs=10, batch_size=128,verbose=1)
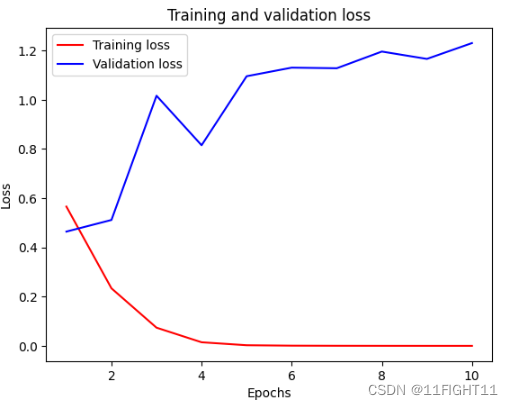
import matplotlib.pyplot as plt
acc = history.history['accuracy' ]
val_acc = history.history['val_accuracy' ]
loss = history.history['loss' ]
val_loss = history.history['val_loss' ]
epochs = range(1, len(acc) + 1)
plt.plot (epochs, loss, 'r',label='Training loss' )
plt.plot (epochs, val_loss, 'b' ,label='Validation loss' )
plt.title('Training and validation loss' )
plt.xlabel( 'Epochs' )
plt.ylabel('Loss' )
plt.legend ()
plt.show()
plt.clf()
# clear figure
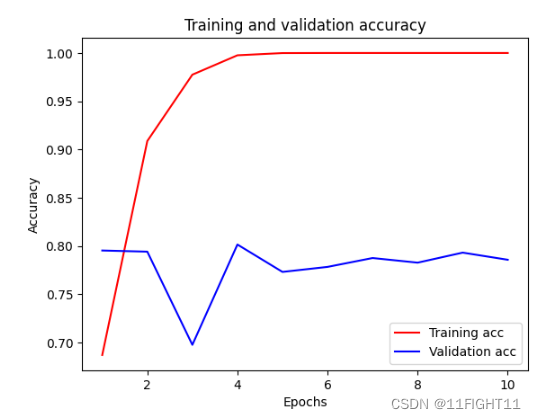
acc_values = history.history['accuracy']
val_acc_values = history.history['val_accuracy']
plt.plot (epochs,acc,'r',label='Training acc' )
plt.plot (epochs,val_acc,'b',label='Validation acc' )
plt.title('Training and validation accuracy' )
plt.xlabel('Epochs' )
plt.ylabel('Accuracy' )
plt.legend()
plt.show()
#评估模型准确率
test_1oss,test_acc = model.evaluate(x_test, y_test,verbose=1)
print(' Test accuracy:',test_acc)

#执行模型预测
predictions = model.predict(x_test)
predictions[0]
#定义预测结果显示函数
sentiment_dict = {0:'pos', 1:'neg' }
def display_test_sentiment(i) :print(test_texts[i])print('label value:', sentiment_dict[np.argmax(y_test[i])],'predict value:' , sentiment_dict[np.argmax(predictions[i])])
#查看预测结果
display_test_sentiment(0)

#文本情感分析模型应用
review_text="So much amazing action and beautiful cinematography makes for such an enlightening experience! In The Empire Strikes Back you know who everyone is which is great plus Yoda is introduced! I love this movie the music is soothing, there's romance, more of Darth Vader, and introduces Emperor Palpatine what more can you ask for? A lot to relish and get excited about; it's such a classic gem."input_seq = token.texts_to_sequences([review_text])
pad_input_seq =tf.keras.preprocessing.sequence.pad_sequences(input_seq,padding='post',truncating='post' ,maxlen=400)
pred = model.predict (pad_input_seq)
print('predict value:', sentiment_dict[np.argmax(pred)])

sentiment_dict = {0:' pos',1:'neg' }
def display_text_sentiment (text):print(text)input_seq = token.texts_to_sequences([text])pad_input_seq =tf.keras.preprocessing.sequence.pad_sequences(input_seq, padding='post',truncating='post' ,maxlen=400)pred = model.predict(pad_input_seq)print('predict value:', sentiment_dict[np.argmax(pred)])
display_text_sentiment(review_text)

基于LSTM结构的模型构建
#建立模型
model = tf.keras.models.Sequential()
model.add (tf.keras.layers.Embedding (output_dim=32,input_dim=4000,input_length=400) )
#用RNN,不用把词嵌入层平坦化
# mode1. add (keras. layers. SimpleRNV(units=16))
model.add (tf.keras.layers.Bidirectional (tf.keras.layers.LSTM(units=8)))
model.add (tf.keras.layers.Dense (units=32,activation='relu' ))
model.add (tf.keras.layers.Dropout (0.3))
model.add (tf.keras.layers.Dense (units=2, activation='softmax' ))
model.summary()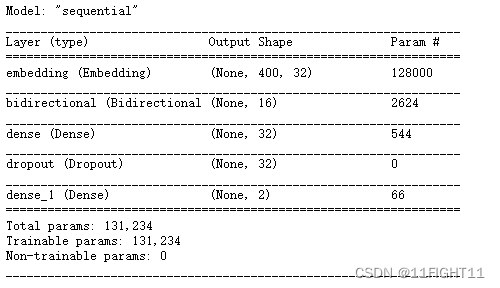
#模型设置与训练
#标签是One -Hot编码的多分类模型,损失函数用categorical crossentropy
#标签不是0ne -Hot编码的多分类模型,损失函数用sparse. categorical .crossentropy
#标签是二分类,损失函数用binary_ crossentropy
model.compile(optimizer='adam',loss='categorical_crossentropy', #二二 分类metrics=['accuracy' ])
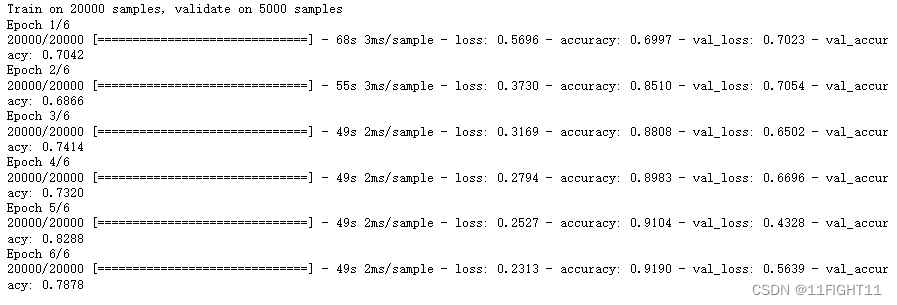
history = model.fit(x_train, y_train,validation_split=0.2,epochs=6,batch_size=128,verbose=1)
#评估模型准确率
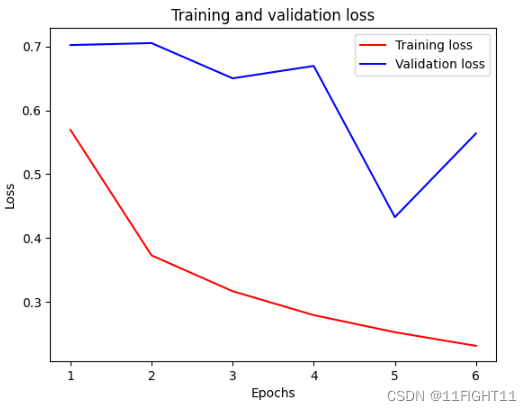
import matplotlib.pyplot as plt
acc = history.history['accuracy' ]
val_acc = history.history['val_accuracy' ]
loss = history.history['loss' ]
val_loss = history.history['val_loss' ]
epochs = range(1, len(acc) + 1)
plt.plot (epochs, loss, 'r',label='Training loss' )
plt.plot (epochs, val_loss, 'b' ,label='Validation loss' )
plt.title('Training and validation loss' )
plt.xlabel( 'Epochs' )
plt.ylabel('Loss' )
plt.legend ()
plt.show()
plt.clf()
# clear figure
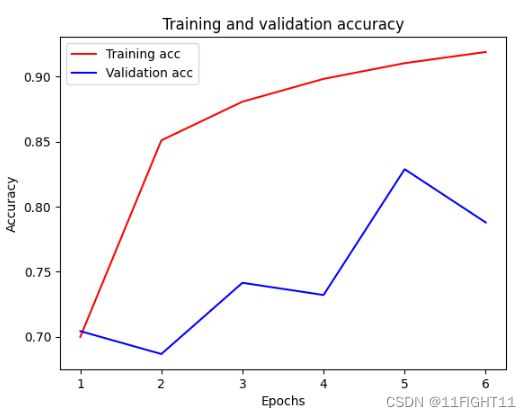
acc_values = history.history['accuracy']
val_acc_values = history.history['val_accuracy']
plt.plot (epochs,acc,'r',label='Training acc' )
plt.plot (epochs,val_acc,'b',label='Validation acc' )
plt.title('Training and validation accuracy' )
plt.xlabel('Epochs' )
plt.ylabel('Accuracy' )
plt.legend()
plt.show()
#评估模型准确率
test_1oss,test_acc = model.evaluate(x_test, y_test,verbose=1)
print(' Test accuracy:',test_acc)

这篇关于NLP——电影评论情感分析的文章就介绍到这儿,希望我们推荐的文章对编程师们有所帮助!


