本文主要是介绍【YOLOv10的使用】YOLOv10的训练/验证/预测/导出模型/ONNX模型的使用,希望对大家解决编程问题提供一定的参考价值,需要的开发者们随着小编来一起学习吧!
🚀🚀🚀 YOLOv10: 实时端到端的目标检测
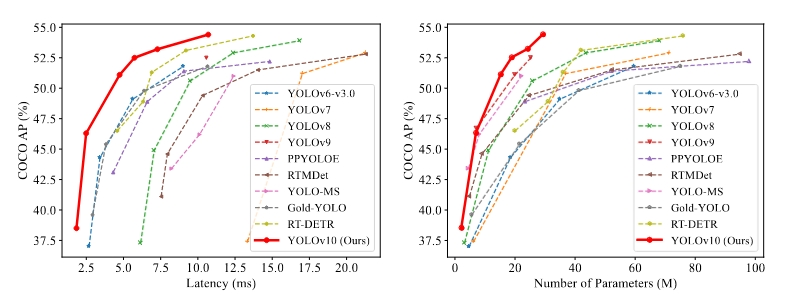
性能
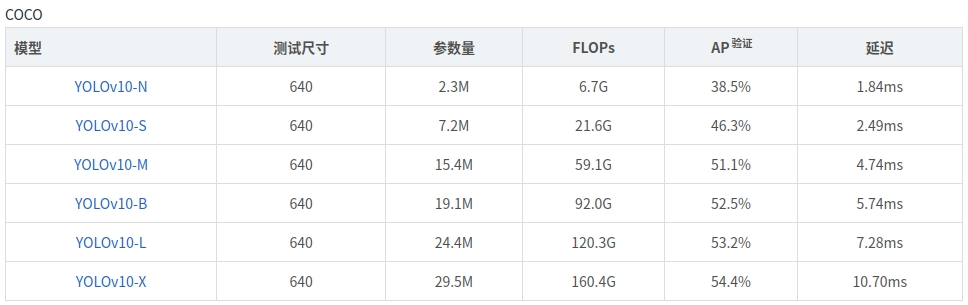
YOLOv10比最先进的YOLOv9延迟时间更低,测试结果可以与YOLOv9媲美,可能会成为YOLO系列模型部署的“新选择”。
目录
1 安装
2 训练
3 验证
4 预测
5 导出模型
6 ONNX模型的使用
官方论文地址:https://arxiv.org/pdf/2405.14458
官方代码地址:GitHub - THU-MIG/yolov10: YOLOv10: Real-Time End-to-End Object Detection
1 安装
建议使用Conda虚拟环境。
① 克隆YOLOv10项目
git clone https://github.com/THU-MIG/yolov10.git② 安装
conda create -n yolov10 python=3.9conda activate yolov10cd yolov10项目所在路径pip install -r requirements.txtpip install -e . -i https://pypi.tuna.tsinghua.edu.cn/simple
2 训练
imgsz:图像放缩大小resize,默认是640。
device:设备id,可以是cpu,如果只有一张显卡,则device=0,如果有两张,则device=0,1,依次类推。
训练示例如下:
- 方式一
# 从yaml构建全新的模型yolo detect train data=coco128.yaml model=yolov10s.yaml epochs=100 batch=8 imgsz=640 device=cpu project=yolov10
- 方式二
首先,需要下载模型。链接如下:
yolov10n.pt yolov10s.pt yolov10m.pt yolov10b.pt yolov10l.pt yolov10x.pt
下载后的模型放在YOLOv10的工程目录下即可。
# 从预训练模型开始训练yolo detect train data=coco128.yaml model=yolov10s.pt epochs=100 batch=8 imgsz=640 device=cpu project=yolov10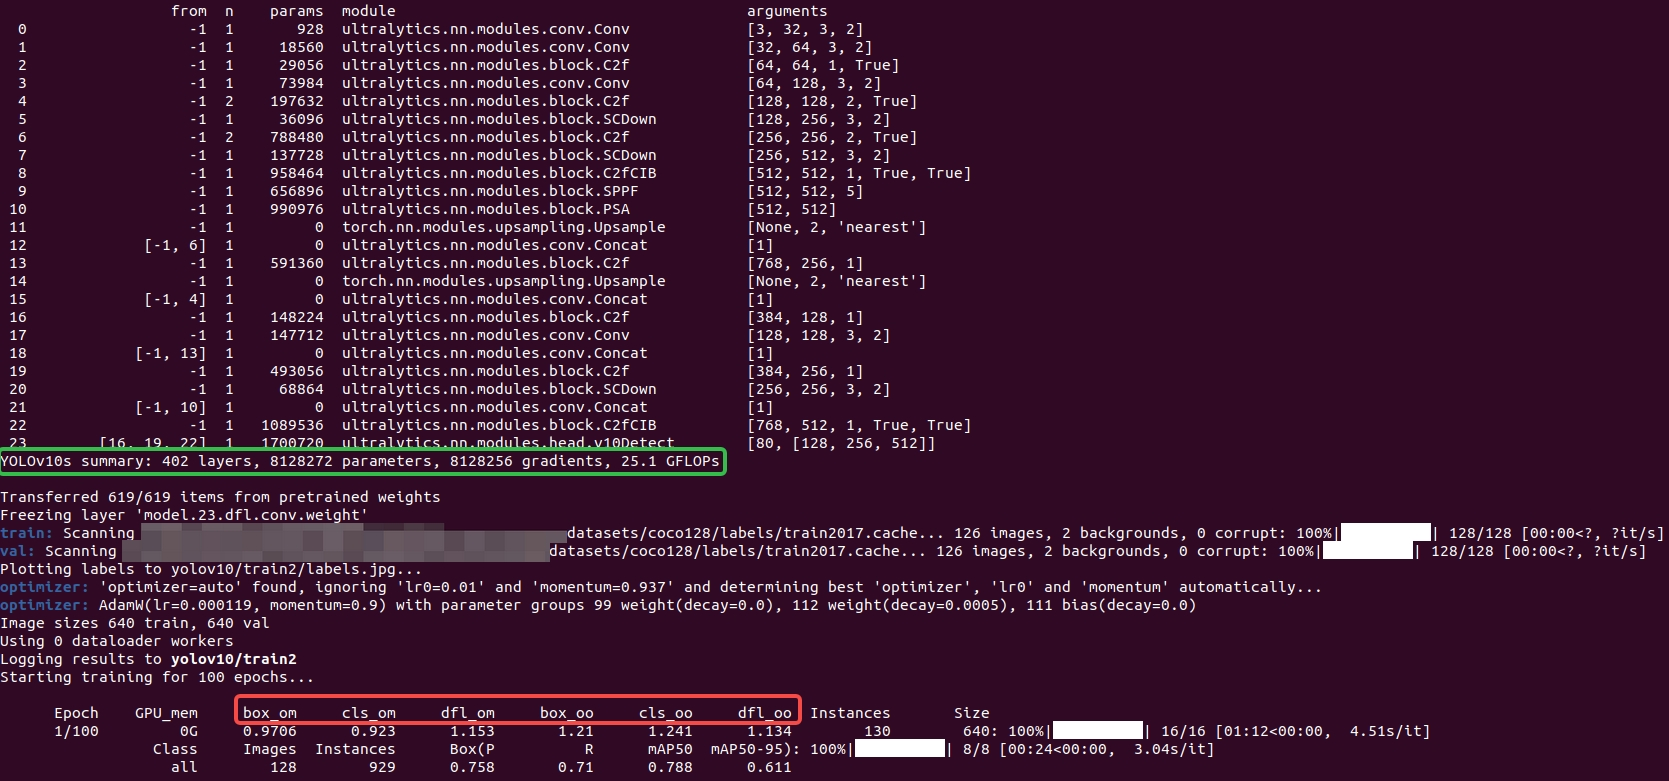
- 方式三
配置好ultralytics/cfg/default.yaml这个文件之后,可以直接执行这个文件进行训练,这样就不需要在命令行输入其它的参数。
yolo cfg=ultralytics/cfg/default.yaml官方原版的default.yaml的内容如下:
# Ultralytics YOLO 🚀, AGPL-3.0 license
# Default training settings and hyperparameters for medium-augmentation COCO trainingtask: detect # (str) YOLO task, i.e. detect, segment, classify, pose
mode: train # (str) YOLO mode, i.e. train, val, predict, export, track, benchmark# Train settings -------------------------------------------------------------------------------------------------------
model: # (str, optional) path to model file, i.e. yolov8n.pt, yolov8n.yaml
data: # (str, optional) path to data file, i.e. coco128.yaml
epochs: 100 # (int) number of epochs to train for
time: # (float, optional) number of hours to train for, overrides epochs if supplied
patience: 100 # (int) epochs to wait for no observable improvement for early stopping of training
batch: 16 # (int) number of images per batch (-1 for AutoBatch)
imgsz: 640 # (int | list) input images size as int for train and val modes, or list[w,h] for predict and export modes
save: True # (bool) save train checkpoints and predict results
save_period: -1 # (int) Save checkpoint every x epochs (disabled if < 1)
val_period: 1 # (int) Validation every x epochs
cache: False # (bool) True/ram, disk or False. Use cache for data loading
device: # (int | str | list, optional) device to run on, i.e. cuda device=0 or device=0,1,2,3 or device=cpu
workers: 8 # (int) number of worker threads for data loading (per RANK if DDP)
project: # (str, optional) project name
name: # (str, optional) experiment name, results saved to 'project/name' directory
exist_ok: False # (bool) whether to overwrite existing experiment
pretrained: True # (bool | str) whether to use a pretrained model (bool) or a model to load weights from (str)
optimizer: auto # (str) optimizer to use, choices=[SGD, Adam, Adamax, AdamW, NAdam, RAdam, RMSProp, auto]
verbose: True # (bool) whether to print verbose output
seed: 0 # (int) random seed for reproducibility
deterministic: True # (bool) whether to enable deterministic mode
single_cls: False # (bool) train multi-class data as single-class
rect: False # (bool) rectangular training if mode='train' or rectangular validation if mode='val'
cos_lr: False # (bool) use cosine learning rate scheduler
close_mosaic: 10 # (int) disable mosaic augmentation for final epochs (0 to disable)
resume: False # (bool) resume training from last checkpoint
amp: True # (bool) Automatic Mixed Precision (AMP) training, choices=[True, False], True runs AMP check
fraction: 1.0 # (float) dataset fraction to train on (default is 1.0, all images in train set)
profile: False # (bool) profile ONNX and TensorRT speeds during training for loggers
freeze: None # (int | list, optional) freeze first n layers, or freeze list of layer indices during training
multi_scale: False # (bool) Whether to use multiscale during training
# Segmentation
overlap_mask: True # (bool) masks should overlap during training (segment train only)
mask_ratio: 4 # (int) mask downsample ratio (segment train only)
# Classification
dropout: 0.0 # (float) use dropout regularization (classify train only)# Val/Test settings ----------------------------------------------------------------------------------------------------
val: True # (bool) validate/test during training
split: val # (str) dataset split to use for validation, i.e. 'val', 'test' or 'train'
save_json: False # (bool) save results to JSON file
save_hybrid: False # (bool) save hybrid version of labels (labels + additional predictions)
conf: # (float, optional) object confidence threshold for detection (default 0.25 predict, 0.001 val)
iou: 0.7 # (float) intersection over union (IoU) threshold for NMS
max_det: 300 # (int) maximum number of detections per image
half: False # (bool) use half precision (FP16)
dnn: False # (bool) use OpenCV DNN for ONNX inference
plots: True # (bool) save plots and images during train/val# Predict settings -----------------------------------------------------------------------------------------------------
source: # (str, optional) source directory for images or videos
vid_stride: 1 # (int) video frame-rate stride
stream_buffer: False # (bool) buffer all streaming frames (True) or return the most recent frame (False)
visualize: False # (bool) visualize model features
augment: False # (bool) apply image augmentation to prediction sources
agnostic_nms: False # (bool) class-agnostic NMS
classes: # (int | list[int], optional) filter results by class, i.e. classes=0, or classes=[0,2,3]
retina_masks: False # (bool) use high-resolution segmentation masks
embed: # (list[int], optional) return feature vectors/embeddings from given layers# Visualize settings ---------------------------------------------------------------------------------------------------
show: False # (bool) show predicted images and videos if environment allows
save_frames: False # (bool) save predicted individual video frames
save_txt: False # (bool) save results as .txt file
save_conf: False # (bool) save results with confidence scores
save_crop: False # (bool) save cropped images with results
show_labels: True # (bool) show prediction labels, i.e. 'person'
show_conf: True # (bool) show prediction confidence, i.e. '0.99'
show_boxes: True # (bool) show prediction boxes
line_width: # (int, optional) line width of the bounding boxes. Scaled to image size if None.# Export settings ------------------------------------------------------------------------------------------------------
format: torchscript # (str) format to export to, choices at https://docs.ultralytics.com/modes/export/#export-formats
keras: False # (bool) use Kera=s
optimize: False # (bool) TorchScript: optimize for mobile
int8: False # (bool) CoreML/TF INT8 quantization
dynamic: False # (bool) ONNX/TF/TensorRT: dynamic axes
simplify: False # (bool) ONNX: simplify model
opset: # (int, optional) ONNX: opset version
workspace: 4 # (int) TensorRT: workspace size (GB)
nms: False # (bool) CoreML: add NMS# Hyperparameters ------------------------------------------------------------------------------------------------------
lr0: 0.01 # (float) initial learning rate (i.e. SGD=1E-2, Adam=1E-3)
lrf: 0.01 # (float) final learning rate (lr0 * lrf)
momentum: 0.937 # (float) SGD momentum/Adam beta1
weight_decay: 0.0005 # (float) optimizer weight decay 5e-4
warmup_epochs: 3.0 # (float) warmup epochs (fractions ok)
warmup_momentum: 0.8 # (float) warmup initial momentum
warmup_bias_lr: 0.1 # (float) warmup initial bias lr
box: 7.5 # (float) box loss gain
cls: 0.5 # (float) cls loss gain (scale with pixels)
dfl: 1.5 # (float) dfl loss gain
pose: 12.0 # (float) pose loss gain
kobj: 1.0 # (float) keypoint obj loss gain
label_smoothing: 0.0 # (float) label smoothing (fraction)
nbs: 64 # (int) nominal batch size
hsv_h: 0.015 # (float) image HSV-Hue augmentation (fraction)
hsv_s: 0.7 # (float) image HSV-Saturation augmentation (fraction)
hsv_v: 0.4 # (float) image HSV-Value augmentation (fraction)
degrees: 0.0 # (float) image rotation (+/- deg)
translate: 0.1 # (float) image translation (+/- fraction)
scale: 0.5 # (float) image scale (+/- gain)
shear: 0.0 # (float) image shear (+/- deg)
perspective: 0.0 # (float) image perspective (+/- fraction), range 0-0.001
flipud: 0.0 # (float) image flip up-down (probability)
fliplr: 0.5 # (float) image flip left-right (probability)
bgr: 0.0 # (float) image channel BGR (probability)
mosaic: 1.0 # (float) image mosaic (probability)
mixup: 0.0 # (float) image mixup (probability)
copy_paste: 0.0 # (float) segment copy-paste (probability)
auto_augment: randaugment # (str) auto augmentation policy for classification (randaugment, autoaugment, augmix)
erasing: 0.4 # (float) probability of random erasing during classification training (0-1)
crop_fraction: 1.0 # (float) image crop fraction for classification evaluation/inference (0-1)# Custom config.yaml ---------------------------------------------------------------------------------------------------
cfg: # (str, optional) for overriding defaults.yaml# Tracker settings ------------------------------------------------------------------------------------------------------
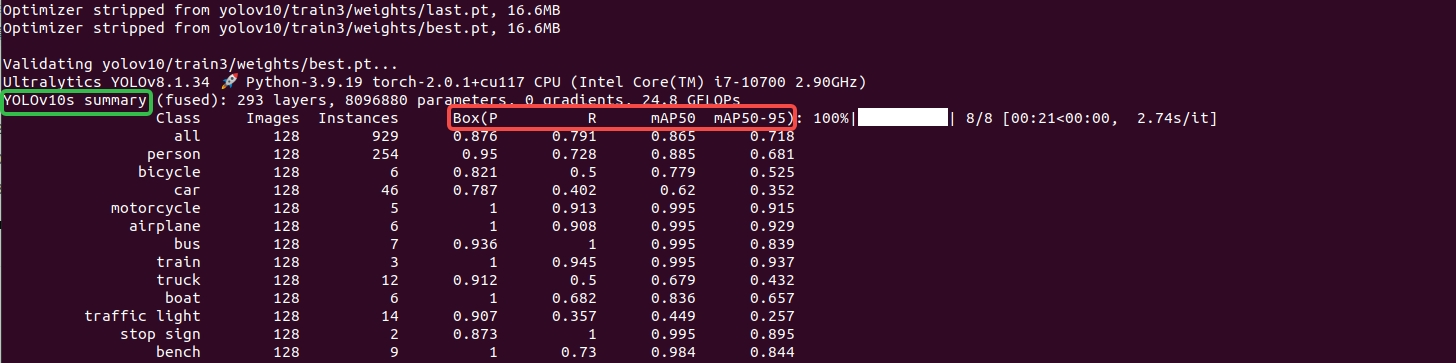
tracker: botsort.yaml # (str) tracker type, choices=[botsort.yaml, bytetrack.yaml]3 验证
验证示例如下:
cd yolov10项目所在的路径yolo task=detect mode=val split=val model=yolov10/train3/weights/best.pt data=ultralytics/cfg/datasets/coco128.yaml batch=4 device=cpu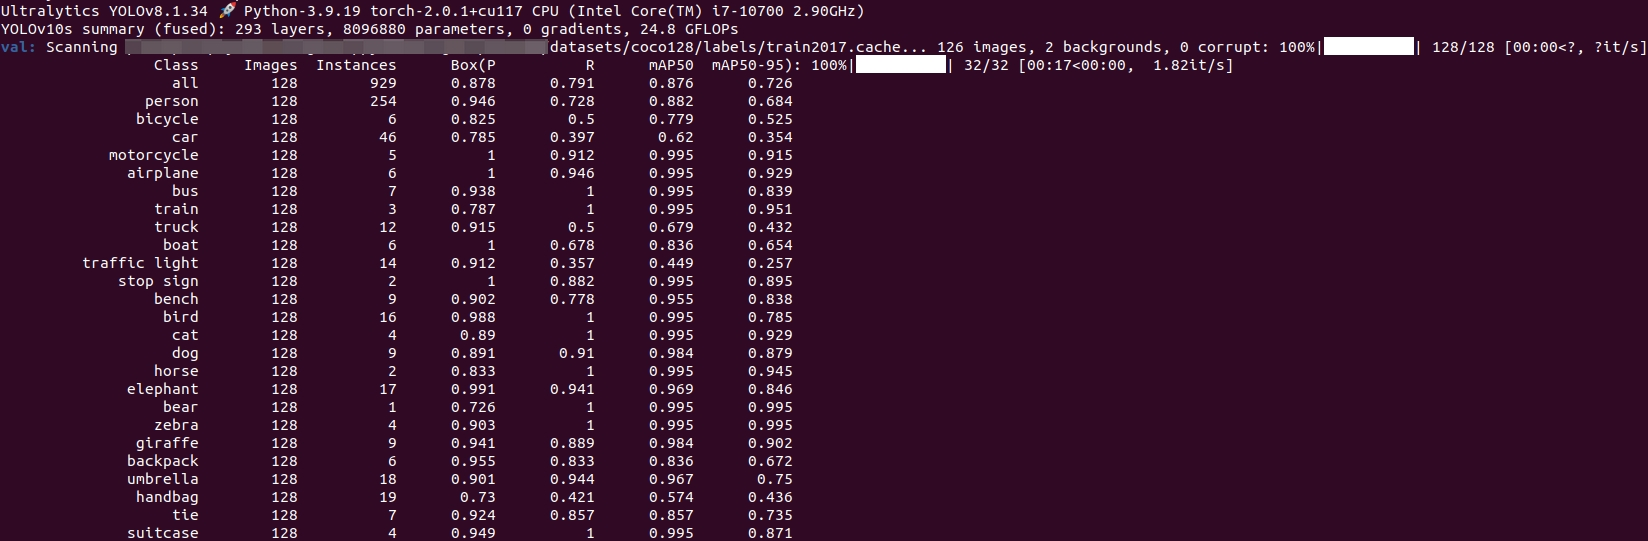
验证过程的产物:

结果图:
4 预测
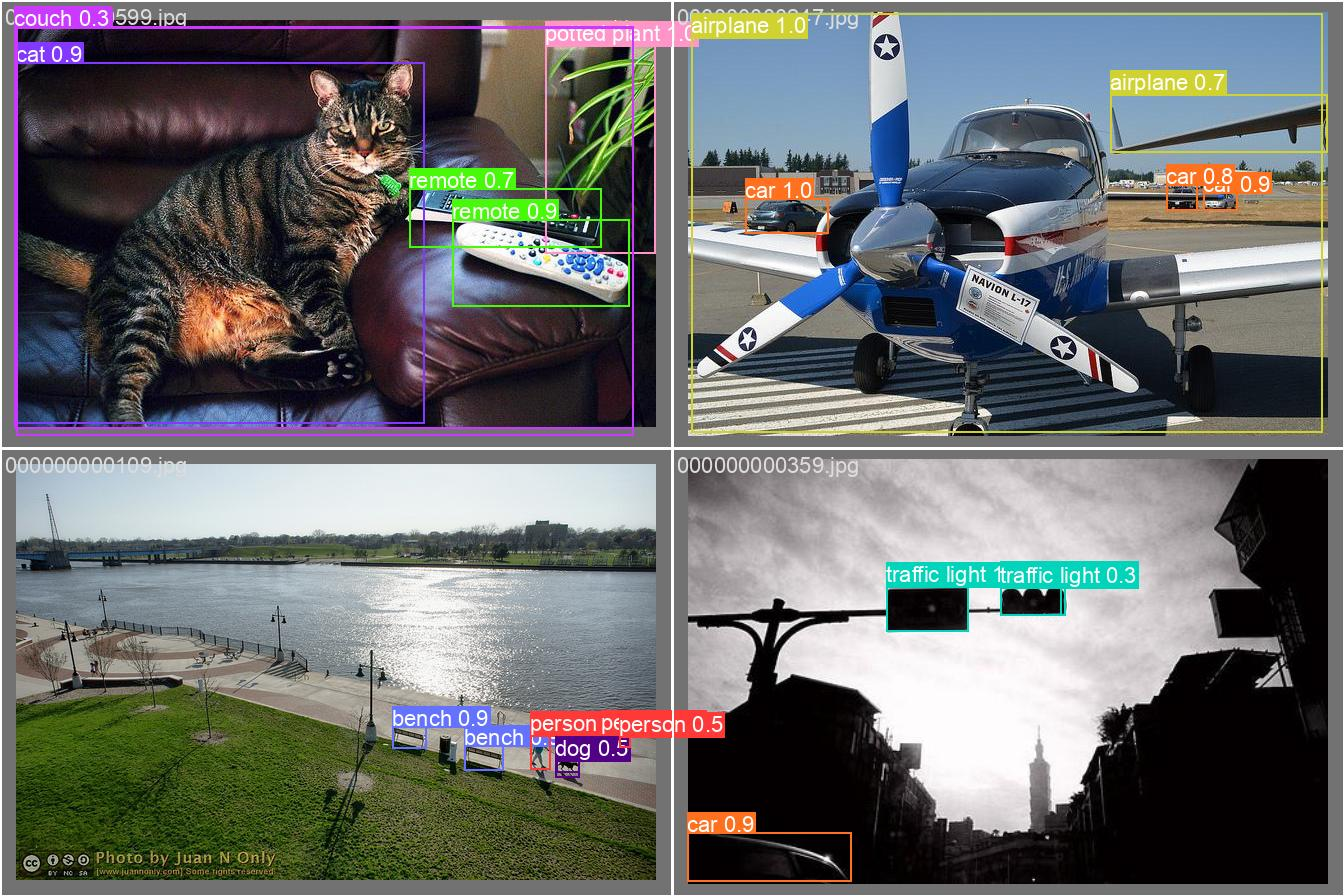
预测示例如下:
cd yolov10项目所在的路径yolo task=detect mode=predict model=yolov10/train3/weights/best.pt source=test1.jpg device=cpu
预测效果如下图:

5 导出模型
导出ONNX模型示例:
# export custom trained modelyolo task=detect mode=export model=yolov10/train3/weights/best.pt format=onnx 
6 ONNX模型的使用
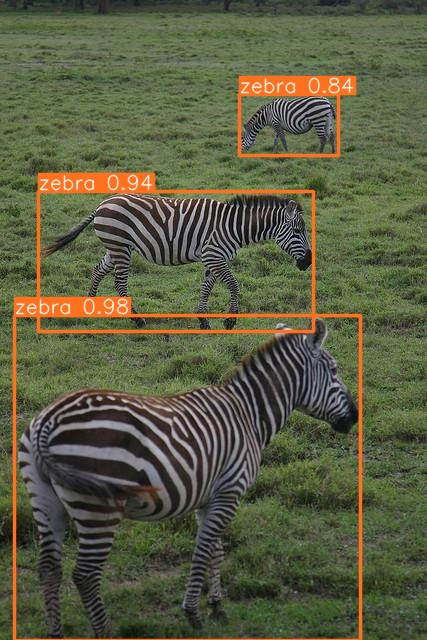
命令行方式:
yolo detect predict model=yolov10/train3/weights/best.onnx source='test2.jpg'
检测结果图片如下:
到此,本文分享的内容就结束啦!遇见便是缘,感恩遇见!点个赞 + 关注吧!哈哈哈哈!!!
这篇关于【YOLOv10的使用】YOLOv10的训练/验证/预测/导出模型/ONNX模型的使用的文章就介绍到这儿,希望我们推荐的文章对编程师们有所帮助!


