本文主要是介绍flutter开发实战-美颜前后对比图效果实现,希望对大家解决编程问题提供一定的参考价值,需要的开发者们随着小编来一起学习吧!
flutter开发实战-美颜前后对比图效果实现
最近使用代码中遇到了图片前后对比,这里使用的是CustomClipper来实现
一、CustomClipper
我们实现CustomClipper子类来实现美颜后的图片裁剪功能
getClip()是用于获取剪裁区域的接口,由于图片大小是60×60,
我们返回剪裁区域为Rect.fromLTWH(10.0, 15.0, 40.0, 30.0),即图片中部40×30像素的范围。
shouldReclip() 接口决定是否重新剪裁。
如果在应用中,剪裁区域始终不会发生变化时应该返回false,这样就不会触发重新剪裁,避免不必要的性能开销。
如果剪裁区域会发生变化(比如在对剪裁区域执行一个动画),那么变化后应该返回true来重新执行剪裁。
二、使用CustomClipper来实现美颜前后对比图效果
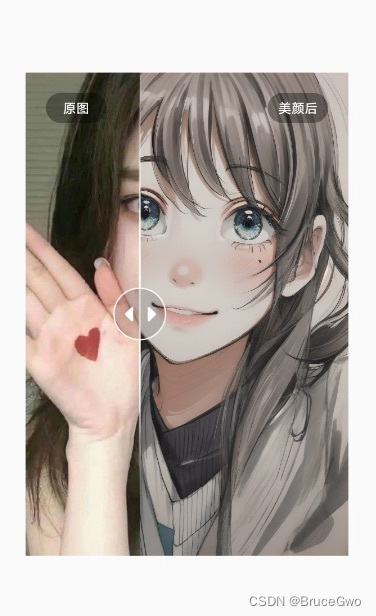
美颜前后对比图,原图展示,美颜后的图片根据手势拖动距离进行裁剪
美颜之后的图裁剪,设置Clip.hardEdge。
ClipRect(clipper: compareCustomClipper,clipBehavior: Clip.hardEdge,child: CachedNetworkImage(imageUrl: "https://qiniu.example.com/64c2fba1-81ff-41dc-b32e-6920b0677f8c0",fit: BoxFit.cover,width: widget.width,height: widget.height,),),手势拖动,更新compareCustomClipper
void onHorizontalDragDown(DragDownDetails details) {print("onHorizontalDragDown");startOffsetX = details.localPosition.dx;print("onHorizontalDragDown startOffsetX:${startOffsetX}");}void onHorizontalDragStart(DragStartDetails details) {print("onHorizontalDragStart");}void onHorizontalDragUpdate(DragUpdateDetails details) {print("onHorizontalDragUpdate");double curOffsetX = details.localPosition.dx;double distance = curOffsetX - startOffsetX;print("onHorizontalDragUpdate curOffsetX:${curOffsetX}, startOffsetX:${startOffsetX}, distance:${distance}");offsetX = widget.width! + distance;if (offsetX > widget.width!) {offsetX = widget.width!;}if (offsetX < 0) {offsetX = 0;}compareCustomClipper = CompareCustomClipper(Rect.fromLTWH(offsetX, 0.0, (widget.width ?? 0) - offsetX, widget.height ?? 0));setState(() {});}完整代码如下
import 'package:cached_network_image/cached_network_image.dart';
import 'package:flutter/material.dart';class ComparePicPage extends StatefulWidget {const ComparePicPage({super.key});@overrideState<ComparePicPage> createState() => _ComparePicPageState();
}class _ComparePicPageState extends State<ComparePicPage> {@overrideWidget build(BuildContext context) {Size size = MediaQuery.of(context).size;return Scaffold(appBar: AppBar(title: const Text('ComparePicPage'),),body: Center(child: ComparePicWidget(width: 320,height: 480,),),);}
}// 自定义裁剪CustomClipper
class CompareCustomClipper extends CustomClipper<Rect> {CompareCustomClipper(this.rect);Rect rect;// Rect getClip(Size size) => Rect.fromLTWH(0.0, 15.0, 40.0, 30.0);@overrideRect getClip(Size size) => rect;@overridebool shouldReclip(CustomClipper<Rect> oldClipper) => true;
}/// 图片美颜前后对比
class ComparePicWidget extends StatefulWidget {const ComparePicWidget({super.key,this.width,this.height,});final double? width;final double? height;@overrideState<ComparePicWidget> createState() => _ComparePicWidgetState();
}class _ComparePicWidgetState extends State<ComparePicWidget> {// 定义一个裁剪CompareCustomClipper? compareCustomClipper;double offsetX = 0;double startOffsetX = 0;@overridevoid initState() {// TODO: implement initStateoffsetX = widget.width ?? 0;compareCustomClipper = CompareCustomClipper(Rect.fromLTWH(offsetX, 0.0, (widget.width ?? 0) - offsetX, widget.height ?? 0));super.initState();}@overridevoid dispose() {// TODO: implement disposesuper.dispose();}void onHorizontalDragDown(DragDownDetails details) {print("onHorizontalDragDown");startOffsetX = details.localPosition.dx;print("onHorizontalDragDown startOffsetX:${startOffsetX}");}void onHorizontalDragStart(DragStartDetails details) {print("onHorizontalDragStart");}void onHorizontalDragUpdate(DragUpdateDetails details) {print("onHorizontalDragUpdate");double curOffsetX = details.localPosition.dx;double distance = curOffsetX - startOffsetX;print("onHorizontalDragUpdate curOffsetX:${curOffsetX}, startOffsetX:${startOffsetX}, distance:${distance}");offsetX = widget.width! + distance;if (offsetX > widget.width!) {offsetX = widget.width!;}if (offsetX < 0) {offsetX = 0;}compareCustomClipper = CompareCustomClipper(Rect.fromLTWH(offsetX, 0.0, (widget.width ?? 0) - offsetX, widget.height ?? 0));setState(() {});}@overrideWidget build(BuildContext context) {return Container(width: widget.width,height: widget.height,decoration: BoxDecoration(color: Colors.black,borderRadius: const BorderRadius.all(Radius.circular(10),),border: Border.all(color: Colors.transparent,width: 0,style: BorderStyle.solid,),),clipBehavior: Clip.none,child: Stack(alignment: Alignment.center,clipBehavior: Clip.none,children: [// 原图ClipRect(clipBehavior: Clip.hardEdge,child: CachedNetworkImage(imageUrl: "https://qiniu.example.com/Fsgjbe7O8Z5x83_Aff8-Qage9bpc8e.png",fit: BoxFit.cover,width: widget.width,height: widget.height,),),// 美颜之后的图ClipRect(clipper: compareCustomClipper,clipBehavior: Clip.hardEdge,child: CachedNetworkImage(imageUrl: "https://qiniu.example.com/64c2fba1-81ff-41dc-b32e-6920b0677f833c",fit: BoxFit.cover,width: widget.width,height: widget.height,),),// linePositioned(left: offsetX + 26.5 + (-27.5),child: buildLine(context),),Positioned(left: offsetX + (-27.5),child: buildCustomButton(context),),// tipPositioned(left: 20,top: 20,child: buildCompareTip(context, "原图"),),Positioned(right: 20,top: 20,child: buildCompareTip(context, "美颜后"),),],),);}Widget buildLine(BuildContext context) {return Image.asset("assets/images/line.png",width: 2,height: 576,fit: BoxFit.cover,);}Widget buildCustomButton(BuildContext context) {return GestureDetector(onHorizontalDragDown: (DragDownDetails details) {onHorizontalDragDown(details);},onHorizontalDragStart: (DragStartDetails details) {onHorizontalDragStart(details);},onHorizontalDragUpdate: (DragUpdateDetails details) {onHorizontalDragUpdate(details);},child: Image.asset("assets/images/move_button.png",width: 55,height: 55,fit: BoxFit.cover,),);}Widget buildCompareTip(BuildContext context, String title) {return Container(width: 60,height: 30,alignment: Alignment.center,decoration: BoxDecoration(color: Colors.black.withOpacity(0.35),borderRadius: const BorderRadius.all(Radius.circular(20),),),child: Text(title,maxLines: 1,overflow: TextOverflow.ellipsis,textAlign: TextAlign.center,style: const TextStyle(fontSize: 13,fontWeight: FontWeight.w600,fontStyle: FontStyle.normal,color: Colors.white,decoration: TextDecoration.none,),),);}
}
三、小结
flutter开发实战-美颜前后对比图效果实现
学习记录,每天不停进步。
这篇关于flutter开发实战-美颜前后对比图效果实现的文章就介绍到这儿,希望我们推荐的文章对编程师们有所帮助!


