本文主要是介绍网络安全技术与应用:远程控制与数据库安全,希望对大家解决编程问题提供一定的参考价值,需要的开发者们随着小编来一起学习吧!
实验准备
软件:VMware Workstation Pro
虚拟机:Red Hat Enterprise Linux 7 服务器,Red Hat Enterprise Linux 7 客户端
网络模式:NAT模式
1、配置服务器及客户端网络
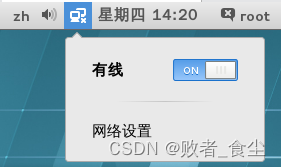
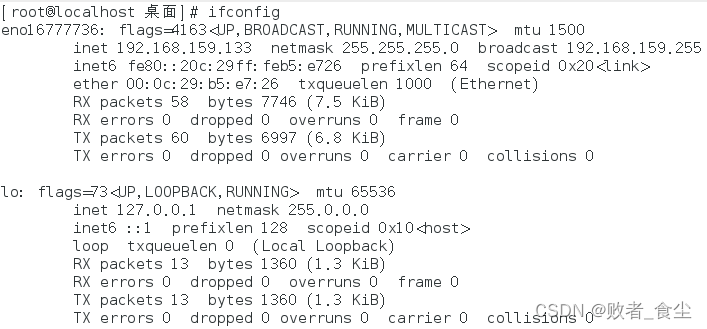
服务器IP
客户端IP

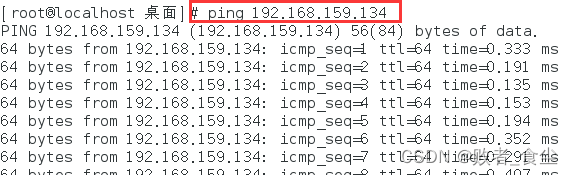
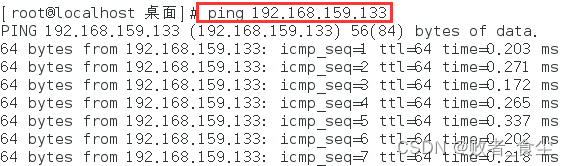
测试相互通信
在客户机上设置镜像,配置yum源
[root@localhost 桌面]# mkdir /mnt/cdrom
[root@localhost 桌面]# mount /dev/sr0 /mnt/cdrom/
mount: /dev/sr0 写保护,将以只读方式挂载
[root@localhost 桌面]# vim /etc/yum.repos.d/a.repo
[root@localhost 桌面]# cat /etc/yum.repos.d/a.repo
[a]
name=a
baseurl=file:///mnt/cdrom
enable=1
gpgcheck=0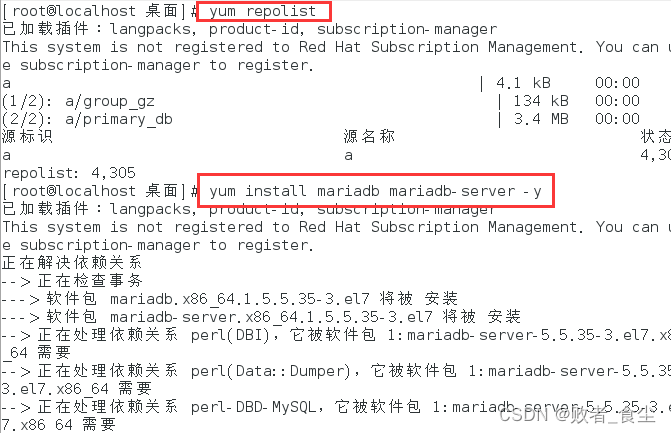
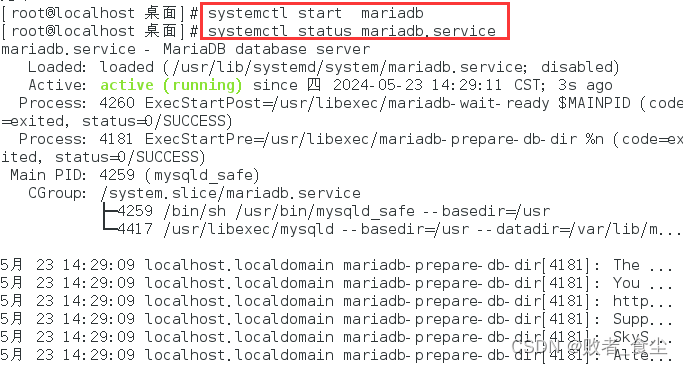
在完成MariaDB数据库软件程序的安装并确保其成功启动后,我们建议先不要急于使用它。为了保障数据库的安全性和稳定运行,首要任务是进行初始化操作。该初始化流程包含以下五个关键步骤:
设置root管理员在数据库中的密码值(该密码并非root管理员在系统中的密码,密码值默认为空,直接回车即可)。
设置root管理员在数据库中的专有密码。
删除匿名用户,并使用root管理员从远程登录数据库,以确保数据库上运行的业务的安全性。
删除默认的测试数据库,取消测试数据库的一系列访问权限。
刷新授权列表,让初始化的设定立即生效。
[root@localhost 桌面]# mysql_secure_installation
/usr/bin/mysql_secure_installation:行379: find_mysql_client: 未找到命令NOTE: RUNNING ALL PARTS OF THIS SCRIPT IS RECOMMENDED FOR ALL MariaDBSERVERS IN PRODUCTION USE!  PLEASE READ EACH STEP CAREFULLY!In order to log into MariaDB to secure it, we'll need the current
password for the root user.  If you've just installed MariaDB, and
you haven't set the root password yet, the password will be blank,
so you should just press enter here.Enter current password for root (enter for none): (默认为空)
OK, successfully used password, moving on...Setting the root password ensures that nobody can log into the MariaDB
root user without the proper authorisation.Set root password? [Y/n] y (设置管理员密码)
New password:
Re-enter new password:
Password updated successfully!
Reloading privilege tables..... Success!By default, a MariaDB installation has an anonymous user, allowing anyone
to log into MariaDB without having to have a user account created for
them.  This is intended only for testing, and to make the installation
go a bit smoother.  You should remove them before moving into a
production environment.Remove anonymous users? [Y/n] y (删除匿名账户)... Success!Normally, root should only be allowed to connect from 'localhost'.  This
ensures that someone cannot guess at the root password from the network.Disallow root login remotely? [Y/n] y (禁止管理员从远程登录)... Success!By default, MariaDB comes with a database named 'test' that anyone can
access.  This is also intended only for testing, and should be removed
before moving into a production environment.Remove test database and access to it? [Y/n] y (删除测试数据库及其访问权限)- Dropping test database...... Success!- Removing privileges on test database...... Success!Reloading the privilege tables will ensure that all changes made so far
will take effect immediately.Reload privilege tables now? [Y/n] y (刷新授权表,让初始化后的设定立即生效)... Success!Cleaning up...All done!  If you've completed all of the above steps, your MariaDB
installation should now be secure.Thanks for using MariaDB!
在众多生产环境的实践中,站库分离技术(即将网站与数据库部署于不同的服务器)被广泛应用以确保系统的高可用性和安全性。当需要为root管理员提供远程访问数据库的权限时,我们需要在初始化过程中制定相应的策略,以允许root管理员从远程地址进行连接。此外,为了保障数据库服务的安全,还需配置防火墙规则,确保其对数据库服务程序(如MySQL,默认占用3306端口)的访问请求进行放行。在防火墙策略中,这类服务通常被统一标识为“mysql”。
[root@localhost 桌面]# firewall-config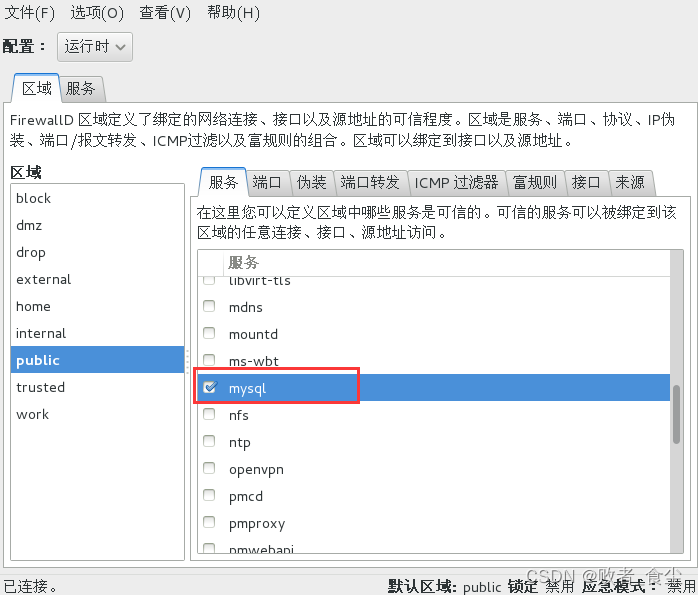
首次登录MariaDB数据库。为了管理数据库,我们将使用mysql命令。在这个命令中,-u参数用于指定以root管理员的身份进行登录,-p用来验证该用户在数据库中的密码值,以确保登录的安全性。
[root@localhost 桌面]# mysql -u root -p
Enter password:  (输入刚刚设置的密码)
Welcome to the MariaDB monitor.  Commands end with ; or \g.
Your MariaDB connection id is 11
Server version: 5.5.35-MariaDB MariaDB ServerCopyright (c) 2000, 2013, Oracle, Monty Program Ab and others.Type 'help;' or '\h' for help. Type '\c' to clear the current input statement.MariaDB [(none)]> SHOW databases;          //查看数据库管理系统中当前都有哪些数据库
+--------------------+
| Database           |
+--------------------+
| information_schema |
| mysql              |
| performance_schema |
+--------------------+
3 rows in set (0.00 sec)MariaDB [(none)]> SET password = PASSWORD('hnswjj');  //使用数据库命令将root管理员在数据库管理系统中的密码值修改为hnswjj
Query OK, 0 rows affected (0.00 sec)MariaDB [(none)]> exit
Bye
(使用原密码redhat尝试登陆,登陆失败)
[root@localhost 桌面]# mysql -u root -p
Enter password:
ERROR 1045 (28000): Access denied for user 'root'@'localhost' (using password: YES)(使用新密码hnswjj尝试登陆,登陆成功,创建用户student,admin,jack)
[root@localhost 桌面]# mysql -u root -p
Enter password:
Welcome to the MariaDB monitor.  Commands end with ; or \g.
Your MariaDB connection id is 13
Server version: 5.5.35-MariaDB MariaDB ServerCopyright (c) 2000, 2013, Oracle, Monty Program Ab and others.Type 'help;' or '\h' for help. Type '\c' to clear the current input statement.MariaDB [(none)]> CREATE USER student@localhost IDENTIFIED BY 'redhat';
Query OK, 0 rows affected (0.00 sec)MariaDB [(none)]> CREATE USER admin@localhost IDENTIFIED BY 'redhat';
Query OK, 0 rows affected (0.00 sec)MariaDB [(none)]> CREATE USER jack@localhost IDENTIFIED BY 'redhat';
Query OK, 0 rows affected (0.00 sec)MariaDB [(none)]> use mysql;
Reading table information for completion of table and column names
You can turn off this feature to get a quicker startup with -ADatabase changed
MariaDB [mysql]> SELECT HOST,USER,PASSWORD FROM user WHERE USER="student";
+-----------+---------+-------------------------------------------+
| HOST      | USER    | PASSWORD                                  |
+-----------+---------+-------------------------------------------+
| localhost | student | *84BB5DF4823DA319BBF86C99624479A198E6EEE9 |
+-----------+---------+-------------------------------------------+
1 row in set (0.00 sec)MariaDB [mysql]> SELECT HOST,USER,PASSWORD FROM user WHERE USER="admin";
+-----------+-------+-------------------------------------------+
| HOST      | USER  | PASSWORD                                  |
+-----------+-------+-------------------------------------------+
| localhost | admin | *84BB5DF4823DA319BBF86C99624479A198E6EEE9 |
+-----------+-------+-------------------------------------------+
1 row in set (0.00 sec)MariaDB [mysql]> SELECT HOST,USER,PASSWORD FROM user WHERE USER="jack";
+-----------+------+-------------------------------------------+
| HOST      | USER | PASSWORD                                  |
+-----------+------+-------------------------------------------+
| localhost | jack | *84BB5DF4823DA319BBF86C99624479A198E6EEE9 |
+-----------+------+-------------------------------------------+
1 row in set (0.00 sec)MariaDB [mysql]> SHOW GRANTS FOR student@localhost;
+----------------------------------------------------------------------------------------------------------------+
| Grants for student@localhost                                                                                   |
+----------------------------------------------------------------------------------------------------------------+
| GRANT USAGE ON *.* TO 'student'@'localhost' IDENTIFIED BY PASSWORD '*84BB5DF4823DA319BBF86C99624479A198E6EEE9' |
+----------------------------------------------------------------------------------------------------------------+
1 row in set (0.00 sec)
查看student用户权限,并针对mysql数据库中的user表单向用户luke授予查询、更新、删除以及插入等权限;
MariaDB [mysql]> GRANT SELECT,UPDATE,DELETE,INSERT ON mysql.user TO student@localhost;
Query OK, 0 rows affected (0.00 sec)MariaDB [mysql]> SHOW GRANTS FOR student@localhost;
+----------------------------------------------------------------------------------------------------------------+
| Grants for student@localhost                                                                                   |
+----------------------------------------------------------------------------------------------------------------+
| GRANT USAGE ON *.* TO 'student'@'localhost' IDENTIFIED BY PASSWORD '*84BB5DF4823DA319BBF86C99624479A198E6EEE9' |
| GRANT SELECT, INSERT, UPDATE, DELETE ON `mysql`.`user` TO 'student'@'localhost'                                |
+----------------------------------------------------------------------------------------------------------------+
2 rows in set (0.00 sec)MariaDB [mysql]> exit;
Bye
mysqldump命令用于备份数据库数据,格式为“mysqldump [参数] [数据库名称]”。其中参数与mysql命令大致相同,-u参数用于定义登录数据库的用户名称,-p参数表示密码提示符。下面将hnswjjxy数据库中的内容导出为一个文件,并保存到root管理员的家目录中:
[root@localhost ~]# mysql -u root -p
Enter password:
Welcome to the MariaDB monitor.  Commands end with ; or \g.
Your MariaDB connection id is 15
Server version: 5.5.35-MariaDB MariaDB ServerCopyright (c) 2000, 2013, Oracle, Monty Program Ab and others.Type 'help;' or '\h' for help. Type '\c' to clear the current input statement.MariaDB [(none)]> CREATE DATABASE hnswjjxy;
Query OK, 1 row affected (0.00 sec)MariaDB [(none)]> exit;
Bye
[root@localhost ~]# mysqldump -u root -p hnswjjxy > /root/hnswjjxy.dump
Enter password:
[root@localhost ~]# cd /root
[root@localhost ~]# ls
anaconda-ks.cfg  initial-setup-ks.cfg  模板  图片  下载  桌面
hnswjjxy.dump    公共                  视频  文档  音乐
然后进入MariaDB数据库管理系统,彻底删除hnswjjxy数据库,这样mybook数据表单也将被彻底删除。
[root@localhost ~]# mysql -u root -p
Enter password:
Welcome to the MariaDB monitor.  Commands end with ; or \g.
Your MariaDB connection id is 17
Server version: 5.5.35-MariaDB MariaDB ServerCopyright (c) 2000, 2013, Oracle, Monty Program Ab and others.Type 'help;' or '\h' for help. Type '\c' to clear the current input statement.MariaDB [(none)]> DROP DATABASE hnswjjxy;
Query OK, 0 rows affected (0.00 sec)MariaDB [(none)]> SHOW databases;
+--------------------+
| Database           |
+--------------------+
| information_schema |
| mysql              |
| performance_schema |
+--------------------+
3 rows in set (0.00 sec)
远程控制服务ssh配置
服务器

客户端
[root@localhost ~]# ifconfig
eno16777736: flags=4163<UP,BROADCAST,RUNNING,MULTICAST>  mtu 1500inet 192.168.159.134  netmask 255.255.255.0  broadcast 192.168.159.255inet6 fe80::20c:29ff:fe48:38d  prefixlen 64  scopeid 0x20<link>ether 00:0c:29:48:03:8d  txqueuelen 1000  (Ethernet)RX packets 939  bytes 66043 (64.4 KiB)RX errors 0  dropped 0  overruns 0  frame 0TX packets 275  bytes 26173 (25.5 KiB)TX errors 0  dropped 0 overruns 0  carrier 0  collisions 0lo: flags=73<UP,LOOPBACK,RUNNING>  mtu 65536inet 127.0.0.1  netmask 255.0.0.0inet6 ::1  prefixlen 128  scopeid 0x10<host>loop  txqueuelen 0  (Local Loopback)RX packets 17  bytes 1808 (1.7 KiB)RX errors 0  dropped 0  overruns 0  frame 0TX packets 17  bytes 1808 (1.7 KiB)TX errors 0  dropped 0 overruns 0  carrier 0  collisions 0[root@localhost ~]# ssh 192.168.159.133
The authenticity of host '192.168.159.133 (192.168.159.133)' can't be established.
ECDSA key fingerprint is 01:e1:e1:a1:fe:89:18:b6:3d:ba:d4:a3:19:f3:1a:f9.
Are you sure you want to continue connecting (yes/no)? yes
Warning: Permanently added '192.168.159.133' (ECDSA) to the list of known hosts.
root@192.168.159.133's password:
Last failed login: Thu May 23 15:16:42 CST 2024 from 192.168.159.134 on ssh:notty
There was 1 failed login attempt since the last successful login.
Last login: Thu May 23 14:07:18 2024
[root@localhost ~]# ifconfig     //注:此时已远程登陆至服务器,故ifconfig命令看到的是服务器ip.
eno16777736: flags=4163<UP,BROADCAST,RUNNING,MULTICAST>  mtu 1500inet 192.168.159.133  netmask 255.255.255.0  broadcast 192.168.159.255inet6 fe80::20c:29ff:feb5:e726  prefixlen 64  scopeid 0x20<link>ether 00:0c:29:b5:e7:26  txqueuelen 1000  (Ethernet)RX packets 1026  bytes 77681 (75.8 KiB)RX errors 0  dropped 0  overruns 0  frame 0TX packets 297  bytes 30414 (29.7 KiB)TX errors 0  dropped 0 overruns 0  carrier 0  collisions 0lo: flags=73<UP,LOOPBACK,RUNNING>  mtu 65536inet 127.0.0.1  netmask 255.0.0.0inet6 ::1  prefixlen 128  scopeid 0x10<host>loop  txqueuelen 0  (Local Loopback)RX packets 13  bytes 1360 (1.3 KiB)RX errors 0  dropped 0  overruns 0  frame 0TX packets 13  bytes 1360 (1.3 KiB)TX errors 0  dropped 0 overruns 0  carrier 0  collisions 0
[root@localhost ~]# exit
登出
Connection to 192.168.159.133 closed.
打开服务器sshd服务配置文件,将第48行的参数设置为禁止root管理员远程登录;
[root@localhost 桌面]# vim /etc/ssh/sshd_config 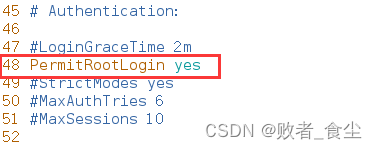
[root@localhost ~]# systemctl restart sshd.service使用客户端远程登陆,提示登陆成功;

使用客户端远程传输文件至服务器的/home目录
[root@localhost /]# cd /opt
[root@localhost opt]# vim /opt/hnsw.txt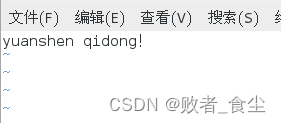
[root@localhost opt]# scp /opt/hnsw.txt 192.168.159.133:/home
root@192.168.159.133's password:
hnsw.txt                                  100%   17     0.0KB/s   00:00
在服务器中查看传输文件内容:
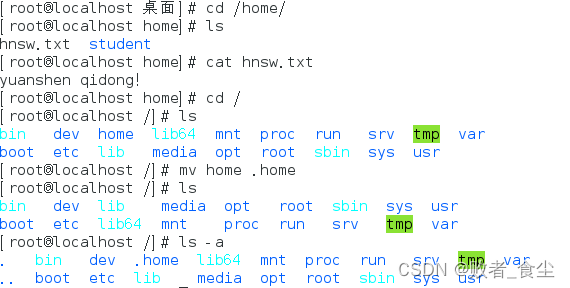
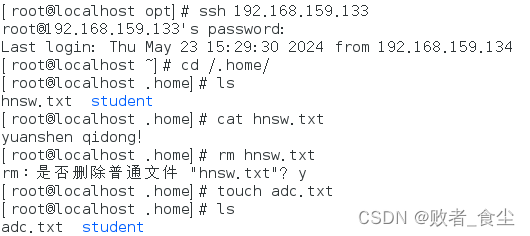
使用客户端远程登录服务器,删除文件hnsw.txt,创建文件abc.txt
这篇关于网络安全技术与应用:远程控制与数据库安全的文章就介绍到这儿,希望我们推荐的文章对编程师们有所帮助!


