本文主要是介绍【Android自定义View实战】之仿去哪儿网App图片按压显示指纹并缩放效果TouchFingerImageView,希望对大家解决编程问题提供一定的参考价值,需要的开发者们随着小编来一起学习吧!
转载请注明出处:http://blog.csdn.net/linglongxin24/article/details/52986713 【DylanAndroid的csdn博客】
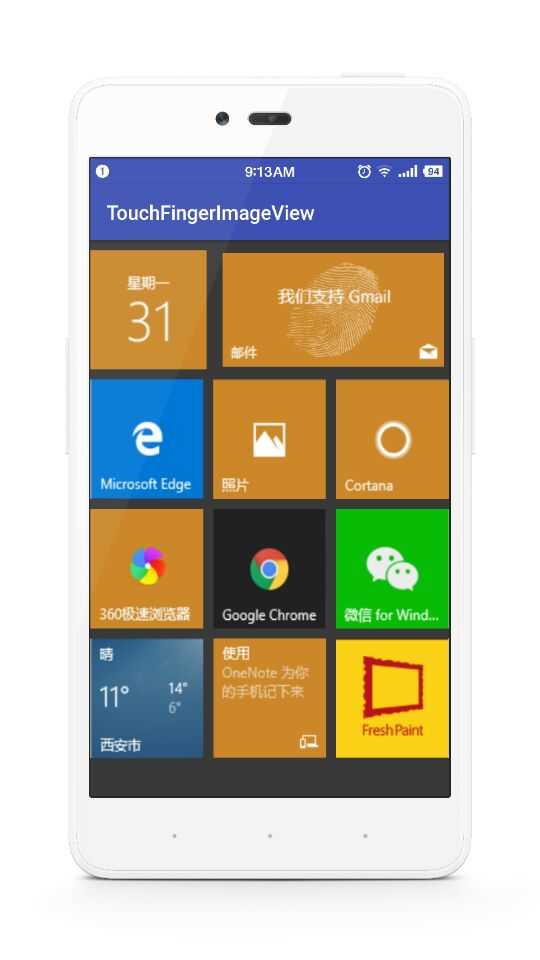
我们发现去哪儿网app的首页做的win8风格的方块,然后按压方块后悔发现,这个图片不但有缩放效果,而且还有显示指纹的效果,感觉跟真的手指按上去一样,很高逼格。今天我们就来看一下,这个是如何实现的。
1.先看一下效果图
2.第一步,准备一张指纹效果的透明背景图片
由于透明的看不到效果,我就连背景图片一起在这里显示了

3.第二步开始自定义View,有详细注释
import android.content.Context;
import android.graphics.Bitmap;
import android.graphics.BitmapFactory;
import android.graphics.Canvas;
import android.graphics.Matrix;
import android.graphics.drawable.BitmapDrawable;
import android.util.AttributeSet;
import android.view.MotionEvent;
import android.view.View;
import android.view.animation.Animation;
import android.view.animation.ScaleAnimation;
import android.widget.ImageView;/*** 自定义仿去哪儿手指按下图片缩放和显示指纹的效果* Created by yuandl on 2016-10-31.*/public class TouchFingerImageView extends ImageView {/*** 指纹的图片*/private Bitmap fingerBitmap;/*** 图片按下的状态标识*/private boolean state = false;/*** 点击事件*/private OnClickListener onClickListener;/*** 默认的构造函数** @param context* @param attrs*/public TouchFingerImageView(Context context, AttributeSet attrs) {super(context, attrs);/**获取指纹图片*/fingerBitmap = zoom(BitmapFactory.decodeResource(getResources(), R.mipmap.finger), 300, 300);}/*** 图片的缩放方法** @param bitmap    源图片资源* @param newWidth  缩放后的宽* @param newHeight 缩放后的高* @return Bitmap    缩放后的图片资源*/public Bitmap zoom(Bitmap bitmap, int newWidth, int newHeight) {// 获取这个图片的宽和高float width = bitmap.getWidth();float height = bitmap.getHeight();// 计算宽高缩放率float rateWidth = ((float) newWidth) / width;float rateHeight = ((float) newHeight) / height;// 创建操作图片用的matrix对象Matrix matrix = new Matrix();// 缩放图片动作matrix.postScale(rateWidth, rateHeight);//创建一个新的缩放后的bitmapBitmap zoomBitmap = Bitmap.createBitmap(bitmap, 0, 0, (int) width,(int) height, matrix, true);return zoomBitmap;}@Overrideprotected void onDraw(Canvas canvas) {super.onDraw(canvas);/**获取源资源图片文件**/Bitmap bitmap = ((BitmapDrawable) this.getDrawable()).getBitmap();Matrix matrix0 = new Matrix();/*** 平移指纹图片使指纹居中显示*/matrix0.postTranslate(this.getWidth() / 2 - fingerBitmap.getWidth() / 2,this.getHeight() / 2 - fingerBitmap.getHeight() / 2);/**绘制源资源图片文件**/canvas.drawBitmap(zoom(bitmap, getWidth(), getHeight()), 0, 0, null);if (state) {Matrix matrix = new Matrix();/*** 平移指纹图片使指纹居中显示*/matrix.postTranslate(this.getWidth() / 2 - fingerBitmap.getWidth() / 2,this.getHeight() / 2 - fingerBitmap.getHeight() / 2);canvas.drawBitmap(fingerBitmap, matrix, null);}}@Overridepublic boolean onTouchEvent(MotionEvent event) {float begin = 1.0f;float end = 0.95f;/** 收缩动画**/Animation beginAnimation = new ScaleAnimation(begin, end, begin, end,Animation.RELATIVE_TO_SELF, 0.5f, Animation.RELATIVE_TO_SELF,0.5f);/** 伸展动画**/Animation finishAnimation = new ScaleAnimation(end, begin, end, begin,Animation.RELATIVE_TO_SELF, 0.5f, Animation.RELATIVE_TO_SELF,0.5f);/** 设置动画持续时间和保留动画结果 **/beginAnimation.setDuration(200);/**设置动画停留在最后一个的状态**/beginAnimation.setFillAfter(true);finishAnimation.setDuration(200);finishAnimation.setFillAfter(true);switch (event.getAction()) {case MotionEvent.ACTION_DOWN://手指按下时startAnimation(beginAnimation);state = true;invalidate();if (onClickListener != null) {onClickListener.onClick(this);}break;case MotionEvent.ACTION_UP:startAnimation(finishAnimation);state = false;invalidate();break;case MotionEvent.ACTION_CANCEL:startAnimation(finishAnimation);state = false;invalidate();break;}return true;}@Overridepublic void setOnClickListener(OnClickListener onClickListener) {this.onClickListener = onClickListener;}
}
4.用法
- 布局文件
<?xml version="1.0" encoding="utf-8"?>
<LinearLayout xmlns:android="http://schemas.android.com/apk/res/android"xmlns:tools="http://schemas.android.com/tools"android:id="@+id/activity_main"android:layout_width="match_parent"android:layout_height="match_parent"android:background="#393939"android:orientation="vertical"tools:context="cn.bluemobi.dylan.touchfingerimageview.MainActivity"><LinearLayout
        android:layout_width="match_parent"android:layout_height="120dp"android:layout_marginTop="10dp"android:orientation="horizontal"><cn.bluemobi.dylan.touchfingerimageview.TouchFingerImageView
            android:id="@+id/tfiv1"android:layout_width="0dp"android:layout_height="match_parent"android:layout_weight="1.00"android:scaleType="centerCrop"android:src="@mipmap/iv1" /><cn.bluemobi.dylan.touchfingerimageview.TouchFingerImageView
            android:layout_width="0dp"android:layout_height="match_parent"android:layout_marginLeft="10dp"android:layout_weight="2.00"android:scaleType="centerCrop"android:src="@mipmap/iv2" /></LinearLayout><LinearLayout
        android:layout_width="match_parent"android:layout_height="120dp"android:layout_marginTop="10dp"android:orientation="horizontal"><cn.bluemobi.dylan.touchfingerimageview.TouchFingerImageView
            android:layout_width="0dp"android:layout_height="match_parent"android:layout_weight="1.00"android:scaleType="centerCrop"android:src="@mipmap/iv3" /><cn.bluemobi.dylan.touchfingerimageview.TouchFingerImageView
            android:layout_width="0dp"android:layout_height="match_parent"android:layout_marginLeft="10dp"android:layout_weight="1.00"android:scaleType="centerCrop"android:src="@mipmap/iv4" /><cn.bluemobi.dylan.touchfingerimageview.TouchFingerImageView
            android:layout_width="0dp"android:layout_height="match_parent"android:layout_marginLeft="10dp"android:layout_weight="1.00"android:scaleType="centerCrop"android:src="@mipmap/iv5" /></LinearLayout><LinearLayout
        android:layout_width="match_parent"android:layout_height="120dp"android:layout_marginTop="10dp"android:orientation="horizontal"><cn.bluemobi.dylan.touchfingerimageview.TouchFingerImageView
            android:layout_width="0dp"android:layout_height="match_parent"android:layout_weight="1.00"android:scaleType="centerCrop"android:src="@mipmap/iv6" /><cn.bluemobi.dylan.touchfingerimageview.TouchFingerImageView
            android:layout_width="0dp"android:layout_height="match_parent"android:layout_marginLeft="10dp"android:layout_weight="1.00"android:scaleType="centerCrop"android:src="@mipmap/iv7" /><cn.bluemobi.dylan.touchfingerimageview.TouchFingerImageView
            android:layout_width="0dp"android:layout_height="match_parent"android:layout_marginLeft="10dp"android:layout_weight="1.00"android:scaleType="centerCrop"android:src="@mipmap/iv8" /></LinearLayout><LinearLayout
        android:layout_width="match_parent"android:layout_height="120dp"android:layout_marginTop="10dp"android:orientation="horizontal"><cn.bluemobi.dylan.touchfingerimageview.TouchFingerImageView
            android:layout_width="0dp"android:layout_height="match_parent"android:layout_weight="1.00"android:scaleType="centerCrop"android:src="@mipmap/iv9" /><cn.bluemobi.dylan.touchfingerimageview.TouchFingerImageView
            android:layout_width="0dp"android:layout_height="match_parent"android:layout_marginLeft="10dp"android:layout_weight="1.00"android:scaleType="centerCrop"android:src="@mipmap/iv10" /><cn.bluemobi.dylan.touchfingerimageview.TouchFingerImageView
            android:layout_width="0dp"android:layout_height="match_parent"android:layout_marginLeft="10dp"android:layout_weight="1.00"android:scaleType="centerCrop"android:src="@mipmap/iv11" /></LinearLayout>
</LinearLayout>- Activity中的用法
import android.os.Bundle;
import android.support.v7.app.AppCompatActivity;
import android.view.View;
import android.widget.Toast;public class MainActivity extends AppCompatActivity {@Overrideprotected void onCreate(Bundle savedInstanceState) {super.onCreate(savedInstanceState);setContentView(R.layout.activity_main);findViewById(R.id.tfiv1).setOnClickListener(new View.OnClickListener() {@Overridepublic void onClick(View view) {Toast.makeText(MainActivity.this,"点击了第一个",Toast.LENGTH_SHORT).show();}});}
}
5.GitHub源码:https://github.com/linglongxin24/TouchFingerImageView
这篇关于【Android自定义View实战】之仿去哪儿网App图片按压显示指纹并缩放效果TouchFingerImageView的文章就介绍到这儿,希望我们推荐的文章对编程师们有所帮助!


