本文主要是介绍【Android自定义View实战】之你应该明白的事儿,希望对大家解决编程问题提供一定的参考价值,需要的开发者们随着小编来一起学习吧!
转载请注明出处:http://blog.csdn.net/linglongxin24/article/details/52910443【DylanAndroid的csdn博客】
在Android的实际开发中,我们Android系统本身已经给我们提供了很丰富的UI以及各种实用的控件,例如TextView,Button,ImageView等。用这些基础控件已经能够实现非常优美的界面以及功能。然而在实际的开发中,我们由于客户的各种需求,App开发的各种标新立异,追求个性化,所以,导致我们用这些最基础的控件已经不能够满足我们的各种个性化需求。那么,我们就要考虑去自定义控件来完成我们的要求,要真正去完成一个自定义控件,我们先来看看这个控件的继承体系:
1.View体系
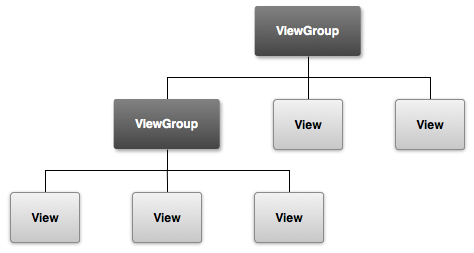
Android 应用中的所有用户界面元素都是使用 View 和 ViewGroup 对象构建而成。View 对象用于在屏幕上绘制可供用户交互的内容。ViewGroup 对象用于储存其他 View(和 ViewGroup)对象,以便定义界面的局部。
Android 提供了一系列 View 和 ViewGroup 子类,可为您提供常用输入控件(如按钮和文本字段)和各种布局模式(如线性布局或相对布局)。
2.View的关键绘制流程和关键的生命周期
综上所述:View的关键生命周期为:
构造View() –> onMeasure() –> onSizeChanged() –> onLayout() –> onDraw()
3.构造函数的自定义属性
构造函数
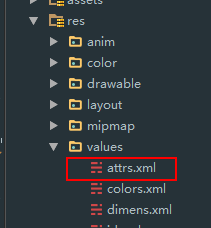
public CustomView(Context context) {super(context); }public CustomView(Context context, AttributeSet attrs) {super(context, attrs); }public CustomView(Context context, AttributeSet attrs, int defStyleAttr) {super(context, attrs, defStyleAttr); }- 首先在res的values文件夹下面建一个attrs.xml文件,如下图所示:
- 然后在里面定义如下内容
<?xml version="1.0" encoding="utf-8"?> <resources> <declare-styleable name="CircleImageView"><attr name="border_width" format="dimension" /><attr name="border_color" format="color" /> </declare-styleable> </resources>- 首先在res的values文件夹下面建一个attrs.xml文件,如下图所示:
- 首先应该在布局文件的跟布局当中定义命名空间
xmlns:app="http://schemas.android.com/apk/res-auto"- 在xml中的用法:如下所示
 <com.bm.dylan.view.CircleImageView
                android:id="@+id/civ_personal_information_head"android:layout_width="50dp"android:layout_height="50dp"android:layout_alignParentRight="true"android:layout_centerVertical="true"android:src="@mipmap/personalcenter_head"app:border_color="@color/white" />app:border_width="2dp" />
最后在构造函数中这样获取:
public CircleImageView(Context context, AttributeSet attrs, int defStyle) {super(context, attrs, defStyle);super.setScaleType(SCALE_TYPE);TypedArray a = context.obtainStyledAttributes(attrs, R.styleable.CircleImageView, defStyle, 0);int mBorderWidth = a.getDimensionPixelSize(R.styleable.CircleImageView_border_width, DEFAULT_BORDER_WIDTH);int mBorderColor = a.getColor(R.styleable.CircleImageView_border_color, DEFAULT_BORDER_COLOR);a.recycle();}在xml中可以定义的属性如下
| 编号 | 类型 | format的值 | 在xml中定义值示例 |
|---|---|---|---|
| 1 | reference参考指定Theme中资源ID | reference | app:name=”@string/label” |
| 2 | color:颜色 | color | app:Textcolor=”#ff0000” |
| 3 | boolean:布尔值 | boolean | app:isVisible=”false” |
| 4 | dimension:尺寸值 | dimension | app:myWidth=”100dp” |
| 5 | float:浮点型 | float | app:fromAlpha=”0.3” |
| 6 | integer:整型 | integer | app:framesCount=”22” |
| 7 | string:字符串 | string | app:name=”My name is yuan dong liang” |
| 8 | fraction:百分数 | fraction | app:pivotX=”200%” |
| 9 | enum:枚举 |  | app:borderRadius=”circle” |
| 10 | flag:位或运算 |  | android:windowSoftInputMode=”stateUnspecified |
| 11 | 多种符合类型 | color | app:background = “@drawable/图片ID|#00FF00”| |
4..测量View大小(onMeasure)
- 代码
    @Overrideprotected void onMeasure(int widthMeasureSpec, int heightMeasureSpec) {// TODO Auto-generated method stub  super.onMeasure(widthMeasureSpec, heightMeasureSpec);  System.out.println(widthMeasureSpec+":"+heightMeasureSpec);  // 如果是自定ViewGroup,计算自定义的ViewGroup中所有子控件的大小  //measureChildren(widthMeasureSpec, heightMeasureSpec);  int w = getMeasureWidth(widthMeasureSpec);    int h = getMeasureHeight(heightMeasureSpec); setMeasuredDimension(w, h);  //必须调用此方法,否则会抛出异常  }private int getMeasureHeight(int heightMeasureSpec) {  int result = 0;  int size = MeasureSpec.getSize(heightMeasureSpec);  //每次调用此方法,测量用到的size会发生变化  int mode = MeasureSpec.getMode(heightMeasureSpec);  //根据定义的Layout_width,Layout_height,会对此值产生影响  if (mode == MeasureSpec.EXACTLY) {  result = size;  } else if (mode == MeasureSpec.UNSPECIFIED) {  result = getPaddingLeft()  + getPaddingRight();  } else {  result = Math.min(result, size);  }  System.out.println("Height size:" + size);    System.out.println("Height mode:" + mode);  return result;
}  private int getMeasureWidth(int widthMeasureSpec) {  int result = 0;  int size = MeasureSpec.getSize(widthMeasureSpec);  int mode = MeasureSpec.getMode(widthMeasureSpec);  if (mode == MeasureSpec.EXACTLY) {  result = size;  } else if (mode == MeasureSpec.UNSPECIFIED) {  result =getPaddingTop()  + getPaddingBottom();  } else {  result = Math.min(result, size);  }  System.out.println("Width size:" + size);  System.out.println("Width mode:" + mode);  return result;
} - MeasureSpec
从上面可以看出 onMeasure 函数中有 widthMeasureSpec 和 heightMeasureSpec 这两个 int 类型的参数, 毫无疑问他们是和宽高相关的, 但它们其实不是宽和高, 而是由宽、高和各自方向上对应的测量模式来合成的一个值:对于详细测量值( measureSpec )需要两样东西来确定它,那就是大小(size)和模式(mode)。 而 measureSpec,size,mode他们三个的关系,都封装在View类中的一个内部类里,名叫 MeasureSpec 。
测量模式一共有三种, 被定义在 Android 中的 View 类的一个内部类View.MeasureSpec中:
| 模式 | 二进制数值 | 描述 |
|---|---|---|
| UNSPECIFIED | 00 | 默认值,父控件没有给子view任何限制,子View可以设置为任意大小。 |
| EXACTLY | 01 | 表示父控件已经确切的指定了子View的大小。 |
| AT_MOST | 10 | 表示子View具体大小没有尺寸限制,但是存在上限,上限一般为父View大小。 |
我们重写onMeasure()所要实现的最终目的。它的作用就是存储我们测量好的宽高值。
5.确定View大小(onSizeChanged)
因为View的大小不仅由View本身控制,而且受父控件的影响,所以我们在确定View大小的时候最好使用系统提供的onSizeChanged回调函数。它又四个参数,分别为 宽度,高度,上一次宽度,上一次高度。这个函数比较简单,我们只需关注 宽度(w), 高度(h) 即可,这两个参数就是View最终的大小。
@Overrideprotected void onSizeChanged(int w, int h, int oldw, int oldh) {super.onSizeChanged(w, h, oldw, oldh);}6.确定子View布局位置(onLayout)
确定布局的函数是onLayout,它用于确定子View的位置,在自定义ViewGroup中会用到,他调用的是子View的layout函数。在自定义ViewGroup中,onLayout一般是循环取出子View,然后经过计算得出各个子View位置的坐标值,然后用以下函数设置子View位置。
@Override protected void onLayout(boolean changed, int l, int t, int r, int b) { // 记录总高度 int mTotalHeight = 0; // 遍历所有子视图 int childCount = getChildCount(); for (int i = 0; i < childCount; i++) { View childView = getChildAt(i); // 获取在onMeasure中计算的视图尺寸 int measureHeight = childView.getMeasuredHeight(); int measuredWidth = childView.getMeasuredWidth(); childView.layout(l, mTotalHeight, measuredWidth, mTotalHeight + measureHeight); mTotalHeight += measureHeight; } } | 名称 | 说明 | 对应的函数 |
|---|---|---|
| l | View左侧距父View左侧的距离 | getLeft(); |
| t | View顶部距父View顶部的距离 | getTop(); |
| r | View右侧距父View左侧的距离 | getRight(); |
| b | View底部距父View顶部的距离 | getBottom(); |
7.绘制内容(onDraw)
@Overrideprotected void onDraw(Canvas canvas) {super.onDraw(canvas);//利用Canvas 画图}8.绘图知识
Canvas(画布)类
画笔属性设置好之后,还需要将图像绘制到画布上。Canvas类可以用来实现各种图形的绘制工作,如绘制直线、矩形、圆等等。Canvas绘制常用图形的方法如下:
绘制直线:canvas.drawLine(float startX, float startY, float stopX, float stopY, Paint paint);绘制矩形:canvas.drawRect(float left, float top, float right, float bottom, Paint paint);
绘制圆形:canvas.drawCircle(float cx, float cy, float radius, Paint paint);
绘制字符:canvas.drawText(String text, float x, float y, Paint paint);
绘制图形:canvas.drawBirmap(Bitmap bitmap, float left, float top, Paint paint);
- Paint(画笔)类
要绘制图形,首先得调整画笔,按照自己的开发需要设置画笔的相关属性。Pain类的常用属性设置方法如下:
setAntiAlias(); //设置画笔的锯齿效果setColor(); //设置画笔的颜色setARGB(); //设置画笔的A、R、G、B值setAlpha(); //设置画笔的Alpha值setTextSize(); //设置字体的尺寸setStyle(); //设置画笔的风格(空心或实心)setStrokeWidth(); //设置空心边框的宽度getColor(); //获取画笔的颜色9.对外提供操作方法和监听回调
自定义完View之后,一般会对外暴露一些接口,用于控制View的状态等,或者监听View的变化.也就是定义接口。我们的像Button的点击事件就是这样的原理。10.自定义View的分类
- 在原有的控件基础上扩展,比如继承ImageView去实现圆形头像等。
- 通过组合控件来自定义View,比如标题栏就可以通过组合控件来实现,左边一个返回按钮,中间一个显示文本,右边可有可无的提交按钮。
- 完全重写onDraw()自定义View。
这篇关于【Android自定义View实战】之你应该明白的事儿的文章就介绍到这儿,希望我们推荐的文章对编程师们有所帮助!


