本文主要是介绍vue2人力资源项目8员工详情,希望对大家解决编程问题提供一定的参考价值,需要的开发者们随着小编来一起学习吧!
页面结构
<template><div class="dashboard-container"><div class="app-container"><div class="edit-form"><el-form ref="userForm" label-width="220px"><!-- 姓名 部门 --><el-row><el-col :span="12"><el-form-item label="姓名" prop="username"><el-input size="mini" class="inputW" /></el-form-item></el-col></el-row><!-- 工号 入职时间 --><el-row><el-col :span="12"><el-form-item label="工号" prop="workNumber"><el-input size="mini" class="inputW" /></el-form-item></el-col></el-row><!--手机 聘用形式  --><el-row><el-col :span="12"><el-form-item label="手机" prop="mobile"><el-inputsize="mini"class="inputW"/></el-form-item></el-col></el-row><el-row><el-col :span="12"><el-form-item label="部门" prop="departmentId"><!-- 放置及联部门组件 --></el-form-item></el-col></el-row><el-row><el-col :span="12"><el-form-item label="聘用形式" prop="formOfEmployment"><el-select size="mini" class="inputW" /></el-form-item></el-col></el-row><el-row><el-col :span="12"><el-form-item label="入职时间" prop="timeOfEntry"><el-date-pickersize="mini"type="date"value-format="yyyy-MM-dd"class="inputW"/></el-form-item></el-col></el-row><el-row><el-col :span="12"><el-form-item label="转正时间" prop="correctionTime"><el-date-pickersize="mini"type="date"class="inputW"/></el-form-item></el-col></el-row><!-- 员工照片 --><el-row><el-col :span="12"><el-form-item label="员工头像"><!-- 放置上传图片 --></el-form-item></el-col></el-row><!-- 保存个人信息 --><el-row type="flex"><el-col :span="12" style="margin-left:220px"><el-button size="mini" type="primary">保存更新</el-button></el-col></el-row></el-form></div></div></div>
</template><script>export default {}
</script><style scoped lang="scss">.edit-form {background: #fff;padding: 20px;.inputW {width: 380px}}</style>
配置路由:
只想在左侧菜单显示一级菜单,二级路由只有一个显示在左侧菜单
{ path: '/employee/detail', // 员工详情的地址component: () => import('@/views/employee/detail.vue'),hidden: true, // 表示隐藏在左侧菜单meta: {title: '员工详情'// 表示显示在导航的文本}}添加点击事件跳转
<el-button size="mini" type="primary" @click="$router.push('/employee/detail')">添加员工</el-button>封装部门级联组件

select-tree.vue
<template><el-cascader />
</template>
在detail.vue里注册
import selectTree from './components/select-tree.vue'
export default {comments: { selectTree },
在detail.vue里使用及增加样式
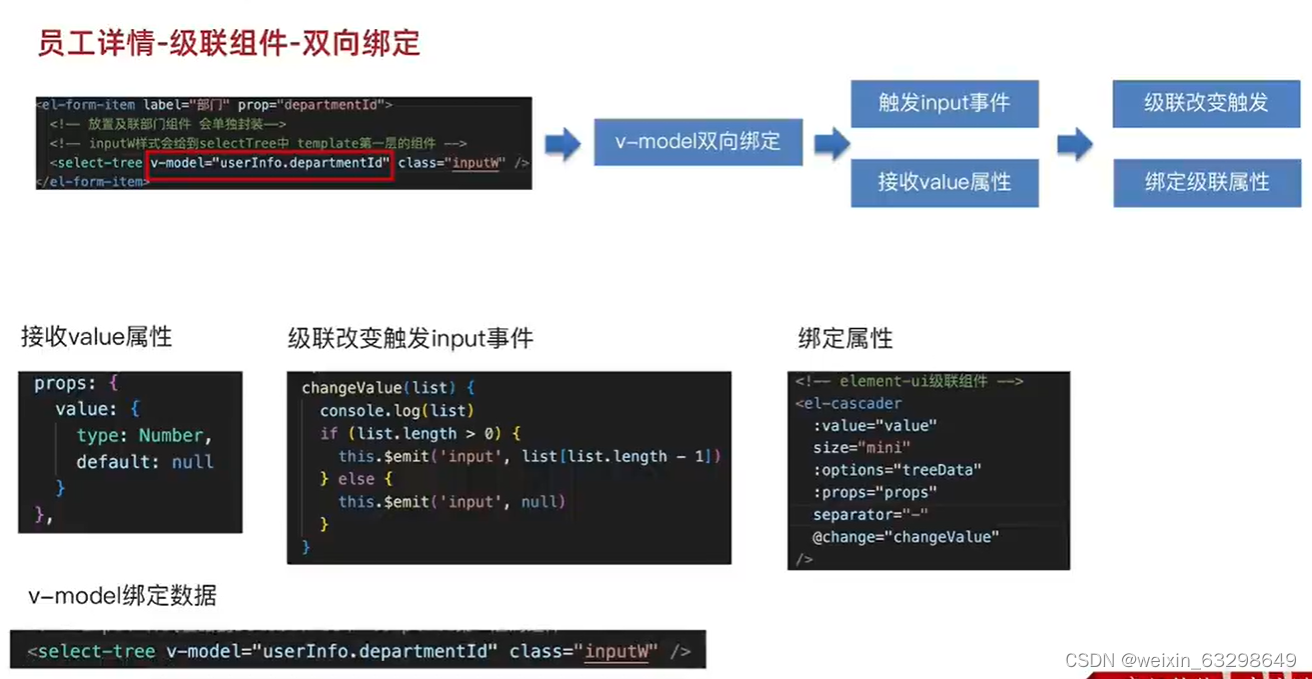
<el-form-item label="部门" prop="departmentId"><!-- 放置及联部门组件 --><!--inputw样式会给到select-tree中 template第一层的组件--><select-tree class="inputw" /></el-form-item>调用接口获取数据
export default {data() {return {treeData: []// 赋值给 级联组件的options}},created() {this.getDepartment()},methods: {async getDepartment() {const result = await getDepartment()}}将组织架构的数据转换为树形结构赋值给treeData
methods: {async getDepartment() {// 将组织架构的数据转换为树形结构赋值给treeDatathis.treeData = transListToTreeData(await getDepartment(), 0)}}转换树形的代码,注意判断长度
export function transListToTreeData(list, rootValue) {const arr = []list.forEach(item => {if (item.pid === rootValue) {arr.push()const children = transListToTreeData(list, item.id)if (children.length) {list.children = children}}})
绑定给组件
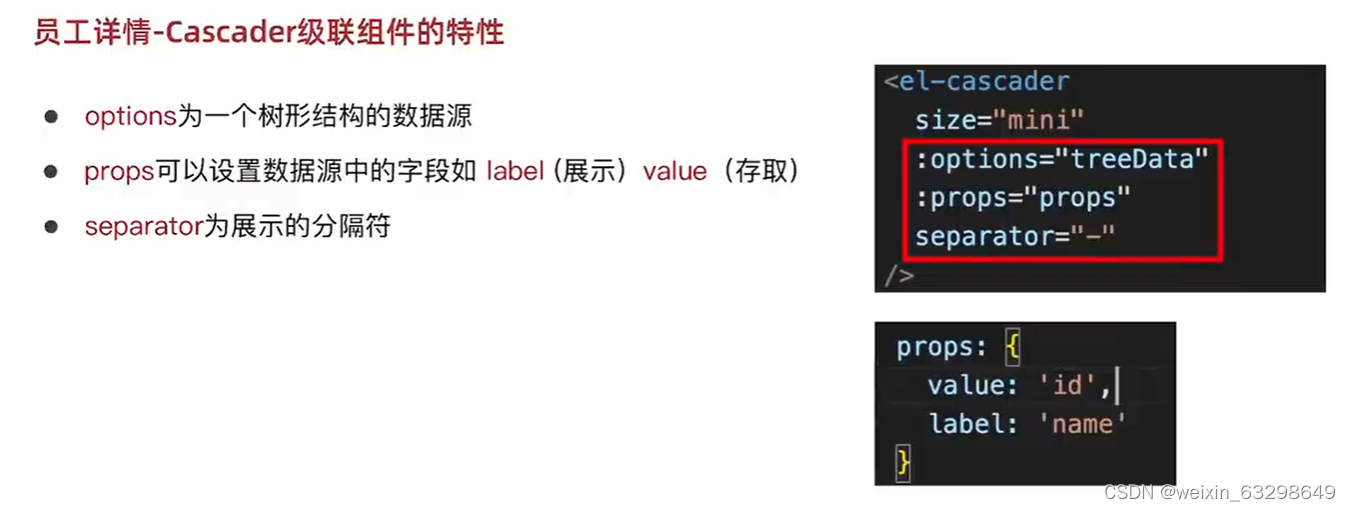
<template><el-cascader size="mini" :options="treeData" />
</template>
准备props数据
props: {label: 'name', // 要显示的字段value: 'id'// 要存储的字段}绑定给组件
<template><el-cascader size="mini" :options="treeData" :props="propss"/>
</template> 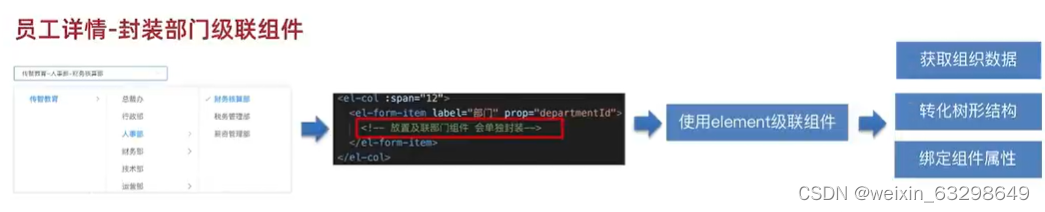
级联组件双向绑定
用input和value实现v-model
select-tree.vue级联组件里接收value属性
<template><el-cascader :value="value" size="mini" :options="treeData" :props="propss" />
</template>
<script>
import { getDepartment } from '@/api/department'
import { transListToTreeData } from '@/utils'
export default {props: {value: {type: Number, // 存储的是部门的iddefault: null}},
绑定change事件(即input)@change="changeValue"
<template><el-cascader :value="value" size="mini" :options="treeData" :props="propss" separator="-" @change="changeValue" />
</template>
changeValue的逻辑
changeValue(list) {// list是传过来的参数// 将list数组里的最后一位传递出去if (list.length) {// 将最后一位的id取出来// 传递给 <select-tree v-model="userInfo.departmentId" class="inputw" />的v-model="userInfo.departmentId"// 把id赋值给usersInfo.departmentIdthis.$emit('input', list[list.length - 1])} else {this.$emit('input', null)// 如果长度为0,说明值为空}}新增员工

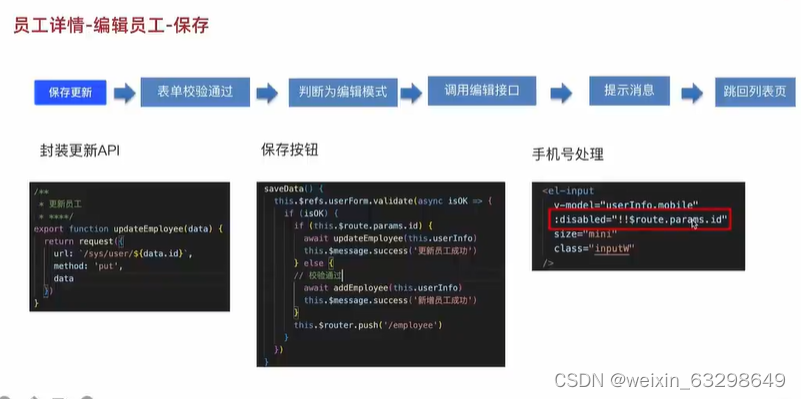
saveData() {this.$refs.userForm.validate(async isOk => {if (isOk) {await addEmployee(this.userInfo)this.$message.success('成功')this.$router.push('/employee')}})}跳转查看员工详情
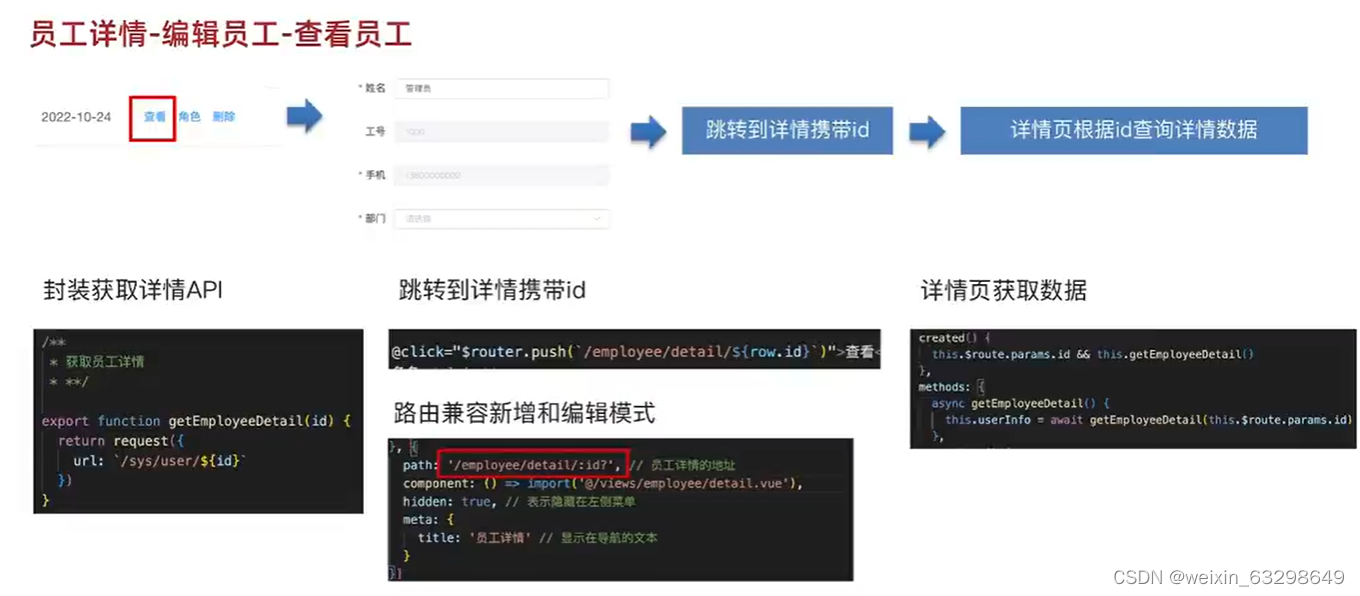
<button size="mini" type="text" @click="$router.push(`/employee/detail`)">查看</button>为了携带id,配置了路由
path: '/employee/detail:id?', :id表示detail之后还有内容,就是动态参数。?表示这个id可以有(如编辑),也可能没有,(如添加)。
{ path: '/employee/detail:id', // 员工详情的地址component: () => import('@/views/employee/detail.vue'),hidden: true, // 表示隐藏在左侧菜单meta: {title: '员工详情'// 表示显示在导航的文本}}跳转时携带id,拼接了字符串
<button size="mini" type="text" @click="$router.push(`/employee/detail/${row.id}`)">查看</button>$router.push()便在用户交互时触发页面跳转
$route是一个对象,它代表当前的 Vue Router 路由。它包含了当前路由的详细信息,如路由的名称 (name)、路径 (path)、参数 (params) 和查询参数 (query)。$route 对象是不可变的,也就是说,你不能通过修改 $route 对象来改变当前路由
封装获取员工详情的api
// 获取员工详情
export function getEmployeeDetail(id) {return request({url: `/sys/user/${id}`})
}
封装获取员工详情的方法
methods: {async getEmployeeDetail() {this.userInfo = await getEmployeeDetail(this.$route.id)},created里去调用(有id才调用)
created() {// 获取路由参数中的idthis.$route.id && this.getEmployeeDetail()},员工详情-编辑员工

saveData() {this.$refs.userForm.validate(async isOk => {if (isOk) {if (this.$router.prams.id) {// 编辑模式await updateEmployee(this.userInfo)this.$message.success('编辑成功')} else {// 新增模式await addEmployee(this.userInfo)this.$message.success('新增成功')}this.$router.push('/employee')}})}手机号设定编辑时不能修改
<el-row><el-col :span="12"><el-form-item label="手机" prop="mobile"><el-inputv-model="userInfo.mobile"size="mini"class="inputW":disabled="!!$route.prams.id"/></el-form-item></el-col></el-row>:disabled="!!$route.prams.id"第一个!设定转化为布尔值,第二个!还原为之前的布尔值
员工头像

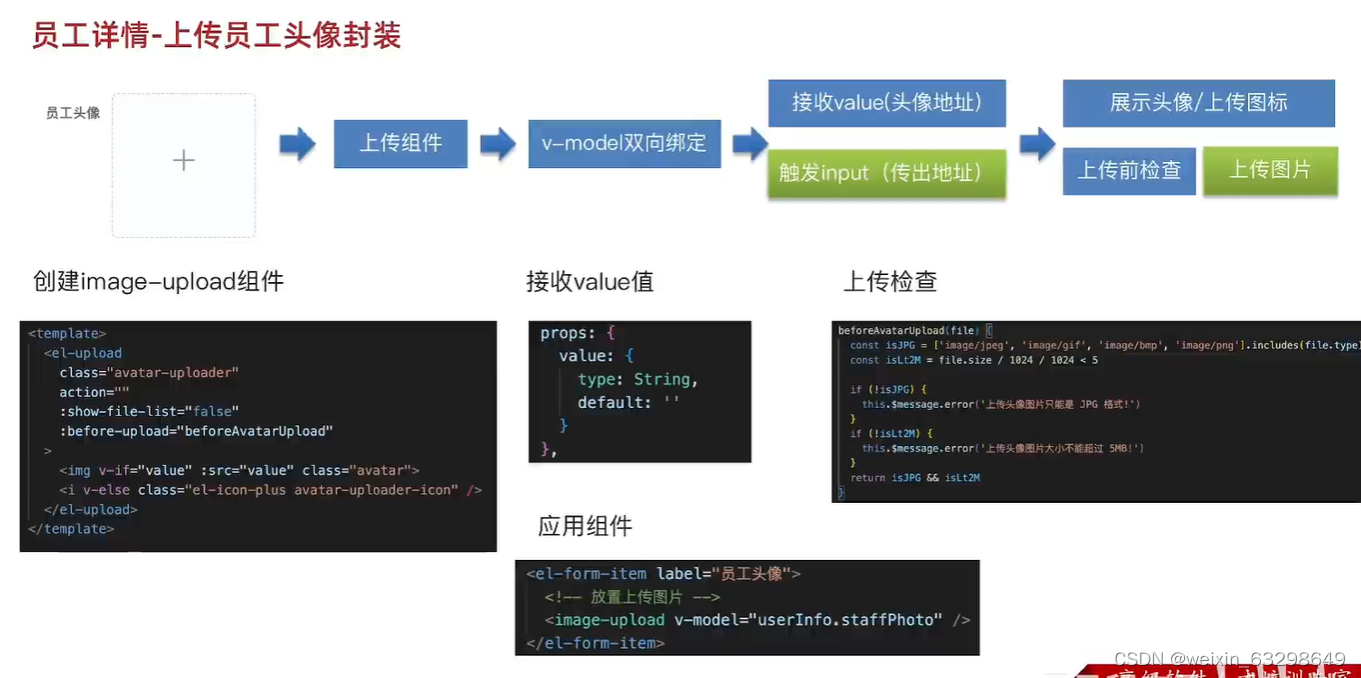
创建组件样式,从elementUi里粘贴过来
Cascader 级联选择器 | Element Plus (element-plus.org)
设置prop变量(接收从父组件绑定的v-model传过来的值)
props: {value: {type: String,default: ''}},绑定给子组件的img标签里的value和src,判断value值存不存在
<img v-if="value" :src="imageUrl" class="avatar">父组件
<!-- 放置上传图片 --><image-upload v-model="userInfo.staffPhoto" />属性用冒号,事件用@
使用cos-sdk上传图片
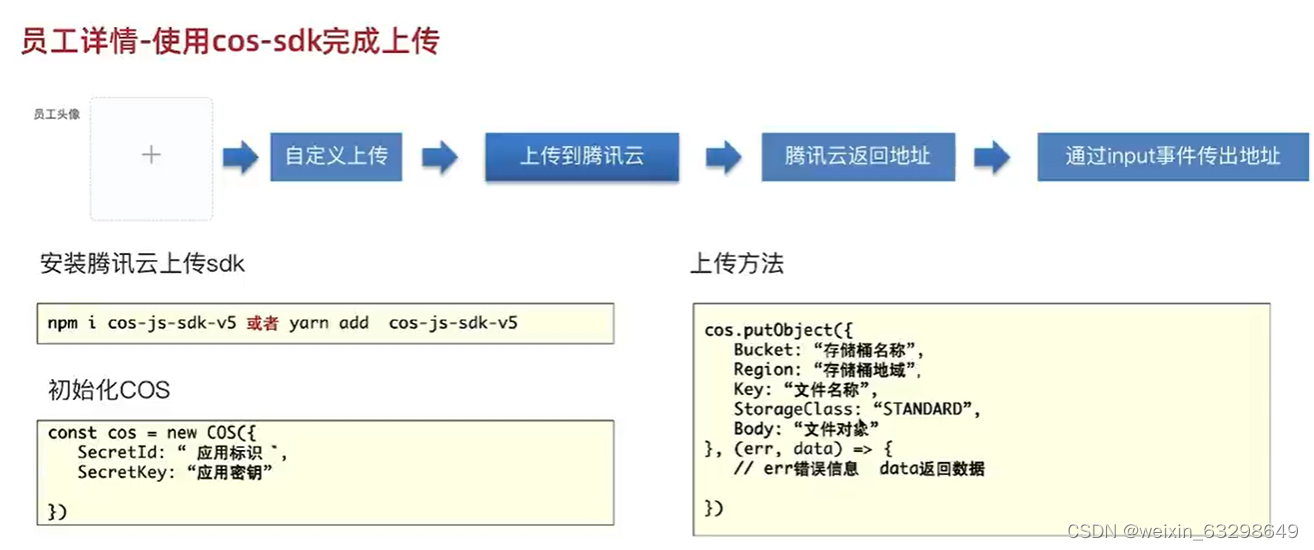
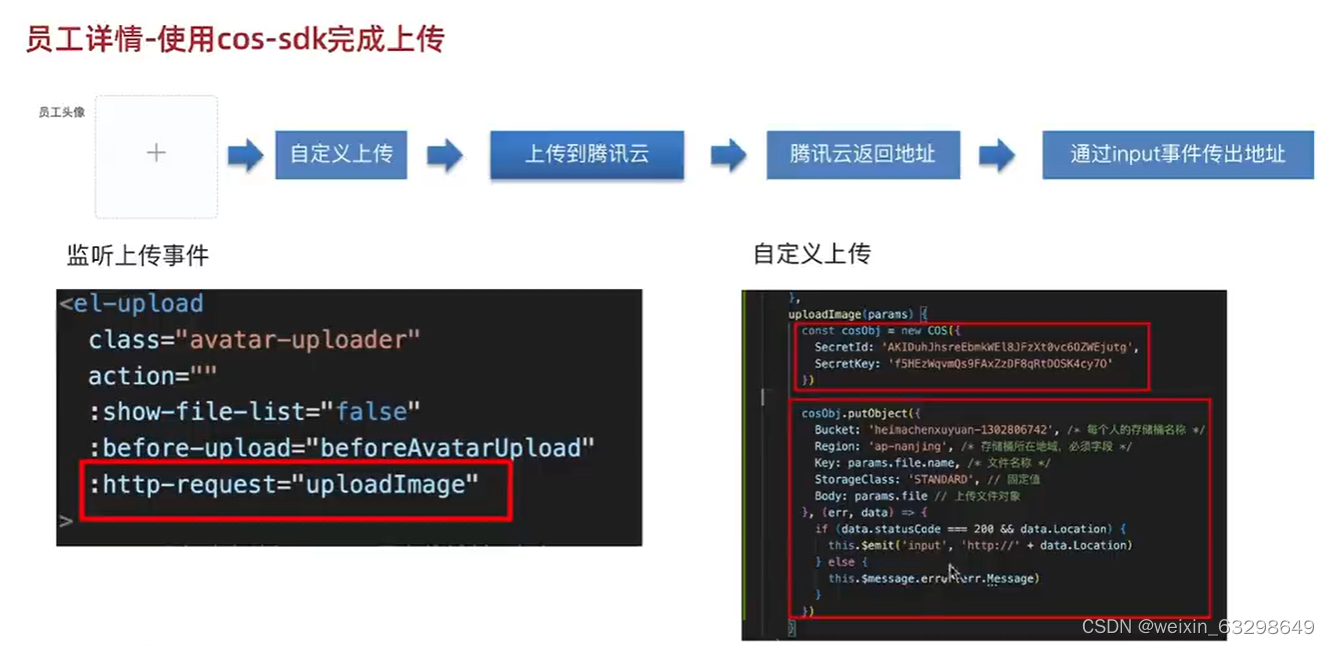 用uploadIMage监听组件的http-request属性
组件代码
<template><el-uploadclass="avatar-uploader"action="":show-file-list="false":http-request="uploadIMage":before-upload="beforeAvatarUpload"><img v-if="value" :src="value" class="avatar"><el-icon v-else class="avatar-uploader-icon"><Plus /></el-icon></el-upload>
</template>
这篇关于vue2人力资源项目8员工详情的文章就介绍到这儿,希望我们推荐的文章对编程师们有所帮助!


