本文主要是介绍射击游戏案例(一),希望对大家解决编程问题提供一定的参考价值,需要的开发者们随着小编来一起学习吧!
目录
一、使用到的资源:
1.小白人动画包(AnimStarterPack)
2.基础武器包(MilitaryWeapSilver)
二、角色创建
2.1 添加摄像机臂和摄像机组件
2.2 基于创建的角色C++类创建对应的蓝图类
2.3 基础项目设置
2.4 角色按键输入
一、使用到的资源:
以下使用到的资源都可以在虚幻商城免费资源处获取,也可以使用自己的资源。
1.小白人动画包(AnimStarterPack)

2.基础武器包(MilitaryWeapSilver)

二、角色创建
以Character为基类创建出需要的角色,我这里创建了一个BaseCharacter作为角色类的基类,并以这个角色类为基类创建出子类ManCharacter,将部分功能放到子类中去处理。
2.1 添加摄像机臂和摄像机组件
BaseCharacter.h中:
private:
/*
*摄像机臂
*/
UPROPERTY(VisibleAnywhere,BlueprintReadOnly,Category=Components,meta=(AllowPrivateAccess="true"))
USpringArmComponent*CameraBoom;
/*
*摄像机
*/
UPROPERTY(VisibleAnywhere,BlueprintReadOnly,Category=Components,meta=(AllowPrivateAccess="true"))
UCameraComponent*FollowCamera;
BaseCharacter.cpp中:
ABaseCharacter::ABaseCharacter()
{PrimaryActorTick.bCanEverTick = true;CameraBoom = CreateDefaultSubobject<USpringArmComponent>(TEXT("CameraBoom"));CameraBoom->SetupAttachment(RootComponent);CameraBoom->bUsePawnControlRotation = true;FollowCamera = CreateDefaultSubobject<UCameraComponent>(TEXT("FollowCamera"));FollowCamera->SetupAttachment(CameraBoom);
}
在cpp中需要添加的头文件:
#include"Camera/CameraComponent.h"
#include"GameFramework/SpringArmComponent.h"
2.2 基于创建的角色C++类创建对应的蓝图类
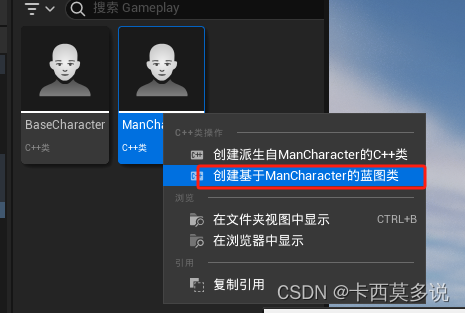
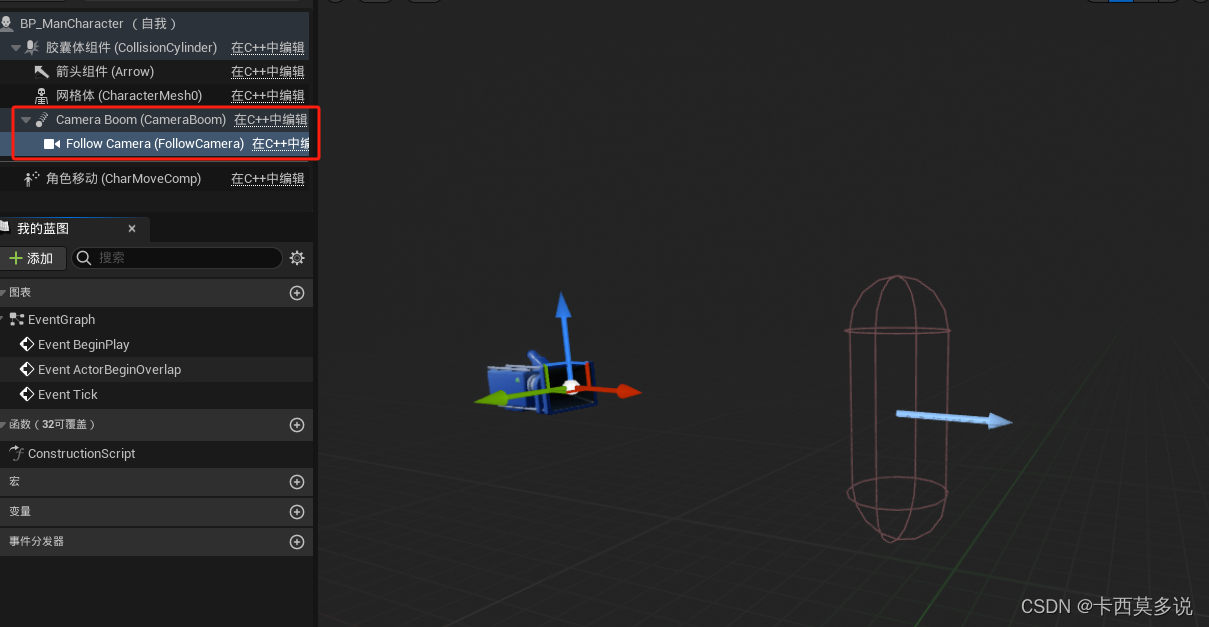
创建完两个组件之后,在编辑器中可以选中BaseCharacter或者ManCharacter右键创建下属的蓝图类,这个是为了方便进行可视化操作。创建出来之后,在代码里面创建的摄像机臂和摄像机组件就会显示在创建的蓝图类中。
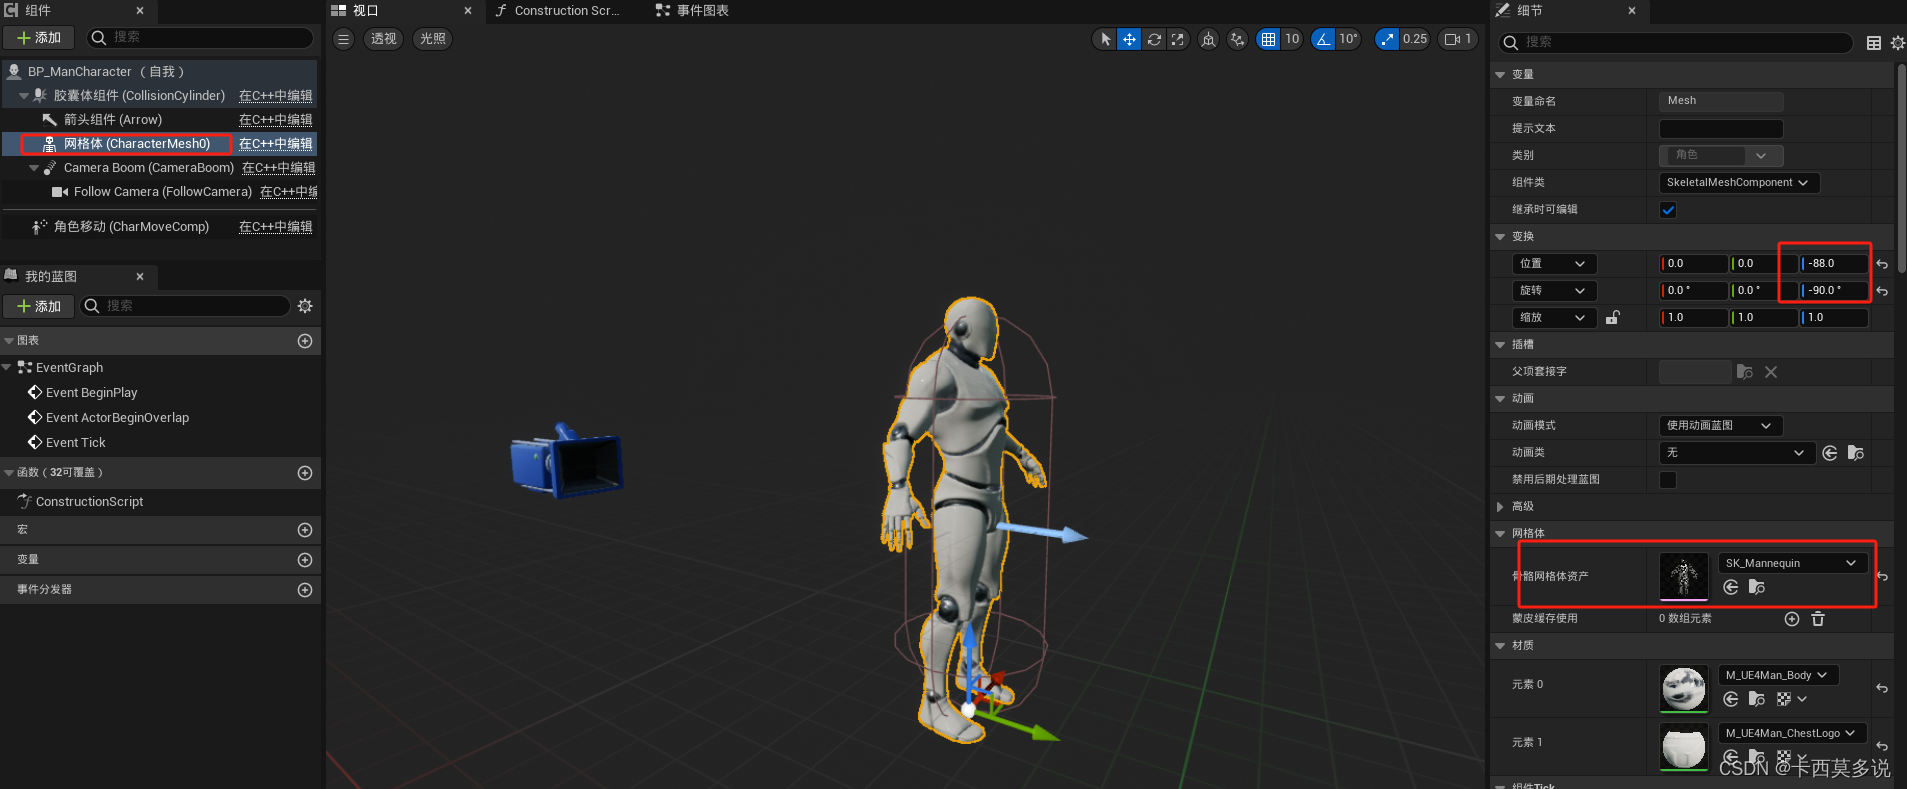
选中网格体的组件(骨骼体组件),为骨骼体组件赋予模型,模型对应的动画后续再进行赋予。调整模型的位置,这里的下移-88是根据胶囊体组件的高度进行调整的,旋转是因为要将模型角色的正面面向箭头组件,这样会跟移动的方向一致。
2.3 基础项目设置
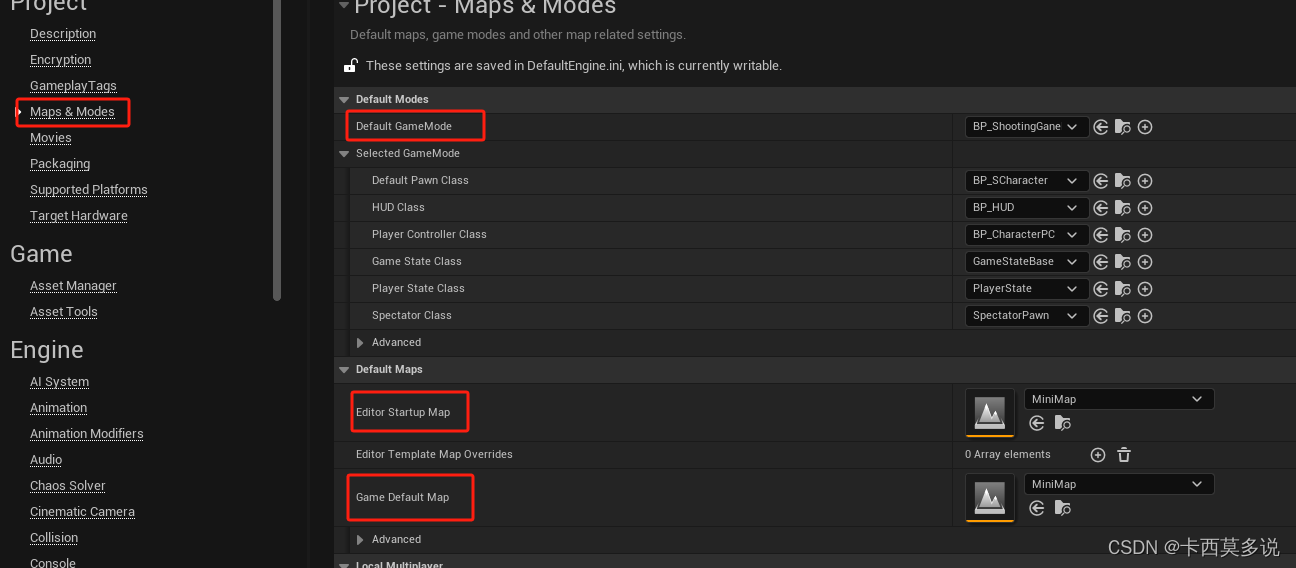
打开项目设置,找到地图和模式,将默认的GameMode设置为自己的,并将默认Pawn类,HUD,以及玩家控制器设置为自己创建的;编辑器开始地图和游戏默认地图也设置为自己创建的。
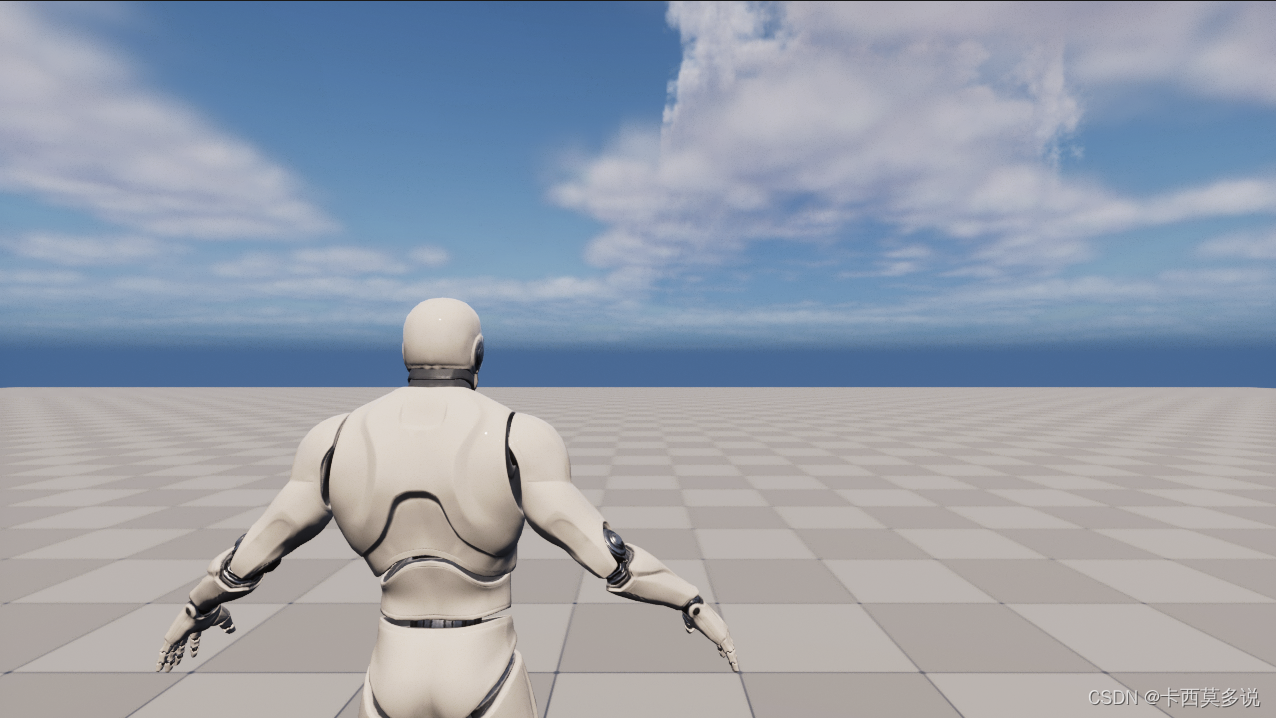
运行,调整自己的角色在界面中的位置。
2.4 角色按键输入
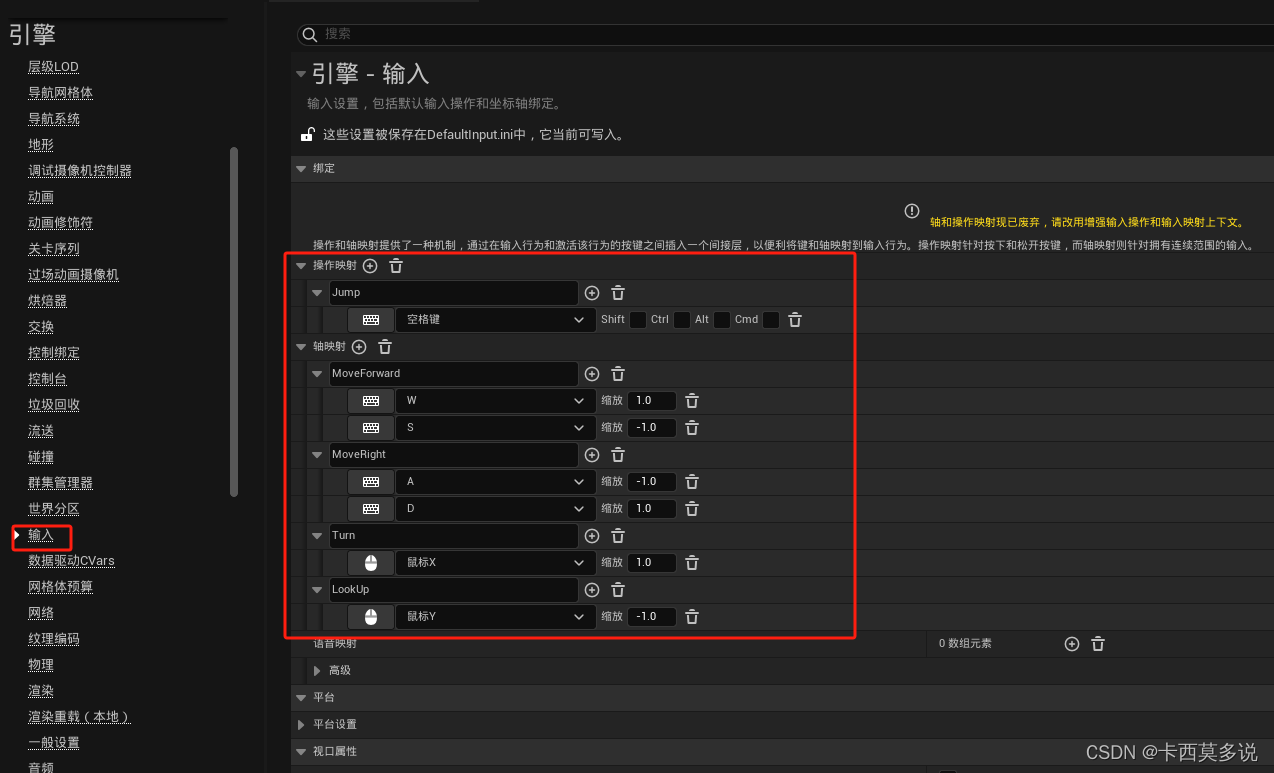
编辑器按键设置,在项目设置里面的输入模块,在这里并没有使用UE5特有的增强输入系统,还是按照UE4原有的轴绑定和按键绑定,可以先加一个角色前后左右走和上下左右看,以及跳跃的输入绑定。
BaseCharacter.h中:
/*
*角色移动和视角查看
*/
voidMoveForward(floatValue);
voidMoveRight(floatValue);
voidTurn(floatValue);
voidLookUp(floatValue);
BaseCharacter.cpp中:
void ABaseCharacter::MoveForward(float Value)
{if (Controller && Value != 0.0f){const FRotator ControlRotation = Controller->GetControlRotation();const FRotator NewRotation = FRotator(0.0f,ControlRotation.Yaw,0.0f);const FVector Dir = FRotationMatrix(NewRotation).GetUnitAxis(EAxis::X);AddMovementInput(Dir,Value);}
}void ABaseCharacter::MoveRight(float Value)
{if (Controller && Value != 0.0f){const FRotator ControlRotation = Controller->GetControlRotation();const FRotator NewRotation = FRotator(0.0f,ControlRotation.Yaw,0.0f);const FVector Dir = FRotationMatrix(NewRotation).GetUnitAxis(EAxis::Y);AddMovementInput(Dir,Value);}
}void ABaseCharacter::Turn(float Value)
{AddControllerYawInput(Value*0.25f);
}void ABaseCharacter::LookUp(float Value)
{const FRotator ControlRotation = Controller->GetControlRotation();const float PitchValue = ControlRotation.Pitch;//限制上下视角if (PitchValue >= 30.0f && PitchValue < 180.0f && Value < 0.0f){return;}if (PitchValue > 180.0f && PitchValue <= 280.0f && Value > 0.0f){return;}AddControllerPitchInput(Value*0.25f);
}
注:视角查看的*0.25f是控制了鼠标滑动的速度,可要可不要。
在LookUp方法中,为了不让玩家在上下视角看的时候穿裆,进行了视角限制,可以在LookUp中添加屏幕打印,查看PitchValue和Value的具体值,以便去进行范围限制。
if (GEngine){FString Msg = FString::Printf(TEXT("PitchValue:%f,Value:%f"),PitchValue,Value);GEngine->AddOnScreenDebugMessage(-1,5.0f,FColor::Blue,Msg);}全部代码:
BaseCharacter.h
#pragma once#include "CoreMinimal.h"
#include "GameFramework/Character.h"
#include "BaseCharacter.generated.h"class USpringArmComponent;
class UCameraComponent;UCLASS()
class SHOOTINGGAME_API ABaseCharacter : public ACharacter
{GENERATED_BODY()public:ABaseCharacter();protected:virtual void BeginPlay() override;/** 角色移动和视角查看*/void MoveForward(float Value);void MoveRight(float Value);void Turn(float Value);void LookUp(float Value);public:	virtual void Tick(float DeltaTime) override;virtual void SetupPlayerInputComponent(class UInputComponent* PlayerInputComponent) override;private:/** 摄像机臂*/UPROPERTY(VisibleAnywhere,BlueprintReadOnly,Category=Components,meta=(AllowPrivateAccess="true"))USpringArmComponent* CameraBoom;/** 摄像机*/UPROPERTY(VisibleAnywhere,BlueprintReadOnly,Category=Components,meta=(AllowPrivateAccess="true"))UCameraComponent* FollowCamera;};
BaseCharacter.cpp
#include "ShootingGame/Public/Gameplay/BaseCharacter.h"
#include"Camera/CameraComponent.h"
#include"GameFramework/SpringArmComponent.h"ABaseCharacter::ABaseCharacter()
{PrimaryActorTick.bCanEverTick = true;CameraBoom = CreateDefaultSubobject<USpringArmComponent>(TEXT("CameraBoom"));CameraBoom->SetupAttachment(RootComponent);CameraBoom->bUsePawnControlRotation = true;FollowCamera = CreateDefaultSubobject<UCameraComponent>(TEXT("FollowCamera"));FollowCamera->SetupAttachment(CameraBoom);
}void ABaseCharacter::BeginPlay()
{Super::BeginPlay();}void ABaseCharacter::MoveForward(float Value)
{if (Controller && Value != 0.0f){const FRotator ControlRotation = Controller->GetControlRotation();const FRotator NewRotation = FRotator(0.0f,ControlRotation.Yaw,0.0f);const FVector Dir = FRotationMatrix(NewRotation).GetUnitAxis(EAxis::X);AddMovementInput(Dir,Value);}
}void ABaseCharacter::MoveRight(float Value)
{if (Controller && Value != 0.0f){const FRotator ControlRotation = Controller->GetControlRotation();const FRotator NewRotation = FRotator(0.0f,ControlRotation.Yaw,0.0f);const FVector Dir = FRotationMatrix(NewRotation).GetUnitAxis(EAxis::Y);AddMovementInput(Dir,Value);}
}void ABaseCharacter::Turn(float Value)
{AddControllerYawInput(Value*0.25f);
}void ABaseCharacter::LookUp(float Value)
{const FRotator ControlRotation = Controller->GetControlRotation();const float PitchValue = ControlRotation.Pitch;//限制上下视角if (PitchValue >= 30.0f && PitchValue < 180.0f && Value < 0.0f){return;}if (PitchValue > 180.0f && PitchValue <= 280.0f && Value > 0.0f){return;}AddControllerPitchInput(Value*0.25f);
}void ABaseCharacter::Tick(float DeltaTime)
{Super::Tick(DeltaTime);}void ABaseCharacter::SetupPlayerInputComponent(UInputComponent* PlayerInputComponent)
{Super::SetupPlayerInputComponent(PlayerInputComponent);PlayerInputComponent->BindAxis("MoveForward",this,&ABaseCharacter::MoveForward);PlayerInputComponent->BindAxis("MoveRight",this,&ABaseCharacter::MoveRight);PlayerInputComponent->BindAxis("Turn",this,&ABaseCharacter::Turn);PlayerInputComponent->BindAxis("LookUp",this,&ABaseCharacter::LookUp);PlayerInputComponent->BindAction("Jump",IE_Pressed,this,&ABaseCharacter::Jump);PlayerInputComponent->BindAction("Jump",IE_Released,this,&ABaseCharacter::StopJumping);
}
这篇关于射击游戏案例(一)的文章就介绍到这儿,希望我们推荐的文章对编程师们有所帮助!


