本文主要是介绍《React后台管理系统实战:九》Redux原理:异步实现【redux-thunk】、redux工具、合并多个reducer函数combineReducers()(三),希望对大家解决编程问题提供一定的参考价值,需要的开发者们随着小编来一起学习吧!
一、redux-thunk基础
作用:在 redux 中执行异步任务(ajax, 定时器)
1)安装
cnpm install --save redux-thunk
2)使用:在redux/store.js中
//redux最核心的管理对象: store
import {createStore, applyMiddleware} from 'redux' //【0】引入applyMiddleware
import thunk from 'redux-thunk' // 【1】用来实现redux异步的redux中间件插件
import reducer from './reducer'export default createStore(reducer, applyMiddleware(thunk)) // 【2】创建store对象内部会第一次调用reducer()得到初始状态值
3 ) 在redux/action.js中添加如下
/*
包含n个用来创建action的工厂函数(action creator)*/
import {INCREMENT, DECREMENT} from './action-types'/*
增加的同步action*/
export const increment = number => ({type: INCREMENT, data: number})
/*
减少的同步action: 返回对象*/
export const decrement = number => ({type: DECREMENT, data: number})//【1】增加的异步action: 返回的是函数
export const incrementAsync = number => {return dispatch => {// 1. 执行异步(定时器, ajax请求, promise)setTimeout(() => {// 2. 当前异步任务执行完成时, 分发一个同步actiondispatch(increment(number))}, 1000)}
}
4)components/Counter.jsx
import React, {Component} from 'react'
import PropTypes from 'prop-types'/*
UI组件主要做显示与与用户交互代码中没有任何redux相关的代码*/
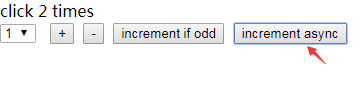
export default class Counter extends Component {static propTypes = {count: PropTypes.number.isRequired,increment: PropTypes.func.isRequired,decrement: PropTypes.func.isRequired,incrementAsync: PropTypes.func.isRequired, //【1】接收}constructor(props) {super(props)this.numberRef = React.createRef()}increment = () => {const number = this.numberRef.current.value * 1this.props.increment(number)}decrement = () => {const number = this.numberRef.current.value * 1this.props.decrement(number)}incrementIfOdd = () => {const number = this.numberRef.current.value * 1if (this.props.count % 2 === 1) {this.props.increment(number)}}//【2】异步函数incrementAsync = () => {const number = this.numberRef.current.value * 1this.props.incrementAsync(number)}render() {const count = this.props.countreturn (<div><p>click {count} times</p><div><select ref={this.numberRef}><option value="1">1</option><option value="2">2</option><option value="3">3</option></select> <button onClick={this.increment}>+</button> <button onClick={this.decrement}>-</button> <button onClick={this.incrementIfOdd}>increment if odd</button> <button onClick={this.incrementAsync}>increment async</button></div></div>)}
}
5)containers/App.jsx
import React, {Component} from 'react'
import {connect} from 'react-redux' //引入连接模块
import Counter from '../components/Counter' //引入components下的counter.jsx 注意路径
import {increment, decrement,incrementAsync} from '../redux/actions' //【1】引入redux下的动作incrementAsync// 指定向Counter传入哪些一般属性(属性值的来源就是store中的state)
const mapStateToProps = (state) => ({count: state})
// 指定向Counter传入哪些函数属性
/*如果是函数, 会自动调用得到对象, 将对象中的方法作为函数属性传入UI组件*/
/*const mapDispatchToProps = (dispatch) => ({increment: (number) => dispatch(increment(number)),decrement: (number) => dispatch(decrement(number)),
})*/
/*如果是对象, 将对象中的方法包装成一个新函数, 并传入UI组件 */
const mapDispatchToProps = {increment, decrement}/*
export default connect(mapStateToProps,mapDispatchToProps
)(Counter)*///【2】把incrementAsync添加进去
export default connect(state => ({count: state}),{increment, decrement,incrementAsync},
)(Counter)
效果:
二、redux开发工具安装
1)下载地址
https://dl.pconline.com.cn/download/2564119-1.html
2)直接拖进浏览器即可
谷歌最新不行就把插件名改为.zip格式解压出来,再到开发中心添加解压后的文件夹即可
3)f12即可看到redux,还不显示则进入4、5步;否则不用进行4、5步
4)安装
cnpm install --save-dev redux-devtools-extension
5)在redux/store.js添加如下
// redux最核心的管理对象: store,
import {createStore, applyMiddleware} from 'redux'
import reducer from './reducer' //导入reducer
import thunk from 'redux-thunk' // 用来实现redux异步的redux中间件插件
import {composeWithDevTools} from 'redux-devtools-extension' //【1】引入工具export default createStore(reducer,composeWithDevTools(applyMiddleware(thunk))) // 【2】再包一层composeWithDevTools();创建store对象内部会第一次调用reducer()得到初始状态值
效果:

三、combineReducers()合并多个reduce函数
1)在redux/reducer.js中
/*
reducer函数模块: 根据当前state和指定action返回一个新的state*/
import {combineReducers} from 'redux' //【1】引入
import {INCREMENT, DECREMENT} from './action-types'/*
管理count状态数据的reducer*/
function count(state=1, action) {console.log('count()', state, action)switch (action.type) {case INCREMENT:return state + action.datacase DECREMENT:return state - action.datadefault:return state}}const initUser = {}
/*
【2】再写一个状态。管理user状态数据的reducer*/
function user(state = initUser, action) {switch (action.type) {default:return state}
}/*
【3】合并多个状态;combineReducers函数: 接收包含所有reducer函数的对象, 返回一个新的reducer函数(总reducer)
总的reducer函数管理的state的结构{count: 2,user: {}}*/
export default combineReducers({count,user
})
2 ) containers/App.js写法要改成对应的对象
import React, {Component} from 'react'
import {connect} from 'react-redux'import Counter from '../components/Counter'
import {increment, decrement, incrementAsync} from '../redux/actions'// 指定向Counter传入哪些一般属性(属性值的来源就是store中的state)
const mapStateToProps = (state) => ({count: state.count}) //【1】此处对应读取对象的 state.count
// 指定向Counter传入哪些函数属性
/*如果是函数, 会自动调用得到对象, 将对象中的方法作为函数属性传入UI组件*/
/*const mapDispatchToProps = (dispatch) => ({increment: (number) => dispatch(increment(number)),decrement: (number) => dispatch(decrement(number)),
})*/
/*如果是对象, 将对象中的方法包装成一个新函数, 并传入UI组件 */
const mapDispatchToProps = {increment, decrement}/*
export default connect(mapStateToProps,mapDispatchToProps
)(Counter)*/export default connect(state => ({count: state.count}), //【2】此处对应读取对象的 state.count{increment, decrement, incrementAsync},
)(Counter)
这篇关于《React后台管理系统实战:九》Redux原理:异步实现【redux-thunk】、redux工具、合并多个reducer函数combineReducers()(三)的文章就介绍到这儿,希望我们推荐的文章对编程师们有所帮助!


