本文主要是介绍GiantPandaCV | FasterTransformer Decoding 源码分析(二)-Decoder框架介绍,希望对大家解决编程问题提供一定的参考价值,需要的开发者们随着小编来一起学习吧!
本文来源公众号“GiantPandaCV”,仅用于学术分享,侵权删,干货满满。
原文链接:FasterTransformer Decoding 源码分析(二)-Decoder框架介绍
作者丨进击的Killua
来源丨https://zhuanlan.zhihu.com/p/669303360
编辑丨GiantPandaCV
Decoder模块是FasterTransformer Decoding model中最核心的处理模块,在GiantPandaCV | FasterTransformer Decoding 源码分析(一)-整体框架介绍一文中详细介绍了Decoder模块在整体中所处的位置,本文试图从流程框架层面对该模块进行源码分析,梳理出主要处理模块,后续再逐步对各个模块实现进行解析。
一、整体框架
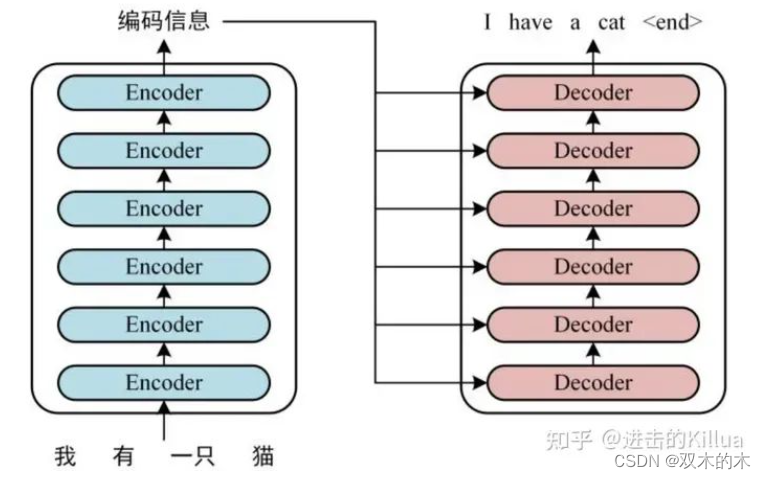
Decoder在整体解码过程中的位置
代码地址:link
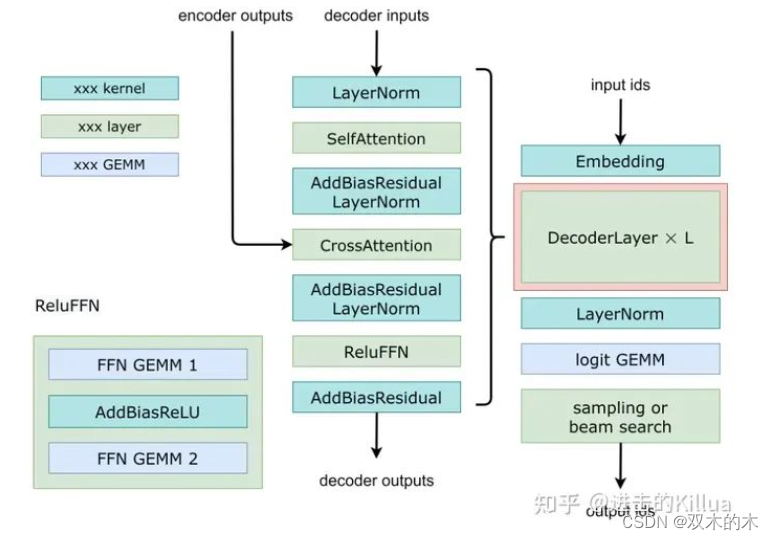
下图中左边是经典的Transformer Decoder结构,右边是FasterTransformer Decoder结构,主要有以下几点区别:
-
将最后的LayerNorm提前到入口,这里并不能加速流程,但是这种顺序在实践中表现得比较好,允许模型更好地调整输入的分布,使其更适合通过self-attention进行处理,最后处理完会在调用外层再做一次LayerNorm。
-
将 SelfAttention和CrossAttention中最后一个 Linear 的 Add Bias,Add Res(残差连接)以及 LayerNorm 合并成一个 (Add Bias & Add Res & LayerNorm) Kernel,降低 Kernel Launch 开销以及提升访问带宽。
-
将 FFN 的最后一个 Linear 的 Add Bias,Add Res(残差连接)合并成一个 (Add Bias & Add Res) Kernel,降低 Kernel Launch 开销以及提升访问带宽。

Decoder具体处理流程
二、数据处理流
接下来结合框架图来解析下forward函数的数据处理流程,整体流程在代码上还是非常清晰的。
Input & Output
template<typename T>
void Decoder<T>::forward(std::vector<Tensor>*                      output_tensors,const std::vector<Tensor>*                input_tensors,const std::vector<DecoderLayerWeight<T>>* decoder_layer_weight)
{// input tensors://      decoder_input [batch_size, hidden_dimension],//      encoder_output [batch_size, mem_max_seq_len, memory_hidden_dimension],//      encoder_sequence_length [batch_size],//      finished [batch_size],//      step [1] on cpu//      sequence_lengths [batch_size]//      cache_indirection [local_batch_size / beam_width, beam_width, max_seq_len]//              Here, local_batch_size contains the beam_width, so local_batch_size / beam_width//              is real local_batch_size.// output tensors://      decoder_output [batch_size, hidden_dimension],//      key_cache [num_layer, batch, head_num, size_per_head // x, max_seq_len, x]//      value_cache [num_layer, batch, head_num, max_seq_len, size_per_head]//      key_mem_cache [num_layer, batch_size, mem_max_seq_len, hidden_dimension],//      value_mem_cache [num_layer, batch_size, mem_max_seq_len, hidden_dimension]
这里初看其实是不知道这些输入输出shape背后的含义的,没关系这里先做个标记,等我们全部都看完了再回过头来看这里的意义。我们可以大致知道Decoder的输入tensor中包含:
-
batch_size个单词的embedding表示或上一个step的解码输出。[batch_size, hidden_dimension]
-
encoder层的输出。[batch_size, mem_max_seq_len, memory_hidden_dimension]
-
encoder层输入序列的实际长度。[batch_size]
-
batch中是否已经解码完成。[batch_size]
-
当前解码的步长。
-
已解码句子的序列长度。[batch_size]
-
中间缓存。(这个暂时还无法理解)
注:这里的batch_size实际是batch_size * beam_size的结果,即对每个batch的beam_size个词分别解码。
Decoder的输出tensor包含:
-
batch个解码器的词向量输出。[batch_size, hidden_dimension]
-
self-attention中前面steps所计算出来的key buffer。[num_layer, batch, head_num, size_per_head // x, max_seq_len, x],其中 x =4(FP32), x=8(FP16).
-
self-attention中前面steps所计算出来的value buffer。
-
cross-attention中前面steps所计算出来的key buffer。
-
cross-attention中前面steps所计算出来的value buffer。
逐层解码
decoder是逐层进行解码的,接下来每层都会使用以下这些模块进行推理。
Cache
size_t self_key_cache_offset = l;for (auto t = output_tensors->at(1).shape.begin() + 1; t != output_tensors->at(1).shape.end(); ++t) {self_key_cache_offset *= (*t);}size_t self_value_cache_offset = l;for (auto t = output_tensors->at(2).shape.begin() + 1; t != output_tensors->at(2).shape.end(); ++t) {self_value_cache_offset *= (*t);}这里是对cache的索引,cache是fastertransformer性能优化的一大重点,思想很简单,就是复用前面step计算的结果,避免重复计算,以空间来换时间。代码中对self-attention和cross-attention中线性化处理后的key和value进行了缓存。针对cross-attention,因为key和value是来自于encoder的输出(如图所示),所以每个step上使用的key和value是相同的。
但是针对self-attention,key和value这里笔者还没完全理解为什么可以复用,这里也先留个标记(self_attention的key,value和query的生成逻辑可能不一样)。
LayerNorm
invokeGeneralLayerNorm(decoder_normed_input_,decoder_input,decoder_layer_weight->at(l).pre_layernorm_weights.gamma,decoder_layer_weight->at(l).pre_layernorm_weights.beta,layernorm_eps_,batch_size,hidden_units_,(float*)nullptr,0,stream_);这里调用layernorm的kernel函数进行处理,我们后续单独介绍kernel实现。
SelfAttention
TensorMap self_attention_input_tensors{{"input_query", Tensor{MEMORY_GPU, data_type, {batch_size, hidden_units_}, decoder_normed_input_}},{"finished", input_tensors->at(3)},{"sequence_lengths", input_tensors->at(5)},{"step", input_tensors->at(4)}};self_attention_input_tensors.insertIfValid("cache_indirection", input_tensors->at(6));TensorMap self_attention_output_tensors{{"hidden_features", Tensor{MEMORY_GPU, data_type, {batch_size, hidden_units_}, self_attn_output_}},{"key_cache",Tensor{MEMORY_GPU,data_type,std::vector<size_t>(output_tensors->at(1).shape.begin() + 1, output_tensors->at(1).shape.end()),output_tensors->at(1).getPtrWithOffset(self_key_cache_offset)}},{"value_cache",Tensor{MEMORY_GPU,data_type,std::vector<size_t>(output_tensors->at(2).shape.begin() + 1, output_tensors->at(2).shape.end()),output_tensors->at(2).getPtrWithOffset<T>(self_value_cache_offset)}}};self_attention_layer_->forward(&self_attention_output_tensors,&self_attention_input_tensors,&decoder_layer_weight->at(l).self_attention_weights);这里以map的方式对输入输出tensor进行了封装,再调用self_attention_layer层进行推理,详细介绍见:进击的Killua:FasterTransformer Decoding 源码分析(四)-SelfAttention实现介绍。
Add Bias & Add Res & LayerNorm
invokeGeneralAddBiasResidualPreLayerNorm(self_attn_output_,normed_self_attn_output_,self_attn_output_,decoder_input,decoder_layer_weight->at(l).self_attn_layernorm_weights.gamma,decoder_layer_weight->at(l).self_attn_layernorm_weights.beta,decoder_layer_weight->at(l).self_attention_weights.attention_output_weight.bias,layernorm_eps_,batch_size,hidden_units_,(float*)nullptr,(float*)nullptr,(float*)nullptr,(float*)nullptr,0,stream_);sync_check_cuda_error();这里将add bias、add res和laynorm操作合成一个kernel进行处理,也是优化的经典方法,文章进击的Killua:FasterTransformer Decoding 源码分析(五)-AddBiasResidualLayerNorm介绍 做了详细介绍。
CrossAttention
TensorMap cross_attention_input_tensors{{"input_query", Tensor{MEMORY_GPU, data_type, {batch_size, hidden_units_}, normed_self_attn_output_}},{"encoder_output", input_tensors->at(1)},{"encoder_sequence_length", input_tensors->at(2)},{"finished", input_tensors->at(3)},{"step", input_tensors->at(4)}};TensorMap cross_attention_output_tensors{{"hidden_features", Tensor{MEMORY_GPU, data_type, {batch_size, hidden_units_}, cross_attn_output_}},{"key_cache",Tensor{MEMORY_GPU,data_type,std::vector<size_t>(output_tensors->at(3).shape.begin() + 1, output_tensors->at(3).shape.end()),output_tensors->at(3).getPtrWithOffset<T>(mem_cache_offset)}},{"value_cache",Tensor{MEMORY_GPU,data_type,std::vector<size_t>(output_tensors->at(4).shape.begin() + 1, output_tensors->at(4).shape.end()),output_tensors->at(4).getPtrWithOffset<T>(mem_cache_offset)}}};cross_attention_layer_->forward(&cross_attention_output_tensors,&cross_attention_input_tensors,&decoder_layer_weight->at(l).cross_attention_weights);这里以map的方式对输入输出tensor进行了封装,再调用cross_attention_layer层进行推理,详见文章:进击的Killua:FasterTransformer Decoding 源码分析(六)-CrossAttention介绍
Add Bias & Add Res & LayerNorm
invokeGeneralAddBiasResidualPreLayerNorm(cross_attn_output_,normed_cross_attn_output_,cross_attn_output_,self_attn_output_,decoder_layer_weight->at(l).cross_attn_layernorm_weights.gamma,decoder_layer_weight->at(l).cross_attn_layernorm_weights.beta,decoder_layer_weight->at(l).cross_attention_weights.attention_output_weight.bias,layernorm_eps_,batch_size,hidden_units_,(float*)nullptr,(float*)nullptr,(float*)nullptr,(float*)nullptr,0,stream_);sync_check_cuda_error();和上述类似。
FFN
TensorMap ffn_input_tensors({{"ffn_input", Tensor{MEMORY_GPU, data_type, {batch_size, hidden_units_}, normed_cross_attn_output_}}});TensorMap ffn_output_tensors({{"ffn_output", Tensor{MEMORY_GPU, data_type, {batch_size, hidden_units_}, decoder_output}}});ffn_layer_->forward(&ffn_output_tensors, &ffn_input_tensors, &decoder_layer_weight->at(l).ffn_weights);FFN详细介绍如下文所示。
进击的Killua:FasterTransformer Decoding 源码分析(七)-FFNLayer MoE(上篇)
进击的Killua:FasterTransformer Decoding 源码分析(八)-FFNLayer MoE(下篇)
Add Bias & Add Res
invokeAddBiasResidual(decoder_output,cross_attn_output_,decoder_layer_weight->at(l).ffn_weights.output_weight.bias,batch_size,hidden_units_,stream_);sync_check_cuda_error();这里将add bias、add res操作合成一个kernel进行处理,属于fused op的常用操作。
三、总结
总体来看fastertransformer的decoder主要用了小OP融合、大OP重写、重复计算缓存化这几个优化策略来进行加速,接下来开始逐步剖析内部细节。
THE END !
文章结束,感谢阅读。您的点赞,收藏,评论是我继续更新的动力。大家有推荐的公众号可以评论区留言,共同学习,一起进步。
这篇关于GiantPandaCV | FasterTransformer Decoding 源码分析(二)-Decoder框架介绍的文章就介绍到这儿,希望我们推荐的文章对编程师们有所帮助!


