本文主要是介绍android 个人开发者接广告admob以及需要注意的错误细节,希望对大家解决编程问题提供一定的参考价值,需要的开发者们随着小编来一起学习吧!
各位知道其他路子的求分享啊,我实在想不到什么方法了,可惜谷歌被屏蔽了,但是总比不能赚1毛钱好。我相信我的粉丝都是极客,
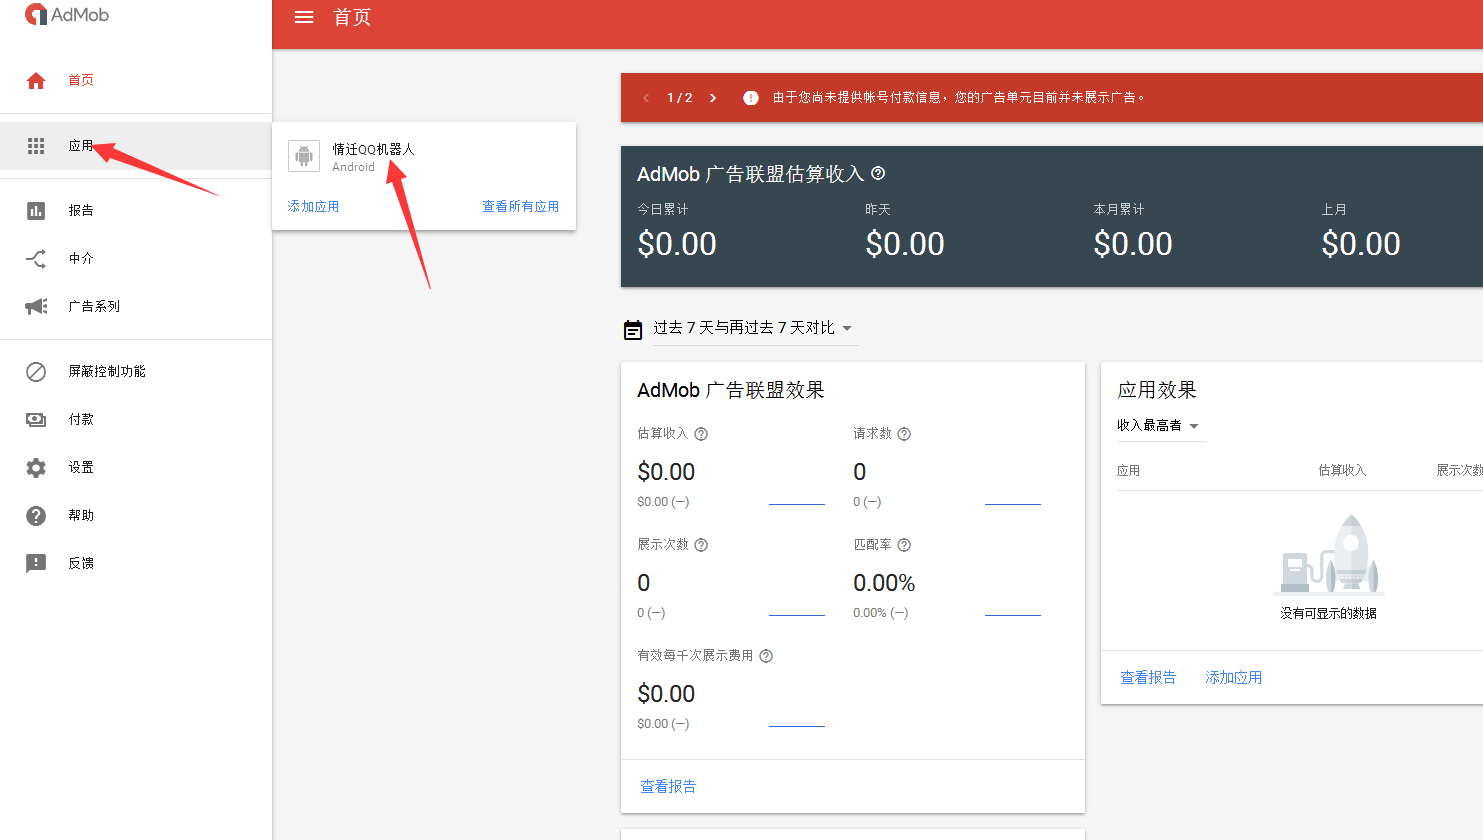
注册admob
https://apps.admob.com
快速开始教程
https://developers.google.com/admob/android/quick-start?hl=zh-CN
创建应用
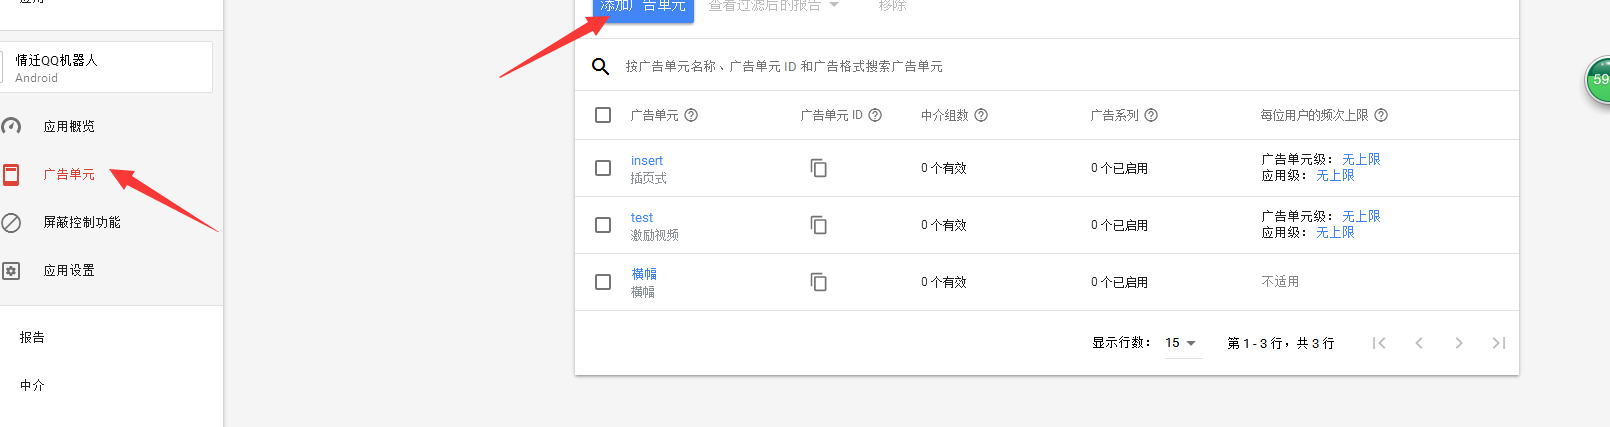
创建banner
得到YOUR_ADMOB_APP_IDhttps://developers.google.com/admob/android/quick-start?hl=zh-CN#import_the_mobile_ads_sdk
添加xml代码
android:id="@+id/ad_view"android:layout_width="match_parent"android:layout_height="wrap_content"android:layout_centerHorizontal="true"android:layout_alignParentBottom="true"ads:adSize="BANNER"ads:adUnitId="ca-app-pub-6391307239504132/6102840431" />添加java代码
package ...
import ...
import com.google.android.gms.ads.MobileAds;public class MainActivity extends AppCompatActivity {protected void onCreate(Bundle savedInstanceState) {super.onCreate(savedInstanceState);setContentView(R.layout.activity_main);
//全局appidMobileAds.initialize(this, "ca-app-pub-6391307239504132~6124388718");
//        MobileAds.initialize(this, "ca-app-pub-3940256099942544~3347511713");adView = findViewById(R.id.ad_view);// 建立发送广告请求AdRequest adRequest = new AdRequest.Builder().addTestDevice(AdRequest.DEVICE_ID_EMULATOR).build();// 添加广告监听.adView.setAdListener(new AdListener(){@Overridepublic void onAdFailedToLoad(int i) {Log.w(TAG,"load fail :"+i);}});
//加载请求adView.loadAd(adRequest);    }}}
横幅实现的官方教程在这里https://developers.google.com/admob/android/banner?hl=zh-CN
或者用代码添加banner的方法
adView adView = new AdView(this);
adView.setAdSize(AdSize.BANNER);
adView.setAdUnitId("ca-app-pub-6391307239504132/6102840431");
规范细节
不要忘记代理一下声明周期。
/** Called when returning to the activity */@Overridepublic void onResume() {super.onResume();if (adView != null) {adView.resume();}}/** Called before the activity is destroyed */@Overridepublic void onDestroy() {if (adView != null) {adView.destroy();}super.onDestroy();}各位测试没效果的可以先直接把我的代码copy测试效果如何。
插屏广告
InterstitialAd mInterstitialAd = new InterstitialAd(this);//插页广告mInterstitialAd.setAdUnitId("xxxxx");激励广告
RewardedVideoAd mRewardedVideoAd = MobileAds.getRewardedVideoAdInstance(this);mRewardedVideoAd.setRewardedVideoAdListener(this);mRewardedVideoAd.loadAd("ca-app-pub-6391307239504132/8306864775", new AdRequest.Builder().build());AdLoader adLoader = new AdLoader.Builder(this, "ca-app-pub-3940256099942544/2247696110").forAppInstallAd(new NativeAppInstallAd.OnAppInstallAdLoadedListener() {@Overridepublic void onAppInstallAdLoaded(NativeAppInstallAd appInstallAd) {// Show the app install ad.}}).forContentAd(new NativeContentAd.OnContentAdLoadedListener() {@Overridepublic void onContentAdLoaded(NativeContentAd contentAd) {// Show the content ad.}}).withAdListener(new AdListener() {@Overridepublic void onAdFailedToLoad(int errorCode) {// Handle the failure by logging, altering the UI, and so on.}}).withNativeAdOptions(new NativeAdOptions.Builder()// Methods in the NativeAdOptions.Builder class can be// used here to specify individual options settings..build()).build();adLoader.loadAd(new AdRequest.Builder().build());原生广告
说实话原生广告的,老美的文档根本不全,有点乱,根本不知道某个东西如何来的。比如
private void displayAppInstallAd(ViewGroup parent,NativeAppInstallAd ad) {// Inflate a layout and add it to the parent ViewGroup.LayoutInflater inflater = (LayoutInflater) parent.getContext().getSystemService(Context.LAYOUT_INFLATER_SERVICE);NativeAppInstallAdView adView = (NativeAppInstallAdView) inflater.inflate(R.layout.my_ad_layout, parent);// Locate the view that will hold the headline, set its text, and call the// NativeAppInstallAdView's setHeadlineView method to register it.TextView headlineView = adView.findViewById(R.id.ad_headline);headlineView.setText(ad.getHeadline());adView.setHeadlineView(headlineView);// Repeat the above process for the other assets in the NativeAppInstallAd// If the app is using a MediaView to display video, it should be// instantiated and passed to setMediaView. This view is a little different// in that the asset is populated automatically, so there's one less step.MediaView mediaView = (MediaView) adView.findViewById(R.id.ad_media);adView.setMediaView(mediaView);// Call the NativeAppInstallAdView's setNativeAd method to register the// NativeAdObject.adView.setNativeAd(ad);// Place the AdView into the parent.parent.addView(adView);}这里需要传递一个参数,文档并没有说是怎么出来的,我感觉需要找找他们的demo.https://developers.google.com/admob/android/native-advanced?hl=zh-CNhttps://apps.admob.com/v2/home
将 Firebase 添加到您的 Android 项目https://firebase.google.com/docs/android/setup
buildscript {// ...dependencies {// ...classpath 'com.google.gms:google-services:3.2.0' // google-services plugin}
}allprojects {// ...repositories {// ...maven {url "https://maven.google.com" // Google's Maven repository}}
}
完整步骤
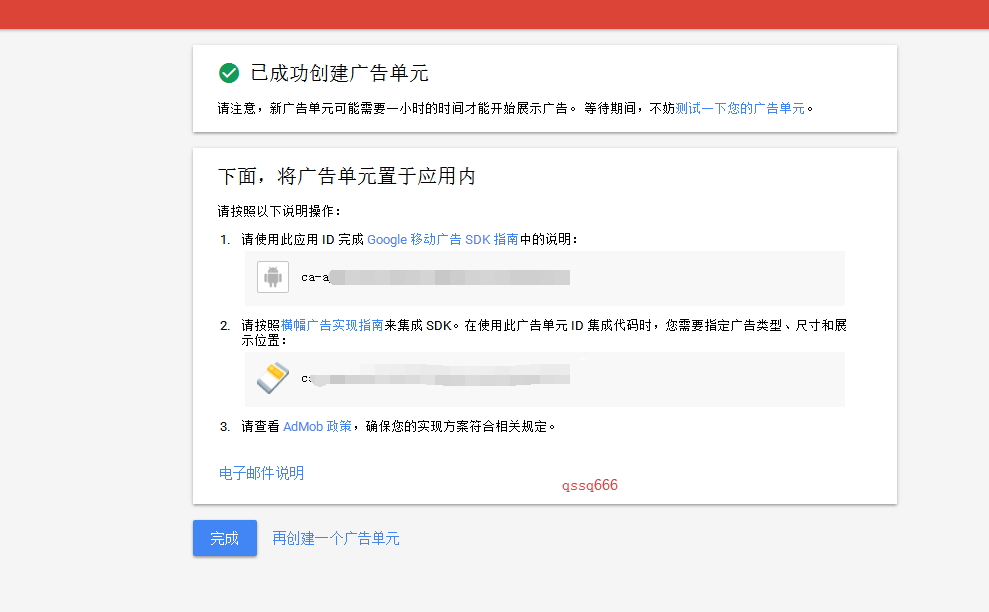
请使用此应用 ID 完成 Google 移动广告 SDK 指南中的说明:
请按照激励广告实现指南来集成 SDK。在使用此广告单元 ID 集成代码时,您需要指定广告类型和展示位置:
- 请点击此处开始从 Firebase 控制台下载配置文件。在下一步的最后,您将需要用到此文件。如果您无法访问 Firebase 控制台,请与 Firebase 项目负责人联系,请其将您添加为项目成员。
- 按照 Firebase 集成指南操作,在您的应用中实施 Firebase SDK。
- 完成集成后,请重新发布您的应用,我们会在应用概览信息中心显示相关的分析数据。
- 请查看 AdMob 政策,确保您的实现方案符合相关规定。
排错
on failed for task ':childgit:app:processDebugGoogleServices'.
> File google-services.json is missing. The Google Services Plugin cannot function without it. Searched Location: F:\src\git_project\qq_qqrobot\childgit\app\src\nullnull\debug\google-services.jsonF:\src\git_project\qq_qqrobot\childgit\app\src\debug\nullnull\google-services.jsonF:\src\git_project\qq_qqrobot\childgit\app\src\null
All firebase libraries must be either above or below 14.0.0fix
//https://dl.google.com/dl/android/maven2/index.htmlimplementation 'com.google.android.gms:play-services-ads:15.0.0'// implementation 'com.google.android.gms:play-services-ads:12.0.1'//implementation 'com.google.firebase:firebase-core:11.8.0'implementation 'com.google.firebase:firebase-core:15.0.0'进入控制台点击firexx 然后点击下载配置文件。放到这个目录https://developers.google.com/android/reference/com/google/android/gms/ads/AdRequest
最终
classpath 'com.google.gms:google-services:3.2.1' // google-services plugin错误码
我刚开始的时候是0
public final class AdRequest {public static final int ERROR_CODE_INTERNAL_ERROR = 0;public static final int ERROR_CODE_INVALID_REQUEST = 1;public static final int ERROR_CODE_NETWORK_ERROR = 2;public static final int ERROR_CODE_NO_FILL = 3;https://github.com/googleads/googleads-mobile-android-examples
遇到问题可以提交到谷歌官方的论坛哈https://groups.google.com/forum/#!forum/google-admob-ads-sdk
2018年05月07日
我现在官方的demo正常显示,强烈建议大家也下载demo玩,其实看文档是很不全的。demo的演示比较全,我这里就只给大家做个导师了,哈哈,
我这里一直提示0,我以为是要等几个小时,过了几天打开官方网站看了一下,有一个警告信息。
提供详细付款信息
只有在您提供此信息后 AdMob 才能投放您的广告
这是比较棘手的,需要信用卡,而且我上次搞谷歌支付用招商这种双币信用卡都不行,虽然可以用来买0.99美元的书,亏了我不少钱,后面还是不行,最后不得已去淘宝购买了礼品卡才搞定了,然后用来购买开发者账号
不过这次很幸运,成功了,ok,错误码从内部错误0 变成没有广告的错误码3了。
pulic static final int ERROR_CODE_INTERNAL_ERROR = 0;public static final int ERROR_CODE_INVALID_REQUEST = 1;public static final int ERROR_CODE_NETWORK_ERROR = 2;public static final int ERROR_CODE_NO_FILL = 3;这篇关于android 个人开发者接广告admob以及需要注意的错误细节的文章就介绍到这儿,希望我们推荐的文章对编程师们有所帮助!


