本文主要是介绍android init进程启动流程,希望对大家解决编程问题提供一定的参考价值,需要的开发者们随着小编来一起学习吧!
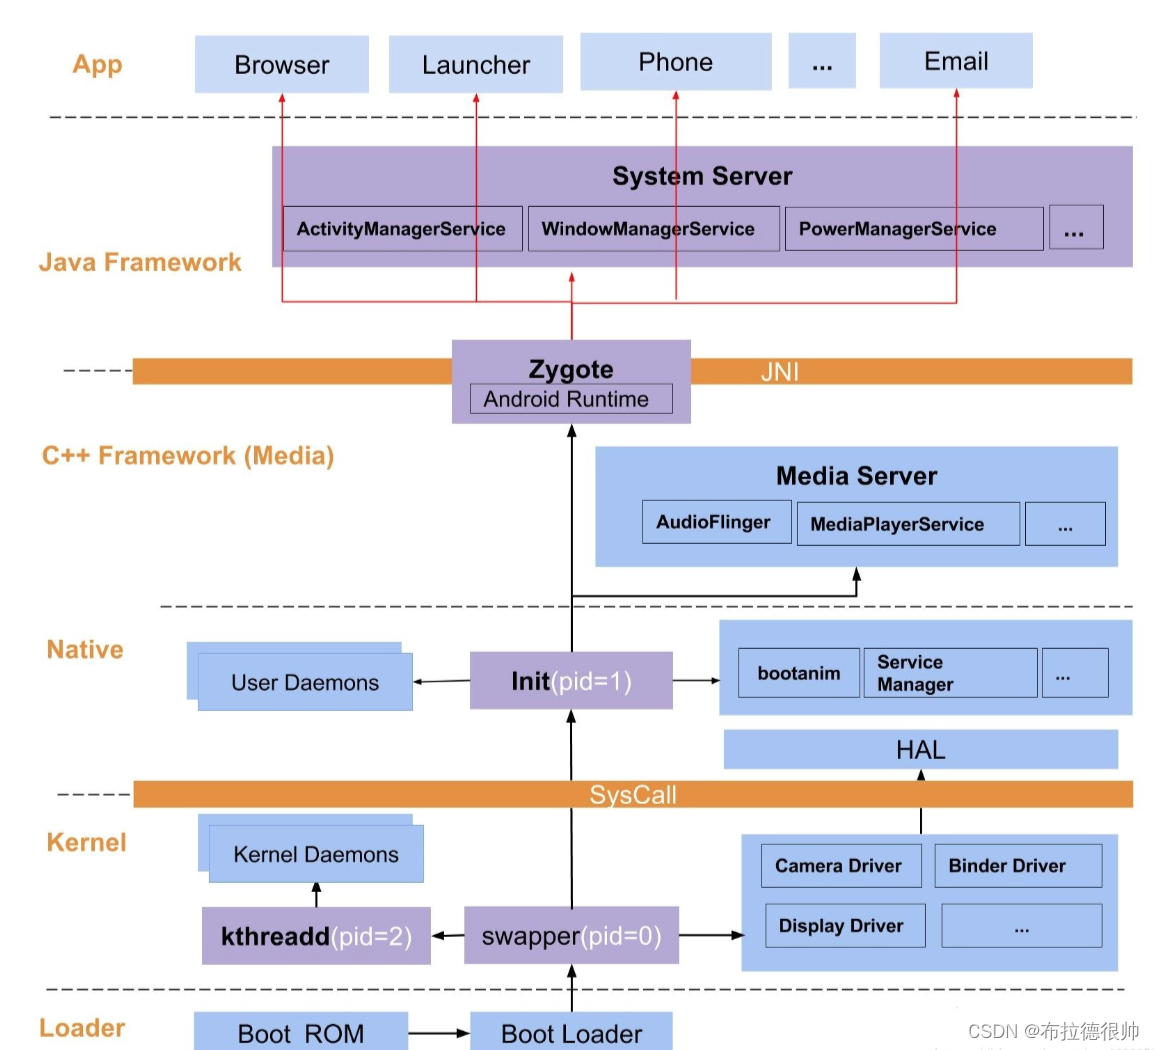
Android系统完整的启动流程

android 系统架构图
init进程的启动流程
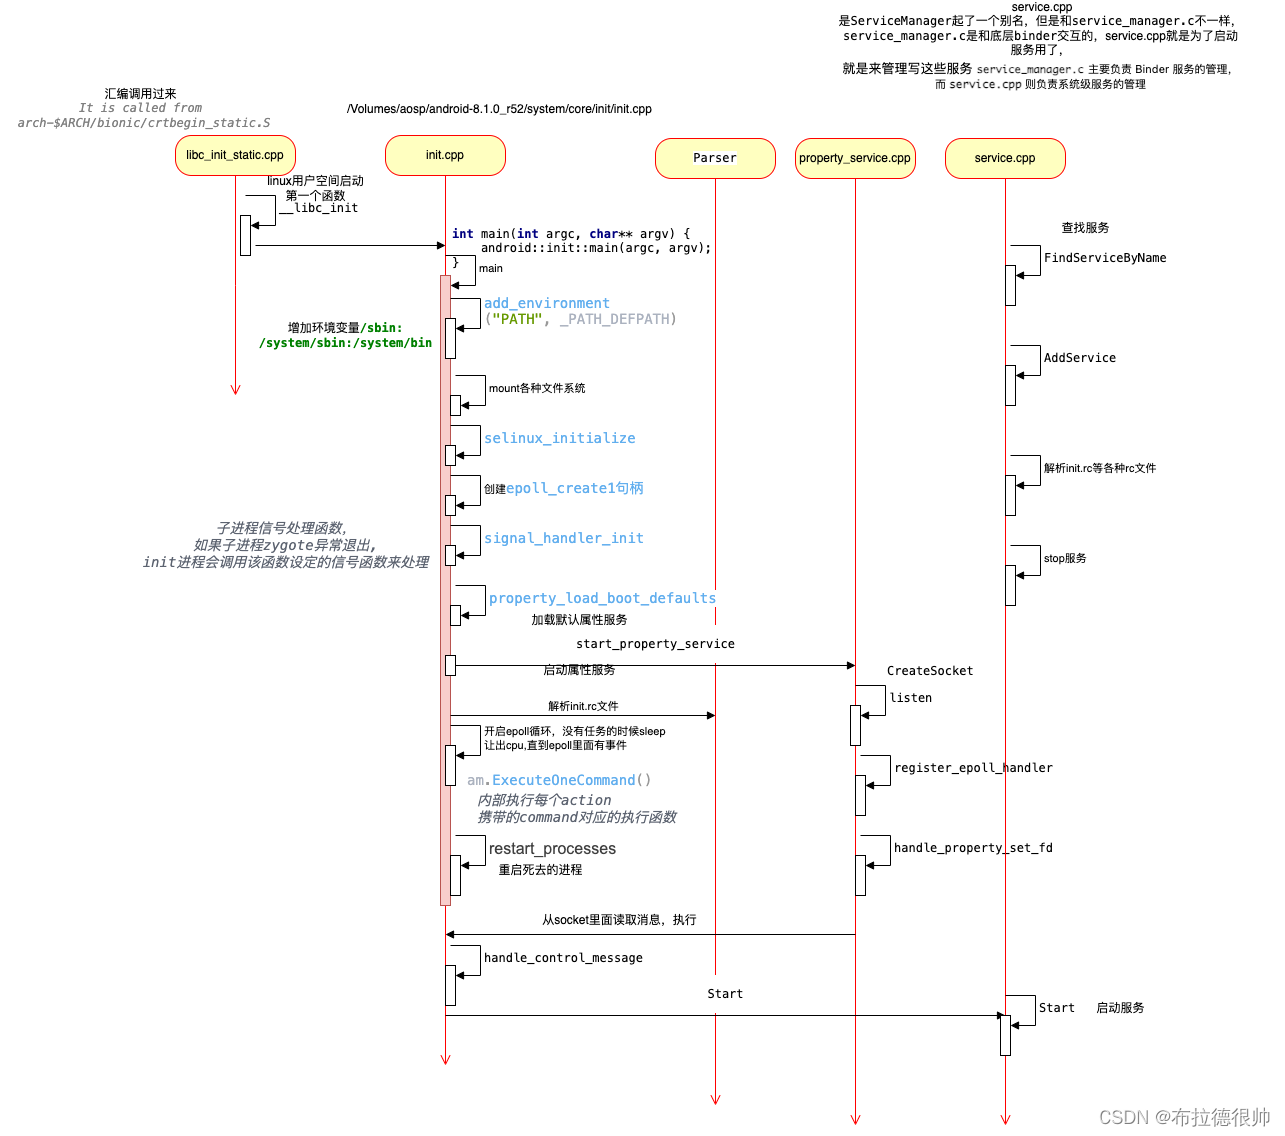
init进程启动服务的顺序

bool Service::Start() {// Starting a service removes it from the disabled or reset state and// immediately takes it out of the restarting state if it was in there.flags_ &= (~(SVC_DISABLED|SVC_RESTARTING|SVC_RESET|SVC_RESTART|SVC_DISABLED_START));// Running processes require no additional work --- if they're in the// process of exiting, we've ensured that they will immediately restart// on exit, unless they are ONESHOT.if (flags_ & SVC_RUNNING) {return false;}bool needs_console = (flags_ & SVC_CONSOLE);if (needs_console) {if (console_.empty()) {console_ = default_console;}// Make sure that open call succeeds to ensure a console driver is// properly registered for the device nodeint console_fd = open(console_.c_str(), O_RDWR | O_CLOEXEC);if (console_fd < 0) {PLOG(ERROR) << "service '" << name_ << "' couldn't open console '" << console_ << "'";flags_ |= SVC_DISABLED;return false;}close(console_fd);}struct stat sb;if (stat(args_[0].c_str(), &sb) == -1) {PLOG(ERROR) << "cannot find '" << args_[0] << "', disabling '" << name_ << "'";flags_ |= SVC_DISABLED;return false;}std::string scon;if (!seclabel_.empty()) {scon = seclabel_;} else {scon = ComputeContextFromExecutable(name_, args_[0]);if (scon == "") {return false;}}LOG(INFO) << "starting service '" << name_ << "'...";pid_t pid = -1;if (namespace_flags_) {pid = clone(nullptr, nullptr, namespace_flags_ | SIGCHLD, nullptr);} else {pid = fork();}if (pid == 0) {umask(077);if (namespace_flags_ & CLONE_NEWPID) {// This will fork again to run an init process inside the PID// namespace.SetUpPidNamespace(name_);}for (const auto& ei : envvars_) {add_environment(ei.name.c_str(), ei.value.c_str());}std::for_each(descriptors_.begin(), descriptors_.end(),std::bind(&DescriptorInfo::CreateAndPublish, std::placeholders::_1, scon));// See if there were "writepid" instructions to write to files under /dev/cpuset/.auto cpuset_predicate = [](const std::string& path) {return StartsWith(path, "/dev/cpuset/");};auto iter = std::find_if(writepid_files_.begin(), writepid_files_.end(), cpuset_predicate);if (iter == writepid_files_.end()) {// There were no "writepid" instructions for cpusets, check if the system default// cpuset is specified to be used for the process.std::string default_cpuset = GetProperty("ro.cpuset.default", "");if (!default_cpuset.empty()) {// Make sure the cpuset name starts and ends with '/'.// A single '/' means the 'root' cpuset.if (default_cpuset.front() != '/') {default_cpuset.insert(0, 1, '/');}if (default_cpuset.back() != '/') {default_cpuset.push_back('/');}writepid_files_.push_back(StringPrintf("/dev/cpuset%stasks", default_cpuset.c_str()));}}std::string pid_str = std::to_string(getpid());for (const auto& file : writepid_files_) {if (!WriteStringToFile(pid_str, file)) {PLOG(ERROR) << "couldn't write " << pid_str << " to " << file;}}if (ioprio_class_ != IoSchedClass_NONE) {if (android_set_ioprio(getpid(), ioprio_class_, ioprio_pri_)) {PLOG(ERROR) << "failed to set pid " << getpid()<< " ioprio=" << ioprio_class_ << "," << ioprio_pri_;}}if (needs_console) {setsid();OpenConsole();} else {ZapStdio();}// As requested, set our gid, supplemental gids, uid, context, and// priority. Aborts on failure.SetProcessAttributes();if (!ExpandArgsAndExecve(args_)) {PLOG(ERROR) << "cannot execve('" << args_[0] << "')";}_exit(127);}这段代码最后调用_exit(127)的原因:
当一个进程调用fork()创建一个子进程时,子进程会继承父进程的内存映像,包括代码段、数据段、堆栈等。子进程会在fork()调用的位置开始执行,并且会复制父进程的文件描述符。在fork()之后,子进程通常会调用execve()来加载一个新的程序映像,取代原来的父进程映像。如果execve()执行成功,子进程会开始执行新程序的代码,而原来的父进程则继续执行下去。
在这段代码中,当子进程执行if (!ExpandArgsAndExecve(args_))时,它试图调用execve()加载一个新程序,如果加载失败(例如,找不到要执行的程序),那么子进程将无法继续执行。这时候,子进程就没有必要再继续执行下去,因为它无法完成它的任务。所以,为了避免子进程继续运行下去造成不必要的资源浪费,程序员选择在这种情况下使用_exit(127)来终止子进程。
为什么是_exit(127)呢?这是一个惯例,Unix系统的shell约定,当一个命令找不到时,会返回状态码127。这种约定让父进程能够根据子进程的返回状态码来判断子进程的执行情况。所以,在这里使用_exit(127)是为了向父进程传达“找不到要执行的程序”的信息。
如果调用execve()成功了,意味着新程序已经被加载并且开始执行了,那么当前进程的代码段、数据段等都已经被替换成了新程序的内容,所以当前进程不再执行原来的代码,而是转而执行新程序的代码。因此,_exit(127)之后的代码将不会被执行到,包括_exit(127)本身。
在这段代码中,_exit(127)被视为一种防御措施,用于处理execve()调用失败的情况。一旦execve()成功执行,子进程就不会继续执行后续的代码,而是会执行新程序的代码
举例:
#include <iostream>
#include <unistd.h>int main() {pid_t pid = fork();if (pid == -1) {// 错误处理std::cerr << "fork() failed" << std::endl;return 1;} else if (pid == 0) {// 在子进程中std::cout << "Child process: fork() returned " << pid << std::endl;} else {// 在父进程中std::cout << "Parent process: fork() returned " << pid << std::endl;}return 0;
}
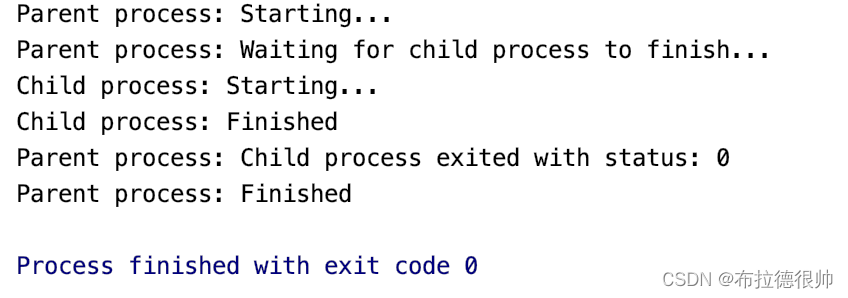
执行以后输出结果:

默认情况下fork以后,
在Linux中,默认情况下,父进程不会一直等待子进程执行完毕才结束自己。父进程和子进程是并发执行的,父进程会继续执行自己的任务,不会阻塞等待子进程的执行。
当父进程结束时,它的子进程可能还在运行,这时子进程的状态会被转移给 init 进程(进程号为1),这样子进程就不会成为孤儿进程。
但是,如果父进程希望等待子进程结束,可以使用 wait() 或 waitpid() 系统调用来实现。这些调用可以使父进程阻塞,直到它的一个或多个子进程结束。
所以,要使父进程在子进程执行完毕后再结束自己,需要显式地调用 wait() 或 waitpid() 函数。
#include <iostream>
#include <unistd.h>
#include <sys/wait.h>int main() {std::cout << "Parent process: Starting..." << std::endl;pid_t pid = fork();if (pid == -1) {std::cerr << "fork() failed" << std::endl;return 1;} else if (pid == 0) {// 子进程std::cout << "Child process: Starting..." << std::endl;sleep(3); // 模拟子进程执行一些任务std::cout << "Child process: Finished" << std::endl;return 0;} else {// 父进程std::cout << "Parent process: Waiting for child process to finish..." << std::endl;int status;waitpid(pid, &status, 0); // 等待子进程结束if (WIFEXITED(status)) {std::cout << "Parent process: Child process exited with status: " << WEXITSTATUS(status) << std::endl;} else {std::cerr << "Parent process: Child process terminated abnormally" << std::endl;}std::cout << "Parent process: Finished" << std::endl;}return 0;
}
这篇关于android init进程启动流程的文章就介绍到这儿,希望我们推荐的文章对编程师们有所帮助!


