本文主要是介绍使用yolov8+QT+onnrunxtime进行开发的注意事项,希望对大家解决编程问题提供一定的参考价值,需要的开发者们随着小编来一起学习吧!
1、本来想尝试做一个C++的yolov8在QT5.15.2的应用;
因此,在实现这个目标的时候,我先用了yolov8自带的export进行导出,使用的代码很简单,如下所示:
import os
from ultralytics import YOLO# model = YOLO("yolov8s.yaml")
model = YOLO(r"E:/yolov8/ultralytics_ds_converter/ultralytics/yolov8s.pt")#yolov8s.pt
# success=model.export(format="onnx")
success = model.export(format="onnx", half=False, dynamic=False,project="E:/yolov8/ultralytics_ds_converter")#dynamic要为false不然c++推理的时候会找不到输入输出sizeprint("demo")
因为我是打算采用C++进行推理,所以不希望模型的推理是动态图的形式,为此,设置了
dynamic=False,导出了yolov8.onnx
为了方便调试,我先尝试在VS2019上面运行,在这里我配置的是onnxruntime-win-x64-gpu-1.14.1的onnxruntime进行下载的,下载地址如下:onnxruntime
只需要下载,解压即可,然后添加,配置对应的lib,include文件夹路径;
使用的C++代码如下:
#include <onnxruntime_cxx_api.h>
#include <opencv2/opencv.hpp>
#include <fstream>using namespace cv;
using namespace std;std::string labels_txt_file = "classes.txt";
std::vector<std::string> readClassNames();
std::vector<std::string> readClassNames()
{std::vector<std::string> classNames;std::ifstream fp(labels_txt_file);if (!fp.is_open()){printf("could not open file...\n");exit(-1);}std::string name;while (!fp.eof()){std::getline(fp, name);if (name.length())classNames.push_back(name);}fp.close();return classNames;
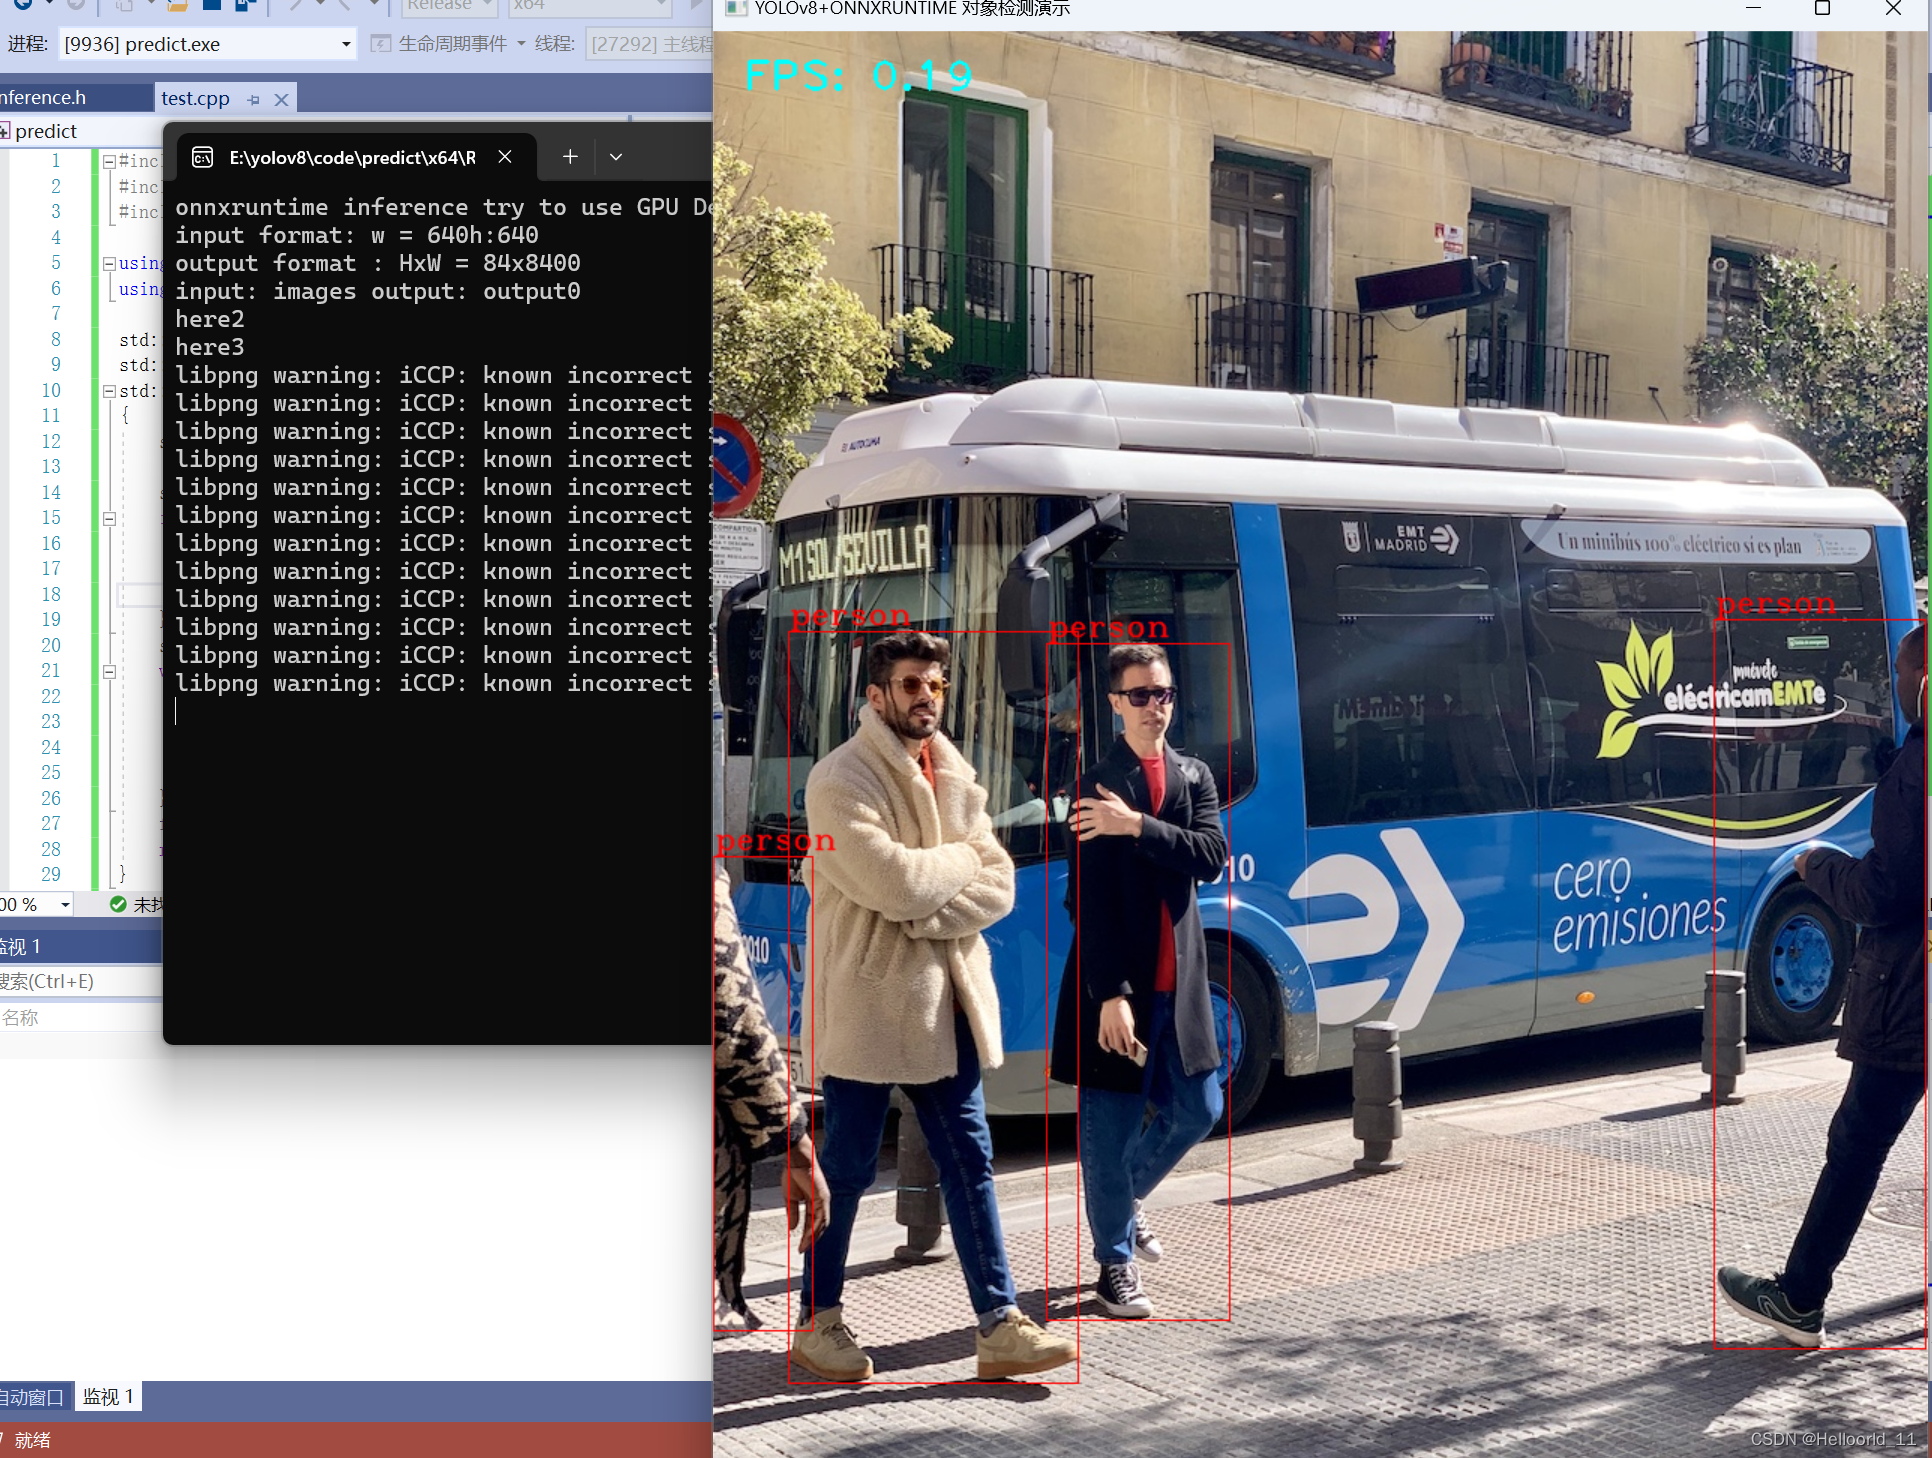
}int main(int argc, char** argv) {std::vector<std::string> labels = readClassNames();cv::Mat frame = cv::imread("E:/yolov8/code/predict/predict/bus.jpg");//E:/yolov8/dataset/images/ZDSpersonriver20231010_V8_train_rivers_4_000826.jpg//int ih = frame.rows;//int iw = frame.cols;// 创建InferSession, 查询支持硬件设备// GPU Mode, 0 - gpu device id //E:/yolov8/ultralytics_ds_converter/ultralytics/yolov8s.onnxstd::string onnxpath = "E:/yolov8/code/predict/predict/yolov8s.onnx";//E:/yolov8/ultralytics_ds_converter/ultralytics/runs/detect/train/weights/best.onnxstd::wstring modelPath = std::wstring(onnxpath.begin(), onnxpath.end());Ort::SessionOptions session_options;Ort::Env env = Ort::Env(ORT_LOGGING_LEVEL_ERROR, "yolov8-onnx");session_options.SetGraphOptimizationLevel(ORT_ENABLE_BASIC);std::cout << "onnxruntime inference try to use GPU Device" << std::endl;OrtSessionOptionsAppendExecutionProvider_CUDA(session_options, 0);Ort::Session session_(env, modelPath.c_str(), session_options);std::vector<std::string> input_node_names;std::vector<std::string> output_node_names;size_t numInputNodes = session_.GetInputCount();size_t numOutputNodes = session_.GetOutputCount();Ort::AllocatorWithDefaultOptions allocator;input_node_names.reserve(numInputNodes);// 获取输入信息int input_w = 0;int input_h = 0;for (int i = 0; i < numInputNodes; i++) {auto input_name = session_.GetInputNameAllocated(i, allocator);input_node_names.push_back(input_name.get());Ort::TypeInfo input_type_info = session_.GetInputTypeInfo(i);auto input_tensor_info = input_type_info.GetTensorTypeAndShapeInfo();auto input_dims = input_tensor_info.GetShape();input_w = input_dims[3];input_h = input_dims[2];std::cout << "input format: w = " << input_w << "h:" << input_h << std::endl;}// 获取输出信息int output_h = 0;int output_w = 0;Ort::TypeInfo output_type_info = session_.GetOutputTypeInfo(0);auto output_tensor_info = output_type_info.GetTensorTypeAndShapeInfo();auto output_dims = output_tensor_info.GetShape();output_h = output_dims[1]; // 84output_w = output_dims[2]; // 8400std::cout << "output format : HxW = " << output_dims[1] << "x" << output_dims[2] << std::endl;for (int i = 0; i < numOutputNodes; i++) {auto out_name = session_.GetOutputNameAllocated(i, allocator);output_node_names.push_back(out_name.get());}std::cout << "input: " << input_node_names[0] << " output: " << output_node_names[0] << std::endl;// format frameint64 start = cv::getTickCount();int w = frame.cols;int h = frame.rows;int _max = std::max(h, w);cv::Mat image = cv::Mat::zeros(cv::Size(_max, _max), CV_8UC3);cv::Rect roi(0, 0, w, h);frame.copyTo(image(roi));// fix bug, boxes consistence!float x_factor = image.cols / static_cast<float>(input_w);float y_factor = image.rows / static_cast<float>(input_h);cv::Mat blob = cv::dnn::blobFromImage(image, 1 / 255.0, cv::Size(input_w, input_h), cv::Scalar(0, 0, 0), true, false);size_t tpixels = input_h * input_w * 3;std::array<int64_t, 4> input_shape_info{ 1, 3, input_h, input_w };// set input data and inferenceauto allocator_info = Ort::MemoryInfo::CreateCpu(OrtDeviceAllocator, OrtMemTypeCPU);Ort::Value input_tensor_ = Ort::Value::CreateTensor<float>(allocator_info, blob.ptr<float>(), tpixels, input_shape_info.data(), input_shape_info.size());const std::array<const char*, 1> inputNames = { input_node_names[0].c_str() };const std::array<const char*, 1> outNames = { output_node_names[0].c_str() };std::vector<Ort::Value> ort_outputs;try {ort_outputs = session_.Run(Ort::RunOptions{ nullptr }, inputNames.data(), &input_tensor_, 1, outNames.data(), outNames.size());}catch (std::exception e) {std::cout << e.what() << std::endl;}// output dataconst float* pdata = ort_outputs[0].GetTensorMutableData<float>();cv::Mat dout(output_h, output_w, CV_32F, (float*)pdata);cv::Mat det_output = dout.t(); // 8400x84// post-processstd::vector<cv::Rect> boxes;std::vector<int> classIds;std::vector<float> confidences;cout << "here2" << std::endl;for (int i = 0; i < det_output.rows; i++) {cv::Mat classes_scores = det_output.row(i).colRange(4, 5);//修改查找的类cv::Point classIdPoint;double score;minMaxLoc(classes_scores, 0, &score, 0, &classIdPoint);// 置信度 0~1之间if (score > 0.25){float cx = det_output.at<float>(i, 0);float cy = det_output.at<float>(i, 1);float ow = det_output.at<float>(i, 2);float oh = det_output.at<float>(i, 3);int x = static_cast<int>((cx - 0.5 * ow) * x_factor);int y = static_cast<int>((cy - 0.5 * oh) * y_factor);int width = static_cast<int>(ow * x_factor);int height = static_cast<int>(oh * y_factor);cv::Rect box;box.x = x;box.y = y;box.width = width;box.height = height;boxes.push_back(box);classIds.push_back(classIdPoint.x);confidences.push_back(score);}}cout << "here3" << std::endl;// NMSstd::vector<int> indexes;cv::dnn::NMSBoxes(boxes, confidences, 0.25, 0.45, indexes);for (size_t i = 0; i < indexes.size(); i++) {int index = indexes[i];int idx = classIds[index];float score_confidences=confidences[i];cv::rectangle(frame, boxes[index], cv::Scalar(0, 0, 255), 1, 8);//改变矩形框线条//cv::rectangle(frame, cv::Point(boxes[index].tl().x, boxes[index].tl().y - 20),// cv::Point(boxes[index].br().x, boxes[index].tl().y), cv::Scalar(255, 0, 0), -1);putText(frame, labels[idx], cv::Point(boxes[index].tl().x, boxes[index].tl().y-5), cv::FONT_HERSHEY_COMPLEX_SMALL, 1.0, cv::Scalar(0, 0, 255), 1, cv::LINE_AA);//改变文本cv::imshow("YOLOv8+ONNXRUNTIME 对象检测演示", frame);}// 计算FPS render itfloat t = (cv::getTickCount() - start) / static_cast<float>(cv::getTickFrequency());putText(frame, cv::format("FPS: %.2f", 1.0 / t), cv::Point(20, 40), cv::FONT_HERSHEY_PLAIN, 2.0, cv::Scalar(255, 255, 0), 2, 8);cv::imshow("YOLOv8+ONNXRUNTIME 对象检测演示", frame);cv::waitKey(0);session_options.release();session_.release();return 0;
}但是在使用这个代码之前要先包含,inference.h文件:修改类别在class的vector容器里面;
#ifndef INFERENCE_H
#define INFERENCE_H// Cpp native
#include <fstream>
#include <vector>
#include <string>
#include <random>// OpenCV / DNN / Inference
#include <opencv2/imgproc.hpp>
#include <opencv2/opencv.hpp>
#include <opencv2/dnn.hpp>struct Detection
{int class_id{0};std::string className{};float confidence{0.0};cv::Scalar color{};cv::Rect box{};
};class Inference
{
public:Inference(const std::string &onnxModelPath, const cv::Size &modelInputShape = {640, 640}, const std::string &classesTxtFile = "", const bool &runWithCuda = true);std::vector<Detection> runInference(const cv::Mat &input);private:void loadClassesFromFile();void loadOnnxNetwork();cv::Mat formatToSquare(const cv::Mat &source);std::string modelPath{};std::string classesPath{};bool cudaEnabled{};std::vector<std::string> classes{ "person", "bicycle", "car", "motorcycle", "airplane", "bus", "train", "truck", "boat", "traffic light", "fire hydrant", "stop sign", "parking meter", "bench", "bird", "cat", "dog", "horse", "sheep", "cow", "elephant", "bear", "zebra", "giraffe", "backpack", "umbrella", "handbag", "tie", "suitcase", "frisbee", "skis", "snowboard", "sports ball", "kite", "baseball bat", "baseball glove", "skateboard", "surfboard", "tennis racket", "bottle", "wine glass", "cup", "fork", "knife", "spoon", "bowl", "banana", "apple", "sandwich", "orange", "broccoli", "carrot", "hot dog", "pizza", "donut", "cake", "chair", "couch", "potted plant", "bed", "dining table", "toilet", "tv", "laptop", "mouse", "remote", "keyboard", "cell phone", "microwave", "oven", "toaster", "sink", "refrigerator", "book", "clock", "vase", "scissors", "teddy bear", "hair drier", "toothbrush" };cv::Size2f modelShape{};float modelConfidenceThreshold {0.25};float modelScoreThreshold      {0.45};float modelNMSThreshold        {0.50};bool letterBoxForSquare = true;cv::dnn::Net net;
};#endif // INFERENCE_H
和这个inference.cpp文件:
#include "inference.h"
#include "stdio.h"Inference::Inference(const std::string &onnxModelPath, const cv::Size &modelInputShape, const std::string &classesTxtFile, const bool &runWithCuda)
{modelPath = onnxModelPath;modelShape = modelInputShape;classesPath = classesTxtFile;cudaEnabled = runWithCuda;loadOnnxNetwork();// loadClassesFromFile(); The classes are hard-coded for this example
}std::vector<Detection> Inference::runInference(const cv::Mat &input)
{cv::Mat modelInput = input;if (letterBoxForSquare && modelShape.width == modelShape.height)modelInput = formatToSquare(modelInput);cv::Mat blob;cv::dnn::blobFromImage(modelInput, blob, 1.0/255.0, modelShape, cv::Scalar(), true, false);net.setInput(blob);std::vector<cv::Mat> outputs;net.forward(outputs, net.getUnconnectedOutLayersNames());int rows = outputs[0].size[1];int dimensions = outputs[0].size[2];bool yolov8 = false;// yolov5 has an output of shape (batchSize, 25200, 85) (Num classes + box[x,y,w,h] + confidence[c])// yolov8 has an output of shape (batchSize, 84,  8400) (Num classes + box[x,y,w,h])if (dimensions > rows) // Check if the shape[2] is more than shape[1] (yolov8){yolov8 = true;rows = outputs[0].size[2];dimensions = outputs[0].size[1];outputs[0] = outputs[0].reshape(1, dimensions);cv::transpose(outputs[0], outputs[0]);}float *data = (float *)outputs[0].data;float x_factor = modelInput.cols / modelShape.width;float y_factor = modelInput.rows / modelShape.height;std::vector<int> class_ids;std::vector<float> confidences;std::vector<cv::Rect> boxes;for (int i = 0; i < rows; ++i){if (yolov8){float *classes_scores = data+4;cv::Mat scores(1, classes.size(), CV_32FC1, classes_scores);cv::Point class_id;double maxClassScore;minMaxLoc(scores, 0, &maxClassScore, 0, &class_id);if (maxClassScore > modelScoreThreshold){confidences.push_back(maxClassScore);class_ids.push_back(class_id.x);float x = data[0];float y = data[1];float w = data[2];float h = data[3];int left = int((x - 0.5 * w) * x_factor);int top = int((y - 0.5 * h) * y_factor);int width = int(w * x_factor);int height = int(h * y_factor);boxes.push_back(cv::Rect(left, top, width, height));}}else // yolov5{float confidence = data[4];if (confidence >= modelConfidenceThreshold){float *classes_scores = data+5;cv::Mat scores(1, classes.size(), CV_32FC1, classes_scores);cv::Point class_id;double max_class_score;minMaxLoc(scores, 0, &max_class_score, 0, &class_id);if (max_class_score > modelScoreThreshold){confidences.push_back(confidence);class_ids.push_back(class_id.x);float x = data[0];float y = data[1];float w = data[2];float h = data[3];int left = int((x - 0.5 * w) * x_factor);int top = int((y - 0.5 * h) * y_factor);int width = int(w * x_factor);int height = int(h * y_factor);boxes.push_back(cv::Rect(left, top, width, height));}}}data += dimensions;}std::vector<int> nms_result;cv::dnn::NMSBoxes(boxes, confidences, modelScoreThreshold, modelNMSThreshold, nms_result);std::vector<Detection> detections{};for (unsigned long i = 0; i < nms_result.size(); ++i){int idx = nms_result[i];Detection result;result.class_id = class_ids[idx];result.confidence = confidences[idx];std::random_device rd;std::mt19937 gen(rd());std::uniform_int_distribution<int> dis(100, 255);result.color = cv::Scalar(dis(gen),dis(gen),dis(gen));result.className = classes[result.class_id];result.box = boxes[idx];detections.push_back(result);}return detections;
}void Inference::loadClassesFromFile()
{std::ifstream inputFile(classesPath);if (inputFile.is_open()){std::string classLine;while (std::getline(inputFile, classLine))classes.push_back(classLine);inputFile.close();}
}void Inference::loadOnnxNetwork()
{std::cout<< "path:" << modelPath;net = cv::dnn::readNetFromONNX(modelPath);if (cudaEnabled){std::cout << "\nRunning on CUDA" << std::endl;net.setPreferableBackend(cv::dnn::DNN_BACKEND_CUDA);net.setPreferableTarget(cv::dnn::DNN_TARGET_CUDA);}else{std::cout << "\nRunning on CPU" << std::endl;net.setPreferableBackend(cv::dnn::DNN_BACKEND_OPENCV);net.setPreferableTarget(cv::dnn::DNN_TARGET_CPU);}
}cv::Mat Inference::formatToSquare(const cv::Mat &source)
{int col = source.cols;int row = source.rows;int _max = MAX(col, row);cv::Mat result = cv::Mat::zeros(_max, _max, CV_8UC3);source.copyTo(result(cv::Rect(0, 0, col, row)));return result;
}
效果显示是这样:
但是当我将这个代码功能移植到QT5.15.2上面的时候,遇到了很大的问题,那就是QT5.15.2的版本不支持onnruntime1.14的版本,只支持1~1.10的版本。因此,尝试下载了onnruntime1.10的版本,但是使用1.10的版本进行推理,会显示很多函数的功能不对,推理yolov8出现更多的bug。
于是经过决定,采用opencv的DNN模块对yolov8.onnx进行推理,,这是我使用的代码:
#include <iostream>
#include <vector>
#include <opencv2/opencv.hpp>
#include <fstream>
using namespace cv;
using namespace std;
#include "inference.h"int main(int argc, char** argv)
{bool runOnGPU = false;// 1. 设置你的onnx模型// Note that in this example the classes are hard-coded and 'classes.txt' is a place holder.Inference inf("E:/yolov8/code/predict2/predict/yolov8s.onnx", cv::Size(640, 480), "classes.txt", runOnGPU); // classes.txt 可以缺失// 2. 设置你的输入图片std::vector<std::string> imageNames;imageNames.push_back("E:/yolov8/code/predict/predict/bus.jpg");//imageNames.push_back("zidane.jpg");for (int i = 0; i < imageNames.size(); ++i){cv::Mat frame = cv::imread(imageNames[i]);// Inference starts here...std::vector<Detection> output = inf.runInference(frame);int detections = output.size();std::cout << "Number of detections:" << detections << std::endl;// feiyull// 这里需要resize下,否则结果不对//cv::resize(frame, frame, cv::Size(480, 640));for (int i = 0; i < detections; ++i){Detection detection = output[i];cv::Rect box = detection.box;cv::Scalar color = detection.color;// Detection boxcv::rectangle(frame, box, color, 2);// Detection box textstd::string classString = detection.className + ' ' + std::to_string(detection.confidence).substr(0, 4);cv::Size textSize = cv::getTextSize(classString, cv::FONT_HERSHEY_DUPLEX, 1, 2, 0);cv::Rect textBox(box.x, box.y - 40, textSize.width + 10, textSize.height + 20);cv::rectangle(frame, textBox, color, cv::FILLED);cv::putText(frame, classString, cv::Point(box.x + 5, box.y - 10), cv::FONT_HERSHEY_DUPLEX, 1, cv::Scalar(0, 0, 0), 2, 0);}cv::imshow("Inference", frame);cv::waitKey(0);cv::destroyAllWindows();}
}
但是在我推理的时候,报了如下信息的错误:
ONNXImporter::handleNode DNN/ONNX: ERROR during processing node with 2 inputs and 1 outputs: [Reshape]:(onnx::Transpose_418)
经过一些资料的查找,发现,应该输入和输出的维度对不上,于是更换了opencv的版本从4.5.2换成了4.8.0才成功运行:
然后就是video的打开和使用,这里使用的Qtimer的信号:
bool runOnGPU = false;QString filename1=QFileDialog::getOpenFileName(this,QStringLiteral("打开视频"),"../");if(filename1.isEmpty()==false){cvfilename1 =filename1.toLocal8Bit().toStdString();//转换为OpenCV路径cap.open(cvfilename1);if (!cap.isOpened()) {qDebug() << "Error opening video file";return;}else{inf=new Inference("E:/yolov8/code/predict2/predict/yolov8s.onnx", cv::Size(640, 480), "classes.txt", runOnGPU); // classes.txt 可以缺失double fps = cap.get(cv::CAP_PROP_FPS);cv::Size frameSize(static_cast<int>(cap.get(cv::CAP_PROP_FRAME_WIDTH)),static_cast<int>(cap.get(cv::CAP_PROP_FRAME_HEIGHT)));out.open("output.mp4", cv::VideoWriter::fourcc('M', 'P', '4', 'V'), fps, frameSize, true); // 最后一个参数为是否彩色视频}// 设置定时器以定期处理帧connect(timer, &QTimer::timeout, this, &MainWindow::show_video);timer->start(20); // 每30毫秒处理一次帧,约等于30fps}这篇关于使用yolov8+QT+onnrunxtime进行开发的注意事项的文章就介绍到这儿,希望我们推荐的文章对编程师们有所帮助!


