本文主要是介绍十年失眠架构师教你使用Docker来构建、运行、发布微服务,希望对大家解决编程问题提供一定的参考价值,需要的开发者们随着小编来一起学习吧!
使用Docker来构建、运行、发布微服务
可以说,Docker是目前市面上比较流行的容器技术之一。
本节我们将带领大家一起使用Docker来演示如何构建、运行、发布微服务。

Docker的安装
原先,Docker只支持Linux环境下的安装。自从微软与Docker展开了深入合作之后,对于Windows平台的支持力度也加大了许多。目前,已经知道支持的Windows平台有Windows 10和Windows Server 2016。
本文将基于Windows 10来演示安装的过程。本例所使用的Docker版本为17.09.1-ce-win42。
1.下载安装Docker
下载位置可见https://docs.docker.com/docker-for-windows/install/#download-docker-for-windows
下载成功之后,可以获取到Docker for Windows Installer.exe安装文件。双击该文件,根据提示执行安装即可。
安装完毕后,会自动启动Docker。状态栏中显示了Docker图标,说明Docker正在运行,可以从终端访问。
单击顶部状态栏中的Docker 图标,并选择“About Docker”,来验证所安装的是否是最新的版本。
2.验证安装
为了验证安装是否正确,可以在命令行工具( cmd.exe或PowerShell)中执行下列命令来验证Docker Engine、Compose及 Machine。
C:lUsersAdministrator>docker --versionDocker version 17.09.1-ce, build 19e2cf6
C:\Users\Administrator>docker-compose --versiondocker-compose version 1.17.1,build 6d101fb0
C:lUsers \Administrator>docker-machine --versiondocker-machine version 0.13.0,build 9ba6da9

Docker的简单使用
接下来我们将通过一些简单的示例,来熟悉Docker的基本用户。使用命令行工具来执行Docker相关的命令。
1.查看容器列表
执行docker ps可以查看已经安装的容器。
C:lUsers\Administrator>docker ps
CONTAINER ID IMAGE COMMAND CREATED
STATUS PORTS NAMES
正如上面所输出的那样,一开始,我们的容器列表是空的。
⒉.查看Docker的版本信息
执行docker version可以查看Docker 的版本信息。
C:Users Administrator>docker version
Client:
version:17.09.1-ce
APIversion:1.32
Go version:go1.8.3
Git commit: 19e2cf6
Built: Thu Dec 722:22:26 2017
oS/Arch:windows/amd64
Server:
version:17.09.1-ce
API version:1.32 (minimumversion 1.12)
Go version:gol.8.3
Git commit:19e2cf6
Built: Thu Dec 7 22:28:28 2017
OS/Arch:linux/amd64
Experimental:true
3.查看Docker的详细信息
执行 docker info可以查看Docker 的详细信息。
C: lUserslAdministrator>docker info
Containers:o
Running:o
Paused:0
Stopped: 0
工mages:0
Server version:17.09.1-ce
Storage Driver: overlay2
Backing Filesystem:extfs
Supports d_type:true
Native Overlay Diff:true
Logging Driver: json-file
cgroup Driver:cgroupfs
Plugins:
volume: local
Network: bridge host ipvlan macvlan null overlay
Log: awslogs fluentd gcplogs gelf journald json-file logentries splunk
syslog
Swarm: inactive
Runtimes:runc
Default Runtime: runc
Init Binary:docker-init
containerd version: 06b9cb35161009dcb7123345749fef027cea8e0
runc version:328b84a7773d38244dd690525642a72156c64
init version:949e6fa
Security Options:
seccomp
Profile: default
Kernel version: 4.9.49-moby
operating System: Alpine Linux v3.5
OSType:linux
Architecture:x86 64
CPUs:2
Total Memory: 1.934GiB
Name: moby
ID:FB3K:DR7K:UX7V:23AU:MPDR:E2NJ:R746:JFU5:730V:P2RU:YQ7F:MYPF
Docker Root Dir:/var/lib/docker
Debug Mode (client):false
Debug Mode (server) :true
File Descriptors:16
Goroutines:25
System Time:2017-12-22T15:40:01.6330973z
EventsListeners:o
Registry:https://index.docker.io/v1/
Experimental:true
Insecure Registries:
127.0.0.0/8
Live Restore Enabled: false
4.运行容器
执行docker run hello-world可以测试运行容器。
C:\Users\Administrator>docker run hello-world
Unable to find image 'hello-world:latest' locally
latest: Pulling from library/hello-world
ca4f61b1923c:Pull complete
Digest:sha256:445b2fe9afea8b4aa0b227fe49dd6ad130dfe7a8fd0832be5de
99625dad47cd
Status: Downloaded newer image for hello-world:latest
Hello from Docker!
This message shows that your installation appears to be working
correctly.
To generate this message,Docker took the following steps:
1.The Docker client contacted the Docker daemon.
2. The Docker daemon pulled the "hello-world" image from the DockerHub.
(amd64))
3.The Docker daemon created a new container from that image which runstheexecutable that produces the output you are currently reading.
4.The Docker daemon streamed that output to the Docker client,which
sent it
toyour terminal.
To try something more ambitious,you can run an Ubuntu container with:
$docker run-it ubuntu bash
Share images,automate workflows,and more with a free Docker ID:
https://cloud.docker.com/
For more examples and ideas, visit:
https://docs.docker.com/engine/userguide/
其中:
- . hello-world是一个用于测试的非常简单的程序。该程序执行之后,会输出上述文本内容;
- .hello-world是托管于Docker Hub上的一个image;
- 执行docker run hello-world之后,会先在本地查找是否存在hello-world image,如果没有找到,则联网到Docker Hub上下载;
- ·找到hello-world image后,就运行容器。
Docker运行微服务
下面,我们就演示下如何用Docker来运行微服务。
1.创建微服务
我们在之前所创建的hello-world应用的基础上,生成一个新的应用hello-world-docker,用于微服务示例。
同时,我们执行gradlew build来编译hello-world-docker应用。编译成功之后,就能运行该编译文件。
java-jar build/libs/hello-world-docker-1.0.0.jar
此时,在浏览器访问http:/localhost:8080/hello,应能看到“Hello World! Welcome to visit way-lau.com!”字样的内容,则说明该微服务构建成功。
2.微服务容器化
我们需要将微服务应用包装为Docker容器。Docker使用 Dockerfile文件格式来指定image层。
我们在 hello-world-docker应用的根目录下创建Dockerfile文件。
EROM openjdk:8-jdk-alpine
VOLUME/tmp
ARG JAR FILE
ADD ${JAR FILE}app.jar
ENTRYPOINT ["java","-Djava.security.egd=file:/dev/./urandom", "-jar","/
app.jar"]
这个Dockerfile是非常简单的,因为本例子中的微服务应用相对比较简单。其中:
·FROM可以理解为我们这个image依赖于另外一个image。因为我们的应用是一个Java应用,所以依赖于JDK;
·项目JAR文件以“app.jar”的形式添加到容器中,然后在ENTRYPOINT中执行;
. VOLUME指定了临时文件目录为/tmp。其效果是在主机/var/lib/docker目录下创建了一个临时文件,并链接到容器的/tmp。该步骤是可选的,如果涉及文件系统的应用,就很有必要了。/tmp目录用来持久化到Docker数据文件夹,因为Spring Boot使用的内嵌Tomcat容器默认使用/tmp 作为工作目录;
·为了缩短Tomcat启动时间,添加一个系统属性指向/dev/./urandomo
3.使用Gradle来构建Docker image
为了使用Gradle来构建Docker image,需要添加docker插件在应用的build.gradle中。
buildscript {
dependencies{
...
classpath ('gradle.plugin.com.palantir.gradle.docker:gradle-dock-
er:0.17.2')
apply plugin: 'com.palantir.docker'
docker {
name "${project.group}/${jar.baseName }"
files jar.archivePath
buildArgs(['JAR_FILE':"${jar.archiveName}"])
执行gradlew build docker来构建Docker image。
>gradlew build docker --info
...
Starting process 'command 'docker' '. Working directory:D:|workspaceGi
tosclspring-cloud-microservices-development\samples\hello-world-docker
build\docker Command:docker build --build-arg JAR_FILE=hello-world-
docker-1.0.0.jar-t com.waylau.spring.cloud/hello-world-docker .
Successfully started process 'command 'docker''
2fdfelcd78c2:Pulling fs layer
82630fd6e5ba: Pulling fs layer
00151leb3437:Pulling fs layer
82630fd6e5ba:verifying Checksum
82630fd6e5ba:Download complete
2fdfelcd78c2:verifying Checksum
2fdfelcd78c2:Download complete
2dfelcd78c2:Pull complete
82630fd6e5ba: Pull complete
001511eb3437:Verifying Checksum
001511eb3437: Download complete
0015l1eb3437: Pull complete
Digest:sha256:388566cc68259a0019004c2d343dd6c69b83914dc5c458be959271
a2761795
Status:Downloaded newer image for openjdk:8-jdk-alpine
-—-> 3642e636096d
Step 2/5 :VOLUME /tmp
---> Running in 40ff6fa809e8
--->f467a7dlc267
Removing intermediate container 40ff6fa809e8
step 3/5 :ARG JAR FILE
---> Running in 4872c7353093
--->4406b96eca35
Removing intermediate container 4872c7353093
Step 4/5 : ADD ${JAR_FILE} app-jar
---> a2e55472f1db
step 5/5:ENTRYPOINT java-Djava.security.egd=file:/dev/./urandom -jar
/app.jar
---> Running in f536a4993ca5
-―->527b7c667dd2
Removing intermediate container f536a4993ca5
Successfully built 527b7c667dd2
Successfully tagged com.waylau.spring.cloud/hello-world-docker:latest
SECURITY WARNING: You are building a Docker image from Windows against
a non-Windows Docker host. All files and directories added to build
context will have '-rWxr-Xr-x' permissions. It is recommended to double
check and reset permissions for sensitive files and directories.
:docker(Thread[Task worker,5,main]) completed.Took 15 mins 24.218
secs.
BUILD SUCCESSFUL in 15m 26s
9actionable tasks: 3 executed,6 up-to-date
Stoppedo worker daemon(s).
构建成功,可以在控制台看到如上信息。因篇幅有限,这里省去大部分内容。
4.运行image
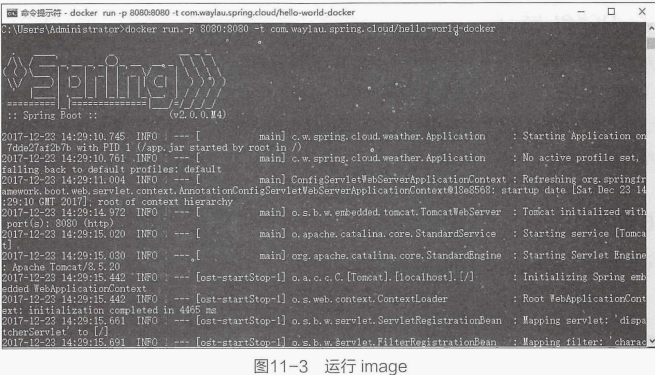
在构建Docker image完成之后,使用Docker来运行该image。
docker run -p 8080:8080 -t com.waylau.spring.cloud/hello-world-docker图11-3展示了运行image的过程。
5.访问应用
image运行成功后,就能在浏览器访问http:/localhost:8080/hello,应能看到“Hello World! Wel-come to visit waylau.com!”字样的内容。
6.关闭容器
可以先通过docker ps命令来查看正在运行的容器的ID,而后可以执行docker stop命令来关闭容器。命令如下。
C:UserslAdministrator>docker ps
CONTAINER ID IMAGE COMMAND
CREATED STATUS PORTS NAMES
7dde27af2b7b com.waylau.spring.cloud/hello-world-docker "java
0.0.0.0:8080-
-Djava.secur..." 4 minutes ago Up 4 minutes
>8080/tcpxenodochial_heyrovsky
C:lUsers\Administrator>docker stop 7dde27af2b7b7dde27af2b7b
Docker发布微服务
当我们的微服务包装成为Docker的image之后,就能进行分发了。Docker Hub是专门用于托管image的云服务。用户可以将自己的image推送到Docker Hub上,以方面其他人下载。
Docker展望
虽然本文只是挑选了一个最简单的Spring Boot微服务作为例子,但是可以完整呈现如何使用Docker构建、运行、发布一个微服务应用的整个过程。读者可以举一反三,将天气预报系统中的其他微服务实例做相应的操作,实现天气预报系统的容器化改造。为节约篇幅,本文不再对这个改造做详细的描述。
源码
本节示例所涉及的源码见hello-world-docker。
本篇文章内容给大家讲解的是使用Docker来构建、运行、发布微服务
- 下篇文章给大家讲解微服务的日志与监控;
- 觉得文章不错的朋友可以转发此文关注小编;
- 感谢大家的支持!
这篇关于十年失眠架构师教你使用Docker来构建、运行、发布微服务的文章就介绍到这儿,希望我们推荐的文章对编程师们有所帮助!


