本文主要是介绍Vue3 + Element-Plus 对接高德地图实现搜索提示选址、点击地图选址、自我定位功能(最新),希望对大家解决编程问题提供一定的参考价值,需要的开发者们随着小编来一起学习吧!
Vue3 + Element-Plus 对接高德地图实现搜索提示选址、点击地图选址、自我定位功能(最新)
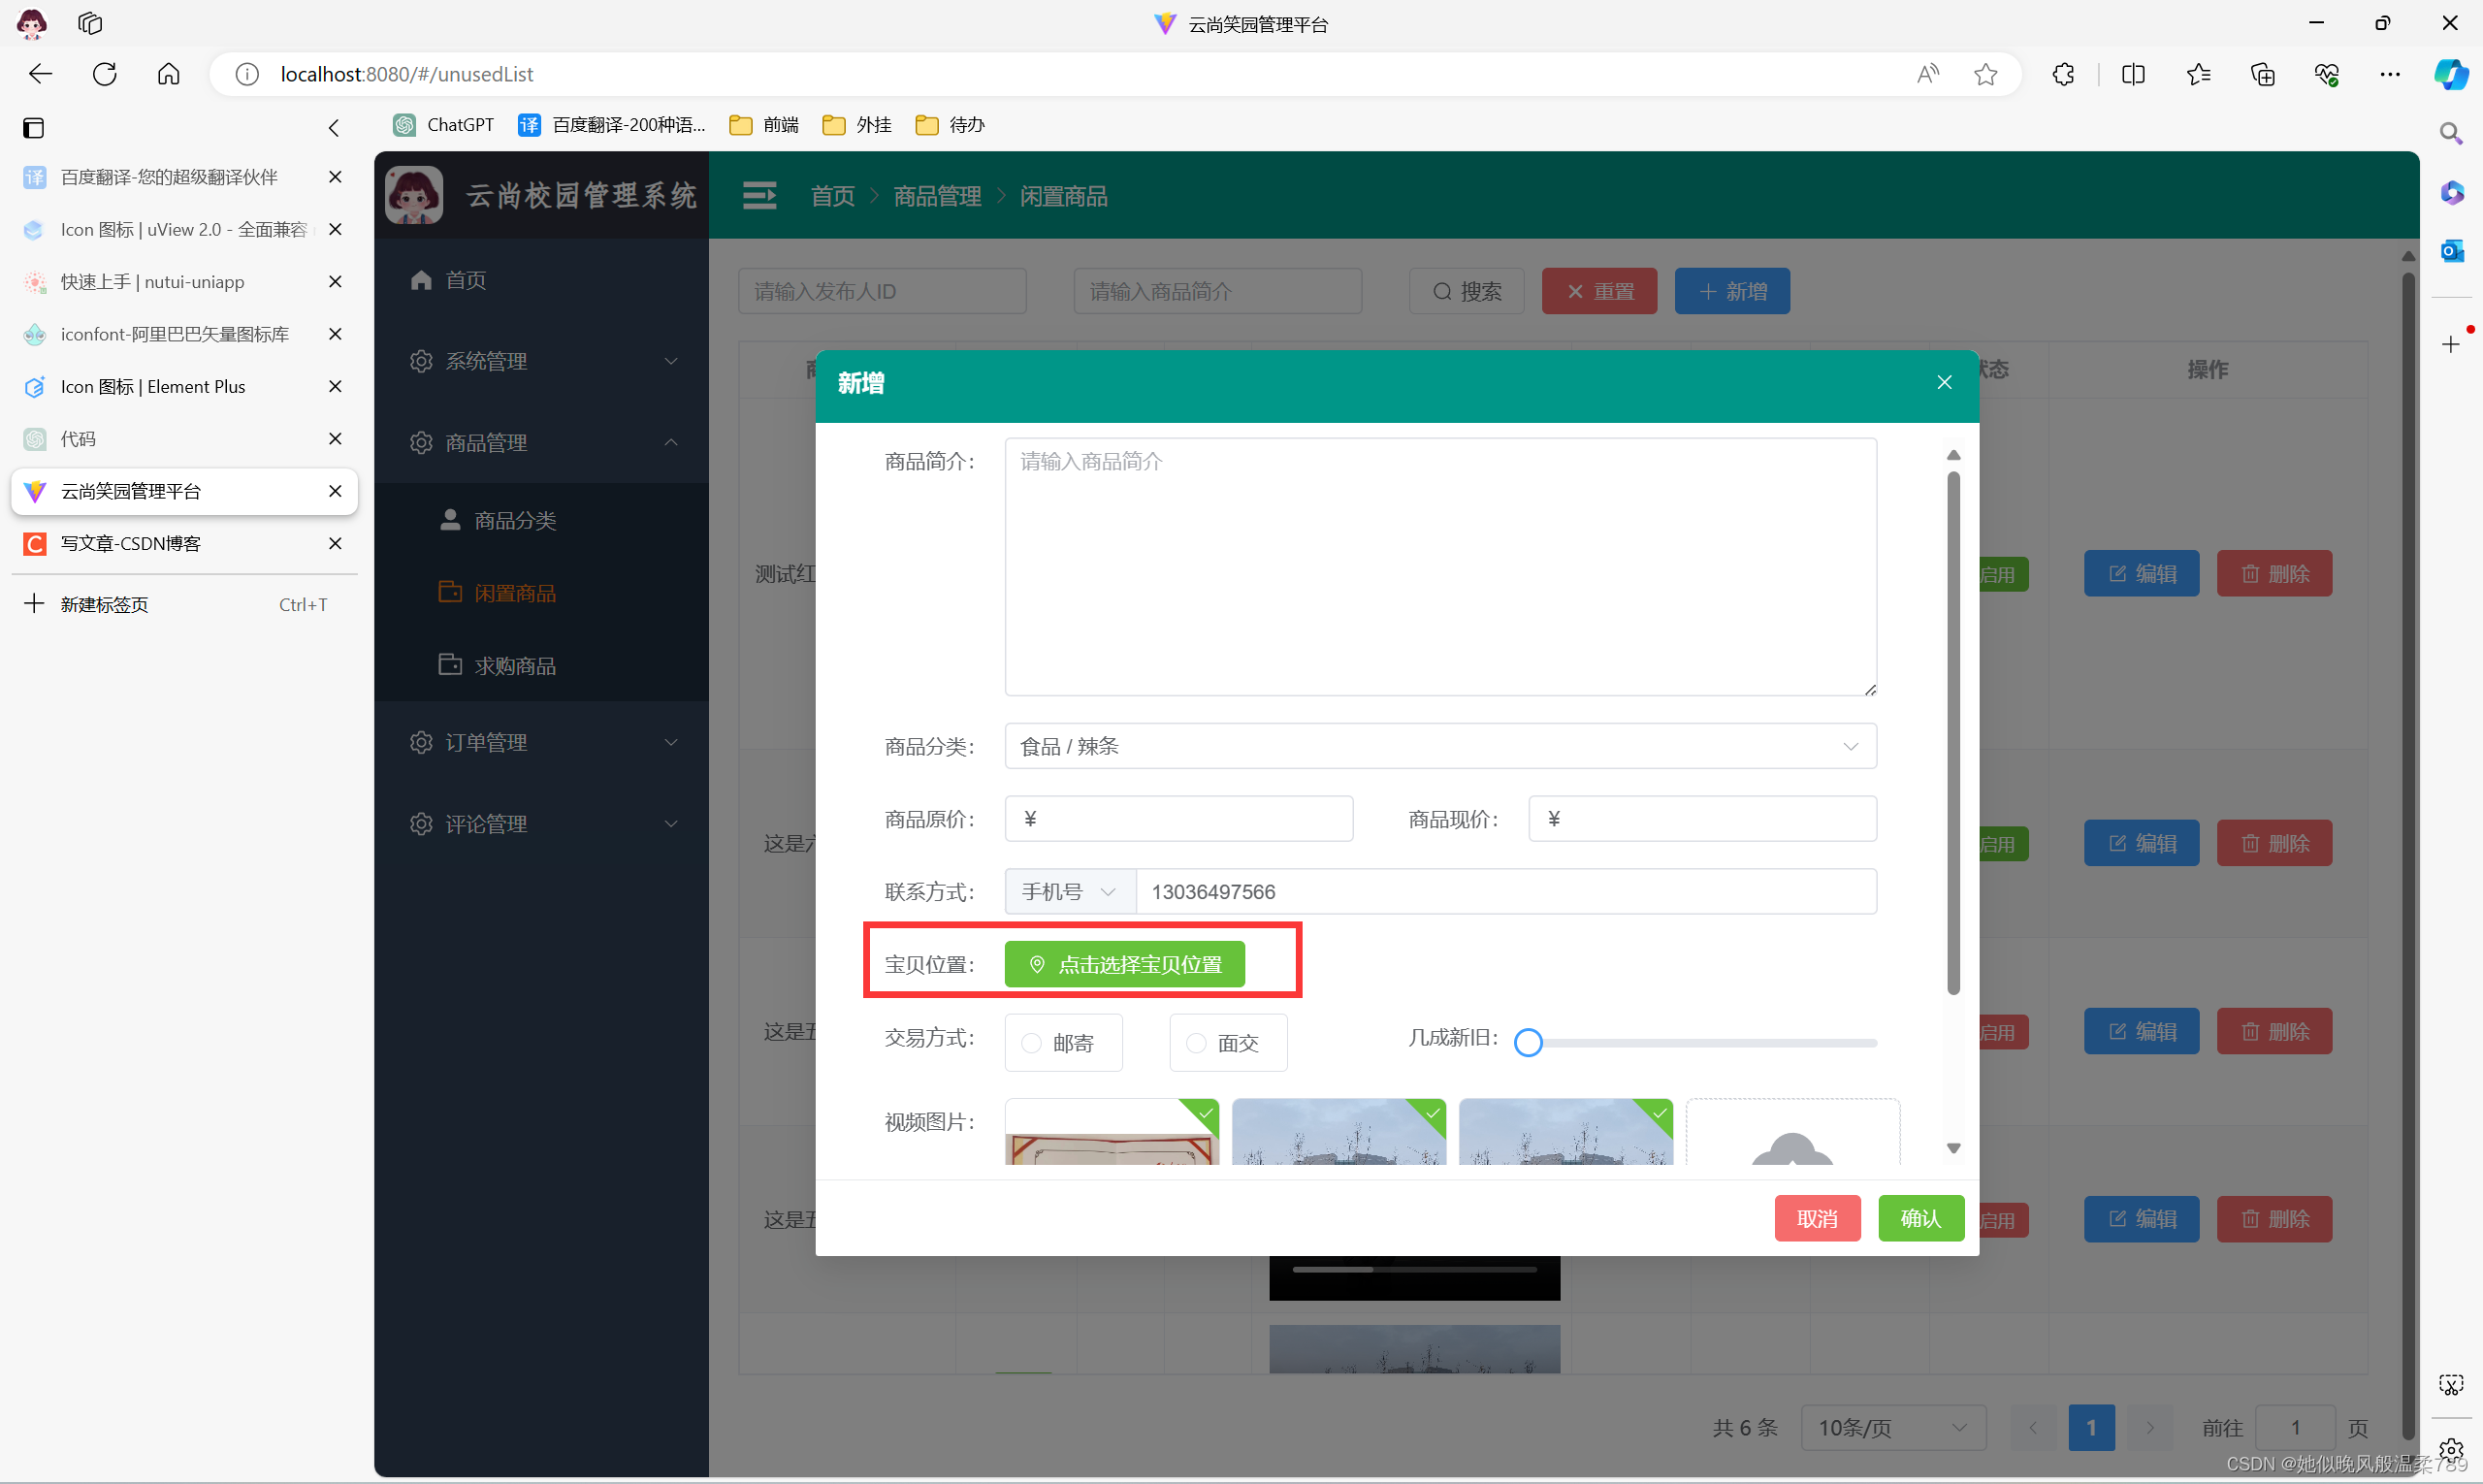
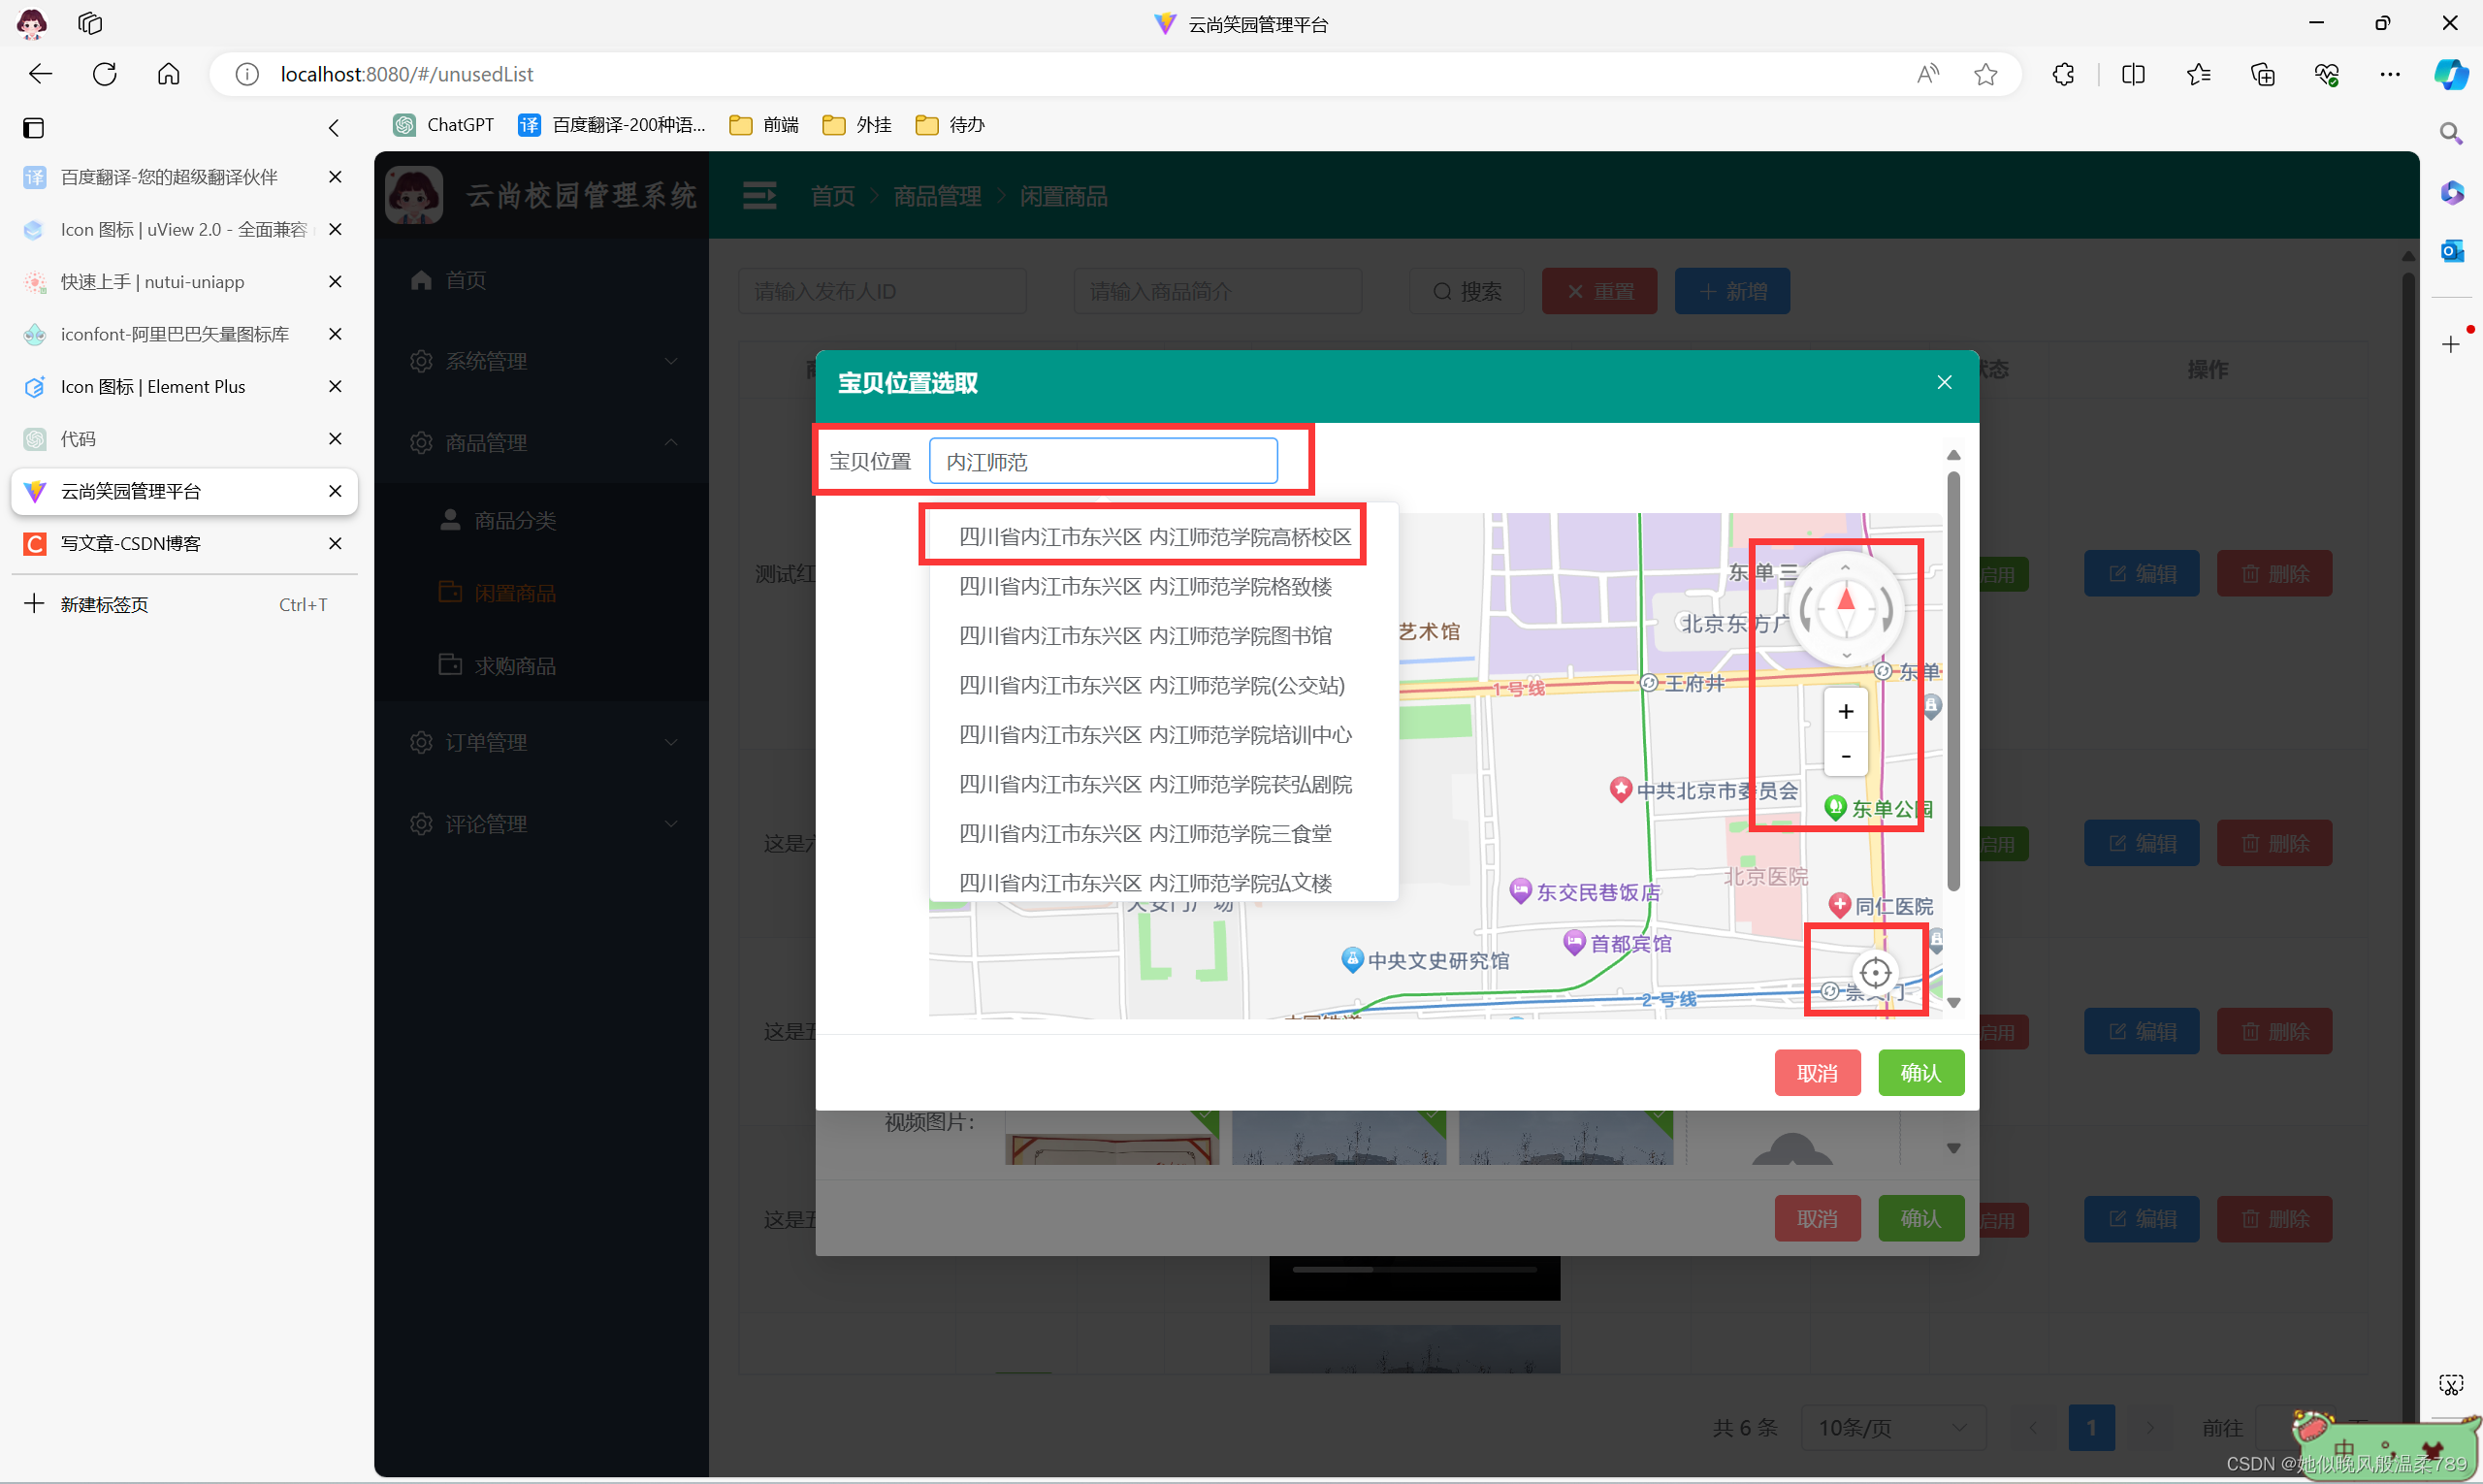
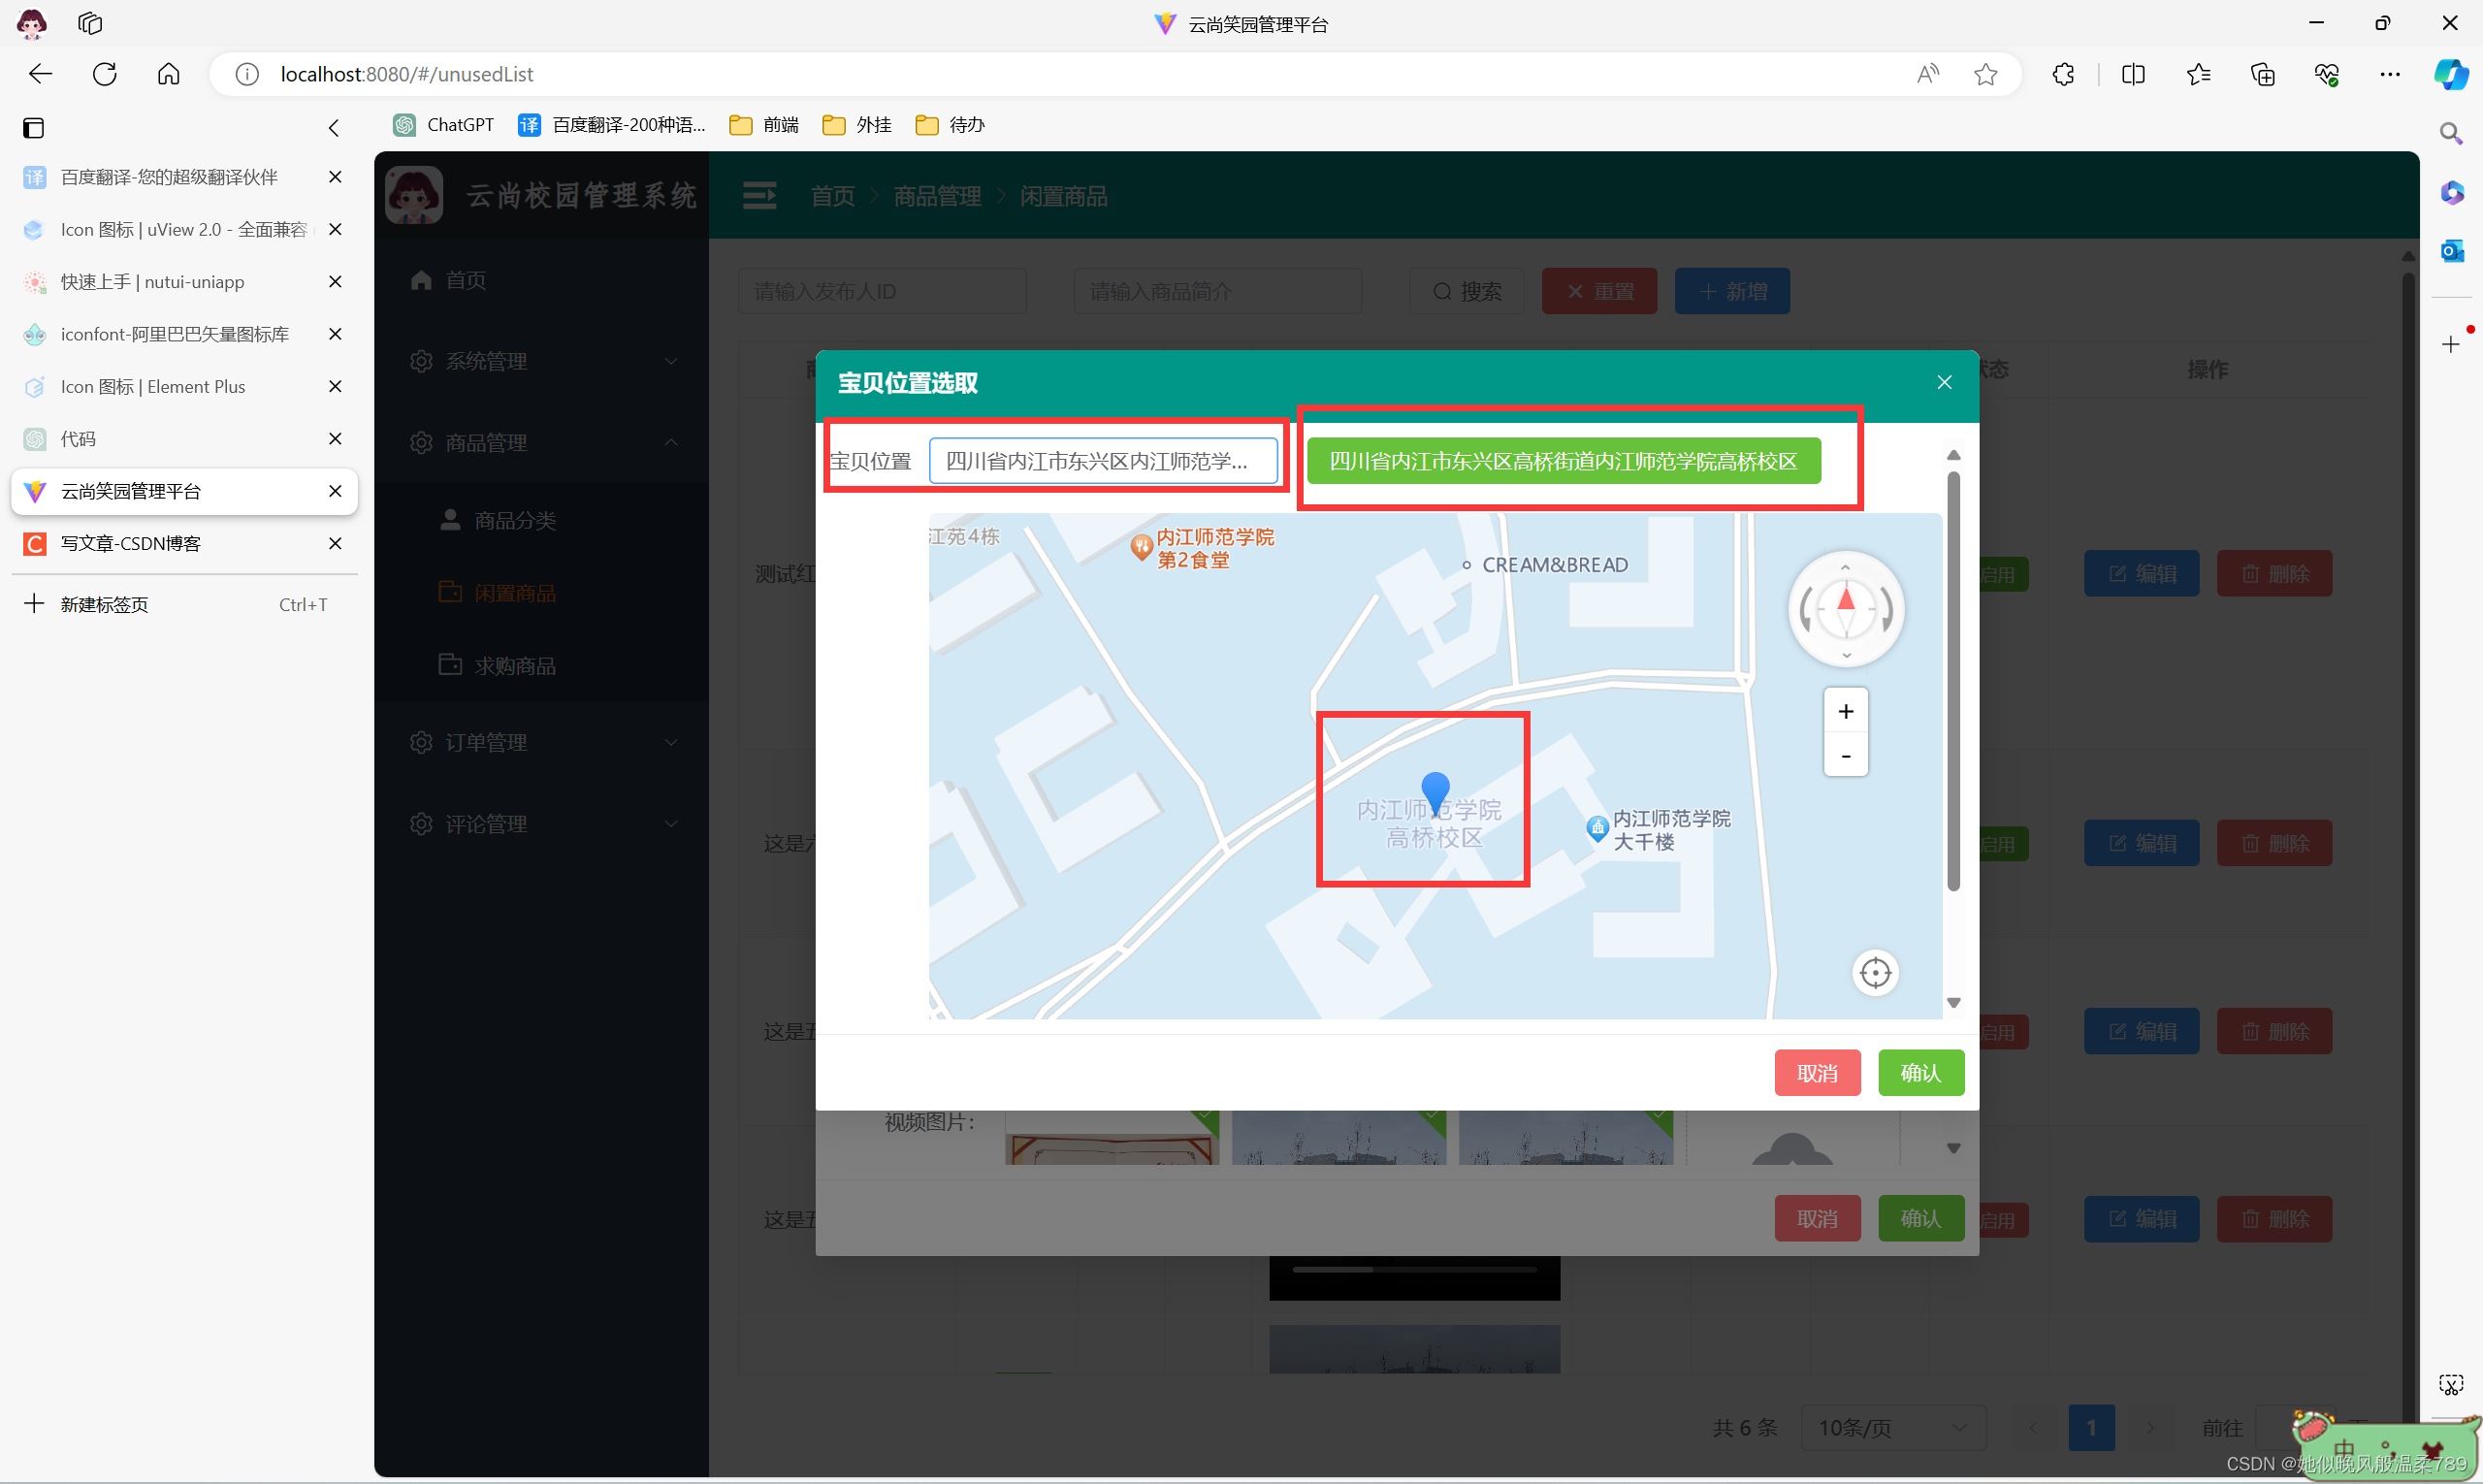
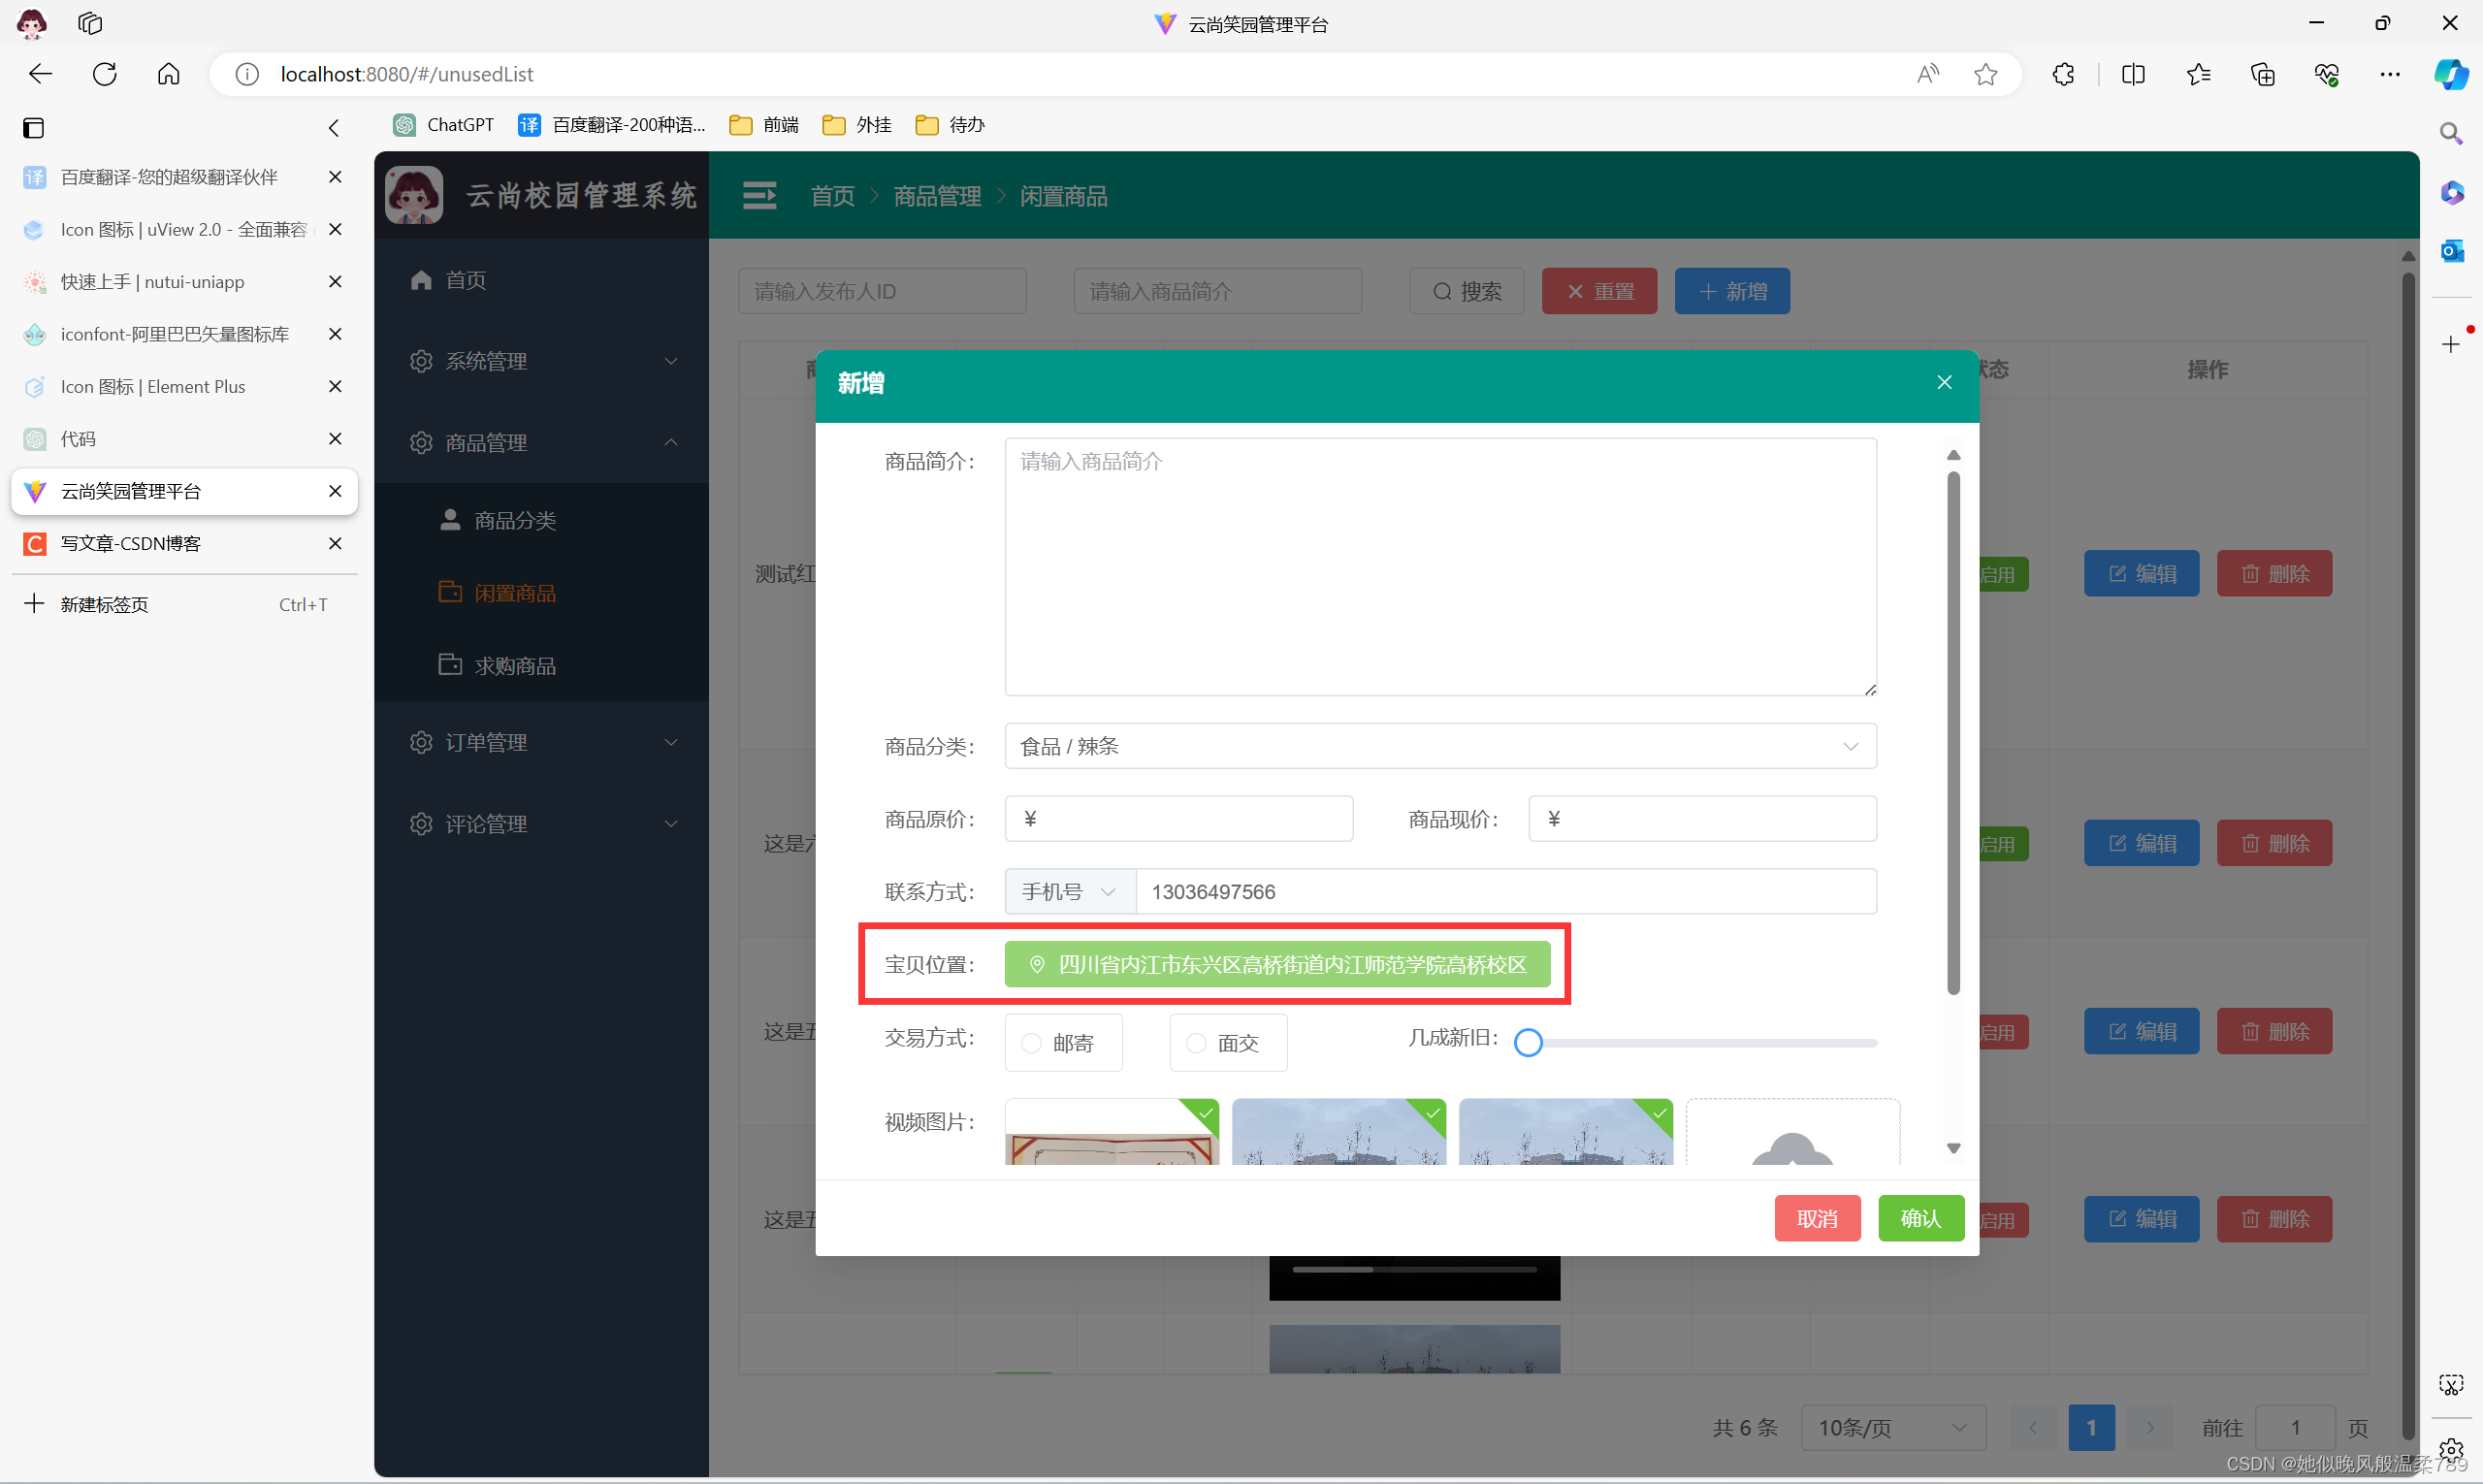
- 1、效果展示
- 2、实现代码
- 2.1 GaoDeMap.vue
- 2.2 SystemDialog.vue
- 2.3 UnusedList.vue.vue
1、效果展示

2、实现代码
2.1 GaoDeMap.vue
<template><div style="width: 100%;"><div class="search-box"><el-select v-model="address" clearable placeholder="请输入位置关键词" style="width: 240px;" :remote-method="remoteMethod"filterable remote @change="currentSelect" class="one-text" size="default"><el-option v-for="(item, index) in areaList" :key="index" :label="item.district + item.name":value="item.district + item.name"><span>{{ item.district }}</span> <span>{{ item.name }}</span></el-option></el-select><el-button type="success" v-if="addressGet" class="address">{{ addressGet.split(",")[0] }}</el-button></div><div id="container" class="map"></div></div>
</template><script setup>
import { reactive, ref, toRefs, onMounted, nextTick, defineProps, defineEmits } from 'vue';
import AMapLoader from "@amap/amap-jsapi-loader";
// 定义 props 和 emits
const emits = defineEmits(['address']);
const props = defineProps({addressClick: Function,
})
onMounted(() => {window._AMapSecurityConfig = {securityJsCode: '你的安全密钥', // https://console.amap.com/dev/key/app   绑定的服务为 Web端}initMap()
})
const addressGet = ref("")const state = reactive({map: null,placeSearch: null,autoComplete: null,marker: null,form: {address: '',lng: '',lat: '',},areaList: [],address: ''
})const { areaList, address } = toRefs(state)
function initMap(arr) {AMapLoader.load({key: "安全密钥左边的key的值",	// https://console.amap.com/dev/key/app   绑定的服务为 Web端version: "2.0",plugins: ["AMap.ToolBar", "AMap.ControlBar", 'AMap.AutoComplete', 'AMap.PlaceSearch', 'AMap.Geocoder', 'AMap.Marker', 'AMap.Geolocation'],}).then((AMap) => {state.map = new AMap.Map('container', {viewMode: "3D",  //  是否为3D地图模式zoom: 15,center: arr,resizeEnable: true});// 地图放大缩小插件let toolBar = new AMap.ToolBar({position: {top: '120px',right: '51px'}})// 3D地图插件let controlBar = new AMap.ControlBar({position: {top: '20px',right: '20px',},});state.geoCoder = new AMap.Geocoder({city: '010', //城市设为北京,默认:“全国”radius: 1000 //范围,默认:500});// 正向地理编码state.geocoder = new AMap.Geocoder({city: state.address})// 定位let geolocation = new AMap.Geolocation({enableHighAccuracy: true, // 是否使用高精度定位,默认:truetimeout: 10000, // 超过10秒后停止定位,默认:5sposition: {top: '300px',right: '30px',}, // 定位按钮的停靠位置buttonOffset: new AMap.Pixel(10, 20), // 定位按钮与设置的停靠位置的偏移量,默认:Pixel(10, 20)zoomToAccuracy: true, // 定位成功后是否自动调整地图视野到定位点});// 监听定位按钮的点击事件geolocation.on('complete', (result) => {console.log('定位成功:', result);// 处理定位成功的逻辑console.log(result.position.lng, result.position.lat);// 使用高德地图 JavaScript API 的坐标转换服务将 WGS84 坐标转换为 GCJ02 坐标AMap.convertFrom([result.position.lng, result.position.lat], 'gps', (status, result) => {if (status === 'complete' && result.locations.length > 0) {const gcj02Lng = result.locations[0].lng;const gcj02Lat = result.locations[0].lat;// 解析定位结果为中文地址let lnglat = [gcj02Lng, gcj02Lat];console.log(gcj02Lng, gcj02Lat);state.geoCoder.getAddress(lnglat, (status, addressResult) => {if (status === 'complete' && addressResult.regeocode) {let formattedAddress = addressResult.regeocode.formattedAddress;console.log('解析后的地址:', formattedAddress);// 在这里处理解析后的地址addressGet.value = formattedAddress;state.address = formattedAddress;// 返回给父组件的值emits("address", `${formattedAddress},${gcj02Lng},${gcj02Lat}`);}});// 这里可以继续处理转换后的坐标数据,例如显示标记点等} else {console.error('Coordinate conversion failed.');}});});geolocation.on('error', (error) => {console.error('定位失败:', error);// 处理定位失败的逻辑});state.autoComplete = new AMap.AutoComplete({ city: '全国' });state.map.setDefaultCursor("pointer"); // 使用CSS默认样式定义地图上的鼠标样式state.map.on('click', (e) => { // 点击地图事件if (!e && !e.lnglat) {return}state.form.lng = e.lnglat.lngstate.form.lat = e.lnglat.latremoveMarker() // 先删除地图上标记点setMapMarker() // 在添加新的标记点})state.map.addControl(toolBar);   // 添加右上角的放大缩小state.map.addControl(controlBar);   // 添加右上角的放大缩小state.map.addControl(geolocation);   // 添加右上角的放大缩小// 监听定位成功事件}).catch((e) => {console.error(e);  //加载错误提示}).finally(() => {removeMarker()setMapMarker()})}function setMapMarker() {if (state.form.lng == '' && state.form.lat == '') {return}state.map.setFitView()state.marker = new AMap.Marker({map: state.map,position: [state.form.lng, state.form.lat],})toGetAddress()state.map.setFitView()state.map.add(state.marker)
}function removeMarker() {if (state.marker) {state.map.remove(state.marker)}
}function toGetAddress() {let lnglat = [state.form.lng, state.form.lat]state.geoCoder.getAddress(lnglat, (status, result) => {if (status === 'complete' && result.regeocode) {props.addressClick(result, state.form.lng, state.form.lat) // 返回位置信息以及经纬度addressGet.value = `${result.regeocode.formattedAddress},${state.form.lng},${state.form.lat}`}})
}function remoteMethod(query) {if (query !== '') {setTimeout(() => {state.autoComplete.search(query, (status, result) => {state.areaList = result.tips})}, 500)} else {state.areaList = []}
}
function currentSelect(val) {if (!val) {return}toGetCoordinate(val)
}function toGetCoordinate(address) {state.geocoder.getLocation(address, function (status, result) {if (status === 'complete' && result.info === 'OK') {initMap([result.geocodes[0].location.lng, result.geocodes[0].location.lat])state.form.lng = result.geocodes[0].location.lngstate.form.lat = result.geocodes[0].location.latstate.form.address = `${result.geocodes[0].formattedAddress}`// 返回给父组件的值emits("address", `${result.geocodes[0].formattedAddress},${result.geocodes[0].location.lng},${result.geocodes[0].location.lat}`);}})nextTick(function () {removeMarker()setMapMarker()})
}function fixed(lng, lat) {initMap([lng, lat])state.form.lng = lngstate.form.lat = lat
}// 暴露方法
defineExpose({fixed,toGetCoordinate
});
</script><style scoped lang="scss">
.map {width: 100%;height: 400px;padding-top: 20px;
}#container {margin-top: 20px;border-radius: 5px;
}.search-box {display: flex;}.address {margin-left: 20px;
}
</style>
2.2 SystemDialog.vue
<!--* @Date: 2024-03-25 16:55:53* @LastEditors: zhong* @LastEditTime: 2024-04-18 11:21:23* @FilePath: \app-admin\src\components\SystemDialog\SystemDialog.vue
-->
<template><div><el-dialog :model-value="props.visible" :title="props.title" :width="props.width + 'px'":height="props.height + 'px'" :before-close="onClose" :close-on-click-modal="false"><!-- 内容显示区 --><div class="container" :style="{ height: height + 'px' }"><slot name="content"></slot></div><template #footer><div class="dialog-footer"><el-button @click="onClose" type="danger">取消</el-button><el-button type="success" @click="onConfirm">确认</el-button></div></template></el-dialog></div>
</template><script setup lang="ts">
// 定义弹窗数据类型
interface dialogProps {title: string,visible: boolean,width: number,height: number
}// 接收父组件传递的参数
const props = withDefaults(defineProps<dialogProps>(), {title: "新增",visible: false,width: 630,height: 280
})
// 注册事件
const emit = defineEmits(["onClose", "onConfirm"])// 关闭事件
const onClose = () => {emit("onClose");
}
// 提交事件
const onConfirm = () => {emit("onConfirm");
}
</script><style lang="scss" scoped>
.container {overflow-x: inherit;overflow-y: auto;
}:deep(.el-dialog) {padding: 0;border-top-left-radius: 7px !important;border-top-right-radius: 7px !important;.el-dialog__header {margin-right: 0px;padding-top: 10px;border-top-left-radius: 7px !important;border-top-right-radius: 7px !important;background-color: #009688 !important;.el-dialog__title {padding: 16px;color: #FFF;font-size: 16px;font-weight: 600;}}.el-dialog__headerbtn {.el-dialog__close {color: #FFF;}}.el-dialog__body {padding: 10px;}.el-dialog__footer {border-top: 1px solid #e8eaec !important;padding: 10px;}
}
</style>
2.3 UnusedList.vue.vue
<template><SystemDialog :title="name" :visible="mapOpen" :height="400" :width="800" @on-close="closeAddress" @on-confirm="commitAddress"><template v-slot:content><el-form-item label="宝贝位置"><GaoDeMap :addressClick="addressClick" ref="mapRef" @address="getAddress"></GaoDeMap></el-form-item></template></SystemDialog>
</template><script setup lang="ts">
import { onMounted, ref } from 'vue';
import SystemDialog from '@/components/SystemDialog/SystemDialog.vue';
import GaoDeMap from '@/components/Map/GaoDeMap.vue'const mapRef = ref('') as any
const name = ref("宝贝位置选取");
const mapOpen = ref(false)const address = ref("");
const getAddress = (data: string) => {if (data != "") {address.value = data;addGoodParm.address = data;}
}// 提交地图地址
const commitAddress = () => {// 提交地图地址addGoodParm.address = address.value;// 关闭地图mapOpen.value = false;console.log(address, addGoodParm.address);}// 关闭地图
const closeAddress = () => {addGoodParm.address = "";address.value = "";// 关闭地图mapOpen.value = false;
}
// 地图选位置
function addressClick(item: { regeocode: { addressComponent: { city: string; province: string; district: string; }; formattedAddress: string; }; }, lng: number, lat: number) {address.value = `${item.regeocode.formattedAddress}, ${lng}, ${lat}`;
}onMounted(() => {// 这里传后台获取的经纬度mapRef.value.fixed(100.179253, 27.096143)
})
</script>
这篇关于Vue3 + Element-Plus 对接高德地图实现搜索提示选址、点击地图选址、自我定位功能(最新)的文章就介绍到这儿,希望我们推荐的文章对编程师们有所帮助!


