本文主要是介绍Bentley二次开发教程16-元素管理-巩固练习,希望对大家解决编程问题提供一定的参考价值,需要的开发者们随着小编来一起学习吧!
该练习中的方法涉及到前两期的方法,主要步骤为:
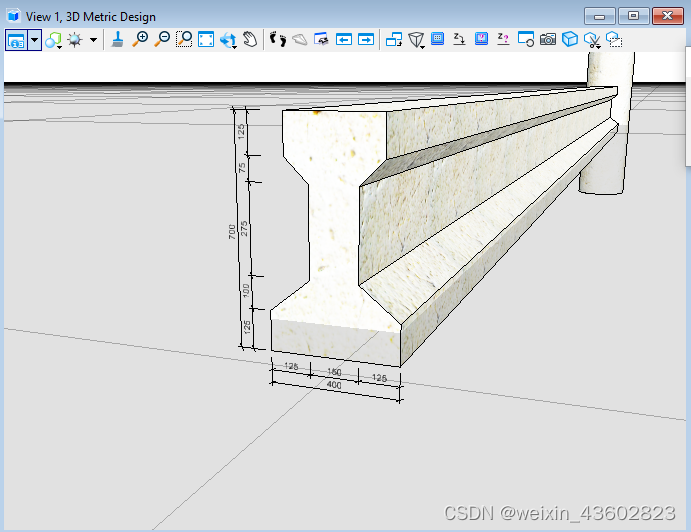
- 使用拉伸实体功能创建梁与圆柱并进行变换
- 对梁截面进行标注并进行变换
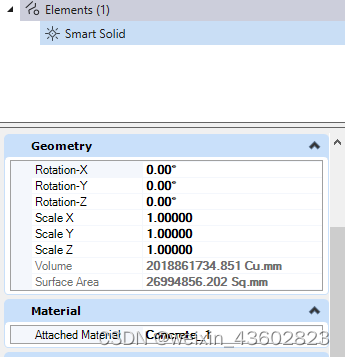
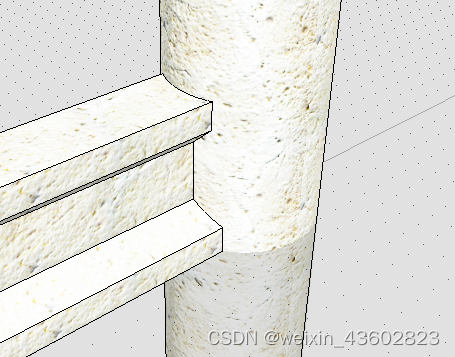
- 对梁与圆柱执行布尔运算
- 对实体进行材质附加
public static void CmdPracticeWork(string unparsed)
{DgnFile dgnFile = Session.Instance.GetActiveDgnFile();//获得当前激活的文件DgnModel dgnModel = Session.Instance.GetActiveDgnModel();//获取当前的模型空间double uorPerMeter = Session.Instance.GetActiveDgnModel().GetModelInfo().UorPerMeter;//分辨率单位转换为米#region Create beam#region Create profiledouble H = 700 * uorPerMeter/1000;double H1 = 125 * uorPerMeter / 1000, H2 = 125 * uorPerMeter / 1000;double H3 = 275 * uorPerMeter / 1000;double H4 = 75 * uorPerMeter / 1000, B4 = 75 * uorPerMeter / 1000;double H5 = 100 * uorPerMeter / 1000;double B3 = 125 * uorPerMeter / 1000;double B1 = 400 * uorPerMeter / 1000;double B2 = 300 * uorPerMeter / 1000;double B = 150 * uorPerMeter / 1000;DPoint3d p1 = new DPoint3d(-1 * 0.5 * B1, 0, 0);//声明体元素端点DPoint3d p2 = new DPoint3d(-1 * 0.5 * B1, 0, H2);DPoint3d p3 = new DPoint3d(-0.5 * B, 0, H2 + H5);DPoint3d p4 = new DPoint3d(-0.5 * B, 0, H2 + H5 + H3);DPoint3d p5 = new DPoint3d(-0.5 * B2, 0, H2 + H5 + H3 + H4);DPoint3d p6 = new DPoint3d(-0.5 * B2, 0, H);DPoint3d p7 = new DPoint3d(0.5 * B2, 0, H);DPoint3d p8 = new DPoint3d(0.5 * B2, 0, H2 + H5 + H3 + H4);DPoint3d p9 = new DPoint3d(0.5 * B, 0, H2 + H5 + H3);DPoint3d p10 = new DPoint3d(0.5 * B, 0, H2 + H5);DPoint3d p11 = new DPoint3d(0.5 * B1, 0, H2);DPoint3d p12 = new DPoint3d(0.5 * B1, 0, 0);DPoint3d[] pos = { p1, p2, p3, p4, p5, p6, p7, p8, p9, p10, p11, p12 };//将面元素端点添加到面元素端点数组中ShapeElement shape = new ShapeElement(dgnModel, null, pos);//声明形元素#endregionDPoint3d origin = DPoint3d.Zero;//声明拉伸基点DVector3d extrudeVector = new DVector3d(0, 12 * uorPerMeter, 0);//声明拉伸向量SurfaceOrSolidElement beamSolid = SurfaceOrSolidElement.CreateProjectionElement(dgnModel, null, shape, origin, extrudeVector, DTransform3d.Identity, true);//使用投影的方式声明拉伸体元素            #endregion#region Create dimensionDPoint3d d1 = new DPoint3d(-0.5 * B1, 0, -50 * uorPerMeter / 1000);//声明标注点DPoint3d d2 = new DPoint3d(0.5 * B1, 0, -50 * uorPerMeter / 1000);//声明标注点DPoint3d[] dimensionPos1 = { d1, d2 };//声明标注点数组DMatrix3d dMatrix1 = new DMatrix3d(-1, 0, 0, 0, 0, 1, 0, -1, 0);//声明变换矩阵DimensionElement dimEle1 = CreateDimensionElement(dgnFile, dgnModel, dimensionPos1, string.Empty, dMatrix1);//声明标注元素dimEle1.AddToModel();//将标注元素写入模型DPoint3d d3 = new DPoint3d(-0.5 * B1, 0, -10 * uorPerMeter / 1000);DPoint3d d4 = new DPoint3d(-0.5 * B, 0, -10 * uorPerMeter / 1000);DPoint3d d5 = new DPoint3d(0.5 * B, 0, -10 * uorPerMeter / 1000);DPoint3d d6 = new DPoint3d(0.5 * B1, 0, -10 * uorPerMeter / 1000);DPoint3d[] dimensionPos2 = { d3, d4, d5, d6 };DimensionElement dimEle2 = CreateDimensionElement(dgnFile, dgnModel, dimensionPos2, string.Empty, dMatrix1);dimEle2.AddToModel();//将标注元素写入模型DMatrix3d dMatrix2 = DMatrix3d.FromRows(new DVector3d(0, 1, 0), new DVector3d(-1, 0, 0), new DVector3d(0, 0, 1));DMatrix3d dMatrix = DMatrix3d.Multiply(dMatrix1, dMatrix2);DPoint3d d7 = new DPoint3d(-0.5 * B1 - 50 * uorPerMeter / 1000, 0, 0);DPoint3d d8 = new DPoint3d(-0.5 * B1 - 50 * uorPerMeter / 1000, 0, H);DPoint3d[] dimensionPos3 = { d7, d8 };DimensionElement dimEle3 = CreateDimensionElement(dgnFile, dgnModel, dimensionPos3, string.Empty, dMatrix);dimEle3.AddToModel();//将标注元素写入模型DPoint3d d9 = new DPoint3d(-0.5 * B1 - 10 * uorPerMeter / 1000, 0, 0);DPoint3d d10 = new DPoint3d(-0.5 * B1 - 10 * uorPerMeter / 1000, 0, H2);DPoint3d d11 = new DPoint3d(-0.5 * B1 - 10 * uorPerMeter / 1000, 0, H2 + H5);DPoint3d d12 = new DPoint3d(-0.5 * B1 - 10 * uorPerMeter / 1000, 0, H2 + H5 + H3);DPoint3d d13 = new DPoint3d(-0.5 * B1 - 10 * uorPerMeter / 1000, 0, H2 + H5 + H3 + H4);DPoint3d d14 = new DPoint3d(-0.5 * B1 - 10 * uorPerMeter / 1000, 0, H);DPoint3d[] dimensionPos4 = { d9, d10, d11, d12, d13, d14 };DimensionElement dimEle4 = CreateDimensionElement(dgnFile, dgnModel, dimensionPos4, string.Empty, dMatrix);dimEle4.AddToModel();//将标注元素写入模型#endregion#region Create columnEllipseElement ellipse = new EllipseElement(dgnModel,null, DPoint3d.Zero,350*uorPerMeter/1000, 350 * uorPerMeter / 1000,DMatrix3d.Identity);DVector3d columnVector = new DVector3d(0, 0, 3 * uorPerMeter);//声明拉伸向量SurfaceOrSolidElement columnSolid = SurfaceOrSolidElement.CreateProjectionElement(dgnModel, null, ellipse, DPoint3d.Zero, columnVector, DTransform3d.Identity, true);//使用投影的方式声明拉伸体元素            DTransform3d dTransform3D= DTransform3d.FromTranslation(new DPoint3d(0,12*uorPerMeter,-1*uorPerMeter));//声明变换几何,执行元素平移操作TransformInfo trans = new TransformInfo(dTransform3D);//声明变换信息columnSolid.ApplyTransform(trans);//对拉伸圆柱体施加变换信息#endregion#region BooleanSubtractConvert1.ElementToBody(out SolidKernelEntity entity1, beamSolid, true, false, false);//将实体转成SolidKernelEntityConvert1.ElementToBody(out SolidKernelEntity entity2, columnSolid, true, false, false);//将圆台实体元素转成SolidKernelEntitySolidKernelEntity[] entities = { entity2 };//声明实核实体集Modify.BooleanSubtract(ref entity1, ref entities, entities.Count());//用实核实体集中的实体与实体进行布尔减运算Convert1.BodyToElement(out Element resultElem, entity1, null, dgnModel);//将结果转换为元素#endregion#region Attach materialMaterialId id = FindMaterial(dgnFile, dgnModel);AttachMaterialToElement(id, resultElem);AttachMaterialToElement(id, columnSolid);#endregion
}
代码中用到的几个方法:
private static void AttachMaterialToElement(MaterialId id, Element elem)
{            if (id != null){MaterialPropertiesExtension propertiesExtension = MaterialPropertiesExtension.GetAsMaterialPropertiesExtension((DisplayableElement)elem);//为拉伸实体元素设置材料属性            propertiesExtension.AddMaterialAttachment(id);//添加嵌入的材料信息propertiesExtension.StoresAttachmentInfo(id);//保存拉伸实体元素的材料信息           propertiesExtension.AddToModel();//将拉伸实体写入模型}
}private static MaterialId FindMaterial(DgnFile dgnFile, DgnModel dgnModel)
{MaterialTable matTbl = new MaterialTable(dgnFile);//声明材料表matTbl.Name = "MyMaterialTable";//声明材料表名称PaletteInfo[] palInfo = MaterialManager.GetPalettesInSearchPath("MS_MATERIAL");//从MS_MATERIAL的环境变量声明路径下读取材料图表if (palInfo.Length < 1)//判断是否获取到材料图表{MessageCenter.Instance.ShowInfoMessage("Can't get palette", null, true);//输出错误信息return null;//返回}for (int i = 0; i < palInfo.Count(); i++)//遍历材料图表{if (palInfo[i].Name == "Concrete&Pavers")//判断材料图表是否名为Concrete&Pavers{matTbl.AddPalette(palInfo[i]);//添加材料图表至材料表break;//跳出循环}else if (i == palInfo.Count() - 1)//若未找到名为lightwidgets的材料图表{MessageCenter.Instance.ShowErrorMessage("Can't find material lib named lightwidgets, please check","Can't find material lib named lightwidgets, please check",true);//输出错误信息}}MaterialManager.SetActiveTable(matTbl, dgnModel);//设置当前材料表为激活图表MaterialManager.SaveTable(matTbl);//保存材料表MaterialId id = new MaterialId("Concrete_1");//查找名为Concrete_1的材料return id;
}
这篇关于Bentley二次开发教程16-元素管理-巩固练习的文章就介绍到这儿,希望我们推荐的文章对编程师们有所帮助!


