本文主要是介绍6、Lagent AgentLego 智能体应用搭建(homework),希望对大家解决编程问题提供一定的参考价值,需要的开发者们随着小编来一起学习吧!
基础作业
- 完成 Lagent Web Demo 使用,并在作业中上传截图。文档可见 Lagent Web Demo
0 环境准备
conda create -n agent
conda activate agent
conda install python=3.10
conda install pytorch==2.1.2 torchvision==0.16.2 torchaudio==2.1.2 pytorch-cuda=11.8 -c pytorch -c nvidia##  安装 Lagent 和 AgentLego
cd /root/agent
conda activate agent
git clone https://gitee.com/internlm/lagent.git
cd lagent && git checkout 581d9fb && pip install -e . && cd ..
git clone https://gitee.com/internlm/agentlego.git
cd agentlego && git checkout 7769e0d && pip install -e . && cd ..
1 使用 LMDeploy 部署
由于 Lagent 的 Web Demo 需要用到 LMDeploy 所启动的 api_server,因此我们首先按照下图指示在 vscode terminal 中执行如下代码使用 LMDeploy 启动一个 api_server。
conda activate agent
lmdeploy serve api_server /root/share/new_models/Shanghai_AI_Laboratory/internlm2-chat-7b \--server-name 127.0.0.1 \--model-name internlm2-chat-7b \--cache-max-entry-count 0.1## 启动并使用 Lagent Web Demo
cd /root/agent/lagent/examples
streamlit run internlm2_agent_web_demo.py --server.address 127.0.0.1 --server.port 7860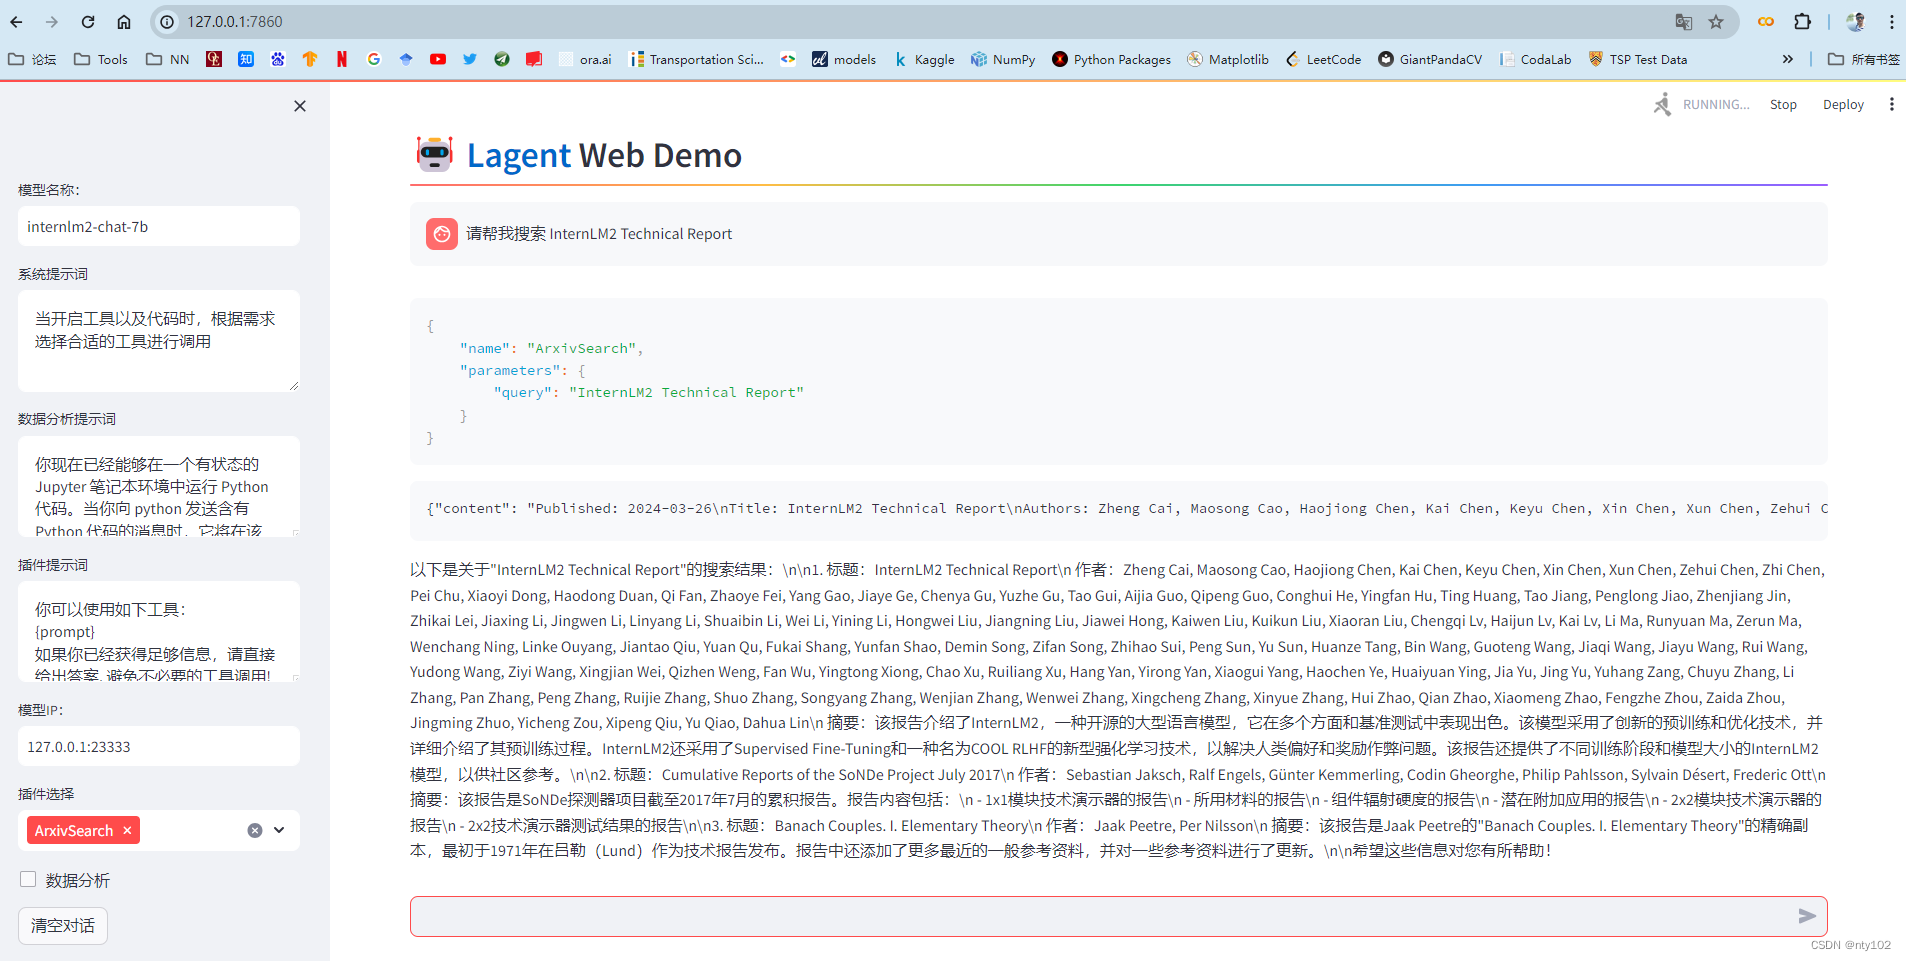
- 完成 AgentLego 直接使用部分,并在作业中上传截图。文档可见 直接使用 AgentLego。
由于 AgentLego 在安装时并不会安装某个特定工具的依赖,因此我们接下来准备安装目标检测工具运行时所需依赖。
AgentLego 所实现的目标检测工具是基于 mmdet (MMDetection) 算法库中的 RTMDet-Large 模型,因此我们首先安装 mim,然后通过 mim 工具来安装 mmdet。这一步所需时间可能会较长,请耐心等待。
conda activate agent
pip install openmim==0.3.9
mim install mmdet==3.3.0
然后通过 touch /root/agent/direct_use.py(大小写敏感)的方式在 /root/agent 目录下新建 direct_use.py 以直接使用目标检测工具,direct_use.py 的代码如下:
import reimport cv2
from agentlego.apis import load_tool# load tool
tool = load_tool('ObjectDetection', device='cuda')# apply tool
visualization = tool('/root/agent/road.jpg')
print(visualization)# visualize
image = cv2.imread('/root/agent/road.jpg')preds = visualization.split('\n')
pattern = r'(\w+) \((\d+), (\d+), (\d+), (\d+)\), score (\d+)'for pred in preds:name, x1, y1, x2, y2, score = re.match(pattern, pred).groups()x1, y1, x2, y2, score = int(x1), int(y1), int(x2), int(y2), int(score)cv2.rectangle(image, (x1, y1), (x2, y2), (0, 255, 0), 1)cv2.putText(image, f'{name} {score}', (x1, y1), cv2.FONT_HERSHEY_SIMPLEX, 0.8, (0, 255, 0), 1)cv2.imwrite('/root/agent/road_detection_direct.jpg', image)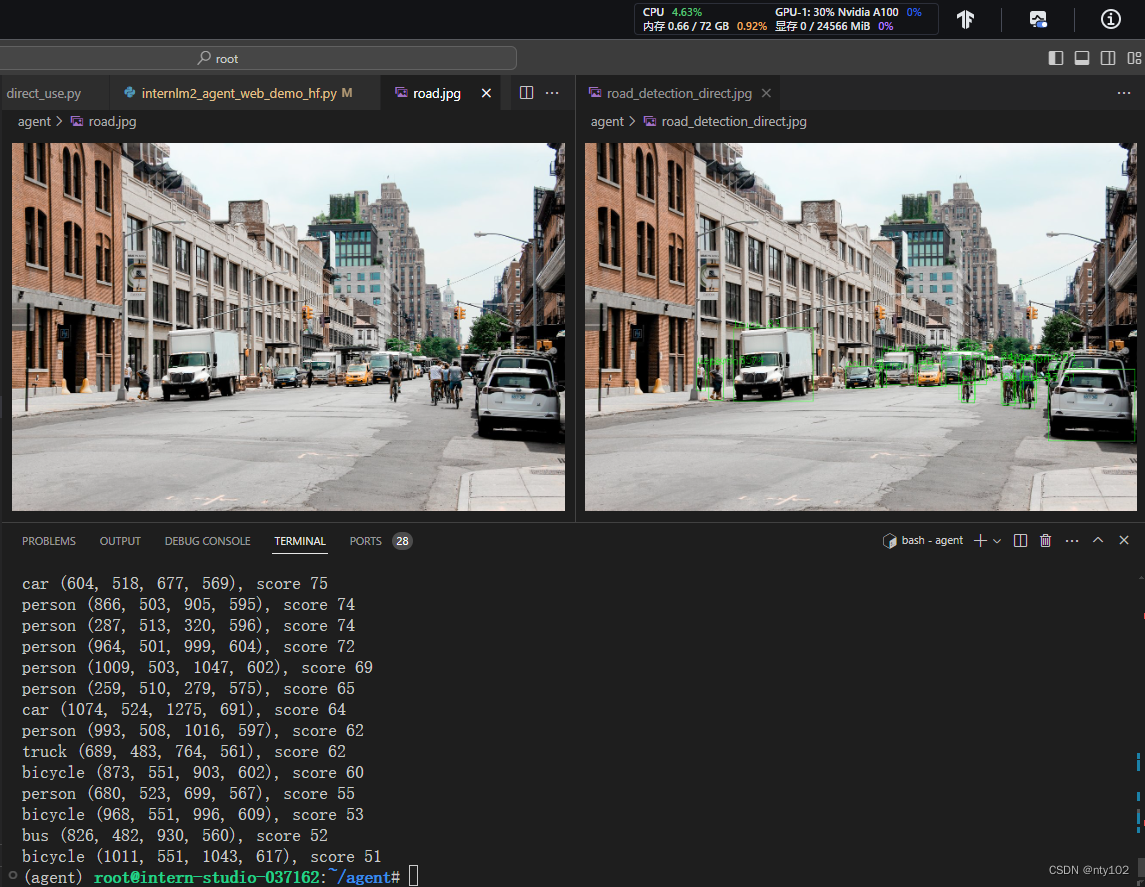
进阶作业
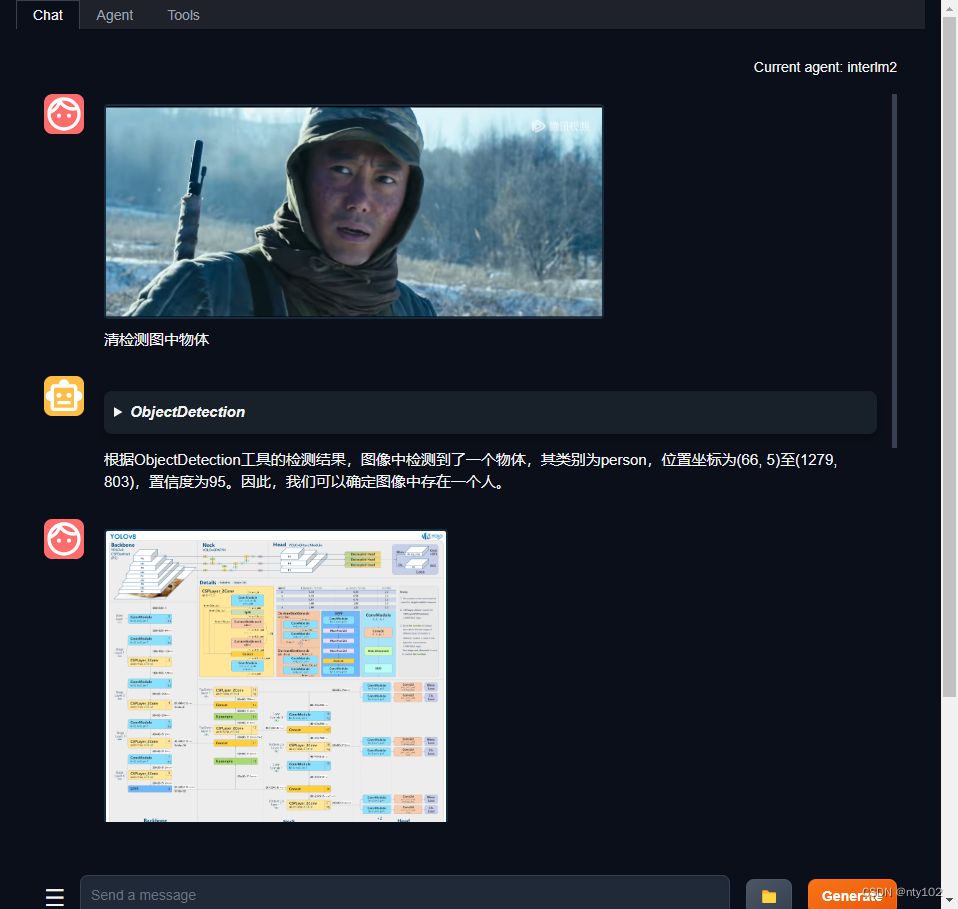
- 完成 AgentLego WebUI 使用,并在作业中上传截图。文档可见 AgentLego WebUI。
- 使用 Lagent 或 AgentLego 实现自定义工具并完成调用,并在作业中上传截图。文档可见:
- 用 Lagent 自定义工具
1 创建工具文件
首先通过 touch /root/agent/lagent/lagent/actions/weather.py(大小写敏感)新建工具文件,该文件内容如下:
import json
import os
import requests
from typing import Optional, Typefrom lagent.actions.base_action import BaseAction, tool_api
from lagent.actions.parser import BaseParser, JsonParser
from lagent.schema import ActionReturn, ActionStatusCodeclass WeatherQuery(BaseAction):"""Weather plugin for querying weather information."""def __init__(self,key: Optional[str] = None,description: Optional[dict] = None,parser: Type[BaseParser] = JsonParser,enable: bool = True) -> None:super().__init__(description, parser, enable)key = os.environ.get('WEATHER_API_KEY', key)if key is None:raise ValueError('Please set Weather API key either in the environment ''as WEATHER_API_KEY or pass it as `key`')self.key = keyself.location_query_url = 'https://geoapi.qweather.com/v2/city/lookup'self.weather_query_url = 'https://devapi.qweather.com/v7/weather/now'@tool_apidef run(self, query: str) -> ActionReturn:"""一个天气查询API。可以根据城市名查询天气信息。Args:query (:class:`str`): The city name to query."""tool_return = ActionReturn(type=self.name)status_code, response = self._search(query)if status_code == -1:tool_return.errmsg = responsetool_return.state = ActionStatusCode.HTTP_ERRORelif status_code == 200:parsed_res = self._parse_results(response)tool_return.result = [dict(type='text', content=str(parsed_res))]tool_return.state = ActionStatusCode.SUCCESSelse:tool_return.errmsg = str(status_code)tool_return.state = ActionStatusCode.API_ERRORreturn tool_returndef _parse_results(self, results: dict) -> str:"""Parse the weather results from QWeather API.Args:results (dict): The weather content from QWeather APIin json format.Returns:str: The parsed weather results."""now = results['now']data = [f'数据观测时间: {now["obsTime"]}',f'温度: {now["temp"]}°C',f'体感温度: {now["feelsLike"]}°C',f'天气: {now["text"]}',f'风向: {now["windDir"]},角度为 {now["wind360"]}°',f'风力等级: {now["windScale"]},风速为 {now["windSpeed"]} km/h',f'相对湿度: {now["humidity"]}',f'当前小时累计降水量: {now["precip"]} mm',f'大气压强: {now["pressure"]} 百帕',f'能见度: {now["vis"]} km',]return '\n'.join(data)def _search(self, query: str):# get city_codetry:city_code_response = requests.get(self.location_query_url,params={'key': self.key, 'location': query})except Exception as e:return -1, str(e)if city_code_response.status_code != 200:return city_code_response.status_code, city_code_response.json()city_code_response = city_code_response.json()if len(city_code_response['location']) == 0:return -1, '未查询到城市'city_code = city_code_response['location'][0]['id']# get weathertry:weather_response = requests.get(self.weather_query_url,params={'key': self.key, 'location': city_code})except Exception as e:return -1, str(e)return weather_response.status_code, weather_response.json()
2 获取 API KEY
conda activate agent
lmdeploy serve api_server /root/share/new_models/Shanghai_AI_Laboratory/internlm2-chat-7b \--server-name 127.0.0.1 \--model-name internlm2-chat-7b \--cache-max-entry-count 0.1export WEATHER_API_KEY=在2.2节获取的API KEY
# 比如 export WEATHER_API_KEY=1234567890abcdef
conda activate agent
cd /root/agent/Tutorial/agent
streamlit run internlm2_weather_web_demo.py --server.address 127.0.0.1 --server.port 7860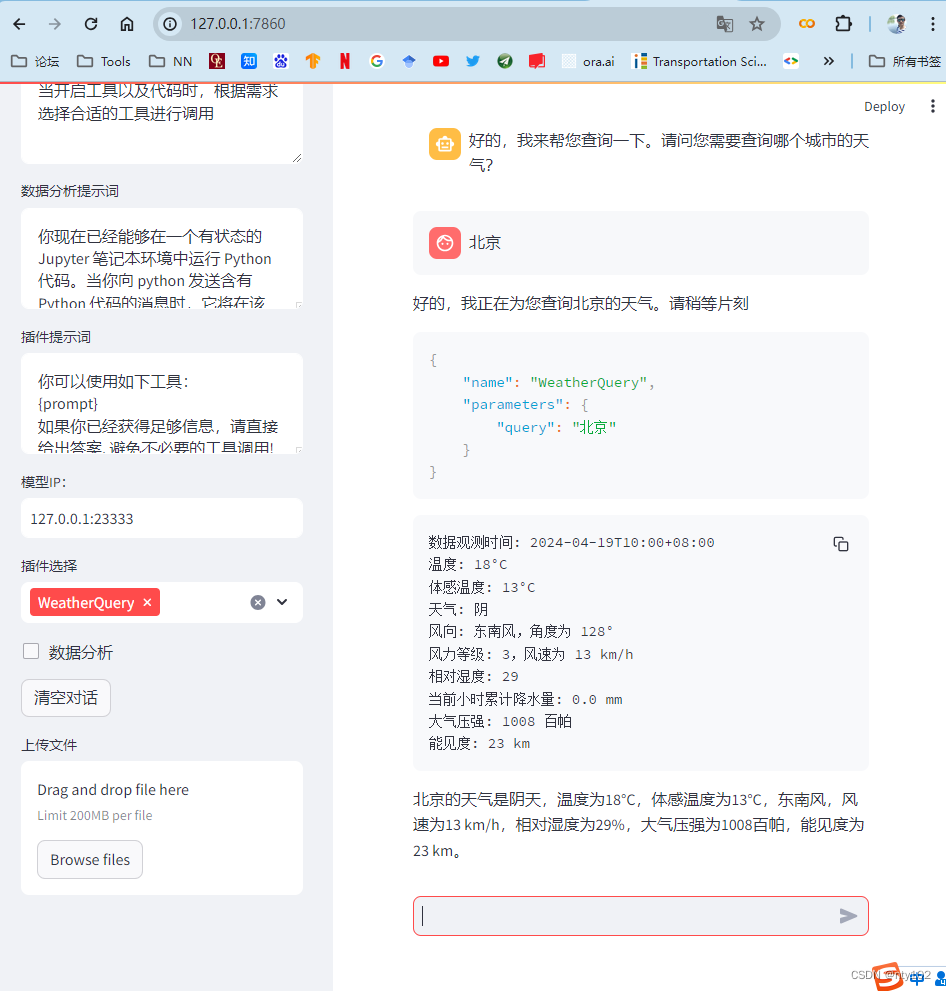
- 用 AgentLego 自定义工具
AgentLego 在这方面提供了较为详尽的文档,文档地址为 自定义工具 — AgentLego 0.2.0 文档 。自定义工具主要分为以下几步:
- 继承 BaseTool 类
- 修改 default_desc 属性(工具功能描述)
- 如有需要,重载 setup 方法(重型模块延迟加载)
- 重载 apply 方法(工具功能实现)
其中第一二四步是必须的步骤。下面我们将实现一个调用 MagicMaker 的 API 以实现图像生成的工具。
首先通过 touch /root/agent/agentlego/agentlego/tools/magicmaker_image_generation.py(大小写敏感)的方法新建工具文件。该文件的内容如下:
import json
import requestsimport numpy as npfrom agentlego.types import Annotated, ImageIO, Info
from agentlego.utils import require
from .base import BaseToolclass MagicMakerImageGeneration(BaseTool):default_desc = ('This tool can call the api of magicmaker to ''generate an image according to the given keywords.')styles_option = ['dongman',  # 动漫'guofeng',  # 国风'xieshi',   # 写实'youhua',   # 油画'manghe',   # 盲盒]aspect_ratio_options = ['16:9', '4:3', '3:2', '1:1','2:3', '3:4', '9:16']@require('opencv-python')def __init__(self,style='guofeng',aspect_ratio='4:3'):super().__init__()if style in self.styles_option:self.style = styleelse:raise ValueError(f'The style must be one of {self.styles_option}')if aspect_ratio in self.aspect_ratio_options:self.aspect_ratio = aspect_ratioelse:raise ValueError(f'The aspect ratio must be one of {aspect_ratio}')def apply(self,keywords: Annotated[str,Info('A series of Chinese keywords separated by comma.')]) -> ImageIO:import cv2response = requests.post(url='https://magicmaker.openxlab.org.cn/gw/edit-anything/api/v1/bff/sd/generate',data=json.dumps({"official": True,"prompt": keywords,"style": self.style,"poseT": False,"aspectRatio": self.aspect_ratio}),headers={'content-type': 'application/json'})image_url = response.json()['data']['imgUrl']image_response = requests.get(image_url)image = cv2.imdecode(np.frombuffer(image_response.content, np.uint8), cv2.IMREAD_COLOR)return ImageIO(image)
接下来修改 /root/AgentLego/agentlego/agentlego/tools/__init__.py 文件,将我们的工具注册在工具列表中。如下所示,我们将 MagicMakerImageGeneration 通过 from .magicmaker_image_generation import MagicMakerImageGeneration 导入到了文件中,并且将其加入了 __all__ 列表中。
from .base import BaseTool
from .calculator import Calculator
from .func import make_tool
from .image_canny import CannyTextToImage, ImageToCanny
from .image_depth import DepthTextToImage, ImageToDepth
from .image_editing import ImageExpansion, ImageStylization, ObjectRemove, ObjectReplace
from .image_pose import HumanBodyPose, HumanFaceLandmark, PoseToImage
from .image_scribble import ImageToScribble, ScribbleTextToImage
from .image_text import ImageDescription, TextToImage
from .imagebind import AudioImageToImage, AudioTextToImage, AudioToImage, ThermalToImage
from .object_detection import ObjectDetection, TextToBbox
from .ocr import OCR
from .scholar import *  # noqa: F401, F403
from .search import BingSearch, GoogleSearch
from .segmentation import SegmentAnything, SegmentObject, SemanticSegmentation
from .speech_text import SpeechToText, TextToSpeech
from .translation import Translation
from .vqa import VQA
+ from .magicmaker_image_generation import MagicMakerImageGeneration__all__ = ['CannyTextToImage', 'ImageToCanny', 'DepthTextToImage', 'ImageToDepth','ImageExpansion', 'ObjectRemove', 'ObjectReplace', 'HumanFaceLandmark','HumanBodyPose', 'PoseToImage', 'ImageToScribble', 'ScribbleTextToImage','ImageDescription', 'TextToImage', 'VQA', 'ObjectDetection', 'TextToBbox', 'OCR','SegmentObject', 'SegmentAnything', 'SemanticSegmentation', 'ImageStylization','AudioToImage', 'ThermalToImage', 'AudioImageToImage', 'AudioTextToImage','SpeechToText', 'TextToSpeech', 'Translation', 'GoogleSearch', 'Calculator',
-     'BaseTool', 'make_tool', 'BingSearch'
+     'BaseTool', 'make_tool', 'BingSearch', 'MagicMakerImageGeneration'
]
运行
cd /root/agent/agentlego/webui
python one_click.py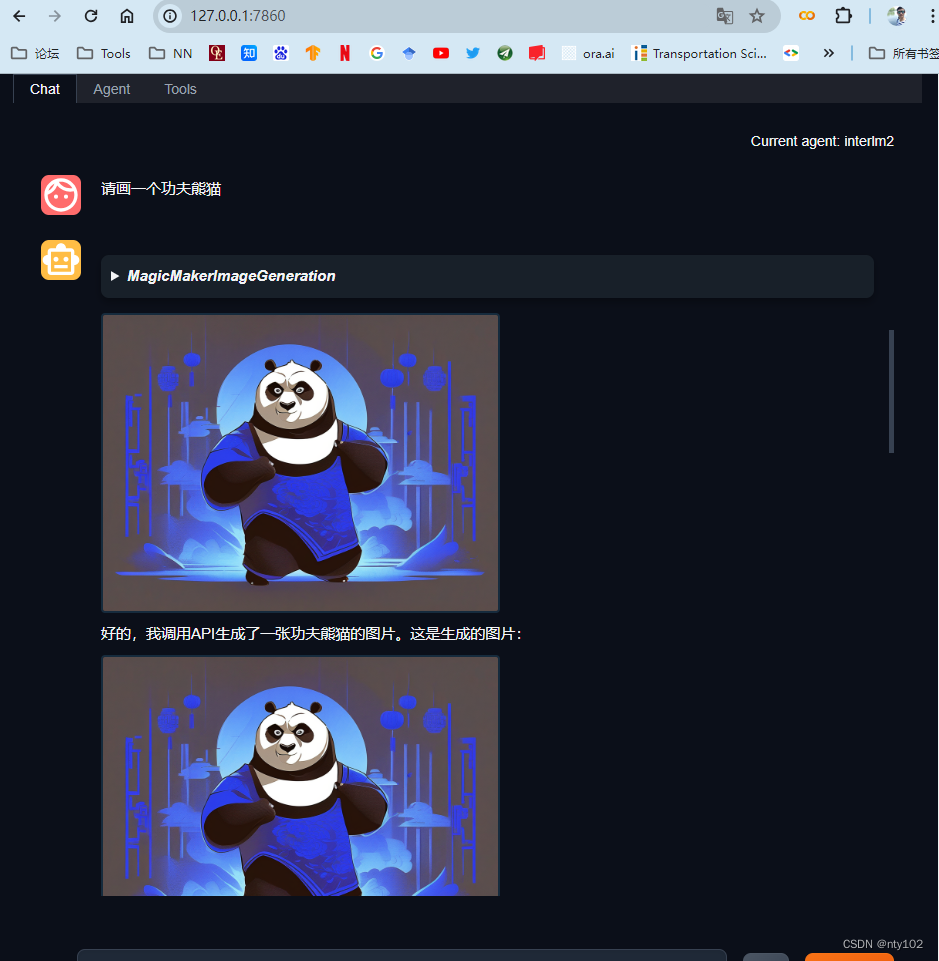
这篇关于6、Lagent AgentLego 智能体应用搭建(homework)的文章就介绍到这儿,希望我们推荐的文章对编程师们有所帮助!


