本文主要是介绍or1200下Raw-OS学习(任务篇),希望对大家解决编程问题提供一定的参考价值,需要的开发者们随着小编来一起学习吧!
这次就来说说基于上一节介绍的系统框图去建立我们所需要的任务,顺便学习Raw-OS提供的API,根据上节的分析,对于Slave Board有如下设计:
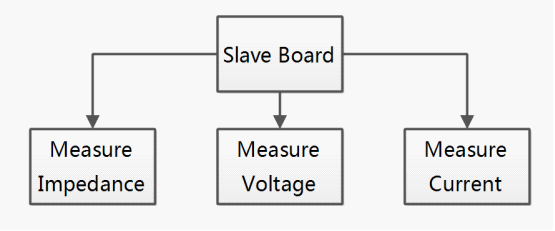
Slave Board有三个任务,分别负责测试阻抗,电压,电流功能,至于底层实现先不管,先把任务框架设计出来~
对于任务相关的操作,Raw-OS提供一组API操作,用到什么解释什么,说多了都是泪~
首先建立任务用到的API是raw_task_create,详细的解释见下文~
/*
************************************************************************************************************************
*                                         Create a task
*
* Description: This function is called to create a task.
*
* Arguments  : task_obj      is a pointer to the  RAW_TASK_OBJ.
*               	------
*              	task_name  	is a string name assigned to a task
*			------
*			task_arg   is an argument passing to task
*			------
*			task_prio   is a priority to task, smalled priority is higher priority
*			 -------
*			time_slice  is run time slice tick to task, assign to 0 means it will accept default slice time
*			-------
*			task_stack_base is a low address of memory
*			------
*			stack_size is the number of stack elements of this task
*			------
*			task_entry is the entry of this task
*			 ------
*			auto_start is the flag to activate task:
*			         							RAW_AUTO_START	1
*				                                                RAW_DONT_START	0
*
* Returns    :		RAW_IDLE_EXIT   the idle priority should only be created once.
*        			 -----
*        			 RAW_OS_STOPPED  raw os has not been started yet
*        			 -----
*        			 RAW_SUCCESS  raw os return success.
*
* Note(s)    :
*
*
************************************************************************************************************************
*/
#if (CONFIG_RAW_TASK_CREATE > 0)RAW_U16 raw_task_create(RAW_TASK_OBJ  *task_obj, RAW_U8  *task_name,  RAW_VOID   *task_arg, RAW_U8  task_prio,  RAW_U32  time_slice,  PORT_STACK  *task_stack_base, RAW_U32 stack_size, RAW_TASK_ENTRY task_entry, RAW_U8 auto_start)
首先,建立任务所需要的参数,包括:任务优先级,任务堆栈,任务对象,任务时间片~
/* tasks parameters */
#define IMPEDANCE_PRIO	10
#define IMPEDANCE_SLICE	100#define VOLTAGE_PRIO	10
#define VOLTAGE_SLICE	100#define CURRENT_PRIO	10
#define CURRENT_SLICE	100/* task stack */
PORT_STACK impedance_stack[TASK_STK_SIZE];
PORT_STACK voltage_stack[TASK_STK_SIZE];
PORT_STACK current_stack[TASK_STK_SIZE];/* task instance */
RAW_TASK_OBJ taskMeasureImpedance_obj;
RAW_TASK_OBJ taskMeasureVoltage_obj;
RAW_TASK_OBJ taskMeasureCurrent_obj;
那么,首先建立slave_board.c把slave_board的任务建立好~3个任务~
/* taskMeasureImpedance function */
void taskMeasureImpedance(void *pParam){/* taskMeasureImpedance loop */while(1){}
}/* taskMeasureVoltage function */
void taskMeasureVoltage(void *pParam){/* taskMeasureVoltage loop */while(1){}
}/* taskMeasureCurrent function */
void taskMeasureCurrent(void *pParam){/* taskMeasureCurrent loop */while(1){}
}
顺利建立好3个任务之后,封装到到一个专门负责slave任务建立的函数中~
int slaveTaskInit(void){RAW_U32 resultImpedance = -1;RAW_U32 resultVoltage = -1;RAW_U32 resultCurrent = -1;raw_printk("\n");raw_printk("====== Slave Board Tasks Setup ======\n");/* Creat taskMeasureImpedance */resultImpedance = raw_task_create(&taskMeasureImpedance_obj, "taskMeasureImpedance", NULL, IMPEDANCE_PRIO, IMPEDANCE_SLICE, impedance_stack, TASK_STK_SIZE, taskMeasureImpedance, 0);if(resultImpedance == RAW_OS_STOPPED){raw_printk("creat taskMeasureImpedance successful ...\n");}else{raw_printk("creat taskMeasureImpedance faild with error code : %x ... \n", resultImpedance);RAW_ASSERT(0)}	/* Creat taskMeasureVoltage */resultVoltage = raw_task_create(&taskMeasureVoltage_obj, "taskMeasureVoltage", NULL, VOLTAGE_PRIO, VOLTAGE_SLICE, voltage_stack, TASK_STK_SIZE, taskMeasureVoltage, 0);if(resultVoltage == RAW_OS_STOPPED){raw_printk("creat taskMeasureVoltage successful ...\n");}else{raw_printk("creat taskMeasureVoltage faild with error code : %x ... \n", resultVoltage);RAW_ASSERT(0)}/* Creat taskMeasureCurrent */resultCurrent = raw_task_create(&taskMeasureCurrent_obj, "taskMeasureCurrent", NULL, CURRENT_PRIO, CURRENT_SLICE, current_stack, TASK_STK_SIZE, taskMeasureCurrent, 0);if(resultCurrent == RAW_OS_STOPPED){raw_printk("creat taskMeasureCurrent successful ...\n");}else{raw_printk("creat taskMeasureCurrent faild with error code : %x ... \n", resultCurrent);RAW_ASSERT(0)}raw_printk("\n");return 0;
}
对于master board也有相似的过程~建立master board任务如下:
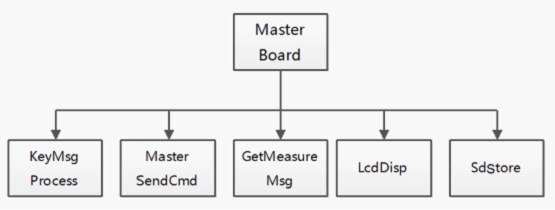
对应slave board任务建立的过程,编写master board任务,并且最后封装到负责master任务建立的函数~
#include "application.h"#define TASK_STK_SIZE 512/* tasks parameters */
#define KEY_MSG_PROCESS_PRIO	10
#define KEY_MSG_PROCESS_SLICE	100#define MASTER_SEND_CMD_PRIO	10
#define MASTER_SEND_CMD_SLICE	100#define GET_MEASURE_MSG_PRIO	10
#define GET_MEASURE_MSG_SLICE	100#define LCD_DISP_PRIO	10
#define LCD_DISP_SLICE	100#define SD_STORE_PRIO	10
#define SD_STORE_SLICE	100/* task stack */
PORT_STACK key_msg_process_stack[TASK_STK_SIZE];
PORT_STACK master_send_cmd_stack[TASK_STK_SIZE];
PORT_STACK get_measure_msg_stack[TASK_STK_SIZE];
PORT_STACK lcd_disp_stack[TASK_STK_SIZE];
PORT_STACK sd_store_stack[TASK_STK_SIZE];/* task instance */
RAW_TASK_OBJ taskKeyMsgProcess_obj;
RAW_TASK_OBJ taskMasterSendCmd_obj;
RAW_TASK_OBJ taskGetMeasureMsg_obj;
RAW_TASK_OBJ taskLcdDisp_obj;
RAW_TASK_OBJ taskSdStore_obj;/* taskKeyMsgProcess function */
void taskKeyMsgProcess(void *pParam){/* taskKeyMsgProcess loop */while(1){}
}/* taskMasterSendCmd function */
void taskMasterSendCmd(void *pParam){/* taskMasterSendCmd loop */while(1){}
}/* taskGetMeasureMsg function */
void taskGetMeasureMsg(void *pParam){/* taskGetMeasureMsg loop */while(1){}
}/* taskLcdDisp function */
void taskLcdDisp(void *pParam){/* taskLcdDisp loop */while(1){}
}/* taskSdStore function */
void taskSdStore(void *pParam){/* taskSdStore loop */while(1){}
}int masterTaskInit(void){RAW_U32 resultKeyMsgProcess = -1;RAW_U32 resultMasterSendCmd = -1;RAW_U32 resultGetMeasureMsg = -1;RAW_U32 LcdDisp = -1;RAW_U32 SdStore = -1;raw_printk("\n");raw_printk("====== Master Board Tasks Setup ======\n");/* Creat KeyMsgProcess */resultKeyMsgProcess = raw_task_create(&taskKeyMsgProcess_obj, "taskKeyMsgProcess", NULL, KEY_MSG_PROCESS_PRIO, KEY_MSG_PROCESS_SLICE, key_msg_process_stack, TASK_STK_SIZE, taskKeyMsgProcess, 0);if(resultKeyMsgProcess == RAW_OS_STOPPED){raw_printk("creat KeyMsgProcess successful ...\n");}else{raw_printk("creat KeyMsgProcess faild with error code : %x ... \n", resultKeyMsgProcess);RAW_ASSERT(0)}	/* Creat MasterSendCmd */resultMasterSendCmd = raw_task_create(&taskMasterSendCmd_obj, "taskMasterSendCmd", NULL, MASTER_SEND_CMD_PRIO, MASTER_SEND_CMD_SLICE, master_send_cmd_stack, TASK_STK_SIZE, taskMasterSendCmd, 0);if(resultMasterSendCmd == RAW_OS_STOPPED){raw_printk("creat taskMasterSendCmd successful ...\n");}else{raw_printk("creat taskMasterSendCmd faild with error code : %x ... \n", resultMasterSendCmd);RAW_ASSERT(0)}/* Creat taskGetMeasureMsg */resultGetMeasureMsg = raw_task_create(&taskGetMeasureMsg_obj, "taskGetMeasureMsg", NULL, GET_MEASURE_MSG_PRIO, GET_MEASURE_MSG_SLICE, get_measure_msg_stack, TASK_STK_SIZE, taskGetMeasureMsg, 0);if(resultGetMeasureMsg == RAW_OS_STOPPED){raw_printk("creat taskGetMeasureMsg successful ...\n");}else{raw_printk("creat taskGetMeasureMsg faild with error code : %x ... \n", resultGetMeasureMsg);RAW_ASSERT(0)}/* Creat taskLcdDisp */LcdDisp = raw_task_create(&taskLcdDisp_obj, "taskLcdDisp", NULL, LCD_DISP_PRIO, LCD_DISP_SLICE, lcd_disp_stack, TASK_STK_SIZE, taskLcdDisp, 0);if(LcdDisp == RAW_OS_STOPPED){raw_printk("creat taskLcdDisp successful ...\n");}else{raw_printk("creat taskLcdDisp faild with error code : %x ... \n", LcdDisp);RAW_ASSERT(0)}/* Creat taskSdStore */SdStore = raw_task_create(&taskSdStore_obj, "taskSdStore", NULL, SD_STORE_PRIO, SD_STORE_SLICE, sd_store_stack, TASK_STK_SIZE, taskSdStore, 0);if(SdStore == RAW_OS_STOPPED){raw_printk("creat taskSdStore successful ...\n");}else{raw_printk("creat taskSdStore faild with error code : %x ... \n", SdStore);RAW_ASSERT(0)}raw_printk("\n");return 0;
}
好了,到此结束了,这次先把任务建立起来,可以下载Raw-OS的kernel看看任务头文件还有那些函数可用,先熟悉熟悉,至于编程练习,可以自行试试,至少一半的函数都用用。
/* 	2012-4  Created by jorya_txj*	xxxxxx   please added here*/#ifndef RAW_TASK_H
#define RAW_TASK_Htypedef  RAW_VOID    (*RAW_TASK_ENTRY)(RAW_VOID *p_arg);RAW_U16 raw_task_create(RAW_TASK_OBJ  *task_obj, RAW_U8  *task_name,  RAW_VOID   *task_arg, RAW_U8  task_prio,  RAW_U32  time_slice,  PORT_STACK  *task_stack_base, RAW_U32 stack_size, RAW_TASK_ENTRY task_entry, RAW_U8 auto_start);RAW_U16 raw_disable_sche(void);RAW_U16 raw_enable_sche(void);RAW_U16 raw_sleep(RAW_TICK_TYPE dly);
RAW_U16 raw_time_sleep(RAW_U16 hours, RAW_U16 minutes, RAW_U16 seconds, RAW_U32 milli);#if (CONFIG_RAW_TASK_SUSPEND > 0)
RAW_U16 raw_task_suspend(RAW_TASK_OBJ *task_ptr);
RAW_U16 raw_task_resume(RAW_TASK_OBJ *task_ptr);
RAW_U16 task_suspend(RAW_TASK_OBJ *task_ptr);
RAW_U16 task_resume(RAW_TASK_OBJ *task_ptr);#endif#if (CONFIG_RAW_TASK_PRIORITY_CHANGE > 0)
RAW_U16 raw_task_priority_change (RAW_TASK_OBJ *task_ptr, RAW_U8 new_priority, RAW_U8 *old_priority);
#endif#if (CONFIG_RAW_TASK_DELETE > 0)
RAW_U16 raw_task_delete(RAW_TASK_OBJ *task_ptr);
#endif#if (CONFIG_RAW_TASK_WAIT_ABORT > 0)
RAW_U16 raw_task_wait_abort(RAW_TASK_OBJ *task_ptr);
#endif#if (CONFIG_SCHED_FIFO_RR > 0)
RAW_U16 raw_task_time_slice_change(RAW_TASK_OBJ *task_ptr, RAW_U32 new_time_slice);
RAW_U16 raw_set_sched_way(RAW_TASK_OBJ *task_ptr, RAW_U8 policy);
RAW_U16 raw_get_sched_way(RAW_TASK_OBJ *task_ptr, RAW_U8 *policy_ptr);
#endifRAW_TASK_OBJ  *raw_task_identify(void);#if (CONFIG_RAW_TASK_STACK_CHECK > 0)
RAW_U16 raw_task_stack_check(RAW_TASK_OBJ  *task_obj, RAW_U32 *free_stack);
#endif#if (CONFIG_USER_DATA_POINTER > 0)
RAW_VOID raw_set_task_user_point(RAW_TASK_OBJ *task_ptr, RAW_VOID *user_point, RAW_U32 point_position);RAW_VOID *raw_get_task_user_point(RAW_TASK_OBJ *task_ptr, RAW_U32 point_position);
#endif#if (CONFIG_RAW_DEBUG > 0)
RAW_U16 raw_iter_block_task(LIST *object_head, RAW_VOID  (*debug_function)(RAW_TASK_OBJ *), RAW_U8 opt);
RAW_U32 raw_get_system_global_space(void);
#endif#define RAW_TASK_AUTO_START         1
#define	RAW_TASK_DONT_START         0#endif
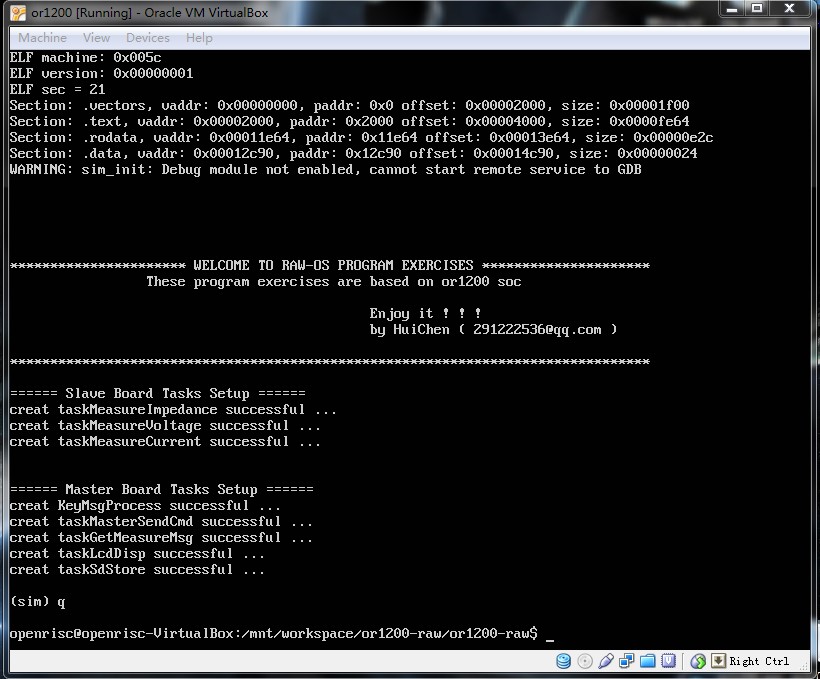
最后,在linux下openrisc架构验证的信息是这样的:
在Raw-OS的官网下载相关API说明,看看任务相关还有哪些函数可用,小弟也会本着用到再去解释的原则去说明一下,希望大家继续支持Raw-OS发展哈~
http://www.raw-os.org/
好了,下次见,荆轲刺秦王~~~
这篇关于or1200下Raw-OS学习(任务篇)的文章就介绍到这儿,希望我们推荐的文章对编程师们有所帮助!


