本文主要是介绍ruoyi-nbcio-plus基于vue3的多租户机制,希望对大家解决编程问题提供一定的参考价值,需要的开发者们随着小编来一起学习吧!
更多ruoyi-nbcio功能请看演示系统
gitee源代码地址
前后端代码: https://gitee.com/nbacheng/ruoyi-nbcio
演示地址:RuoYi-Nbcio后台管理系统 http://122.227.135.243:9666/
更多nbcio-boot功能请看演示系统
gitee源代码地址
后端代码: https://gitee.com/nbacheng/nbcio-boot
前端代码:https://gitee.com/nbacheng/nbcio-vue.git
在线演示(包括H5) : http://122.227.135.243:9888
因为基于ruoyi-vue-plus的框架,所以多租户总体基于使用了 MyBatis-Plus (简称 MP)的多租户插件功能
可以参考
- MP官方文档 - 多租户插件
- MP官方 Demo
实现主要有以下步骤:
在相关表添加多租户字段
在多租户配置TenantConfig 里中添加多租户插件拦截器 TenantLineInnerInterceptor
根据业务对多租户插件拦截器 TenantLineInnerInterceptor 进行配置(多租户字段、需要进行过滤的表等)
在数据库相关表中加入租户id字段 tenant_id(别忘了相关实体类也要加上)
具体代码如下:
@EnableConfigurationProperties(TenantProperties.class)
@AutoConfiguration(after = {RedisConfig.class, MybatisPlusConfig.class})
@ConditionalOnProperty(value = "tenant.enable", havingValue = "true")
public class TenantConfig {/*** 初始化租户配置*/@Beanpublic boolean tenantInit(MybatisPlusInterceptor mybatisPlusInterceptor,TenantProperties tenantProperties) {List<InnerInterceptor> interceptors = new ArrayList<>();// 多租户插件 必须放到第一位interceptors.add(tenantLineInnerInterceptor(tenantProperties));interceptors.addAll(mybatisPlusInterceptor.getInterceptors());mybatisPlusInterceptor.setInterceptors(interceptors);return true;}/*** 多租户插件*/public TenantLineInnerInterceptor tenantLineInnerInterceptor(TenantProperties tenantProperties) {return new TenantLineInnerInterceptor(new PlusTenantLineHandler(tenantProperties));}@Beanpublic RedissonAutoConfigurationCustomizer tenantRedissonCustomizer(RedissonProperties redissonProperties) {return config -> {TenantKeyPrefixHandler nameMapper = new TenantKeyPrefixHandler(redissonProperties.getKeyPrefix());SingleServerConfig singleServerConfig = ReflectUtils.invokeGetter(config, "singleServerConfig");if (ObjectUtil.isNotNull(singleServerConfig)) {// 使用单机模式// 设置多租户 redis key前缀singleServerConfig.setNameMapper(nameMapper);ReflectUtils.invokeSetter(config, "singleServerConfig", singleServerConfig);}ClusterServersConfig clusterServersConfig = ReflectUtils.invokeGetter(config, "clusterServersConfig");// 集群配置方式 参考下方注释if (ObjectUtil.isNotNull(clusterServersConfig)) {// 设置多租户 redis key前缀clusterServersConfig.setNameMapper(nameMapper);ReflectUtils.invokeSetter(config, "clusterServersConfig", clusterServersConfig);}};}/*** 多租户缓存管理器*/@Primary@Beanpublic CacheManager tenantCacheManager() {return new TenantSpringCacheManager();}/*** 多租户鉴权dao实现*/@Primary@Beanpublic SaTokenDao tenantSaTokenDao() {return new TenantSaTokenDao();}}
其中 自定义租户处理器代码如下:
/*** 自定义租户处理器** @author nbacheng*/
@Slf4j
@AllArgsConstructor
public class PlusTenantLineHandler implements TenantLineHandler {private final TenantProperties tenantProperties;@Overridepublic Expression getTenantId() {String tenantId = TenantHelper.getTenantId();if (StringUtils.isBlank(tenantId)) {log.error("无法获取有效的租户id -> Null");return new NullValue();}String dynamicTenantId = TenantHelper.getDynamic();if (StringUtils.isNotBlank(dynamicTenantId)) {// 返回动态租户return new StringValue(dynamicTenantId);}// 返回固定租户return new StringValue(tenantId);}@Overridepublic boolean ignoreTable(String tableName) {String tenantId = TenantHelper.getTenantId();// 判断是否有租户if (StringUtils.isNotBlank(tenantId)) {// 不需要过滤租户的表List<String> excludes = tenantProperties.getExcludes();// 非业务表List<String> tables = ListUtil.toList("gen_table","gen_table_column");tables.addAll(excludes);return tables.contains(tableName);}return true;}}
上面就是重载了mybasisplus的TenantLineHandler
/*** 租户处理器( TenantId 行级 )** @author hubin* @since 3.4.0*/
public interface TenantLineHandler {/*** 获取租户 ID 值表达式,只支持单个 ID 值* <p>** @return 租户 ID 值表达式*/Expression getTenantId();/*** 获取租户字段名* <p>* 默认字段名叫: tenant_id** @return 租户字段名*/default String getTenantIdColumn() {return "tenant_id";}/*** 根据表名判断是否忽略拼接多租户条件* <p>* 默认都要进行解析并拼接多租户条件** @param tableName 表名* @return 是否忽略, true:表示忽略,false:需要解析并拼接多租户条件*/default boolean ignoreTable(String tableName) {return false;}/*** 忽略插入租户字段逻辑** @param columns        插入字段* @param tenantIdColumn 租户 ID 字段* @return*/default boolean ignoreInsert(List<Column> columns, String tenantIdColumn) {return columns.stream().map(Column::getColumnName).anyMatch(i -> i.equalsIgnoreCase(tenantIdColumn));}
}
多租户插件的调用流程如下图:
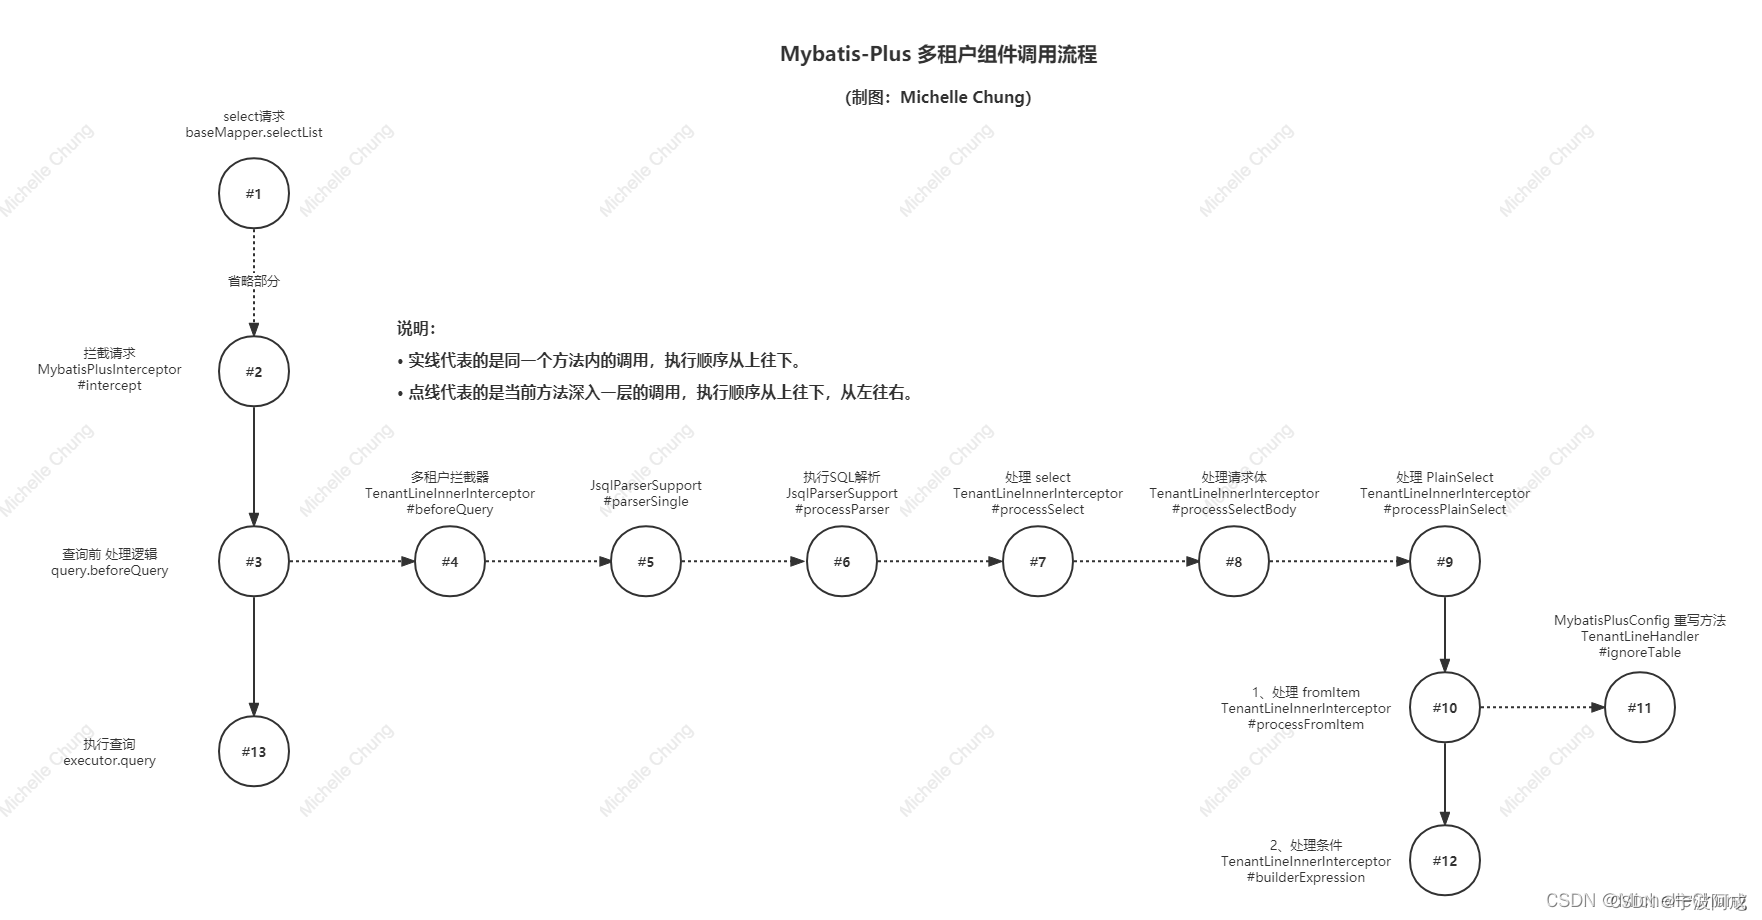
上面主要是用到了mybatisPlusInterceptor,
public class MybatisPlusInterceptor implements Interceptor {@Setterprivate List<InnerInterceptor> interceptors = new ArrayList<>();@Overridepublic Object intercept(Invocation invocation) throws Throwable {Object target = invocation.getTarget();Object[] args = invocation.getArgs();if (target instanceof Executor) {final Executor executor = (Executor) target;Object parameter = args[1];boolean isUpdate = args.length == 2;MappedStatement ms = (MappedStatement) args[0];if (!isUpdate && ms.getSqlCommandType() == SqlCommandType.SELECT) {RowBounds rowBounds = (RowBounds) args[2];ResultHandler resultHandler = (ResultHandler) args[3];BoundSql boundSql;if (args.length == 4) {boundSql = ms.getBoundSql(parameter);} else {// 几乎不可能走进这里面,除非使用Executor的代理对象调用query[args[6]]boundSql = (BoundSql) args[5];}for (InnerInterceptor query : interceptors) {if (!query.willDoQuery(executor, ms, parameter, rowBounds, resultHandler, boundSql)) {return Collections.emptyList();}query.beforeQuery(executor, ms, parameter, rowBounds, resultHandler, boundSql);}CacheKey cacheKey = executor.createCacheKey(ms, parameter, rowBounds, boundSql);return executor.query(ms, parameter, rowBounds, resultHandler, cacheKey, boundSql);} else if (isUpdate) {上面进入beforeQuery
public void beforeQuery(Executor executor, MappedStatement ms, Object parameter, RowBounds rowBounds, ResultHandler resultHandler, BoundSql boundSql) throws SQLException {if (InterceptorIgnoreHelper.willIgnoreTenantLine(ms.getId())) {return;}PluginUtils.MPBoundSql mpBs = PluginUtils.mpBoundSql(boundSql);mpBs.sql(parserSingle(mpBs.sql(), null));}通过parserSingle的processParser
public String parserSingle(String sql, Object obj) {if (logger.isDebugEnabled()) {logger.debug("original SQL: " + sql);}try {Statement statement = JsqlParserGlobal.parse(sql);return processParser(statement, 0, sql, obj);} catch (JSQLParserException e) {throw ExceptionUtils.mpe("Failed to process, Error SQL: %s", e.getCause(), sql);}}protected String processParser(Statement statement, int index, String sql, Object obj) {if (logger.isDebugEnabled()) {logger.debug("SQL to parse, SQL: " + sql);}if (statement instanceof Insert) {this.processInsert((Insert) statement, index, sql, obj);} else if (statement instanceof Select) {this.processSelect((Select) statement, index, sql, obj);} else if (statement instanceof Update) {this.processUpdate((Update) statement, index, sql, obj);} else if (statement instanceof Delete) {this.processDelete((Delete) statement, index, sql, obj);}sql = statement.toString();if (logger.isDebugEnabled()) {logger.debug("parse the finished SQL: " + sql);}return sql;}通过这个processSelect的进入select
@Overrideprotected void processSelect(Select select, int index, String sql, Object obj) {final String whereSegment = (String) obj;processSelectBody(select.getSelectBody(), whereSegment);List<WithItem> withItemsList = select.getWithItemsList();if (!CollectionUtils.isEmpty(withItemsList)) {withItemsList.forEach(withItem -> processSelectBody(withItem, whereSegment));}}其中进入processSelectBody处理
protected void processSelectBody(SelectBody selectBody, final String whereSegment) {if (selectBody == null) {return;}if (selectBody instanceof PlainSelect) {processPlainSelect((PlainSelect) selectBody, whereSegment);} else if (selectBody instanceof WithItem) {WithItem withItem = (WithItem) selectBody;processSelectBody(withItem.getSubSelect().getSelectBody(), whereSegment);} else {SetOperationList operationList = (SetOperationList) selectBody;List<SelectBody> selectBodyList = operationList.getSelects();if (CollectionUtils.isNotEmpty(selectBodyList)) {selectBodyList.forEach(body -> processSelectBody(body, whereSegment));}}}之后进入processPlainSelect
protected void processPlainSelect(final PlainSelect plainSelect, final String whereSegment) {//#3087 githubList<SelectItem> selectItems = plainSelect.getSelectItems();if (CollectionUtils.isNotEmpty(selectItems)) {selectItems.forEach(selectItem -> processSelectItem(selectItem, whereSegment));}// 处理 where 中的子查询Expression where = plainSelect.getWhere();processWhereSubSelect(where, whereSegment);// 处理 fromItemFromItem fromItem = plainSelect.getFromItem();List<Table> list = processFromItem(fromItem, whereSegment);List<Table> mainTables = new ArrayList<>(list);// 处理 joinList<Join> joins = plainSelect.getJoins();if (CollectionUtils.isNotEmpty(joins)) {mainTables = processJoins(mainTables, joins, whereSegment);}// 当有 mainTable 时,进行 where 条件追加if (CollectionUtils.isNotEmpty(mainTables)) {plainSelect.setWhere(builderExpression(where, mainTables, whereSegment));}}上面进入builderExpression 构造表达式
protected Expression builderExpression(Expression currentExpression, List<Table> tables, final String whereSegment) {// 没有表需要处理直接返回if (CollectionUtils.isEmpty(tables)) {return currentExpression;}// 构造每张表的条件List<Expression> expressions = tables.stream().map(item -> buildTableExpression(item, currentExpression, whereSegment)).filter(Objects::nonNull).collect(Collectors.toList());// 没有表需要处理直接返回if (CollectionUtils.isEmpty(expressions)) {return currentExpression;}// 注入的表达式Expression injectExpression = expressions.get(0);// 如果有多表,则用 and 连接if (expressions.size() > 1) {for (int i = 1; i < expressions.size(); i++) {injectExpression = new AndExpression(injectExpression, expressions.get(i));}}上面的buildTableExpression加入了租户的条件
public Expression buildTableExpression(final Table table, final Expression where, final String whereSegment) {if (tenantLineHandler.ignoreTable(table.getName())) {return null;}return new EqualsTo(getAliasColumn(table), tenantLineHandler.getTenantId());}最终通过前面的processParser获取select的sql表达式,加入了多租户条件。
这篇关于ruoyi-nbcio-plus基于vue3的多租户机制的文章就介绍到这儿,希望我们推荐的文章对编程师们有所帮助!


