本文主要是介绍API Blueprint的安装,希望对大家解决编程问题提供一定的参考价值,需要的开发者们随着小编来一起学习吧!
什么是API Blueprint
API Blueprint 是一套基于 markdown 的 API 描述语言规范,API Blueprint 配套工具可以生成对应的HTML文档进行查看,方便生成离线文件保存,也便于对文件的查看
API Blueprint的工具
Aglio
aglioAglio是一种将API文件转换为HTML的工具。Aglio是惊人的,它非常快,默认情况下有一个很好的设计,并且可以通过自定义主题进行扩展。
Drafter
Drafter是由定义API Blueprint规范的Apiary制定的。您指定一个API Blueprint文件,然后Drafter将其转换为JSON对象。然后可以将此JSON对象提供给各种可解析API Blueprint JSON的工具。
Httpsnippet
Mashape提供的httpsnippet是一款非常棒的工具,它会采用HAR文件并为各种语言生成代码片段。
API Blueprint生成文件的流程图

API Blueprint工具 Aglio的安装
安装过程:
准备
在Visual Studio Code中安装API Blueprint
1、nodeJs环境的安装,npm的安装,Python的安装,并在Visual Studio Code的用户设置中设置Python的安装路径;
2.安装Aglio
执行命令:
npm install -g aglio产生报错信息:
在此解决方案中一次生成一个项目。若要启用并行生成,请添加“/m”开关。
D:\ST\nodejs\node_global\node_modules\aglio\node_modules\protagonist\build\drafter\libdrafter.vcxproj(20,3): error MSB4019: 未找到导入的项目“D:\Microsoft.Cpp.Defau
lt.props
”。请确认 <Import> 声明中的路径正确,且磁盘上存在该文件。
D:\ST\nodejs\node_global\node_modules\aglio\node_modules\protagonist\build\drafter\ext\snowcrash\libmarkdownparser.vcxproj(20,3): error MSB4019: 未找到导入的项目“D
:\Micros
oft.Cpp.Default.props”。请确认 <Import> 声明中的路径正确,且磁盘上存在该文件。
D:\ST\nodejs\node_global\node_modules\aglio\node_modules\protagonist\build\drafter\ext\snowcrash\libsnowcrash.vcxproj(20,3): error MSB4019: 未找到导入的项目“D:\Mic
rosoft.C
pp.Default.props”。请确认 <Import> 声明中的路径正确,且磁盘上存在该文件。
D:\ST\nodejs\node_global\node_modules\aglio\node_modules\protagonist\build\drafter\libsos.vcxproj(20,3): error MSB4019: 未找到导入的项目“D:\Microsoft.Cpp.Default.p
rops”。请确
认 <Import> 声明中的路径正确,且磁盘上存在该文件。
D:\ST\nodejs\node_global\node_modules\aglio\node_modules\protagonist\build\drafter\ext\snowcrash\libsundown.vcxproj(20,3): error MSB4019: 未找到导入的项目“D:\Micro
soft.Cpp
.Default.props”。请确认 <Import> 声明中的路径正确,且磁盘上存在该文件。
gyp ERR! build error
gyp ERR! stack Error: `C:\Windows\Microsoft.NET\Framework\v4.0.30319\msbuild.exe` failed with exit code: 1
gyp ERR! stack     at ChildProcess.onExit (D:\ST\nodejs\node_global\node_modules\npm\node_modules\node-gyp\lib\build.js:258:23)
gyp ERR! stack     at ChildProcess.emit (events.js:180:13)
gyp ERR! stack     at Process.ChildProcess._handle.onexit (internal/child_process.js:209:12)
gyp ERR! System Windows_NT 6.1.7601
网上提供解决方案:
npm install -global -production windows-build-tools通过执行该命令,发现主要是安装Python,本人已直接本地安装过Python,并设置过环境变量,并在VIsual Studio Code中设置”python.pythonPath”为本地安装路径
最终通过仔细查找报错信息发现是因为未安装C++编译环境,最后安装了一个 Visual Studio Community 2017,并安装了Microsoft Visual C++ Redistributable for Visual Studio 2017;
上述两文件下载路径均在:
https://www.visualstudio.com/zh-hans/downloads/?rr=http%3A%2F%2Flandinghub.visualstudio.com%2Fvisual-cpp-build-tools
安装后在执行npm install -g aglio,执行过程中需注意若安装了360可能会拦截权限更改,所有点击允许,最终安装成功。
Aglio的使用
foo.md编写的源文件;
bar.html是输出的HTML文件;
进入foo.md文件所在路径,执行命令:
aglio -i foo.md -o bar.html输出文件bar.html在foo.md文件所在文件夹中;
源文件:
FORMAT: 1A
HOST: http://polls.apiblueprint.org/# PollsPolls is a simple API allowing consumers to view polls and vote in them. You can view this documentation over at [Apiary](http://docs.pollsapi.apiary.io).# Polls API Root [/]This resource does not have any attributes. Instead it offers the initial API affordances in the form of the links in the JSON body.It is recommend to follow the “url” link values, [Link](https://tools.ietf.org/html/rfc5988) or Location headers where applicable to retrieve resources. Instead of constructing your own URLs, to keep your client decoupled from implementation details.## Retrieve the Entry Point [GET]+ Response 200 (application/json){"questions_url": "/questions"}## Group QuestionResources related to questions in the API.## Question [/questions/{question_id}]A Question object has the following attributes:+ question
+ published_at - An ISO8601 date when the question was published.
+ url
+ choices - An array of Choice objects.+ Parameters+ question_id: 1 (required, number) - ID of the Question in form of an integer### View a Questions Detail [GET]+ Response 200 (application/json){"question": "Favourite programming language?","published_at": "2014-11-11T08:40:51.620Z","url": "/questions/1","choices": [{"choice": "Swift","url": "/questions/1/choices/1","votes": 2048}, {"choice": "Python","url": "/questions/1/choices/2","votes": 1024}, {"choice": "Objective-C","url": "/questions/1/choices/3","votes": 512}, {"choice": "Ruby","url": "/questions/1/choices/4","votes": 256}]}## Choice [/questions/{question_id}/choices/{choice_id}]+ Parameters+ question_id: 1 (required, number) - ID of the Question in form of an integer+ choice_id: 1 (required, number) - ID of the Choice in form of an integer### Vote on a Choice [POST]This action allows you to vote on a question's choice.+ Response 201+ HeadersLocation: /questions/1## Questions Collection [/questions{?page}]+ Parameters+ page: 1 (optional, number) - The page of questions to return### List All Questions [GET]+ Response 200 (application/json)+ HeadersLink: </questions?page=2>; rel="next"+ Body[{"question": "Favourite programming language?","published_at": "2014-11-11T08:40:51.620Z","url": "/questions/1","choices": [{"choice": "Swift","url": "/questions/1/choices/1","votes": 2048}, {"choice": "Python","url": "/questions/1/choices/2","votes": 1024}, {"choice": "Objective-C","url": "/questions/1/choices/3","votes": 512}, {"choice": "Ruby","url": "/questions/1/choices/4","votes": 256}]}]### Create a New Question [POST]You may create your own question using this action. It takes a JSON object containing a question and a collection of answers in the form of choices.+ question (string) - The question
+ choices (array[string]) - A collection of choices.+ Request (application/json){"question": "Favourite programming language?","choices": ["Swift","Python","Objective-C","Ruby"]}+ Response 201 (application/json)+ HeadersLocation: /questions/2+ Body{"question": "Favourite programming language?","published_at": "2014-11-11T08:40:51.620Z","url": "/questions/2","choices": [{"choice": "Swift","url": "/questions/2/choices/1","votes": 0}, {"choice": "Python","url": "/questions/2/choices/2","votes": 0}, {"choice": "Objective-C","url": "/questions/2/choices/3","votes": 0}, {"choice": "Ruby","url": "/questions/2/choices/4","votes": 0}]}
生成HTML文件:
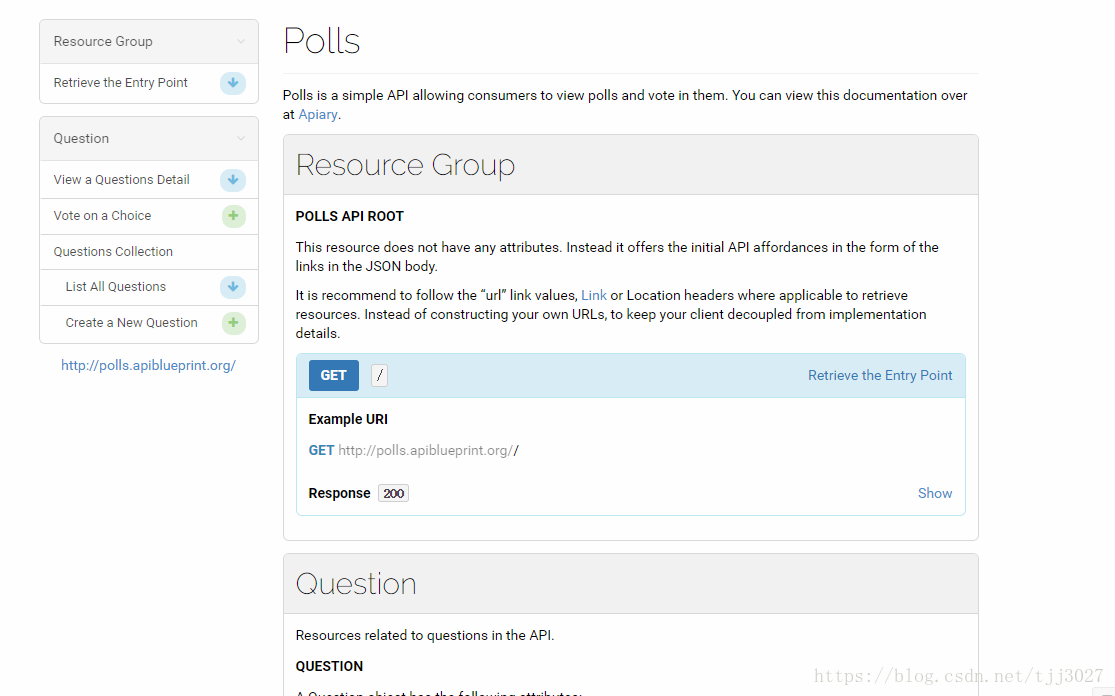
这篇关于API Blueprint的安装的文章就介绍到这儿,希望我们推荐的文章对编程师们有所帮助!


