本文主要是介绍python-study-day1-(病人管理系统-带sql),希望对大家解决编程问题提供一定的参考价值,需要的开发者们随着小编来一起学习吧!
MainWindow代码
from tkinter import *
from tkinter import messagebox
from tkinter.ttk import Comboboxclass MianWindow(Frame):def __init__(self, master=None):super().__init__(master, padx=30, pady=20)self.flag = 0self.pack(expand=True, fill=BOTH)self.id = StringVar(value=' ')self.name = StringVar(value=' ')self.style = StringVar(value='')self.number = StringVar(value=' ')self.text_box = StringVar(value=' ')self.Xu_setup()def Xu_setup(self):container = Frame(self)container.pack(side=TOP, fill=X, expand=YES, pady=10)Button(master=container, text='增    加', width=10, command=self.Yao_add).pack(side=LEFT, padx=20, expand=YES)Button(master=container, text='更    改', width=10, command=self.Yao_update).pack(side=LEFT, padx=20, expand=YES)Button(master=container, text='删    除', width=10, command=self.Yao_del).pack(side=LEFT, padx=20, expand=YES)Button(master=container, text='查    询', width=10, command=self.Yao_select).pack(side=LEFT, padx=20, expand=YES)container = Frame(self)container.pack(side=TOP, fill=X, expand=YES, pady=20)lbl1 = Label(master=container, text="编     号", width=10, font=("微软雅黑", 11))lbl1.pack(side=LEFT, padx=5)self.ent1 = Entry(master=container, textvariable=self.id)self.ent1.pack(ipady=8, side=LEFT, padx=5)lbl2 = Label(master=container, text="姓      名", width=10, font=("微软雅黑", 11))lbl2.pack(side=LEFT, padx=5)self.ent2 = Entry(master=container, textvariable=self.name)self.ent2.pack(ipady=8, side=LEFT, padx=5, fill=X)lbl_box = Label(master=container, text="性       别", width=10, font=("微软雅黑", 11))lbl_box.pack(side=LEFT, padx=5)self.comboxlist = Combobox(master=container, textvariable=self.text_box, width=5)self.comboxlist["values"] = ("男", "女")self.comboxlist.current(0)self.comboxlist.bind("<<ComboboxSelected>>", self.func)self.comboxlist.pack(ipady=8, side=RIGHT, fill=X)container = Frame(self)container.pack(side=TOP, fill=X, expand=YES, pady=20)lbl3 = Label(master=container, text="病      型", width=10, font=("微软雅黑", 11))lbl3.pack(side=LEFT, padx=5)self.ent3 = Entry(master=container, textvariable=self.style)self.ent3.pack(ipady=8, side=LEFT, padx=5, fill=X, expand=YES)lbl4 = Label(master=container, text="年      龄", width=10, font=("微软雅黑", 11))lbl4.pack(side=LEFT, padx=5)self.ent4 = Entry(master=container, textvariable=self.number)self.ent4.pack(ipady=8, side=LEFT, padx=5, fill=X, expand=YES)container = Frame(self)container.pack(side=TOP, fill=X, expand=YES, pady=20)self.text = Text(master=container)scroll = Scrollbar()scroll.pack(side=RIGHT, fill=Y)scroll.config(command=self.text.yview)self.text.config(yscrollcommand=scroll.set)self.text.pack(fill=X, expand=YES)self.text.insert(INSERT, "")def func(self, *args):self.flag = 1print(self.flag)return self.flagdef clear(self):self.ent1.delete(0, "end")self.ent2.delete(0, "end")self.ent3.delete(0, "end")self.ent4.delete(0, "end")def Yao_add(self):if len(self.id.get()) == 0:messagebox.askokcancel("确定/退出对话框", "插入失败,编号为空")self.clear()returnif len(self.name.get()) == 0:messagebox.askokcancel("确定/退出对话框", "插入失败,名称为空")self.clear()returnif len(self.style.get()) == 0:messagebox.askokcancel("确定/退出对话框", "插入失败,病型为空")self.clear()returnif len(self.number.get()) == 0:messagebox.askokcancel("确定/退出对话框", "插入失败,年龄为空")self.clear()returnif self.flag == 0:messagebox.askokcancel("确定/退出对话框", "插入失败,性别未选")self.clear()returnelse:from Patient.db import Connectcon = Connect()con.Zhou_insert(int(self.id.get()),self.name.get(),self.text_box.get(),self.style.get(),self.number.get())messagebox.showinfo("打印信息对话框", "插入成功")self.clear()from Patient.db import Connectcon= Connect()all_ = con.Print_result()for data in all_:s = "编号:%d \t姓名:%s\t性别:%s\t病型:%s\t年龄:%s\n\n" % dataself.text.insert(INSERT, s)def Yao_update(self):if len(self.id.get()) != 0 and len(self.name.get()) != 0 and len(self.number.get()) != 0:from Patient.db import Connectcon = Connect()re = con.Zhou_update(int(self.id.get()), self.name.get(), self.number.get())if re:messagebox.askokcancel("确定/退出对话框", "执行成功")self.clear()from Patient.db import Connectcon = Connect()all_ = con.Print_result()for data in all_:s = "编号:%d \t姓名:%s\t性别:%s\t病型:%s\t年龄:%s\n\n" % dataself.text.insert(INSERT, s)else:messagebox.askokcancel("确定/退出对话框", "执行失败,或数据不存在")self.clear()returnreturnelif len(self.id.get()) != 0 and len(self.name.get()):from Patient.db import Connectcon = Connect()re = con.update_name(int(self.id.get()), self.name.get())if re:messagebox.askokcancel("确定/退出对话框", "执行成功")self.clear()from Patient.db import Connectcon = Connect()all_ = con.Print_result()for data in all_:s = "编号:%d \t姓名:%s\t性别:%s\t病型:%s\t年龄:%s\n\n" % dataself.text.insert(INSERT, s)else:messagebox.askokcancel("确定/退出对话框", "执行失败,或数据不存在在")self.clear()returnreturnelif len(self.id.get()) != 0 and len(self.number.get()) != 0:from Patient.db import Connectcon = Connect()re = con.update_number(int(self.id.get()), self.number.get())if re:messagebox.askokcancel("确定/退出对话框", "执行成功")self.clear()from Patient.db import Connectcon = Connect()all_ = con.Print_result()for data in all_:s = "编号:%d \t姓名:%s\t性别:%s\t病型:%s\t年龄:%s\n\n" % dataself.text.insert(INSERT, s)else:messagebox.askokcancel("确定/退出对话框", "执行失败,或数据不存在在")self.clear()returnreturnelse:messagebox.askokcancel("确定/退出对话框", "执行失败,或数据不存在在")self.clear()returndef Yao_del(self):from Patient.db import Connectcon = Connect()re = con.delete_id(int(self.id.get()))if re:messagebox.askokcancel("确定/退出对话框", "执行成功")self.clear()from Patient.db import Connectcon = Connect()all_ = con.Print_result()for data in all_:s = "编号:%d \t姓名:%s\t性别:%s\t病型:%s\t年龄:%s\n\n" % dataself.text.insert(INSERT, s)else:messagebox.askokcancel("确定/退出对话框", "执行失败,或数据不存在在")self.clear()returndef Yao_select(self):self.clear()from Patient.db import Connectcon = Connect()all_ = con.Print_result()for data in all_:s = "编号:%d \t姓名:%s\t性别:%s\t病型:%s\t年龄:%s\n\n" % dataself.text.insert(INSERT, s)if __name__ == '__main__':root = Tk()root.geometry('800x500')root.title("病人信息登记")MianWindow(root)root.mainloop()
db代码
import pymysql.cursorsclass Connect:def get_connect(self):self.connect = pymysql.Connect(host='localhost',port=3306,user='root',password='admin123',database='person',charset='utf8')self.cursor = self.connect.cursor()def Print_result(self):self.get_connect()sql = "select * from person"self.cursor.execute(sql)all_ = self.cursor.fetchall()for data in all_:print("编号:%d \t名称:%s \t性别:%s\t类型:%s\t数值:%s\n" % data)self.connect.commit()self.connect.close()return all_def Zhou_insert(self, id, name, sex, style, number):self.get_connect()sql = "insert into person (id,name ,sex,style,number) values (%d,'%s','%s','%s','%s')"self.cursor.execute(sql % (id, name, sex, style, number))self.connect.commit()self.connect.close()def Zhou_update(self, number, name, id):self.get_connect()sql = "UPDATE person SET number ='%s',name ='%s' WHERE id = %d;"re = self.cursor.execute(sql % (id, name, number))self.connect.commit()self.connect.close()return redef update_name(self, name, id): #self.get_connect()try:sql = "UPDATE person SET name ='%s' WHERE id = %d;"re = self.cursor.execute(sql % (id, name))except pymysql.err:self.connect.commit()print("执行错误")finally:self.connect.close()return redef update_number(self, id, number):self.get_connect()sql = "UPDATE person SET number ='%s'WHERE id = %d;"re = self.cursor.execute(sql % (number, id))self.connect.commit()self.connect.close()return redef delete_id(self, id):self.get_connect()sql = "DELETE FROM person WHERE id = %d"re = self.cursor.execute(sql % id)self.connect.commit()self.connect.close()return reif __name__ == '__main__':c = Connect()
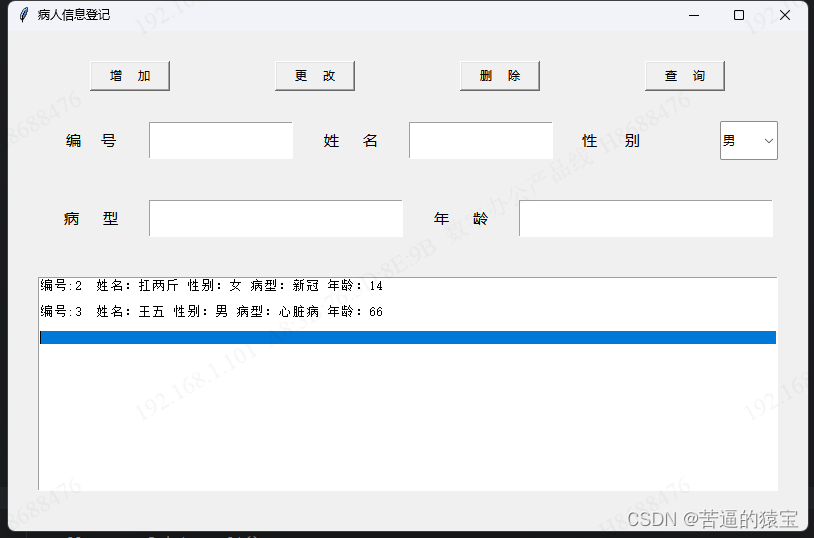
效果图
部署
需要的私,v:13053025350
这篇关于python-study-day1-(病人管理系统-带sql)的文章就介绍到这儿,希望我们推荐的文章对编程师们有所帮助!


