本文主要是介绍骑砍2霸主MOD开发(2)-基础开发环境搭建,希望对大家解决编程问题提供一定的参考价值,需要的开发者们随着小编来一起学习吧!
一.骑砍2霸主程序架构
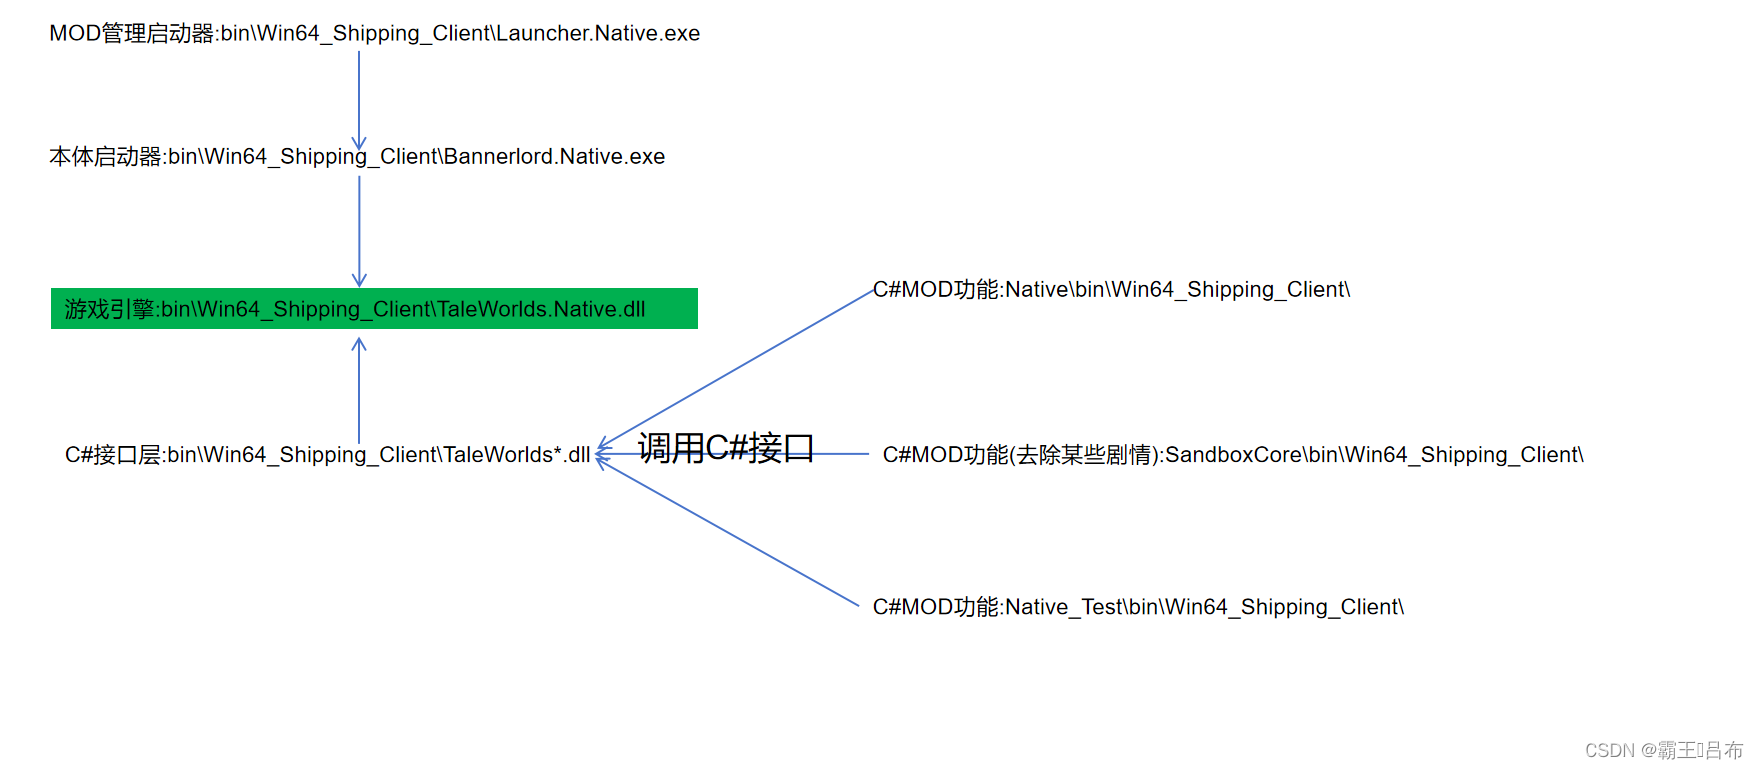
二.骑砍2霸主C#接口层代码查看
1.C#反编译工具dnspy下载:
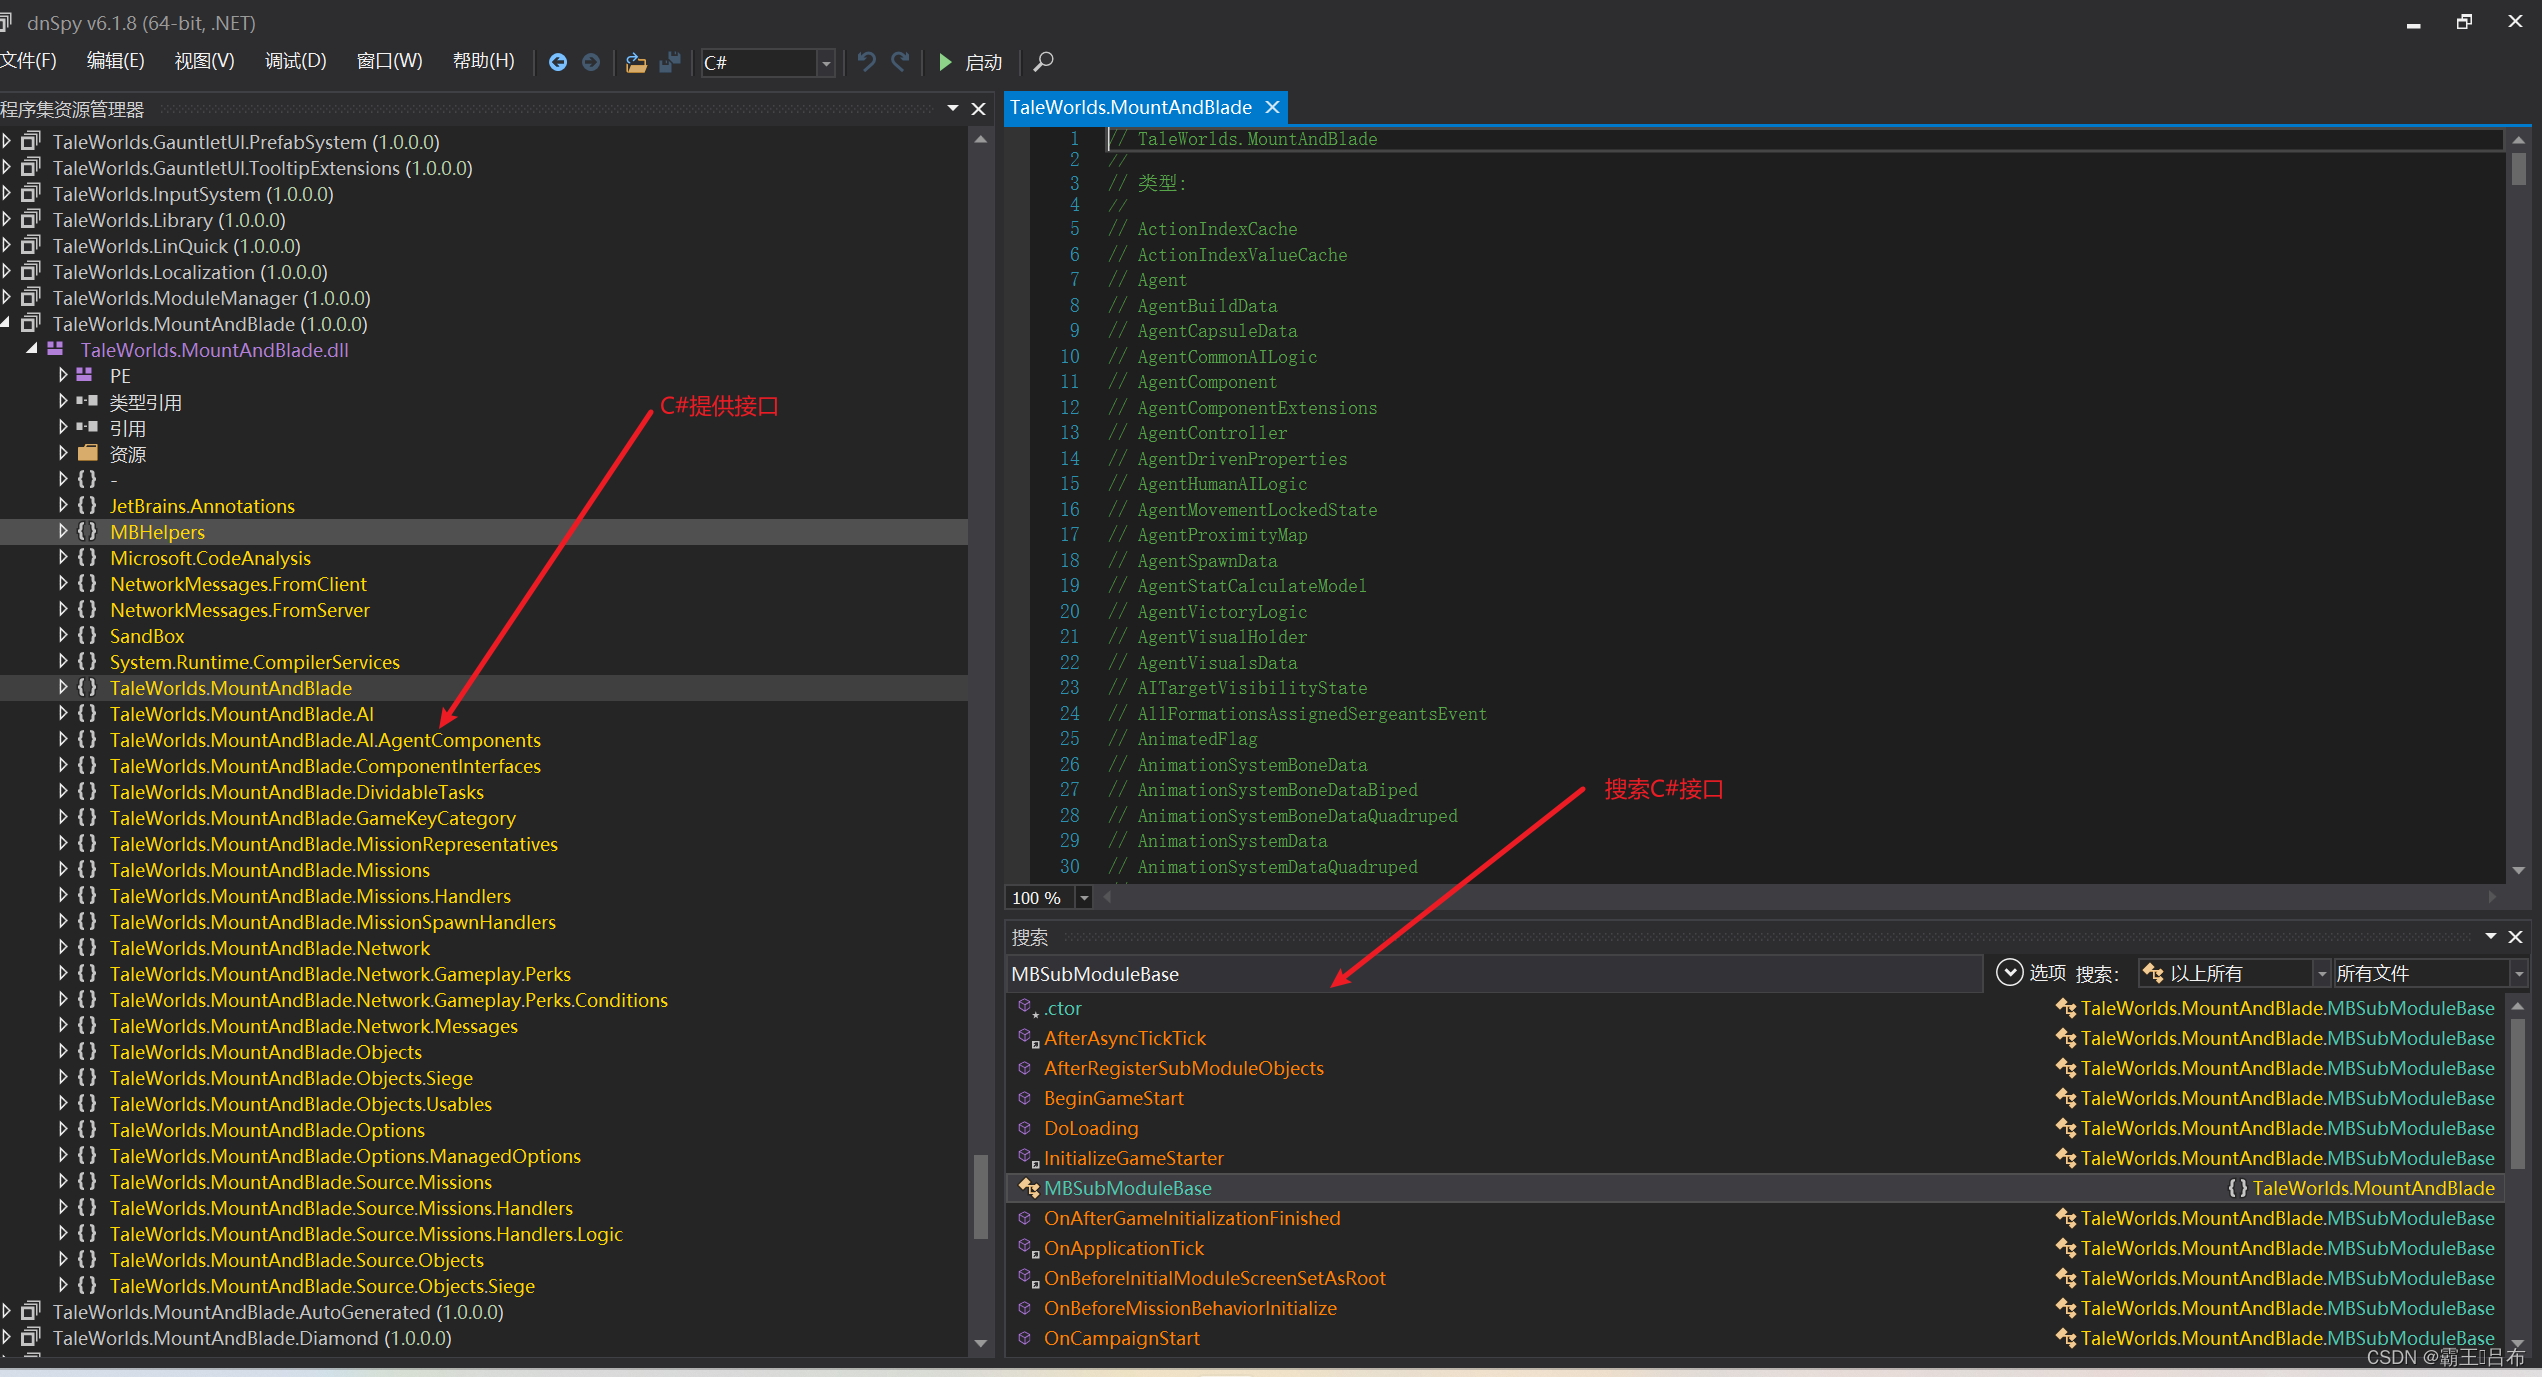
2.骑砍2霸主游戏引擎接口查看:
例如IMBAgent interface接口:
#调用TaleWorlds.Native.dll中的函数
[EngineMethod("get_movement_flags", false)]
uint GetMovementFlags(UIntPtr agentPointer);// Token: 0x060015BE RID: 5566
[EngineMethod("set_movement_flags", false)]
void SetMovementFlags(UIntPtr agentPointer, Agent.MovementControlFlag value);// Token: 0x060015BF RID: 5567
[EngineMethod("get_movement_input_vector", false)]
Vec2 GetMovementInputVector(UIntPtr agentPointer);// Token: 0x060015C0 RID: 5568
[EngineMethod("set_movement_input_vector", false)]
void SetMovementInputVector(UIntPtr agentPointer, Vec2 value);// Token: 0x060015C1 RID: 5569
[EngineMethod("get_collision_capsule", false)]
void GetCollisionCapsule(UIntPtr agentPointer, ref CapsuleData value);
三.MOD下C#代码编译调试
1.VisualStudio下载并创建csproj配置文件:
<Project Sdk="Microsoft.NET.Sdk"><PropertyGroup><Version>0.0.1</Version>#指定VS编译依赖.net6框架<TargetFramework>net6</TargetFramework><Platforms>x64</Platforms>#指定游戏安装目录<GameFolder>D:\work\Steam\steamapps\common\Mount & Blade II Bannerlord</GameFolder><GameBinariesFolder Condition="Exists('$(GameFolder)\bin\Win64_Shipping_Client\Bannerlord.exe')">Win64_Shipping_Client</GameBinariesFolder><GameBinariesFolder Condition="Exists('$(GameFolder)\bin\Gaming.Desktop.x64_Shipping_Client\Bannerlord.exe')">Gaming.Desktop.x64_Shipping_Client</GameBinariesFolder>#指定输出dll名称,输出dll路径<AppendTargetFrameworkToOutputPath>false</AppendTargetFrameworkToOutputPath><AppendRuntimeIdentifierToOutputPath>false</AppendRuntimeIdentifierToOutputPath><AssemblyName>NativeTest</AssemblyName><OutputPath>D:\work\Steam\steamapps\common\Mount & Blade II Bannerlord\Modules\NativeTest\bin\Win64_Shipping_Client</OutputPath></PropertyGroup>#指定使用C#接口<ItemGroup><Reference Include="$(GameFolder)\bin\$(GameBinariesFolder)\Newtonsoft.Json.dll"><HintPath>%(Identity)</HintPath><Private>False</Private></Reference><Reference Include="$(GameFolder)\bin\$(GameBinariesFolder)\TaleWorlds.*.dll" Exclude="$(GameFolder)\bin\$(GameBinariesFolder)\TaleWorlds.Native.dll"><HintPath>%(Identity)</HintPath><Private>False</Private></Reference><Reference Include="$(GameFolder)\Modules\Native\bin\$(GameBinariesFolder)\*.dll"><HintPath>%(Identity)</HintPath><Private>False</Private></Reference><Reference Include="$(GameFolder)\Modules\SandBox\bin\$(GameBinariesFolder)\*.dll"><HintPath>%(Identity)</HintPath><Private>False</Private></Reference><Reference Include="$(GameFolder)\Modules\SandBoxCore\bin\$(GameBinariesFolder)\*.dll"><HintPath>%(Identity)</HintPath><Private>False</Private></Reference><Reference Include="$(GameFolder)\Modules\StoryMode\bin\$(GameBinariesFolder)\*.dll"><HintPath>%(Identity)</HintPath><Private>False</Private></Reference><Reference Include="$(GameFolder)\Modules\CustomBattle\bin\$(GameBinariesFolder)\*.dll"><HintPath>%(Identity)</HintPath><Private>False</Private></Reference><Reference Include="$(GameFolder)\Modules\BirthAndDeath\bin\$(GameBinariesFolder)\*.dll"><HintPath>%(Identity)</HintPath><Private>False</Private></Reference></ItemGroup>
</Project>2.生成/生成解决方案编译cs文件为dll
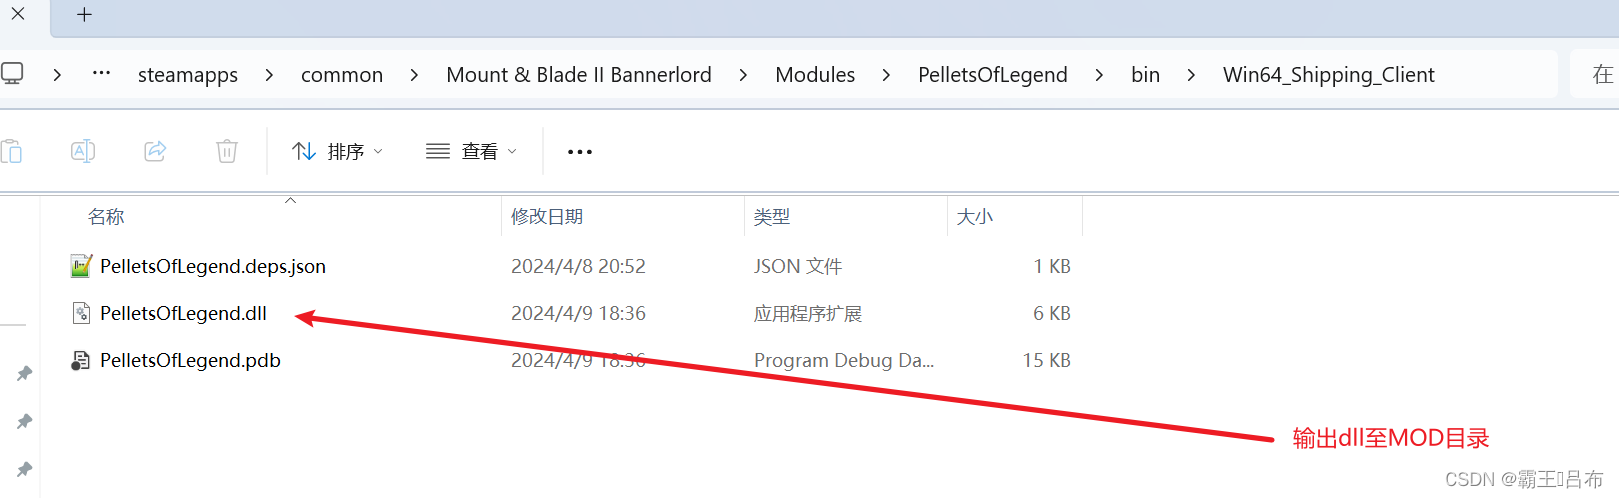
四.MOD文件目录结构
1.sub_module.xml
MOD启动配置文件,配置XML
<?xml version="1.0" encoding="utf-8"?>
<Module>#对应MOD启动器下显示MOD的版本和名称<Id value = "NativeTest"/><Name value = "NativeTest"/><Version value = "v1.2.9.36960"/><DependedModules><DependedModule Id="Native" DependentVersion="v1.2.9" Optional="false"/><DependedModule Id="SandBoxCore" DependentVersion="v1.2.9" Optional="false"/></DependedModules>#对应module_data下武器装备,军团属性的xml文件<Xmls><XmlNode>                <XmlName id="Items" path="items"/><IncludedGameTypes><GameType value = "Campaign"/><GameType value = "CampaignStoryMode"/><GameType value = "CustomGame"/><GameType value = "EditorGame"/></IncludedGameTypes></XmlNode></Xmls>#对应bin\Win64_Shipping_Client下的MOD自定义DLL<SubModules><SubModule><Name value="NativeTestSubModule" /><DLLName value="NativeTest.dll" /><SubModuleClassType value="NativeTest.NativeTest" />		<Tags><Tag key="DedicatedServerType" value ="none" /></Tags></SubModule></SubModules>
</Module>
2.module_data
存放武器装备,军队兵种,场景物等相关配置xml文件.
SandBoxCore\ModuleData\items:存放装备的配置文件
SandBoxCore\ModuleData'spnpccharacters:存放军团兵种的配置文件
五.MOD启动C#接口
通过实现MBSubModuleBase中的接口实现各个阶段的重写
// Token: 0x06001AAB RID: 6827 RVA: 0x0005D190 File Offset: 0x0005B390
protected internal virtual void OnSubModuleLoad()
{
}// Token: 0x06001AAC RID: 6828 RVA: 0x0005D192 File Offset: 0x0005B392
protected internal virtual void OnSubModuleUnloaded()
{
}// Token: 0x06001AAD RID: 6829 RVA: 0x0005D194 File Offset: 0x0005B394
protected internal virtual void OnBeforeInitialModuleScreenSetAsRoot()
{
}// Token: 0x06001AAE RID: 6830 RVA: 0x0005D196 File Offset: 0x0005B396
public virtual void OnConfigChanged()
{
}// Token: 0x06001AAF RID: 6831 RVA: 0x0005D198 File Offset: 0x0005B398
protected internal virtual void OnGameStart(Game game, IGameStarter gameStarterObject)
{
}
六.日志收集&诊断
cs文件范例:
using System;
using System.Diagnostics;
using System.IO;
using System.Runtime.InteropServices;
using TaleWorlds.Core;
using TaleWorlds.Engine;
using TaleWorlds.InputSystem;
using TaleWorlds.Library;
using TaleWorlds.MountAndBlade;
using TaleWorlds.MountAndBlade.Source.Missions.Handlers;namespace NativeTest
{public class NativeTest : MBSubModuleBase{#调用windows弹框MessageBox[DllImport("user32.dll", EntryPoint = "MessageBoxA")]public static extern int MsgBox(int hWnd, string msg, string caption, int type);protected override void OnSubModuleLoad(){base.OnSubModuleLoad();MsgBox(0, "OnSubModuleLoad", "msg box", 0x30);}public override void OnGameLoaded(Game game, object initializerObject){base.OnGameLoaded(game, initializerObject);MsgBox(0, "OnGameLoaded", "msg box", 0x30);}public override void OnNewGameCreated(Game game, object initializerObject){base.OnNewGameCreated(game, initializerObject);MsgBox(0, "OnNewGameCreated", "msg box", 0x30);}public override void OnBeforeMissionBehaviorInitialize(Mission mission){base.OnBeforeMissionBehaviorInitialize(mission);try{var val = 0;var rst = 8 / val;throw new Exception("Dummy exception for stack trace");InformationManager.DisplayMessage(new InformationMessage("on mission behavior initialize"));mission.AddMissionBehavior(new FlyMissionTimer());}catch (Exception ex){string stackTrace = new StackTrace(ex, true).ToString();File.WriteAllText("../../Modules/NativeTest/crash_log.txt", stackTrace);}}}
这篇关于骑砍2霸主MOD开发(2)-基础开发环境搭建的文章就介绍到这儿,希望我们推荐的文章对编程师们有所帮助!


