本文主要是介绍Python接口自动化测试-篇1(postman+requests+pytest+allure),希望对大家解决编程问题提供一定的参考价值,需要的开发者们随着小编来一起学习吧!
Python接口自动化测试是一种使用Python编程语言来编写脚本以自动执行针对应用程序接口(APIs)的测试过程。这种测试方法专注于检查系统的不同组件或服务之间的交互,确保它们按照预期规范进行通信,而不涉及用户界面(UI)的验证。
目录
一、接口测试基础
二、工具实现接口测试
2.1、postman接口测试
2.2、postman自动关联
2.3、postman批量执行
2.4、登录单接口测试
2.5、postman断言
2.6、postman参数化
2.7、课程增删改查测试
三、代码实现接口测试
2.1、图片验证码获取及登录自动化
2.2、课程新增代码自动化
2.3、合同上传与新增接口自动化
2.4、登录单接口自动化测试
2.5、登录单接口自动化-数据驱动实现
2.6、课程添加自动化
2.7、课程查询接口自动化
2.8、课程修改接口自动化
2.9、课程删除接口自动化
2.10、项目配置文件config
2.11、allure生成测试报告
一、接口测试基础
URL的组成=协议+服务器地址+端口号+资源路径+参数
Http请求:请求行+请求头+请求体
请求行=请求类型+资源地址+版本协议
请求头(键值对类型)=请求数据类型等
请求体=请求的数据,一般使用Json类型
Http响应:状态行+响应头
状态行=协议版本号+响应状态码+响应状态说明
响应头=响应服务器+响应时间+响应类型+响应内容长度
响应体=响应的内容,一般是json串的形式
二、工具实现接口测试
2.1、postman接口测试
1.使用postman发送GET请求:查询uuid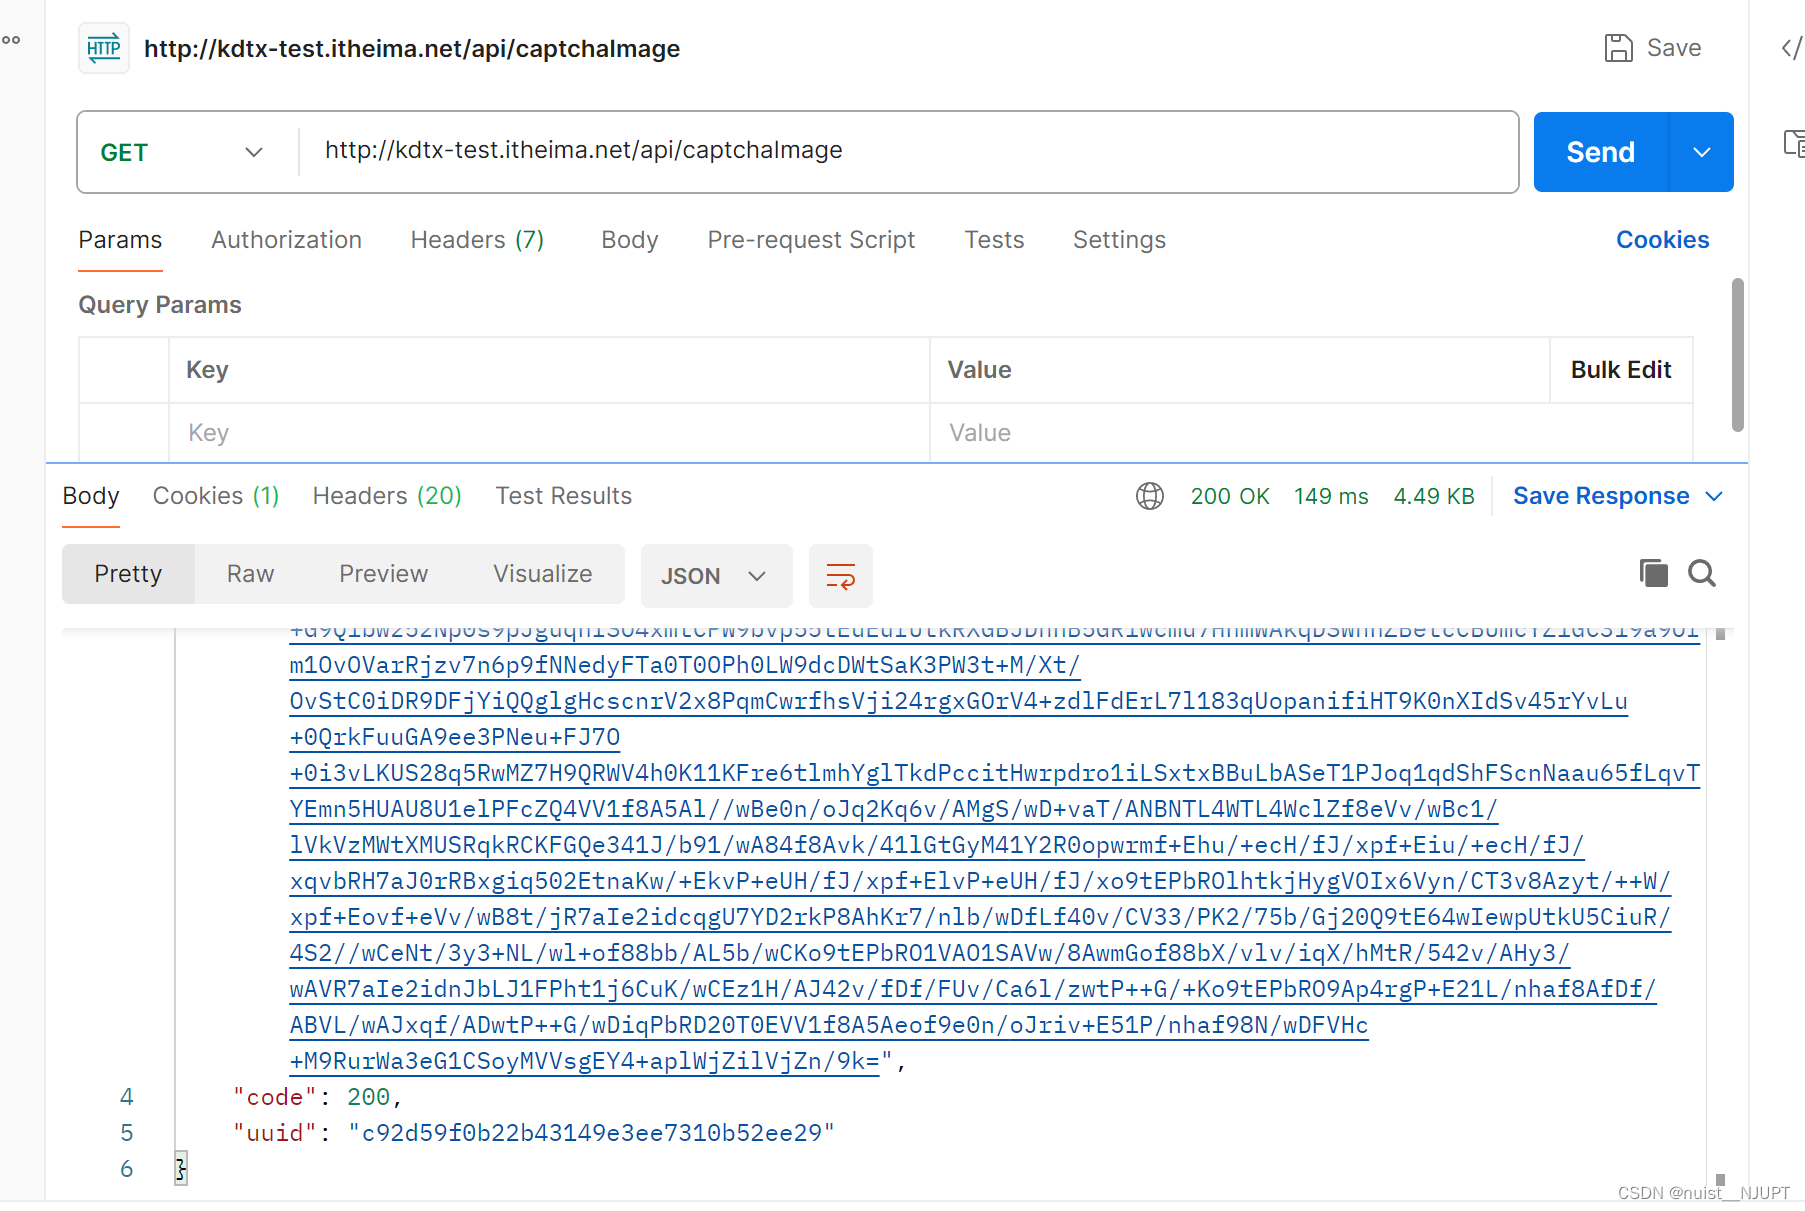
2.使用postman发送POST请求:根据uuid进行登录请求

2.2、postman自动关联
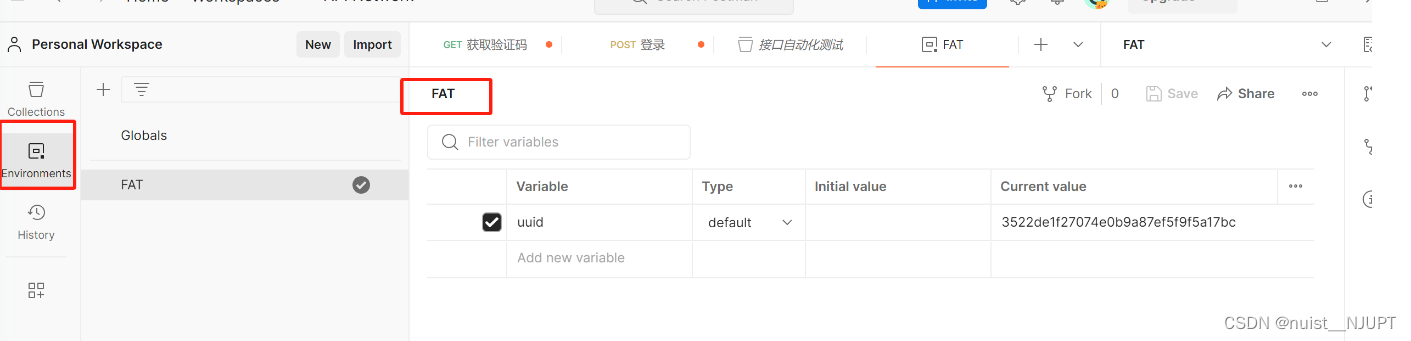
有多个接口请求,需要将一个接口的返回的结果保存为变量,另外一个接口请求的时候使用保存变量。
1.首先创建一个环境变量:并命名为FAT。
2.在第一个接口中设置环境变量,并将第一个接口请求的参数设置到环境变量中去。

3.在第二个接口的请求参数中直接动态引用从第一个接口中获取的动态变量值。

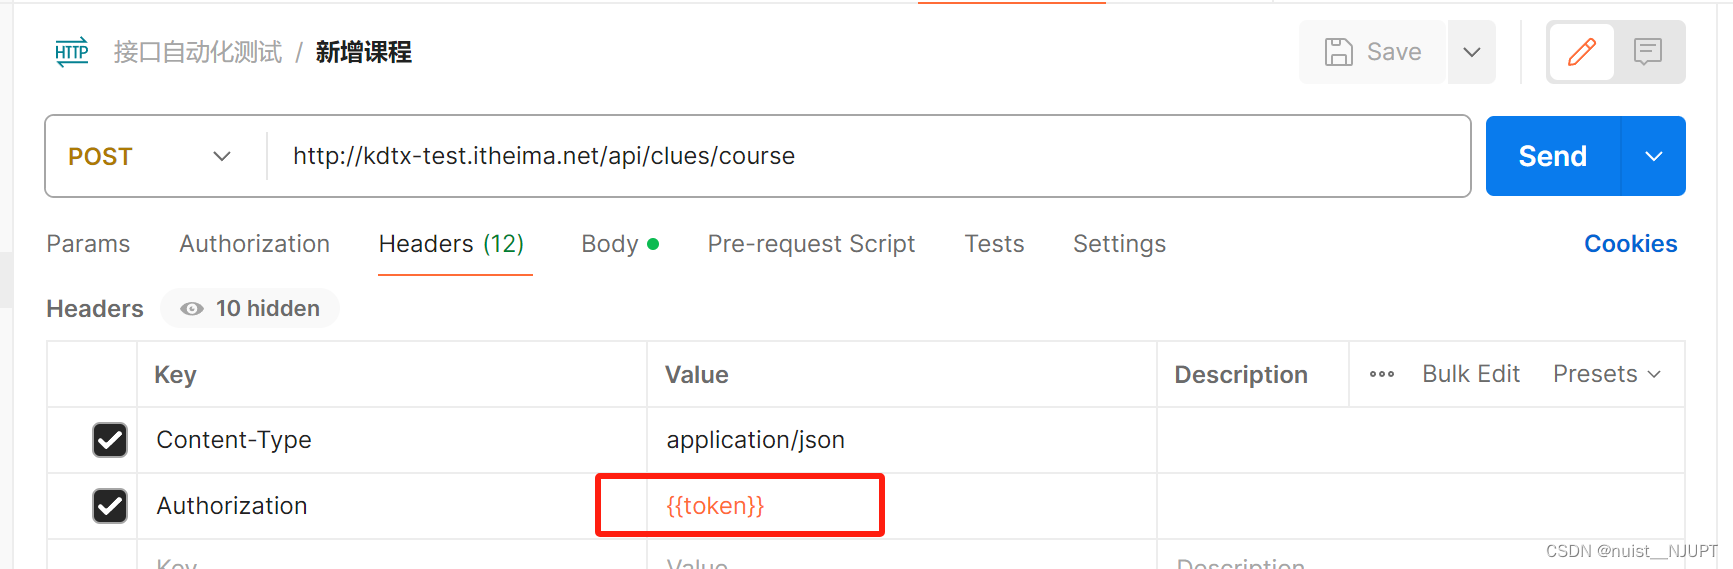
4.在登录接口中获取响应得到的token,存储为环境变量。

5.在新增课程的接口中,引用登录接口存储的token变量。
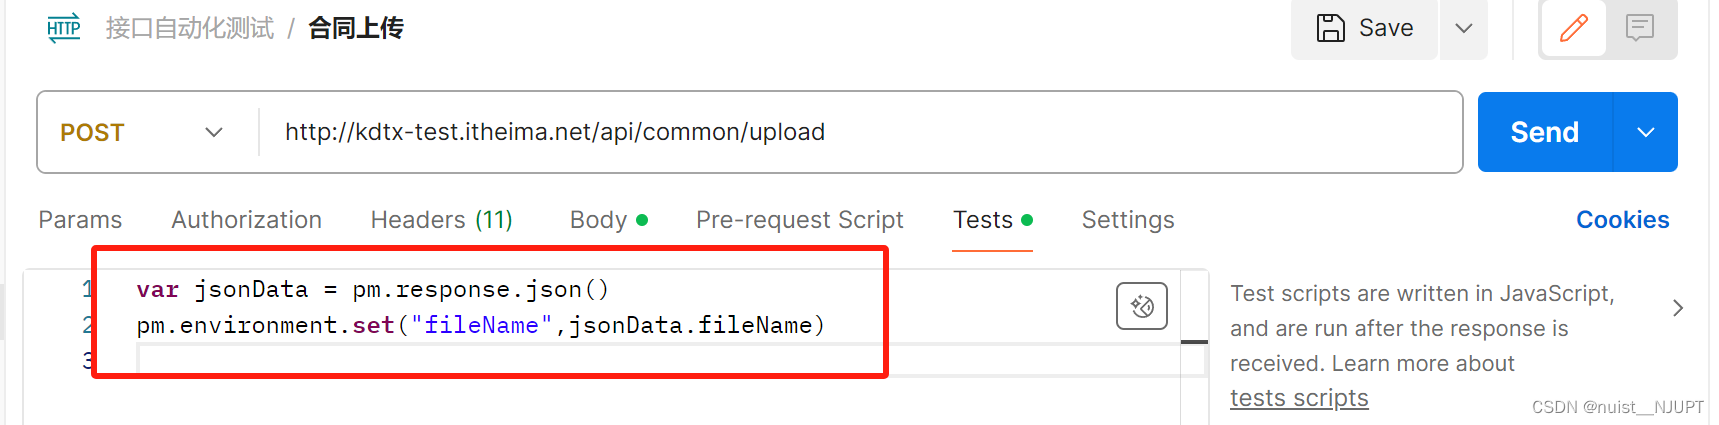
6.合同上传接口,需要获取登录接口保存的token环境变量。

7.在合同上传接口的请求体里设置待上传的合同文件。
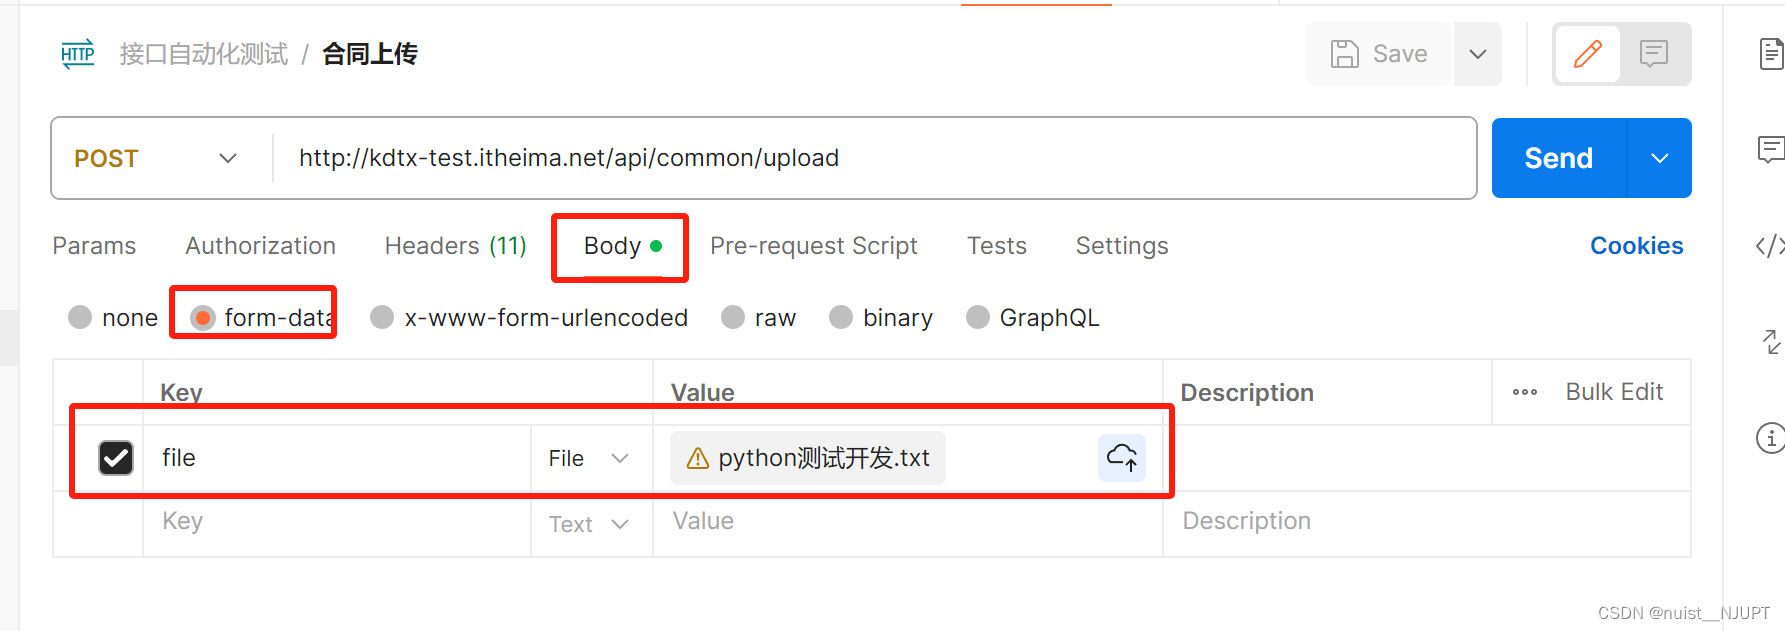
8.需要在合同上传接口中将响应得到的fileName字段保存为环境变量。
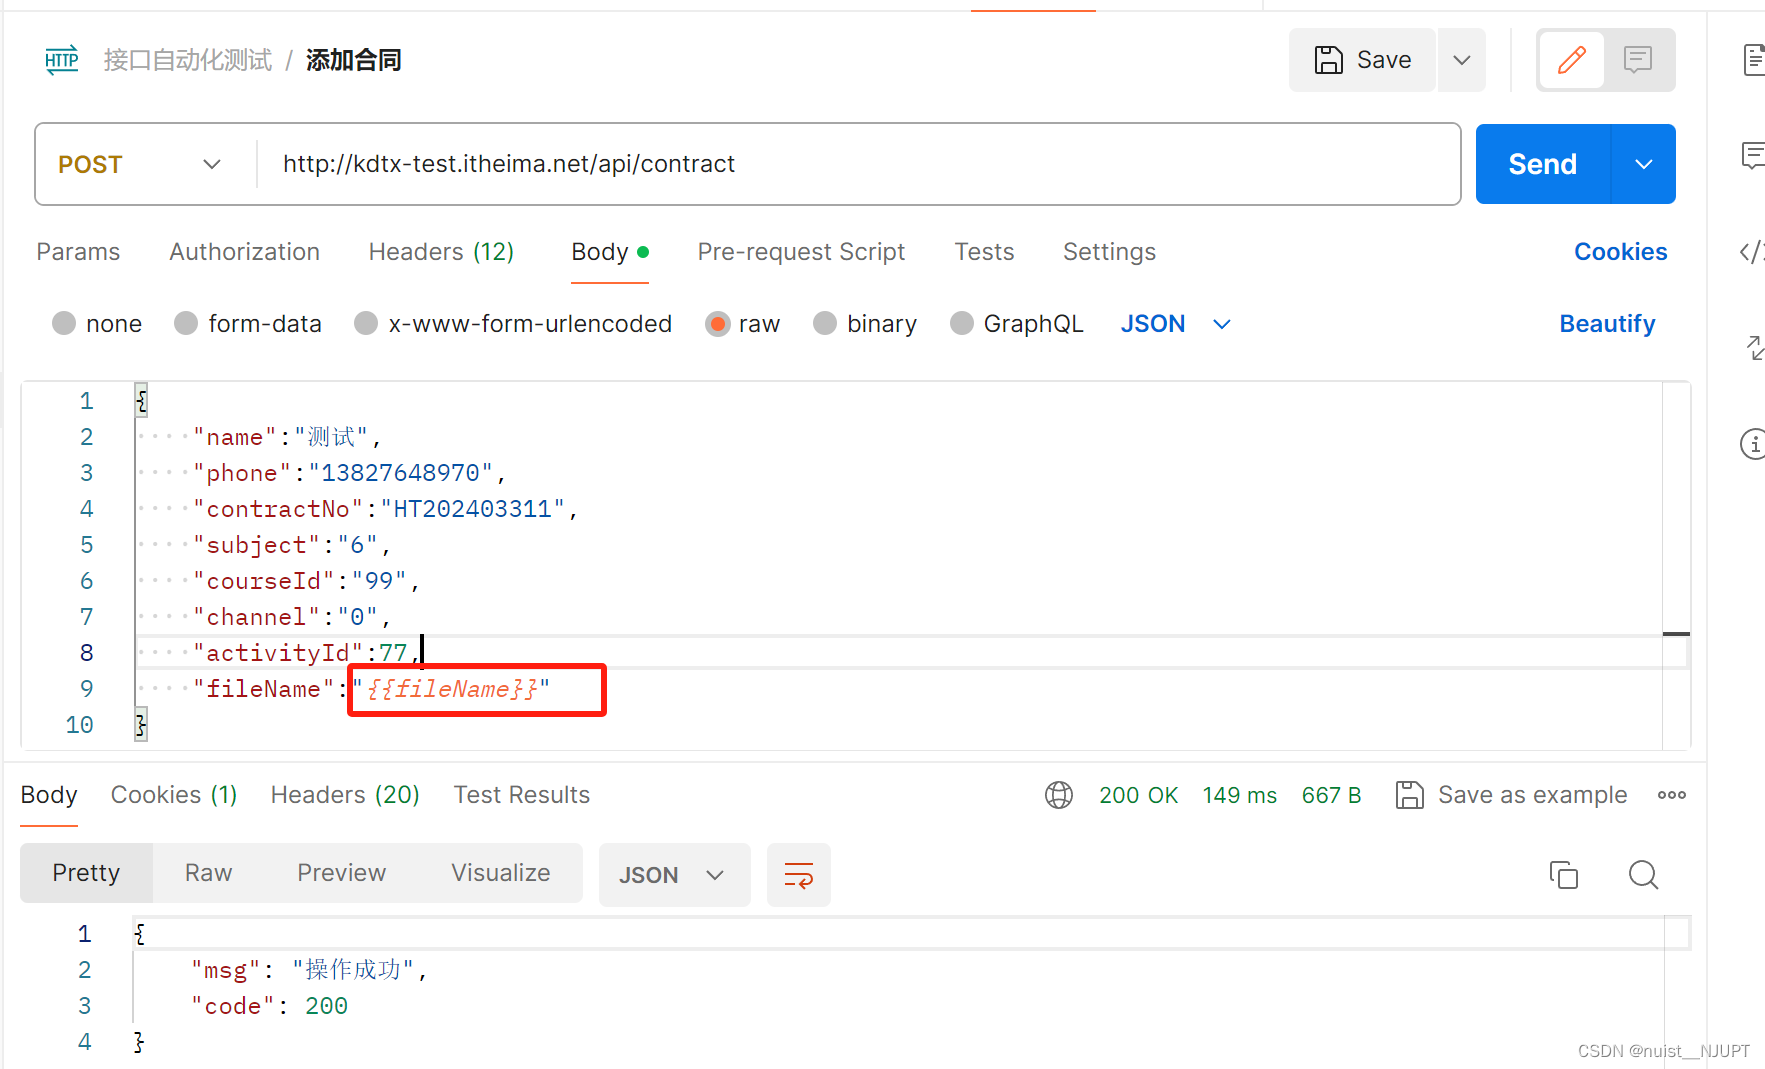
9.在添加合同接口中使用{{fileName}}引用合同上传接口中保存的环境变量。
10.通过手机号查询合同信息。

2.3、postman批量执行
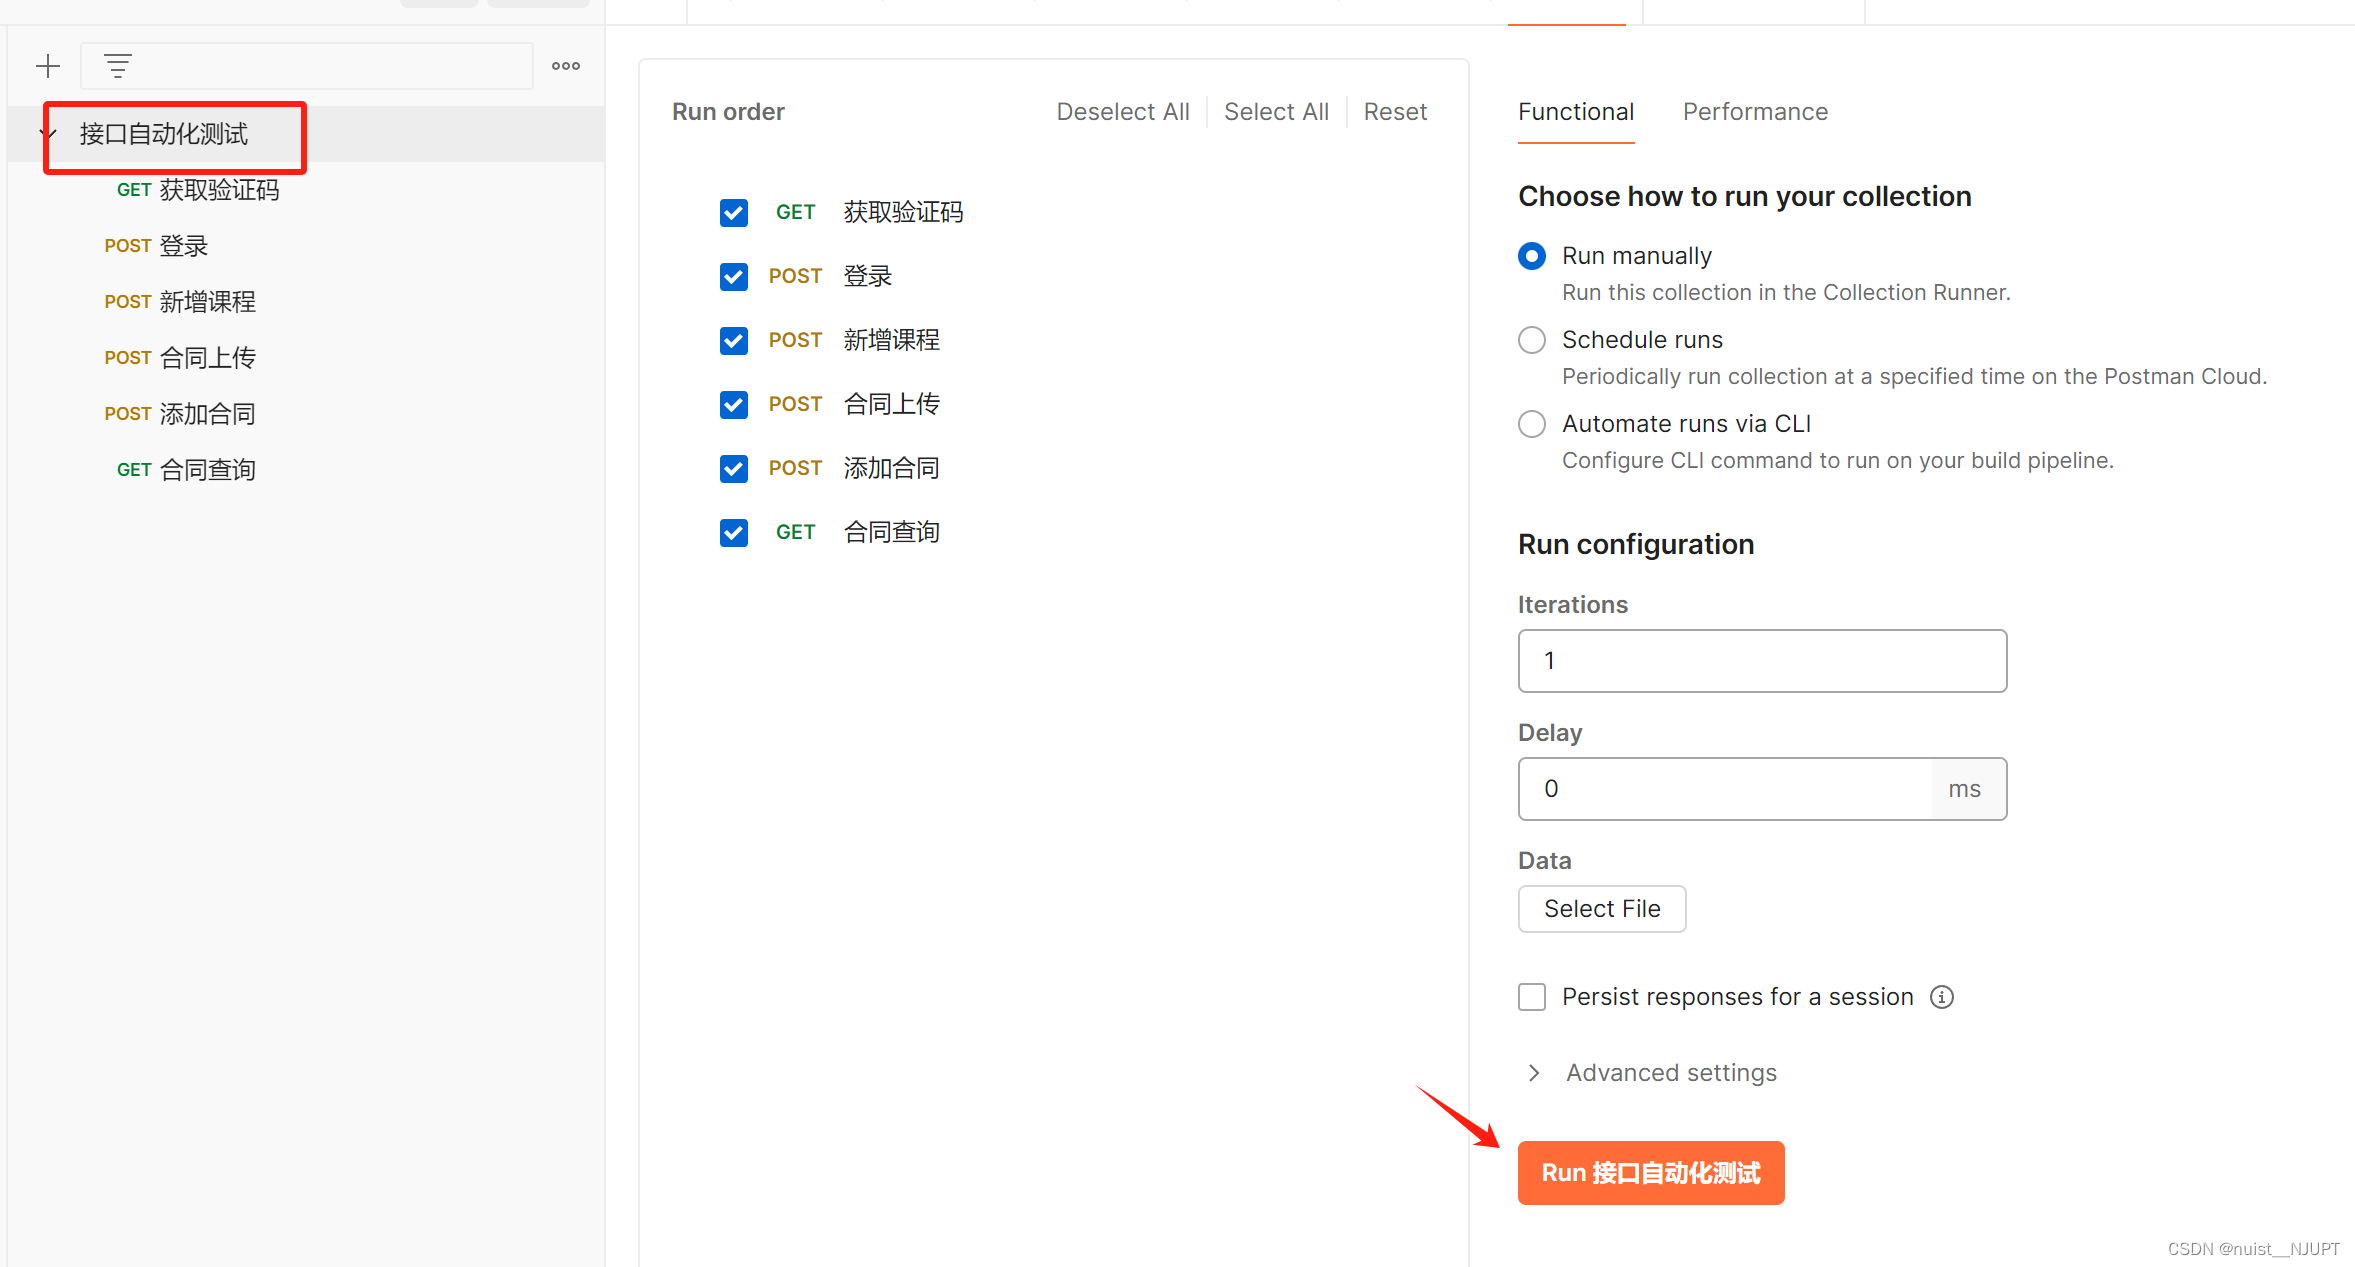
在接口自动化测试文件夹中选择run,然后点击如下箭头所示的Run自动化测试即可实现接口的批量执行。
2.4、登录单接口测试
1.可以创建一个文件夹,在文件夹下建立测试用例请求,进行一个接口的所有用例的测试。

2.5、postman断言
可以在postman中设置断言,Tests中断言函数,通过断言函数对响应结果进行断言。

2.6、postman参数化
设置文件并加载,然后使用动态参数{{变量名}}获取文件中的字段。
2.7、课程增删改查测试
由于增删改查的思路都是一致的,设置请求url,请求头以及请求体即可完成测试,在一个课程添加文件夹下可以测试与管理多个用例。

三、代码实现接口测试
接口自动化测试流程:1.选取自动化测试用例 2.搭建自动化测试环境 3.搭建自动化测试框架 4.代码实现自动化 5.输出测试报告 6.实现持续集成
核心技术:python语言+pytest框架+requests框架
自动化测试框架的目录结构:

2.1、图片验证码获取及登录自动化
第一步,获取图片验证码:
# 获取图片验证码# 1.导包
import requests# 2.发送请求
response = requests.get(url="http://kdtx-test.itheima.net/api/captchaImage")# 3.查看响应
print(response.status_code)
print(response.text)
第二步:根据获取的验证码uuid发送登录请求
# 登录# 1.导包
import requests# 2.发送请求
url = "http://kdtx-test.itheima.net/api/login"
header_data = {"Content-Type": "application/json"
}
login_data = {"username": "admin","password": "HM_2023_test","code": "2","uuid": "98648849e1214e67bd7c9d4af396ab69"
}
try:response = requests.post(url=url,headers=header_data,json=login_data)
except Exception as e:print("异常:", e)
finally:pass# 3.获取响应结果
print(response.status_code)
print(response.json())
上述的代码并没有合理的实现api的封装与调用,下面将登录过程封装到api包下的loginAPI类中,再后续的测试中直接实例化登录类,并调用相应的方法即可实现登录。
# 依据接口文档,封接口信息,需要使用的测试数据从测试用例传递
# 接口方法被调用需要返回对应的响应结果# 1.导包
import requests
# 2.创建接口类
class loginAPI:# 初始化def __init__(self):# 指定urlself.url_verify = "http://kdtx-test.itheima.net/api/captchaImage"self.url_login = "http://kdtx-test.itheima.net/api/login"# 验证码def get_verify_code(self):return requests.get(url=self.url_verify)# 登录def login(self, test_data):return requests.post(self.url_login, json=test_data)
在具体的测试类中调用封装的api进行获取验证码以及登录。
# 1.导包
from api.login import loginAPI# 2.创建测试类
class TestContractBusiness:# 2.1 前置处理def setup(self):# 实例化接口对象self.login_api = loginAPI()# 2.2 后置处理def teardown(self):pass# 01.登录成功def test01_login_success(self):# 获取验证码res_first = self.login_api.get_verify_code()print(res_first.status_code)print(res_first.json())# 登录login_data = {"username": "admin","password": "HM_2023_test","code": "2","uuid": res_first.json().get("uuid")}res_second = self.login_api.login(login_data)print(res_second.status_code)print(res_second.json())if __name__ == '__main__':test = TestContractBusiness()test.setup()test.test01_login_success()
2.2、课程新增代码自动化
首先封装课程新增接口类。
# 课程接口的封装# 导包
import requests# 创建接口类
class courseAPI:# 初始化def __init__(self):self.add_course_url = "http://kdtx-test.itheima.net/api/clues/course/"# 课程添加def add_course(self, test_data, token):return requests.post(url=self.add_course_url, json=test_data, headers={"Authorization": token})
然后在测试类中,定义课程新增测试方法。
# 1.导包
from api.login import loginAPI
from api.course import courseAPI# 2.创建测试类
class TestContractBusiness:# 2.1 前置处理def setup(self):# 实例化接口对象self.login_api = loginAPI()self.course_api = courseAPI()self.token = None# 2.2 后置处理def teardown(self):pass# 01.登录成功def test01_login_success(self):# 获取验证码res_first = self.login_api.get_verify_code()print(res_first.status_code)print(res_first.json())# 登录login_data = {"username": "admin","password": "HM_2023_test","code": "2","uuid": res_first.json().get("uuid")}res_second = self.login_api.login(login_data)print(res_second.status_code)print(res_second.json())TestContractBusiness.token = res_second.json().get("token")# 新增课程成功def test02_add_course(self):add_data = {"name": "测试开发课程","subject": "6","price": "344","applicablePerson": "2"}res_third = self.course_api.add_course(test_data=add_data, token=TestContractBusiness.token)print(res_third.status_code)print(res_third.json())if __name__ == '__main__':test = TestContractBusiness()test.setup()test.test01_login_success()test.test02_add_course()
2.3、合同上传与新增接口自动化
首先封装合同上传与新增接口,如下:
# 1.导包
import requests# 2.定义合同接口类
class ContractAPI:# 初始化def __init__(self):self.url_upload = "http://kdtx-test.itheima.net/api/common/upload"self.add_contract_url = "http://kdtx-test.itheima.net/api/contract"# 合同上传接口def upload_abstract(self, test_data, token):return requests.post(url=self.url_upload, files={"file": test_data}, headers={"Authorization": token})# 合同新增接口def add_abstract(self, test_data, token):return requests.post(url=self.add_contract_url, json=test_data, headers={"Authorization": token})
编写合同上传和合同新增测试脚本:
# 1.导包
from api.login import LoginAPI
from api.course import CourseAPI
from api.contract import ContractAPI# 2.创建测试类
class TestContractBusiness:# 2.1 前置处理token = Nonefile_name = Nonedef setup(self):# 实例化接口对象self.login_api = LoginAPI()self.course_api = CourseAPI()self.contract_api = ContractAPI()# 2.2 后置处理def teardown(self):pass# 01.登录成功def test01_login_success(self):# 获取验证码res_first = self.login_api.get_verify_code()print(res_first.status_code)print(res_first.json())# 登录login_data = {"username": "admin","password": "HM_2023_test","code": "2","uuid": res_first.json().get("uuid")}res_second = self.login_api.login(login_data)print(res_second.status_code)print(res_second.json())TestContractBusiness.token = res_second.json().get("token")# 02.新增课程成功def test02_add_course(self):add_data = {"name": "测试开发课程1","subject": "6","price": "344","applicablePerson": "2"}res_third = self.course_api.add_course(test_data=add_data, token=TestContractBusiness.token)print(res_third.status_code)print(res_third.json())# 03.合同上传接口def test03_upload_abstract(self):file = open("../data/test_file.txt", "rb")response = self.contract_api.upload_abstract(test_data=file, token=TestContractBusiness.token)print(response.status_code)print(response.json())TestContractBusiness.file_name = response.json().get("fileName")# 04.合同新增接口def test04_add_abstract(self):add_data = {"name": "测试","phone": "13827648970","contractNo": "HT20240ww3","subject": "6","courseId": "99","channel": "0","activityId" : 77,"fileName": TestContractBusiness.file_name}response = self.contract_api.add_abstract(test_data=add_data, token=TestContractBusiness.token)print(response.status_code)print(response.json())if __name__ == '__main__':test = TestContractBusiness()test.setup()test.test01_login_success()test.test02_add_course()test.test03_upload_abstract()test.test04_add_abstract()
2.4、登录单接口自动化测试
首先封装获取验证码与登录接口。
# 依据接口文档,封接口信息,需要使用的测试数据从测试用例传递
# 接口方法被调用需要返回对应的响应结果# 1.导包
import requests
# 2.创建接口类
class LoginAPI:# 初始化def __init__(self):# 指定urlself.url_verify = "http://kdtx-test.itheima.net/api/captchaImage"self.url_login = "http://kdtx-test.itheima.net/api/login"# 验证码def get_verify_code(self):return requests.get(url=self.url_verify)# 登录def login(self, test_data):return requests.post(self.url_login, json=test_data)
编写等于测试用例脚本,并对响应结果做校验。
# 1.导包
from api.login import LoginAPI# 2.创建测试类
class TestLoginAPI:uuid = None# 前置处理def setup(self):# 实例化self.login_api = LoginAPI()# 获取验证码response = self.login_api.get_verify_code()# 获取验证码中的uuidTestLoginAPI.uuid = response.json().get("uuid")# 后置处理def teardown(self):pass# 登录成功def login_success(self):login_data = {"username": "admin","password": "HM_2023_test","code": "2","uuid": TestLoginAPI.uuid}response = self.login_api.login(test_data=login_data)# 断言验证码assert 200 == response.status_code# 断言响应数据包含成功assert '成功' in response.text# 断言响应json数据中的code值assert 200 == response.json().get("code")# 登录成功# 登录失败def login_fail(self):login_data = {"username": "","password": "HM_2023_test","code": "2","uuid": TestLoginAPI.uuid}response = self.login_api.login(test_data=login_data)# 断言验证码assert 200 == response.status_code# 断言响应数据包含成功assert '错误' in response.text# 断言响应json数据中的code值assert 500 == response.json().get("code")if __name__ == '__main__':test_login = TestLoginAPI()test_login.setup()test_login.login_success()test_login.setup()test_login.login_fail()
2.5、登录单接口自动化-数据驱动实现
数据驱动:以测试数据驱动脚本执行,维护焦点从脚本转向测试数据的一种自动化测试用例设计模式。
方式1:直接定义测试数据,然后使用pytest框架进行参数化,实现数据驱动。
# 1.导包
from api.login import LoginAPI
import pytest# 测试数据
test_data = [("admin", "HM_2023_test", 200, '成功', 200),("", "HM_2023_test", 200, '错误', 500)]# 2.创建测试类
class TestLoginAPI:uuid = None# 前置处理def setup(self):# 实例化self.login_api = LoginAPI()# 获取验证码response = self.login_api.get_verify_code()# 获取验证码中的uuidTestLoginAPI.uuid = response.json().get("uuid")# 后置处理def teardown(self):pass# 登录成功@pytest.mark.parametrize("username, password, status, message, code",  test_data)def test_login_success(self, username, password, status, message, code):login_data = {"username": username,"password": password,"code": "2","uuid": TestLoginAPI.uuid}response = self.login_api.login(test_data=login_data)# 断言验证码assert status == response.status_code# 断言响应数据包含成功assert message in response.text# 断言响应json数据中的code值assert code == response.json().get("code")# 登录成功# 登录失败@pytest.mark.parametrize("username, password, status, message, code", test_data)def test_login_fail(self,  username, password, status, message, code):login_data = {"username": username,"password": password,"code": "2","uuid": TestLoginAPI.uuid}response = self.login_api.login(test_data=login_data)# 断言验证码assert status == response.status_code# 断言响应数据包含成功assert message in response.text# 断言响应json数据中的code值assert code == response.json().get("code")
方式2:
首先在data文件夹定义:login.json文件用于测试数据。
[
{"username": "admin","password": "HM_2023_test","status": 200,"message": "成功","code": 200
},{"username": "","password": "HM_2023_test","status": 200,"message": "错误","code": 500
}
]
使用pytest做参数化,完成数据驱动测试。
# 1.导包
from api.login import LoginAPI
import pytest
import json# 读取json文件
def build_data(json_file):# 定义空列表test_data = []# 打开jsonwith open(json_file, "r",  encoding='utf-8') as file:# 加载json数据json_data = json.load(file)# 循环遍历测试数据for case_data in json_data:# 解析数据username = case_data.get("username")password = case_data.get("password")status = case_data.get("status")message = case_data.get("message")code = case_data.get("code")test_data.append((username, password, status, message, code))return test_data# 2.创建测试类
class TestLogin:uuid = None# 前置处理def setup(self):# 实例化self.login_api = LoginAPI()# 获取验证码response = self.login_api.get_verify_code()# 获取验证码中的uuidTestLogin.uuid = response.json().get("uuid")# 后置处理def teardown(self):pass# 登录成功@pytest.mark.parametrize("username, password, status, message, code", build_data(json_file="../data/login.json"))def test_login__success(self, username, password, status, message, code):login_data = {"username": username,"password": password,"code": "2","uuid": TestLogin.uuid}response = self.login_api.login(test_data=login_data)# 断言验证码assert status == response.status_code# 断言响应数据包含成功assert message in response.text# 断言响应json数据中的code值assert code == response.json().get("code")# 登录成功# 登录失败@pytest.mark.parametrize("username, password, status, message, code", build_data(json_file="../data/login.json"))def test_login_fail(self, username, password, status, message, code):login_data = {"username": username,"password": password,"code": "2","uuid": TestLogin.uuid}response = self.login_api.login(test_data=login_data)# 断言验证码assert status == response.status_code# 断言响应数据包含成功assert message in response.text# 断言响应json数据中的code值assert code == response.json().get("code")
正常pychram调试的时候方法和类是没有绿色三角形的,即不能单独调试,需要自定义main函数进行实例并调用方法调试,但是可以将类与方法加载到pytest框架中即可单独调试函数和类。
但是需要注意2点:
第一:需要设置测试框架使用pytest

第二,类和方法的命名要符合pytest框架规范,pytest才能识别:
类需要以Test开头,方法需要以test_开头,另外python文件名需要以test_开头,或_test结尾

2.6、课程添加自动化
首先需要在api目录下封装登录接口与课程上传接口。
# 1.导包
import requests
# 2.创建接口类
class LoginAPI:# 初始化def __init__(self):# 指定urlself.url_verify = "http://kdtx-test.itheima.net/api/captchaImage"self.url_login = "http://kdtx-test.itheima.net/api/login"# 验证码def get_verify_code(self):return requests.get(url=self.url_verify)# 登录def login(self, test_data):return requests.post(self.url_login, json=test_data)
# 导包
import requests# 创建接口类
class CourseAPI:# 初始化def __init__(self):self.add_course_url = "http://kdtx-test.itheima.net/api/clues/course/"# 课程添加def add_course(self, test_data, token):return requests.post(url=self.add_course_url, json=test_data, headers={"Authorization": token})
然后编写测试脚本课程上传并断言结果。
# 导包
from api.login import LoginAPI
from api.course import CourseAPI# 课程添加类
class TestAddCourseAPI:token = Nonedef setup(self):# 初始化接口self.api_login = LoginAPI()self.api_course = CourseAPI()# 获取验证码res = self.api_login.get_verify_code()# 登录login_data = {"username": "admin","password": "HM_2023_test","code": "2","uuid": res.json().get("uuid")}response = self.api_login.login(test_data=login_data)TestAddCourseAPI.token = response.json().get("token")def teardown(self):pass# 课程添加成功def test_add_course_success(self):add_data = {"name": "测试开发课程","subject": "6","price": "344","applicablePerson": "2"}response = self.api_course.add_course(test_data=add_data, token=TestAddCourseAPI.token)# 断言响应状态码assert 200 == response.status_code# 断言messageassert '成功' in response.text# 断言codeassert 200 == response.json().get("code")
2.7、课程查询接口自动化
首先封装查询课程接口api,同时需要封装登录接口api。
# 导包
import requests# 创建接口类
class CourseAPI:# 初始化def __init__(self):self.add_course_url = "http://kdtx-test.itheima.net/api/clues/course/"self.select_course_url = "http://kdtx-test.itheima.net/api/clues/course/list"# 课程添加def add_course(self, test_data, token):return requests.post(url=self.add_course_url, json=test_data, headers={"Authorization": token})# 查询课程列表def select_course(self, test_data, token):return requests.get(url=self.select_course_url + f"{test_data}", headers={"Authorization": token})
使用pytest框架调用封装的课程查询接口实现课程查询自动化。
# 导包
from api.login import LoginAPI
from api.course import CourseAPI# 课程添加类
class TestAddCourseAPI:token = Nonedef setup(self):# 初始化接口self.api_login = LoginAPI()self.api_course = CourseAPI()# 获取验证码res = self.api_login.get_verify_code()# 登录login_data = {"username": "admin","password": "HM_2023_test","code": "2","uuid": res.json().get("uuid")}response = self.api_login.login(test_data=login_data)TestAddCourseAPI.token = response.json().get("token")def teardown(self):pass# 课程查询成功def test_select_course_success(self):response = self.api_course.select_course(test_data="?name=测试开发提升课", token=TestAddCourseAPI.token)# 断言assert 200 == response.status_codeassert '成功' in response.textassert 200 == response.json().get("code")# 课程查询失败def test_select_course_fail(self):response = self.api_course.select_course(test_data="?name=测试开发提升课", token="***")# 断言assert 200 == response.status_codeassert '认证失败' in response.textassert 401 == response.json().get("code")
2.8、课程修改接口自动化
首先在api包下先封装课程修改接口,如下:
# 导包
import requests# 创建接口类
class CourseAPI:# 初始化def __init__(self):self.add_course_url = "http://kdtx-test.itheima.net/api/clues/course/"self.select_course_url = "http://kdtx-test.itheima.net/api/clues/course/list"# 课程添加def add_course(self, test_data, token):return requests.post(url=self.add_course_url, json=test_data, headers={"Authorization": token})# 查询课程列表def select_course(self, test_data, token):return requests.get(url=self.select_course_url + f"{test_data}", headers={"Authorization": token})# 修改课程def update_course(self, test_data, token):return requests.put(url=self.add_course_url, json=test_data, headers={"Authorization": token})
在script包下编写测试脚本,测试课程修改接口:
# 导包
from api.login import LoginAPI
from api.course import CourseAPI# 课程添加类
class TestUpdateCourseAPI:token = Nonedef setup(self):# 初始化接口self.api_login = LoginAPI()self.api_course = CourseAPI()# 获取验证码res = self.api_login.get_verify_code()# 登录login_data = {"username": "admin","password": "HM_2023_test","code": "2","uuid": res.json().get("uuid")}response = self.api_login.login(test_data=login_data)TestUpdateCourseAPI.token = response.json().get("token")def teardown(self):pass# 课程修改成功def test_update_course_success(self):update_data = {"id": "109","name": "测试接口001","subject": "6","price": 999,"applicablePerson": "2","info": "课程介绍003"}response = self.api_course.update_course(test_data=update_data, token=TestUpdateCourseAPI.token)# 断言assert 200 == response.status_codeassert '成功' in response.textassert 200 == response.json().get("code")# 课程修改失败def test_update_course_fail(self):update_data = {"id": "109","name": "测试接口001","subject": "6","price": 999,"applicablePerson": "2","info": "课程介绍003"}response = self.api_course.update_course(test_data=update_data, token="***")# 断言assert 200 == response.status_codeassert '认证失败' in response.textassert 401 == response.json().get("code")
2.9、课程删除接口自动化
首先封装删除课程的接口,具体如下:
# 课程接口的封装# 导包
import requests# 创建接口类
class CourseAPI:# 初始化def __init__(self):self.add_course_url = "http://kdtx-test.itheima.net/api/clues/course/"self.select_course_url = "http://kdtx-test.itheima.net/api/clues/course/list"# 课程添加def add_course(self, test_data, token):return requests.post(url=self.add_course_url, json=test_data, headers={"Authorization": token})# 查询课程列表def select_course(self, test_data, token):return requests.get(url=self.select_course_url + f"{test_data}", headers={"Authorization": token})# 修改课程def update_course(self, test_data, token):return requests.put(url=self.add_course_url, json=test_data, headers={"Authorization": token})# 删除课程def delete_course(self, course_id, token):return requests.delete(self.add_course_url + f"/{course_id}", headers={"Authorization": token})
然后编写测试脚本对课程删除接口进行测试,并断言测试结果。
# 导包
from api.login import LoginAPI
from api.course import CourseAPI# 课程删除类
class TestDeleteCourseAPI:token = Nonedef setup(self):# 初始化接口self.api_login = LoginAPI()self.api_course = CourseAPI()# 获取验证码res = self.api_login.get_verify_code()# 登录login_data = {"username": "admin","password": "HM_2023_test","code": "2","uuid": res.json().get("uuid")}response = self.api_login.login(test_data=login_data)TestDeleteCourseAPI.token = response.json().get("token")def teardown(self):pass# 课程删除成功def test_delete_course_success(self):response = self.api_course.delete_course(course_id=109, token=TestDeleteCourseAPI.token)# 断言assert 200 == response.status_codeassert '成功' in response.textassert 200 == response.json().get("code")# 课程删除失败(课程id不存在)def test_delete_course_fail_id(self):response = self.api_course.delete_course(course_id=1000000000, token=TestDeleteCourseAPI.token)# 断言assert 200 == response.status_codeassert '操作失败' in response.textassert 500 == response.json().get("code")# 课程删除失败(未登录)def test_delete_course_fail_login(self):response = self.api_course.delete_course(course_id=110, token="***")# 断言assert 200 == response.status_codeassert '认证失败' in response.textassert 401 == response.json().get("code")
2.10、项目配置文件config
在主项目的根目录下定义一个config1.py文件定义url的共用路径与当前根目录的地址。
# 配置类import os#  设置项目环境域名
BASE_URL = "http://kdtx-test.itheima.net"# 项目根路径
BASE_PATH = os.path.dirname(__file__)
接口封装类中换成BASE_URL拼接的形式。
# 导包
import requests
import config1# 创建接口类
class CourseAPI:# 初始化def __init__(self):self.add_course_url = config1.BASE_URL + "/api/clues/course/"self.select_course_url = config1.BASE_URL + "/api/clues/course/list"# 课程添加def add_course(self, test_data, token):return requests.post(url=self.add_course_url, json=test_data, headers={"Authorization": token})# 查询课程列表def select_course(self, test_data, token):return requests.get(url=self.select_course_url + f"{test_data}", headers={"Authorization": token})# 修改课程def update_course(self, test_data, token):return requests.put(url=self.add_course_url, json=test_data, headers={"Authorization": token})# 删除课程def delete_course(self, course_id, token):return requests.delete(self.add_course_url + f"/{course_id}", headers={"Authorization": token})
具体的路径中换成BASE_PATH拼接的形式。
# 1.导包
from api.login import LoginAPI
import pytest
import json
import config1# 读取json文件
def build_data(json_file):# 定义空列表test_data = []# 打开jsonwith open(json_file, "r",  encoding='utf-8') as file:# 加载json数据json_data = json.load(file)# 循环遍历测试数据for case_data in json_data:# 解析数据username = case_data.get("username")password = case_data.get("password")status = case_data.get("status")message = case_data.get("message")code = case_data.get("code")test_data.append((username, password, status, message, code))return test_data# 2.创建测试类
class TestLogin:uuid = None# 前置处理def setup(self):# 实例化self.login_api = LoginAPI()# 获取验证码response = self.login_api.get_verify_code()# 获取验证码中的uuidTestLogin.uuid = response.json().get("uuid")# 后置处理def teardown(self):pass# 登录成功@pytest.mark.parametrize("username, password, status, message, code", build_data(json_file=config1.BASE_PATH + "/data/login.json"))def test_login__success(self, username, password, status, message, code):login_data = {"username": username,"password": password,"code": "2","uuid": TestLogin.uuid}response = self.login_api.login(test_data=login_data)# 断言验证码assert status == response.status_code# 断言响应数据包含成功assert message in response.text# 断言响应json数据中的code值assert code == response.json().get("code")# 登录成功# 登录失败@pytest.mark.parametrize("username, password, status, message, code", build_data(json_file=config1.BASE_PATH + "/data/login.json"))def test_login_fail(self, username, password, status, message, code):login_data = {"username": username,"password": password,"code": "2","uuid": TestLogin.uuid}response = self.login_api.login(test_data=login_data)# 断言验证码assert status == response.status_code# 断言响应数据包含成功assert message in response.text# 断言响应json数据中的code值assert code == response.json().get("code")
2.11、allure生成测试报告
使用pip指令安装allure:pip install allure-pytest
然后下载并配置allure,下载地址:Central Repository: io/qameta/allure/allure-commandline
下载安装解压到指定目录,并将allure的bin目录路径配置到环境变量中系统变量的path。
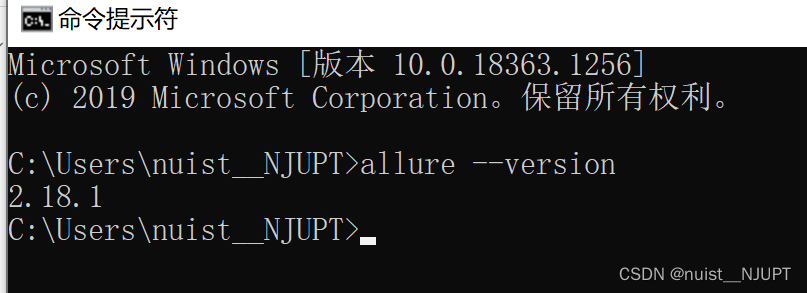
配置完成后使用allure --version命令检测。
在pytest.ins文件中配置执行信息。包含报告输出信息、测试脚本路径、测试类、测试函数等
[pytest]
addopts =-s --alluredir report
testpaths =./script
python_files = test*.py
python_classes = Test*
python_functions = test*
在pychram的终端中使用命令:pytest 批量执行测试用例
使用allure serve report 命令查看测试报告: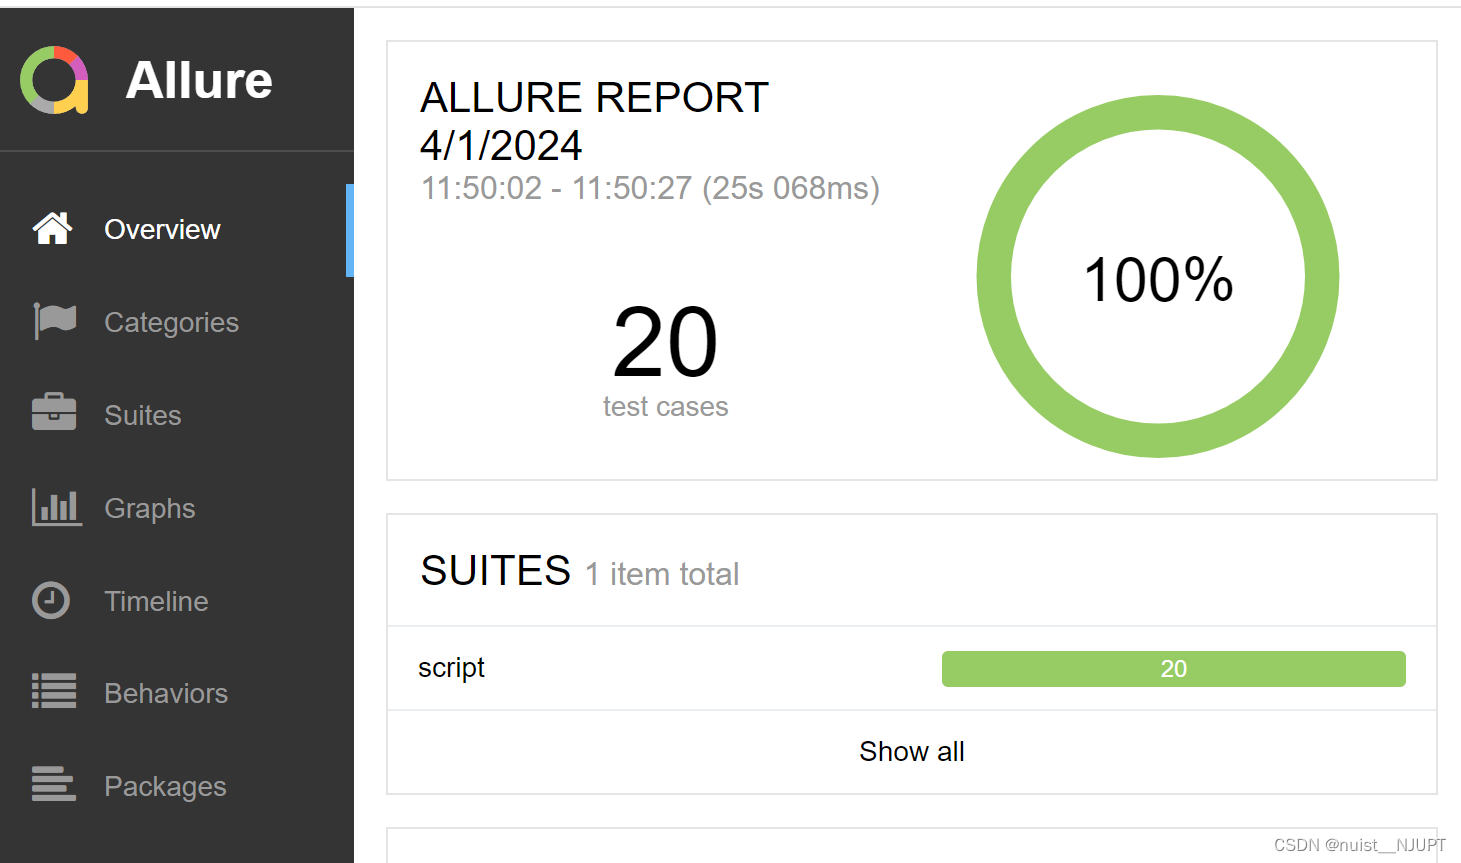

这篇关于Python接口自动化测试-篇1(postman+requests+pytest+allure)的文章就介绍到这儿,希望我们推荐的文章对编程师们有所帮助!


