本文主要是介绍webGIS 之 智慧校园案例,希望对大家解决编程问题提供一定的参考价值,需要的开发者们随着小编来一起学习吧!
1.引入资源创建地图
//index.html
<!DOCTYPE html>
<html lang="en">
<head><meta charset="UTF-8"><meta http-equiv="X-UA-Compatible" content="IE=edge"><meta name="viewport" content="width=device-width, initial-scale=1.0"><title>智慧校园</title><!-- 引⼊资源 --><!-- css样式 --><link rel="stylesheet" href="https://a.amap.com/jsapi_demos/static/demo-center/css/demo-center.css" /><link rel="stylesheet" href="./css/index.css"><!-- 引⼊js资源 --><script type="text/javascript">window._AMapSecurityConfig = {securityJsCode: 'code',}</script><script type="text/javascript" src="https://webapi.amap.com/maps?v=2.0&key=key"></script>
</head>
<body><!-- 创建地图容器 --><div id="container"></div><script>//创建地图对象var map = new AMap.Map('container', {center: [114.402672, 30.518987],zoom: 16,viewMode: '3D',pitch: 45,})</script>
</body>
</html>
//css/index.css
html,
body,
#container {width: 100%;height: 100%;
}
2.使用控件

// 使⽤控件AMap.plugin(['AMap.ToolBar', 'AMap.Scale', 'AMap.ControlBar'], function () {map.addControl(new AMap.ToolBar())map.addControl(new AMap.Scale())map.addControl(new AMap.ControlBar())})
3.标记功能
右上⻆就有了交互控件,且可以⽤⿏标左键单击添加标记。
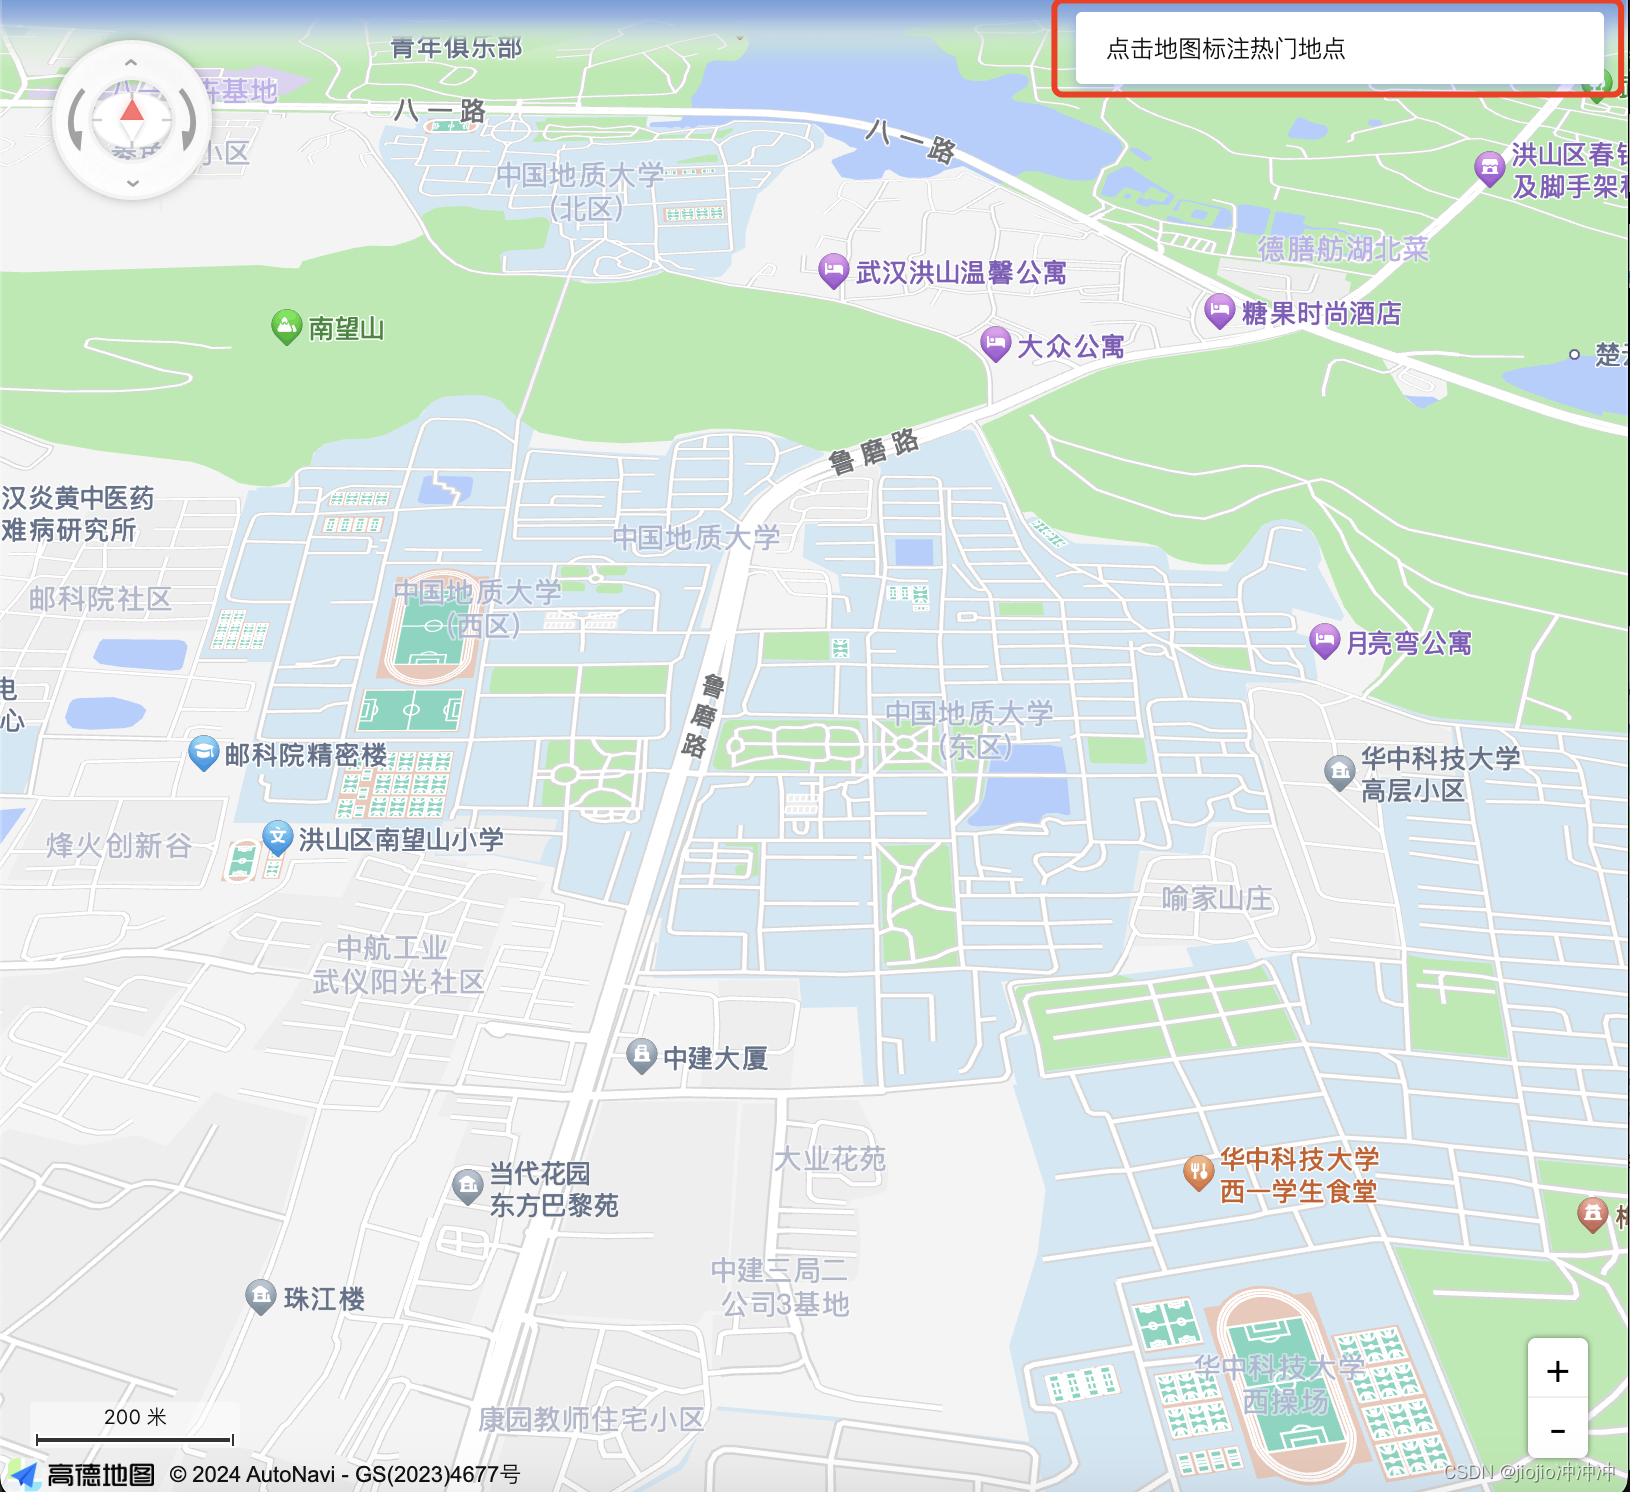
//使⽤⾼德的css样式来创建⼀个div控件<div class="info">点击地图标注热⻔地点</div>
// 添加监听地图点击事件map.on('click',function(e){// 创建标记var marker = new AMap.Marker({position:e.lnglat,})// 添加标记图层map.add(marker)})
4.使⽤GeoJSON数据持久化
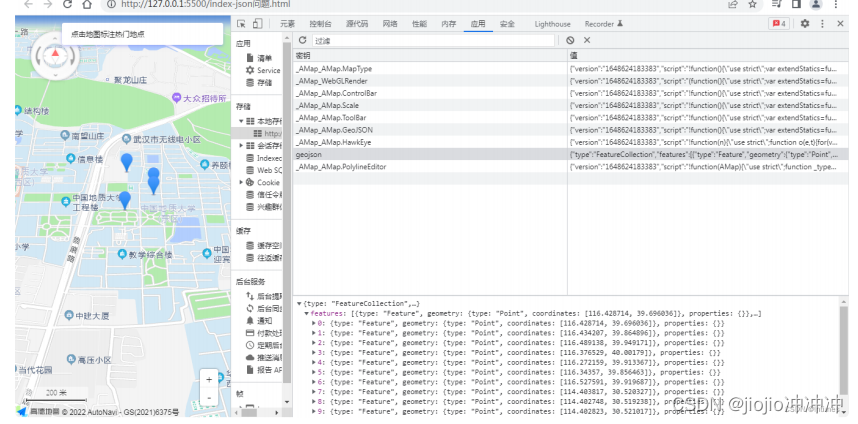
使⽤GeoJSON在本地存储中记录数据
首页我们需要创建一个store.js文件用来写读取和存入的函数
// 从local storage中读取数据
function getData() {//判断本地local storage中不存在数据if (!localStorage.getItem('geojson')) {localStorage.setItem('geojson', '[]')}return JSON.parse(localStorage.getItem('geojson'))
}
// 从local storage中写数据
function saveData(data) {localStorage.setItem('geojson', JSON.stringify(data))
}
在index .html引入
<script src="./js/store.js"></script>
<!DOCTYPE html>
<html lang="en">
<head><meta charset="UTF-8"><meta http-equiv="X-UA-Compatible" content="IE=edge"><meta name="viewport" content="width=device-width, initial-scale=1.0"><title>智慧校园</title><!-- 引⼊资源 --><!-- css样式 --><link rel="stylesheet" href="https://a.amap.com/jsapi_demos/static/demo-center/css/demo-center.css" /><link rel="stylesheet" href="./css/index.css"><!-- 引⼊js资源 --><script type="text/javascript">window._AMapSecurityConfig = {securityJsCode: 'code',}</script><script src="./js/store.js"></script><script type="text/javascript"src="https://webapi.amap.com/maps?v=2.0&key=key"></script>
</head><body><!-- 创建地图容器 --><div id="container"></div><div class="info">点击地图标注热⻔地点</div><script>//创建地图对象var map = new AMap.Map('container', {center: [114.402672, 30.518987],zoom: 16,viewMode: '3D',pitch: 45,})// 使⽤控件AMap.plugin(['AMap.ToolBar', 'AMap.Scale', 'AMap.ControlBar','AMap.GeoJSON'], function () {map.addControl(new AMap.ToolBar())map.addControl(new AMap.Scale())map.addControl(new AMap.ControlBar())})//定义全局变量var geojson = new AMap.GeoJSON({geoJSON: null,})// 导⼊数据if (JSON.stringify(getData()) != '[]') {//有数据的时候才导⼊geojson.importData(getData())}map.add(geojson)// 监听地图点击事件map.on('click', function (e) {// 创建标记var marker = new AMap.Marker({position: e.lnglat,})// 通过geojson对象管理覆盖物geojson.addOverlay(marker)//console.log(geojson)saveData(geojson.toGeoJSON())})</script>
</body>
</html>
5.实现打卡
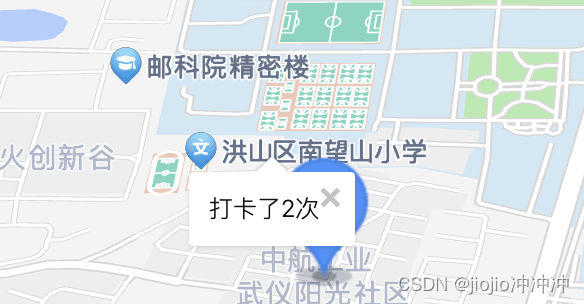
实现思路:使用marker覆盖物的点击事件,导入数据的地方恢复旧数据的点击事件
<!DOCTYPE html>
<html lang="en"><head><meta charset="UTF-8"><meta http-equiv="X-UA-Compatible" content="IE=edge"><meta name="viewport" content="width=device-width, initial-scale=1.0"><title>智慧校园</title><!-- 引⼊资源 --><!-- css样式 --><link rel="stylesheet" href="https://a.amap.com/jsapi_demos/static/demo-center/css/demo-center.css" /><link rel="stylesheet" href="./css/index.css"><!-- 引⼊js资源 --><script type="text/javascript">window._AMapSecurityConfig = {securityJsCode: 'code',}</script><script src="./js/store.js"></script><script type="text/javascript"src="https://webapi.amap.com/maps?v=2.0&key=key"></script>
</head><body><!-- 创建地图容器 --><div id="container"></div><div class="info">点击地图标注热⻔地点,点击地点可以打卡</div><script>//创建地图对象var map = new AMap.Map('container', {center: [114.402672, 30.518987],zoom: 16,viewMode: '3D',pitch: 45,})// 使⽤控件AMap.plugin(['AMap.ToolBar', 'AMap.Scale', 'AMap.ControlBar', 'AMap.GeoJSON'], function () {map.addControl(new AMap.ToolBar())map.addControl(new AMap.Scale())map.addControl(new AMap.ControlBar())})// 创建一个 Iconvar startIcon = new AMap.Icon({// 图标的取图地址image: 'https://a.amap.com/jsapi_demos/static/demo-center/icons/poi-marker-default.png',});//定义全局变量var geojson = new AMap.GeoJSON({geoJSON: null,})// 导⼊数据if (JSON.stringify(getData()) != '[]') {//有数据的时候才导⼊geojson.importData(getData())geojson.eachOverlay(function (item) {item.on('click', function (e) {var ext = item.getExtData()var click = ++ext._geoJsonProperties.click})})saveData(geojson.toGeoJSON())}map.add(geojson)// 监听地图点击事件map.on('click', function (e) {// 创建标记var marker = new AMap.Marker({position: e.lnglat,icon: startIcon,//固定写法extData: {_geoJsonProperties: {gid: geojson.getOverlays().length + 1,click: 0,},}})marker.on('click', function (e) {//固定写法var ext = marker.getExtData()var click = ++ext._geoJsonProperties.clicksaveData(geojson.toGeoJSON())// 使⽤消息提示框var infowindow = new AMap.InfoWindow({anchor: 'top-center',//模板字符串content: `<div>打卡了${click}次</div>`,})//打开信息框在标记的位置infowindow.open(map, marker.getPosition())})// 通过geojson对象管理覆盖物geojson.addOverlay(marker)//console.log(geojson)saveData(geojson.toGeoJSON())// 添加标记图层// map.add(marker)})</script>
</body></html>
6.推荐浏览路线

<!DOCTYPE html>
<html lang="en"><head><meta charset="UTF-8"><meta http-equiv="X-UA-Compatible" content="IE=edge"><meta name="viewport" content="width=device-width, initial-scale=1.0"><title>智慧校园</title><!-- 引⼊资源 --><!-- css样式 --><link rel="stylesheet" href="https://a.amap.com/jsapi_demos/static/demo-center/css/demo-center.css" /><link rel="stylesheet" href="./css/index.css"><!-- 引⼊js资源 --><script type="text/javascript">window._AMapSecurityConfig = {securityJsCode: 'code',}</script><script src="./js/store.js"></script><script type="text/javascript"src="https://webapi.amap.com/maps?v=2.0&key=key"></script>
</head><body><!-- 创建地图容器 --><div id="container"></div><div class="info">点击地图标注热⻔地点,点击地点可以打卡</div><div class="input-card" style="width:10rem;"><h4>推荐游览路线</h4><div class="input-item"><button class="btn" onclick="startAnimation()">开始动画</button></div></div><script>//创建地图对象var map = new AMap.Map('container', {center: [114.402672, 30.518987],zoom: 16,viewMode: '3D',pitch: 45,})// 使⽤控件AMap.plugin(['AMap.ToolBar', 'AMap.Scale', 'AMap.ControlBar', 'AMap.GeoJSON','AMap.MoveAnimation'], function () {map.addControl(new AMap.ToolBar())map.addControl(new AMap.Scale())map.addControl(new AMap.ControlBar())// map.addControl(new AMap.MoveAnimation())})//定义全局变量var geojson = new AMap.GeoJSON({geoJSON: null,})// 导⼊数据if (JSON.stringify(getData()) != '[]') {//有数据的时候才导⼊geojson.importData(getData())geojson.eachOverlay(function (item) {item.on('click', function (e) {var ext = item.getExtData()var click = ++ext._geoJsonProperties.click})})saveData(geojson.toGeoJSON())}map.add(geojson)// 监听地图点击事件map.on('click', function (e) {// 创建标记var marker = new AMap.Marker({position: e.lnglat,extData: {_geoJsonProperties: {gid: geojson.getOverlays().length + 1,click: 0,},}})marker.on('click', function (e) {var ext = marker.getExtData()var click = ++ext._geoJsonProperties.clicksaveData(geojson.toGeoJSON())// 使⽤消息提示框var infowindow = new AMap.InfoWindow({anchor: 'top-center',//模板字符串content: `<div>打卡了${click}次</div>`,})//打开信息框在标记的位置infowindow.open(map, marker.getPosition())})// 通过geojson对象管理覆盖物geojson.addOverlay(marker)//console.log(geojson)saveData(geojson.toGeoJSON())// 添加标记图层// map.add(marker)})function startAnimation() {AMap.plugin('AMap.Driving', function () {var driving = new AMap.Driving({map: map,policy: AMap.DrivingPolicy.LEAST_TIME,//驾⻋策略})//设置起点和终点var start = new AMap.LngLat(114.400984, 30.518653)var end = new AMap.LngLat(114.404755, 30.523851)// 创建途经点var opts = {waypoints: [],}geojson.eachOverlay(function (item) {//拿到每⼀个点opts.waypoints.push(item.getPosition())})driving.search(start, end, opts, function (status, result) {//result结果就会返回当前轨迹对象,其中包含了导航信息var lineArr = []result.routes[0].steps.forEach(function (item) {lineArr.push(...item.path)});if (status == 'complete') {var marker = new AMap.Marker({map: map,position: start,icon: 'https://webapi.amap.com/images/car.png',offset: new AMap.Pixel(-26 ,- 13),autoRotation: true,angle: -180,})var passedPolyline = new AMap.Polyline({map: map,strokeColor: '#AF5',//描边的绿⾊strokeWeight: 6,//线宽})marker.on('moving', function (e) {passedPolyline.setPath(e.passedPath)})map.setFitView()marker.moveAlong(lineArr, {duration: 500,autoRotation: true,})} else {}})})}</script>
</body>
</html>
这篇关于webGIS 之 智慧校园案例的文章就介绍到这儿,希望我们推荐的文章对编程师们有所帮助!


