本文主要是介绍springboot使用com.github.binarywang 包实现微信网页上的支付和退款,希望对大家解决编程问题提供一定的参考价值,需要的开发者们随着小编来一起学习吧!
前提
微信小程序中实现微信支付是从小程序中调去微信支付的界面直接进行支付,那么在pc端需要实现微信的支付呢,是需要出现一个二维码让用户使用扫码支付的。
注意:
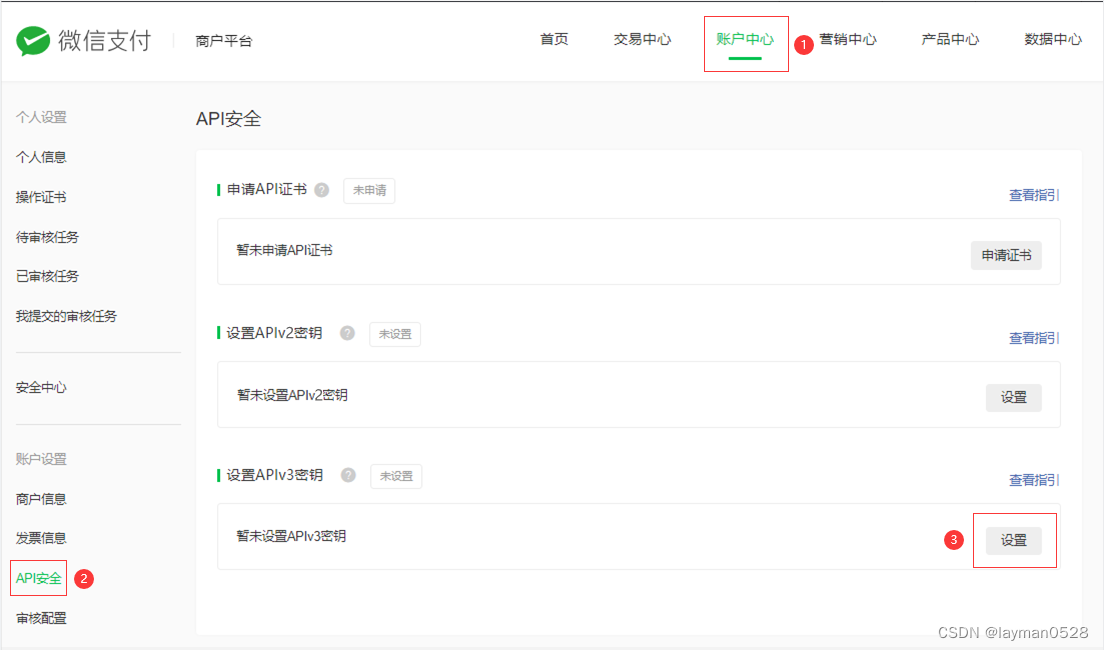
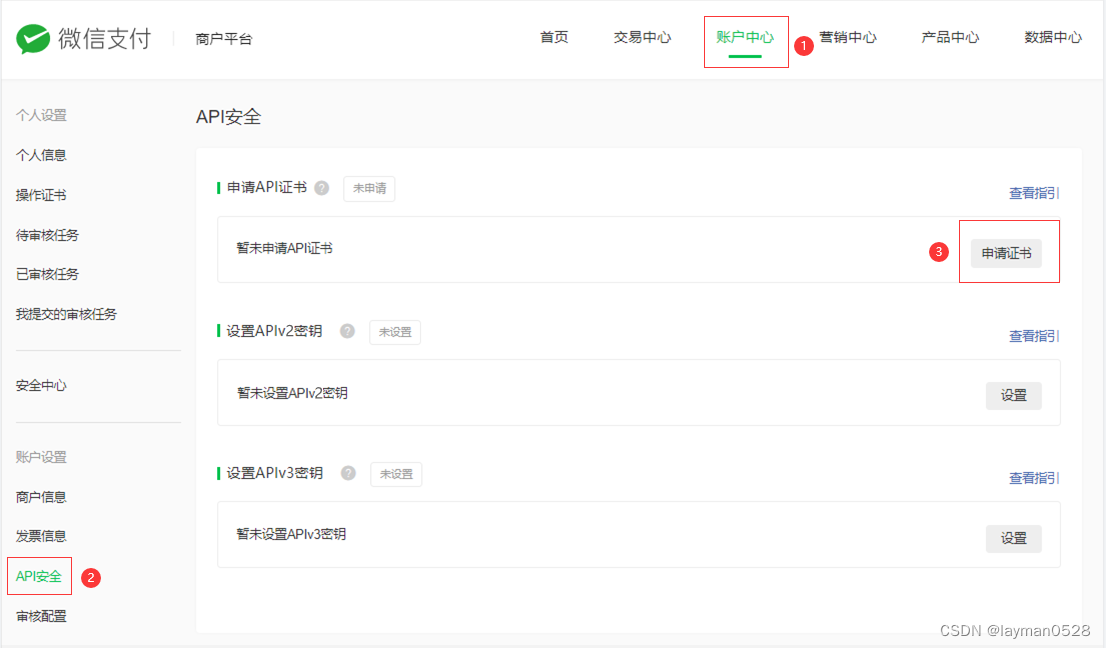
需要实现pc端的微信支付,需要在微信商户平台开通native支付,并且下载并配置商户证书
设置好这些之后,直接看看在springboot 或者springclound 中如何实现。
maven依赖
<dependency><groupId>com.github.binarywang</groupId><artifactId>weixin-java-pay</artifactId><version>4.1.0</version></dependency><dependency><groupId>org.projectlombok</groupId><artifactId>lombok</artifactId><optional>true</optional></dependency>
步骤
在yml中定义微信的商户号,密码等等
wxpay:appId: appIdmchId: mchIdmchKey: mchKeykeyPath: /home/wxpay_cert/apiclient_cert.p12privateKeyPath: /home/wxpay_cert/apiclient_key.pemprivateCertPath: /home/wxpay_cert/apiclient_cert.pemnotifyUrl: notifyUrlrefundNotifyUrl: refundNotifyUrlserialNo: serialNo
notifuyUrl 是 支付回调地址
refundNotifyUrl是 退款回调地址
这两个地址都必须是外网可访问的地址
新建WechatPayConfig类来读取yml文件的中信息
import lombok.Data;
import org.springframework.boot.context.properties.ConfigurationProperties;@Data
@ConfigurationProperties(prefix = "wxpay")
public class WechatPayConfig {private String appId;private String mchId;private String mchKey;private String keyPath;private String privateKeyPath;private String privateCertPath;private String notifyUrl;private String redUrl;private String refundNotifyUrl;private String serialNo;
}
获取ip地址帮助类
IpUtils
public class IpUtils
{public static String getIpAddr(){return getIpAddr(ServletUtils.getRequest());}}
ServletUtils (客户端工具类)
public static HttpServletRequest getRequest(){try{return getRequestAttributes().getRequest();}catch (Exception e){return null;}}public static ServletRequestAttributes getRequestAttributes(){try{RequestAttributes attributes = RequestContextHolder.getRequestAttributes();return (ServletRequestAttributes) attributes;}catch (Exception e){return null;}}
微信支付Service类
@Service
@ConditionalOnClass(WxPayService.class)
@EnableConfigurationProperties(WechatPayConfig.class)
@AllArgsConstructor
public class WechatPayService {static Logger logger = LoggerFactory.getLogger(WechatPayService.class);private WechatPayConfig wechatPayConfig;public WxPayService wxPayService() {WxPayConfig payConfig = new WxPayConfig();payConfig.setAppId(wechatPayConfig.getAppId());payConfig.setMchId(wechatPayConfig.getMchId());payConfig.setMchKey(wechatPayConfig.getMchKey());payConfig.setApiV3Key(wechatPayConfig.getMchKey());payConfig.setKeyPath(wechatPayConfig.getKeyPath());payConfig.setUseSandboxEnv(false);logger.info("wechatPayConfig.getPrivateKeyPath():{}",wechatPayConfig.getPrivateKeyPath());WxPayService wxPayService = new WxPayServiceImpl();wxPayService.setConfig(payConfig); //微信配置信息return wxPayService;}//生成支付二维码//BookingInfo 是你订单表public String generatePayQrCode(BookingInfo booking, String ip) {try {WxPayService wxPayService = wxPayService();WxPayUnifiedOrderRequest orderRequest = new WxPayUnifiedOrderRequest();orderRequest.setOutTradeNo(booking.getDisplayNo()); //订单号orderRequest.setTotalFee(BigDecimal.valueOf(booking.getDisplayPrice()).multiply(new BigDecimal(100)).intValue()); //金额,转换成分 ,至少支付1分钱orderRequest.setSpbillCreateIp(ip);orderRequest.setNotifyUrl(wechatPayConfig.getRedUrl());orderRequest.setBody("");orderRequest.setAttach("");orderRequest.setTradeType("NATIVE");//交易类型orderRequest.setProductId(booking.getId().toString());WxPayNativeOrderResult wxPayNativeOrderResult = (WxPayNativeOrderResult) wxPayService.createOrder(orderRequest);return wxPayNativeOrderResult.getCodeUrl();} catch (Exception e) {// 处理异常e.printStackTrace();return e.getMessage();}}//支付回调函数public String payNotify(String xmlData) {try {WxPayService wxPayService = wxPayService();WxPayOrderNotifyResult notifyResult = wxPayService.parseOrderNotifyResult(xmlData);String orderId = notifyResult.getOutTradeNo();//拿到订单号获取订单logger.info("wechatPayConfig.rePayNotify():{}", xmlData);//处理的业务//因为会重复调用,如果你这里是钱包这种,那么一定要判断是否支付过了return WxPayNotifyResponse.success("成功_" + orderInfo.getId());} catch (WxPayException e) {e.printStackTrace();return WxPayNotifyResponse.fail(e.getMessage());}}//退款订单请求//RefundInfo 退款的订单,这里单笔订单,如果是多笔,你可以构建list 要循环执行//RefundInfo 中需要包括 支付订单的订单号、支付金额、退款的订单号、退款金额public String redRefundPay(RefundInfo refund){try {if (refund == null) {return "订单获取失败";}WxPayService wxPayService = wxPayService();WxPayRefundRequest orderRequest = new WxPayRefundRequest();orderRequest.setOutTradeNo(refund.getDisplayNo());orderRequest.setNotifyUrl(wechatPayConfig.getRefundNotifyUrl());orderRequest.setTotalFee(BigDecimal.valueOf(refund.getDisplaySum()).multiply(new BigDecimal(100)).intValue());orderRequest.setRefundFee(BigDecimal.valueOf(refund.getDisplayPrice()).multiply(new BigDecimal(100)).intValue());orderRequest.setOutRefundNo(memberRedRefund.getDisplayNo());WxPayRefundResult wxPayRefundResult = wxPayService.refund(orderRequest);if ("SUCCESS".equals(wxPayRefundResult.getReturnCode())&& "SUCCESS".equals(wxPayRefundResult.getResultCode())) {/*** 系统内部业务逻辑*/logger.info("wechatPayConfig.redRefundNotify():{}", refund.toString());return "退款中";}return "退款失败";} catch (Exception e) {// 处理异常e.printStackTrace();return e.getMessage();}}//退款回调函数public String redRefundNotify(String xmlData) {try {WxPayService wxPayService = wxPayService();WxPayRefundNotifyResult notifyResult = wxPayService.parseRefundNotifyResult(xmlData);String orderId = notifyResult.getReqInfo().getOutRefundNo();//拿到订单号获取订单logger.info("wechatPayConfig.redRefundNotify():{}", xmlData);//编写自己的业务处理逻辑return WxPayNotifyResponse.success("成功_" + orderInfo.getId());} catch (WxPayException e) {e.printStackTrace();return WxPayNotifyResponse.fail(e.getMessage());}}}
这篇关于springboot使用com.github.binarywang 包实现微信网页上的支付和退款的文章就介绍到这儿,希望我们推荐的文章对编程师们有所帮助!


