本文主要是介绍PSP - 配置 AlphaFold2 的高效 Tensorflow 运行环境,希望对大家解决编程问题提供一定的参考价值,需要的开发者们随着小编来一起学习吧!
欢迎关注我的CSDN:https://spike.blog.csdn.net/
本文地址:https://blog.csdn.net/caroline_wendy/article/details/130560538
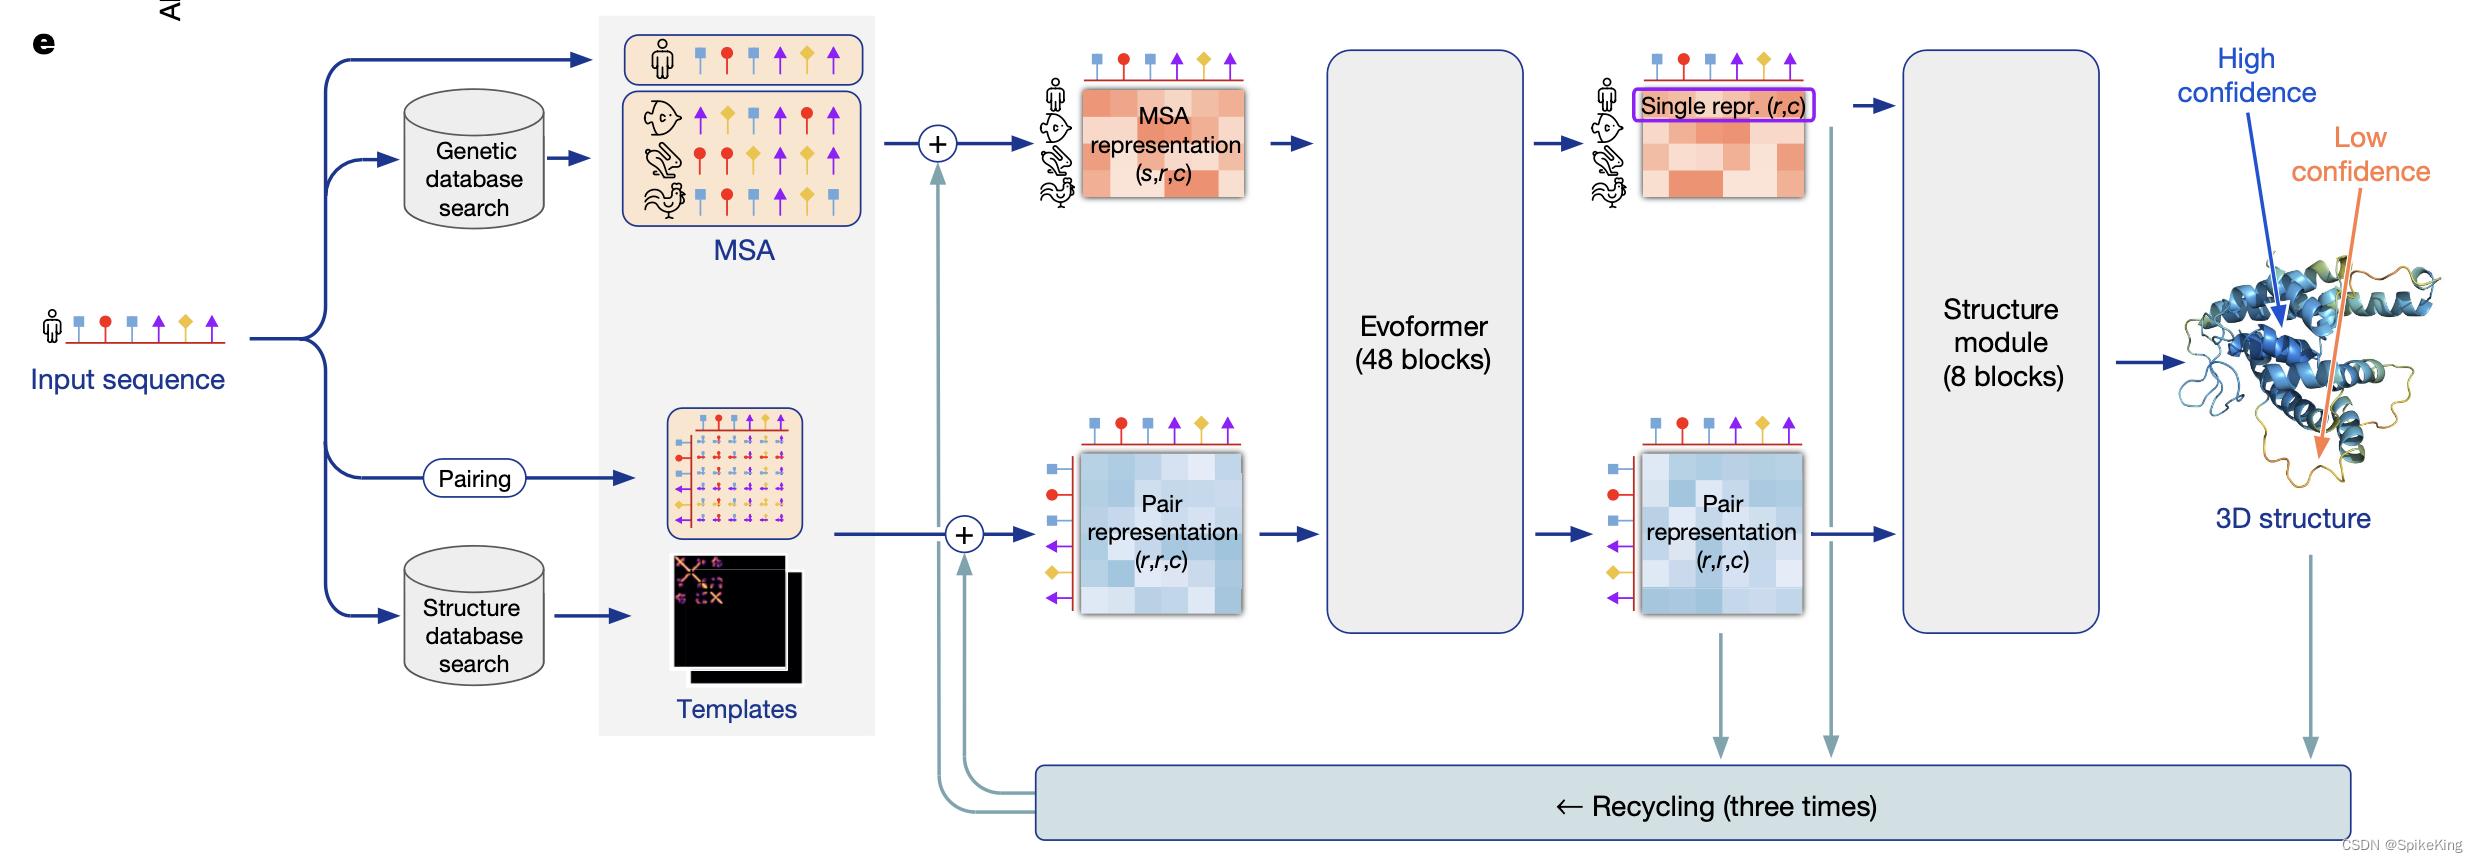
AlphaFold2 是由 DeepMind 开发,可以根据蛋白质的氨基酸序列预测其三维结构,准确度经常可以与实验相媲美。DeepMind 和 EMBL 的欧洲生物信息学研究所合作,创建AlphaFold DB,免费向科学界提供这些预测结果。最新的数据库版本,包含了超过 200 万种蛋白质的结构预测,涵盖人类和其他 20 多种物种的蛋白质组。AlphaFold2 的核心是基于神经网络的计算模型,结合了蛋白质的物理和生物学知识,利用多序列比对(MSA)所设计出的深度学习算法。
1. Docker 环境
命令如下:
# 启动 nvidia-docker 环境
nvidia-docker run -it --name [docker-name] -v [...]:[...] [nvidia-base]:v1.0# 配置 conda
bash Miniconda3-py38_4.10.3-Linux-x86_64.sh
source ~/.bashrc# 创建 alphafold 环境
conda create --name alphafold python==3.8
conda update -n base conda
conda activate alphafold# 配置 conda 库
conda install -y -c conda-forge openmm==7.5.1 cudatoolkit==11.2.2 pdbfixer
conda install -y -c bioconda hmmer hhsuite==3.3.0 kalign2# 再次更新
conda install -y -c conda-forge openmm==7.7.0
conda install -y -c conda-forge pdbfixer==1.8.1# 配置 pip 库, tensorflow-gpu 或 tensorflow-cpu,根据机器选择
pip install absl-py==1.0.0 biopython==1.79 chex==0.0.7 dm-haiku==0.0.9 dm-tree==0.1.6 immutabledict==2.0.0 jax==0.3.25 ml-collections==0.1.0 numpy==1.21.6 pandas==1.3.4 protobuf==3.20.1 scipy==1.7.0 tensorflow-gpu==2.9.0 -i https://pypi.tuna.tsinghua.edu.cn/simple/# 配置 pip jax 库
pip install --upgrade --no-cache-dir jax==0.3.25 jaxlib==0.3.25+cuda11.cudnn805 -f https://storage.googleapis.com/jax-releases/jax_cuda_releases.html# 导出环境
export alphafold_path="$(pwd)"# 下载配置文件
wget -q -P $alphafold_path/alphafold/common/ https://git.scicore.unibas.ch/schwede/openstructure/-/raw/7102c63615b64735c4941278d92b554ec94415f8/modules/mol/alg/src/stereo_chemical_props.txt# 配置 openmm.patch
git checkout v2.3.1  # 最新版本删除 openmm.patch
cd ~/miniconda3/envs/alphafold/lib/python3.8/site-packages/
patch -p0 < $alphafold_path/docker/openmm.patch
测试 Tensorflow 是否安装成功,以及 GPU 是否启动:
python3  # 进入命令行import tensorflow as tfprint(f"is_gpu_available: {tf.test.is_gpu_available()}")
gpu_device_name = tf.test.gpu_device_name()
print(f"gpu_device_name: {gpu_device_name}")from tensorflow.python.client import device_lib
# 列出所有的本地机器设备
local_device_protos = device_lib.list_local_devices()
# 只打印GPU设备
print(x) for x in local_device_protos if x.device_type == 'GPU'
保存和复用 docker,命令如下:
# 保存环境
docker ps -l
docker commit [container-id] af2:v1.0
docker save af2:v1.0 | gzip > af2_v1.tar.gz# 加载环境
docker image load -i af2_v1.tar.gz
nvidia-docker run -it --name [docker-name] -v [...]:[...] af2:v1.0
如需更换 Tensorflow 的 CPU 或 GPU 配置,先卸载再更新即可:
pip uninstall tensorflow-cpu tensorflow-estimator tensorflow-io-gcs-filesystem
pip install tensorflow-gpu==2.9.0 -i https://pypi.tuna.tsinghua.edu.cn/simple/
Bug1: OpenMM 相关 Bug
如遇 OpenMM Bug,以及解决方案:
openmm Bug 1: conda install -c conda-forge openmm==7.7.0
Traceback (most recent call last):File "run_alphafold.py", line 41, in <module>from alphafold.relax import relaxFile "alphafold/relax/relax.py", line 18, in <module>from alphafold.relax import amber_minimizeFile "alphafold/relax/amber_minimize.py", line 25, in <module>from alphafold.relax import cleanupFile "alphafold/relax/cleanup.py", line 23, in <module>from openmm import app
ModuleNotFoundError: No module named 'openmm'
pdbfixer Bug2:conda install -c conda-forge pdbfixer==1.8.1
Traceback (most recent call last):File "run_alphafold.py", line 41, in <module>from alphafold.relax import relaxFile "alphafold/relax/relax.py", line 18, in <module>from alphafold.relax import amber_minimizeFile "alphafold/relax/amber_minimize.py", line 25, in <module>from alphafold.relax import cleanupFile "alphafold/relax/cleanup.py", line 22, in <module>import pdbfixerFile "/root/miniconda3/envs/alphafold/lib/python3.8/site-packages/pdbfixer/__init__.py", line 2, in <module>from .pdbfixer import PDBFixerFile "/root/miniconda3/envs/alphafold/lib/python3.8/site-packages/pdbfixer/pdbfixer.py", line 38, in <module>from simtk.openmm.app.internal.pdbstructure import PdbStructure
ModuleNotFoundError: No module named 'simtk.openmm.app.internal'
参考:PSP - 替换 MSA 数据库 以及 OpenMM 和 mmCIF 异常
Bug2: Collecting package metadata (repodata.json): / Killed
参考:StackOverflow - Collecting package metadata (repodata.json): / Killed
显存 RAM 过低,提升显存 0.5GB 至 8GB + 即可。
2. 配置数据库
参考:官方GitHub:GitHub - deepmind/alphafold
2.1 AlphaFold2 Model
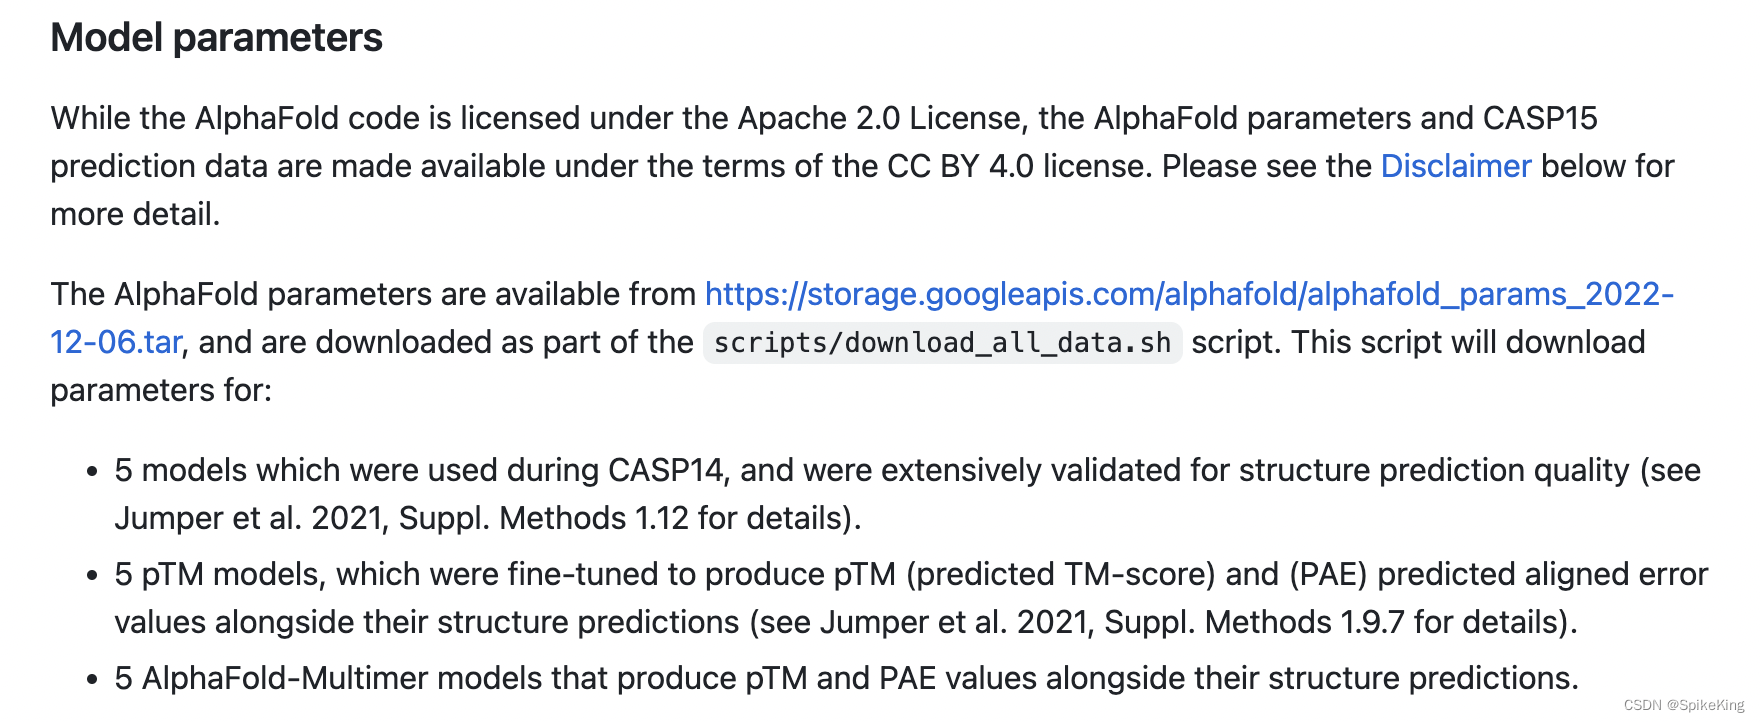
目前,最新版本 (2023.5.7) 是 alphafold_params_2022-12-06。
下载命令:
mkdir params
cd params/
wget -P . https://storage.googleapis.com/alphafold/alphafold_params_2022-12-06.tar   # 5.2G
tar --extract --verbose --file="alphafold_params_2022-12-06.tar" --directory="." --preserve-permissions
模型参数说明:
2.2 Small BFD
下载命令:
mkdir small_bfd
cd small_bfd/
wget -P . https://storage.googleapis.com/alphafold-databases/reduced_dbs/bfd-first_non_consensus_sequences.fasta.gz  # 9.6G
gunzip "bfd-first_non_consensus_sequences.fasta.gz"
2.3 数据库配置
其他数据库,根据工程自行下载。将已有的数据库,配置到一个数据文件夹中,可以使用软连接的方式,即 ln -s,数据库如下:
bfd/					# 多个文件的相同前缀
mgnify/				# fa文件,64G
params/   		# 模型参数,最新版本2022-12-06,monomer,monomer-ptm,multimer_v3
pdb70/				# 文件夹
pdb_mmcif/		# 文件夹
pdb_seqres/		# multimer使用txt,208M
small_bfd/		# bfd的fasta文件,17G
uniprot/			# fasta文件,98G,注意版本信息
uniref30/			# 多个文件的相同前缀,注意日期
uniref90/			# fasta文件,59G
3. 配置脚本
修改运行脚本:run_alphafold.sh
修改数据库配置,注意 uniref30 的不同版本信息,配置如下:
# Path and user config (change me if required)
uniref90_database_path="$data_dir/uniref90/uniref90.fasta"
uniprot_database_path="$data_dir/uniprot/uniprot.fasta"
mgnify_database_path="$data_dir/mgnify/mgy_clusters_2022_05.fa"
bfd_database_path="$data_dir/bfd/bfd_metaclust_clu_complete_id30_c90_final_seq.sorted_opt"
small_bfd_database_path="$data_dir/small_bfd/bfd-first_non_consensus_sequences.fasta"
# uniref30_database_path="$data_dir/uniref30/UniRef30_2021_03"
uniref30_database_path="$data_dir/uniref30/uniclust30_2018_08"
pdb70_database_path="$data_dir/pdb70/pdb70"
pdb_seqres_database_path="$data_dir/pdb_seqres/pdb_seqres.txt"
template_mmcif_dir="$data_dir/pdb_mmcif/mmcif_files"
obsolete_pdbs_path="$data_dir/pdb_mmcif/obsolete.dat"
修改 MSA 搜索工具位置,配置如下:
hhblits_binary_path="/root/miniconda3/envs/alphafold/bin/hhblits"
hhsearch_binary_path="/root/miniconda3/envs/alphafold/bin/hhsearch"
jackhmmer_binary_path="/root/miniconda3/envs/alphafold/bin/jackhmmer"
kalign_binary_path="/root/miniconda3/envs/alphafold/bin/kalign"
修改 数据库位置 与 最大模版日期,配置如下:
if [[ "$data_dir" == "" || "$output_dir" == "" || "$fasta_path" == "" || "$max_template_date" == "" ]] ; thendata_dir=[my data dir];max_template_date="2022-04-01";
fi
搜索 MSA 的过程,在 AF2 推理运行中,占用时间较长,修改优先使用已有 MSA 文件,如下:
if [[ "$use_precomputed_msas" == "" ]] ; thenuse_precomputed_msas="true"
fi
4. 配置源码
加速搜索 MSA 的过程,需要修改 CPU 数量,默认是8个。查询 Linux 的 GPU 数量,如下:
lscpu | grep 'CPU(s):' | head -1 | awk '{print $2}' # 查询 CPU 数量
修改文件 alphafold/data/tools/hhblits.py,如下:
                binary_path: str,databases: Sequence[str],
-               n_cpu: int = 4,
+               n_cpu: int = [your num],n_iter: int = 3,e_value: float = 0.001,maxseq: int = 1_000_000,
修改文件 alphafold/data/tools/hmmsearch.py,如下:
       cmd = [self.binary_path,'--noali',  # Don't include the alignment in stdout.
-          '--cpu', '8'
+          '--cpu', '[your num]']# If adding flags, we have to do so before the output and input:if self.flags:
修改文件 alphafold/data/tools/jackhmmer.py,如下:
                binary_path: str,database_path: str,
-               n_cpu: int = 8,
+               n_cpu: int = [your num],n_iter: int = 1,e_value: float = 0.0001,z_value: Optional[int] = None,
也可以修改 monomer_casp14 模式的默认模型,由 monomer 替换为 monomer_ptm,如下:
-MODEL_PRESETS['monomer_casp14'] = MODEL_PRESETS['monomer']
+# MODEL_PRESETS['monomer_casp14'] = MODEL_PRESETS['monomer']
+MODEL_PRESETS['monomer_casp14'] = MODEL_PRESETS['monomer_ptm']
其中,pTM 模型:
pTM models were fine-tuned to produce pTM (predicted TM-score) and (PAE) predicted aligned error values alongside their structure predictions.
pTM 模型经过微调 (基于monomer),在进行结构预测时,产生 pTM(预测的TM得分)和 PAE(预测的对齐误差)值。
5. 推理序列
推理命令:
bash run_alphafold.sh -o mydata/output/ -f mydata/query.fasta -m monomer_casp14 -c full_dbs
seq:
>dummy_sequence
GWSTELEKHREELKEFLKKEGITNVEIRIDNGRLEVRVEGGTERLKRFLEELRQKLEKKGYTVDIKIE
主要输出:
pdb,最好的结构是ranked_0.pdbranking_debug.json,pdb排名msas,搜索出的 MSA 文件,即mgnify_hits.sto、pdb_hits.hhr、bfd_uniref_hits.a3m、uniref90_hits.sto等。timings.json,运行耗时。
其中 ranking_debug.json,如下:
{"plddts": {"model_1_pred_0": 86.26850453604357,"model_2_pred_0": 85.06505646965638,"model_3_pred_0": 87.40822765097714,"model_4_pred_0": 84.71053426936133,"model_5_pred_0": 82.69870802756033},"order": ["model_3_pred_0","model_1_pred_0","model_2_pred_0","model_4_pred_0","model_5_pred_0"]
}
其中timings.json,如下:
{"features": 103.40737819671631,"process_features_model_1_pred_0": 3.8775177001953125,"predict_and_compile_model_1_pred_0": 116.74437546730042,"relax_model_1_pred_0": 11.63992977142334,"process_features_model_2_pred_0": 1.3910491466522217,"predict_and_compile_model_2_pred_0": 114.51620531082153,"relax_model_2_pred_0": 5.43536114692688,"process_features_model_3_pred_0": 1.1890630722045898,"predict_and_compile_model_3_pred_0": 87.88086938858032,"relax_model_3_pred_0": 5.768261194229126,"process_features_model_4_pred_0": 1.1486437320709229,"predict_and_compile_model_4_pred_0": 87.95040488243103,"relax_model_4_pred_0": 5.295060873031616,"process_features_model_5_pred_0": 1.2103533744812012,"predict_and_compile_model_5_pred_0": 88.90721249580383,"relax_model_5_pred_0": 5.518966436386108
}
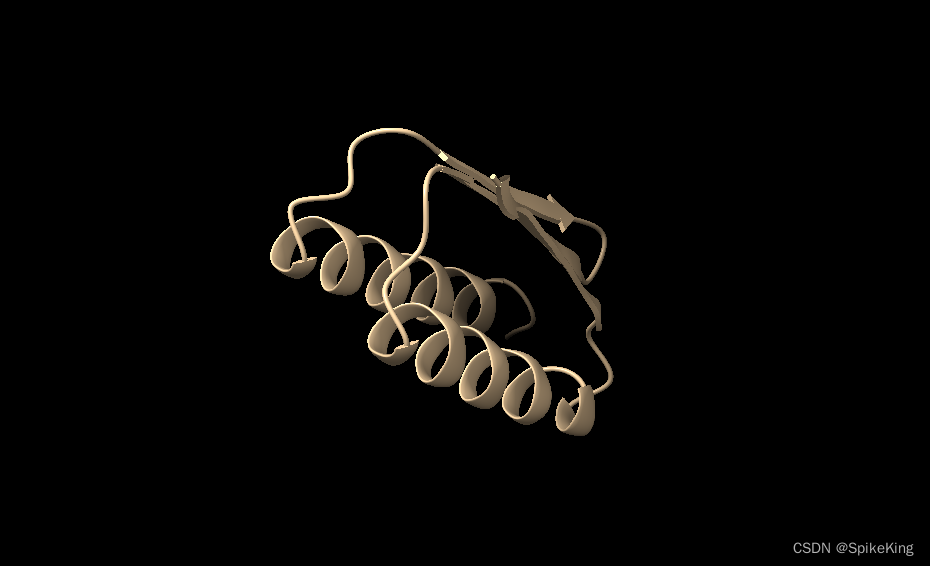
输出的最优PDB结构,如下:
参考
- GitHub - deepmind/alphafold
- GitHub - kalininalab/alphafold_non_docker
源码如下:
#!/bin/bashusage() {echo ""echo "Please make sure all required parameters are given"echo "Usage: $0 <OPTIONS>"echo "Required Parameters:"echo "-d <data_dir>         Path to directory of supporting data"echo "-o <output_dir>       Path to a directory that will store the results."echo "-f <fasta_paths>      Path to FASTA files containing sequences. If a FASTA file contains multiple sequences, then it will be folded as a multimer. To fold more sequences one after another, write the files separated by a comma"echo "-t <max_template_date> Maximum template release date to consider (ISO-8601 format - i.e. YYYY-MM-DD). Important if folding historical test sets"echo "Optional Parameters:"echo "-g <use_gpu>          Enable NVIDIA runtime to run with GPUs (default: true)"echo "-r <run_relax>        Whether to run the final relaxation step on the predicted models. Turning relax off might result in predictions with distracting stereochemical violations but might help in case you are having issues with the relaxation stage (default: true)"echo "-e <enable_gpu_relax> Run relax on GPU if GPU is enabled (default: true)"echo "-n <openmm_threads>   OpenMM threads (default: all available cores)"echo "-a <gpu_devices>      Comma separated list of devices to pass to 'CUDA_VISIBLE_DEVICES' (default: 0)"echo "-m <model_preset>     Choose preset model configuration - the monomer model, the monomer model with extra ensembling, monomer model with pTM head, or multimer model (default: 'monomer')"echo "-c <db_preset>        Choose preset MSA database configuration - smaller genetic database config (reduced_dbs) or full genetic database config (full_dbs) (default: 'full_dbs')"echo "-p <use_precomputed_msas> Whether to read MSAs that have been written to disk. WARNING: This will not check if the sequence, database or configuration have changed (default: 'false')"echo "-l <num_multimer_predictions_per_model> How many predictions (each with a different random seed) will be generated per model. E.g. if this is 2 and there are 5 models then there will be 10 predictions per input. Note: this FLAG only applies if model_preset=multimer (default: 5)"echo "-b <benchmark>        Run multiple JAX model evaluations to obtain a timing that excludes the compilation time, which should be more indicative of the time required for inferencing many proteins (default: 'false')"echo ""exit 1
}while getopts ":d:o:f:t:g:r:e:n:a:m:c:p:l:b:" i; docase "${i}" ind)data_dir=$OPTARG;;o)output_dir=$OPTARG;;f)fasta_path=$OPTARG;;t)max_template_date=$OPTARG;;g)use_gpu=$OPTARG;;r)run_relax=$OPTARG;;e)enable_gpu_relax=$OPTARG;;n)openmm_threads=$OPTARG;;a)gpu_devices=$OPTARG;;m)model_preset=$OPTARG;;c)db_preset=$OPTARG;;p)use_precomputed_msas=$OPTARG;;l)num_multimer_predictions_per_model=$OPTARG;;b)benchmark=$OPTARG;;esac
done# Parse input and set defaults
if [[ "$data_dir" == "" || "$output_dir" == "" || "$fasta_path" == "" || "$max_template_date" == "" ]] ; thenusage
fiif [[ "$benchmark" == "" ]] ; thenbenchmark=false
fiif [[ "$use_gpu" == "" ]] ; thenuse_gpu=true
fiif [[ "$gpu_devices" == "" ]] ; thengpu_devices=0
fiif [[ "$run_relax" == "" ]] ; thenrun_relax="true"
fiif [[ "$enable_gpu_relax" == "" ]] ; thenenable_gpu_relax="true"
fiif [[ "$enable_gpu_relax" == true && "$use_gpu" == true ]] ; thenuse_gpu_relax="true"
elseuse_gpu_relax="false"
fiif [[ "$num_multimer_predictions_per_model" == "" ]] ; thennum_multimer_predictions_per_model=5
fiif [[ "$model_preset" == "" ]] ; thenmodel_preset="monomer"
fiif [[ "$model_preset" != "monomer" && "$model_preset" != "monomer_casp14" && "$model_preset" != "monomer_ptm" && "$model_preset" != "multimer" ]] ; thenecho "Unknown model preset! Using default ('monomer')"model_preset="monomer"
fiif [[ "$db_preset" == "" ]] ; thendb_preset="full_dbs"
fiif [[ "$db_preset" != "full_dbs" && "$db_preset" != "reduced_dbs" ]] ; thenecho "Unknown database preset! Using default ('full_dbs')"db_preset="full_dbs"
fiif [[ "$use_precomputed_msas" == "" ]] ; thenuse_precomputed_msas="false"
fi# This bash script looks for the run_alphafold.py script in its current working directory, if it does not exist then exits
current_working_dir=$(pwd)
alphafold_script="$current_working_dir/run_alphafold.py"if [ ! -f "$alphafold_script" ]; thenecho "Alphafold python script $alphafold_script does not exist."exit 1
fi# Export ENVIRONMENT variables and set CUDA devices for use
# CUDA GPU control
export CUDA_VISIBLE_DEVICES=-1
if [[ "$use_gpu" == true ]] ; thenexport CUDA_VISIBLE_DEVICES=0if [[ "$gpu_devices" ]] ; thenexport CUDA_VISIBLE_DEVICES=$gpu_devicesfi
fi# OpenMM threads control
if [[ "$openmm_threads" ]] ; thenexport OPENMM_CPU_THREADS=$openmm_threads
fi# TensorFlow control
export TF_FORCE_UNIFIED_MEMORY='1'# JAX control
export XLA_PYTHON_CLIENT_MEM_FRACTION='4.0'# Path and user config (change me if required)
uniref90_database_path="$data_dir/uniref90/uniref90.fasta"
uniprot_database_path="$data_dir/uniprot/uniprot.fasta"
mgnify_database_path="$data_dir/mgnify/mgy_clusters_2022_05.fa"
bfd_database_path="$data_dir/bfd/bfd_metaclust_clu_complete_id30_c90_final_seq.sorted_opt"
small_bfd_database_path="$data_dir/small_bfd/bfd-first_non_consensus_sequences.fasta"
uniref30_database_path="$data_dir/uniref30/UniRef30_2021_03"
pdb70_database_path="$data_dir/pdb70/pdb70"
pdb_seqres_database_path="$data_dir/pdb_seqres/pdb_seqres.txt"
template_mmcif_dir="$data_dir/pdb_mmcif/mmcif_files"
obsolete_pdbs_path="$data_dir/pdb_mmcif/obsolete.dat"# Binary path (change me if required)
hhblits_binary_path=$(which hhblits)
hhsearch_binary_path=$(which hhsearch)
jackhmmer_binary_path=$(which jackhmmer)
kalign_binary_path=$(which kalign)command_args="--fasta_paths=$fasta_path --output_dir=$output_dir --max_template_date=$max_template_date --db_preset=$db_preset --model_preset=$model_preset --benchmark=$benchmark --use_precomputed_msas=$use_precomputed_msas --num_multimer_predictions_per_model=$num_multimer_predictions_per_model --run_relax=$run_relax --use_gpu_relax=$use_gpu_relax --logtostderr"database_paths="--uniref90_database_path=$uniref90_database_path --mgnify_database_path=$mgnify_database_path --data_dir=$data_dir --template_mmcif_dir=$template_mmcif_dir --obsolete_pdbs_path=$obsolete_pdbs_path"binary_paths="--hhblits_binary_path=$hhblits_binary_path --hhsearch_binary_path=$hhsearch_binary_path --jackhmmer_binary_path=$jackhmmer_binary_path --kalign_binary_path=$kalign_binary_path"if [[ $model_preset == "multimer" ]]; thendatabase_paths="$database_paths --uniprot_database_path=$uniprot_database_path --pdb_seqres_database_path=$pdb_seqres_database_path"
elsedatabase_paths="$database_paths --pdb70_database_path=$pdb70_database_path"
fiif [[ "$db_preset" == "reduced_dbs" ]]; thendatabase_paths="$database_paths --small_bfd_database_path=$small_bfd_database_path"
elsedatabase_paths="$database_paths --uniref30_database_path=$uniref30_database_path --bfd_database_path=$bfd_database_path"
fi# Run AlphaFold with required parameters
$(python $alphafold_script $binary_paths $database_paths $command_args)
这篇关于PSP - 配置 AlphaFold2 的高效 Tensorflow 运行环境的文章就介绍到这儿,希望我们推荐的文章对编程师们有所帮助!


