本文主要是介绍unity2D笔记-实现饥荒效果的2.5D游戏,希望对大家解决编程问题提供一定的参考价值,需要的开发者们随着小编来一起学习吧!
教程来自B站大佬:https://www.bilibili.com/video/BV1DT4y1A7DJ?spm_id_from=333.337.search-card.all.click&vd_source=19df42746a97e8a5f29ac78388f521d5
在这里主要有2点感悟:
1.对于混合树了解更深刻了
2.人物向量转换关系
3.协程的使用
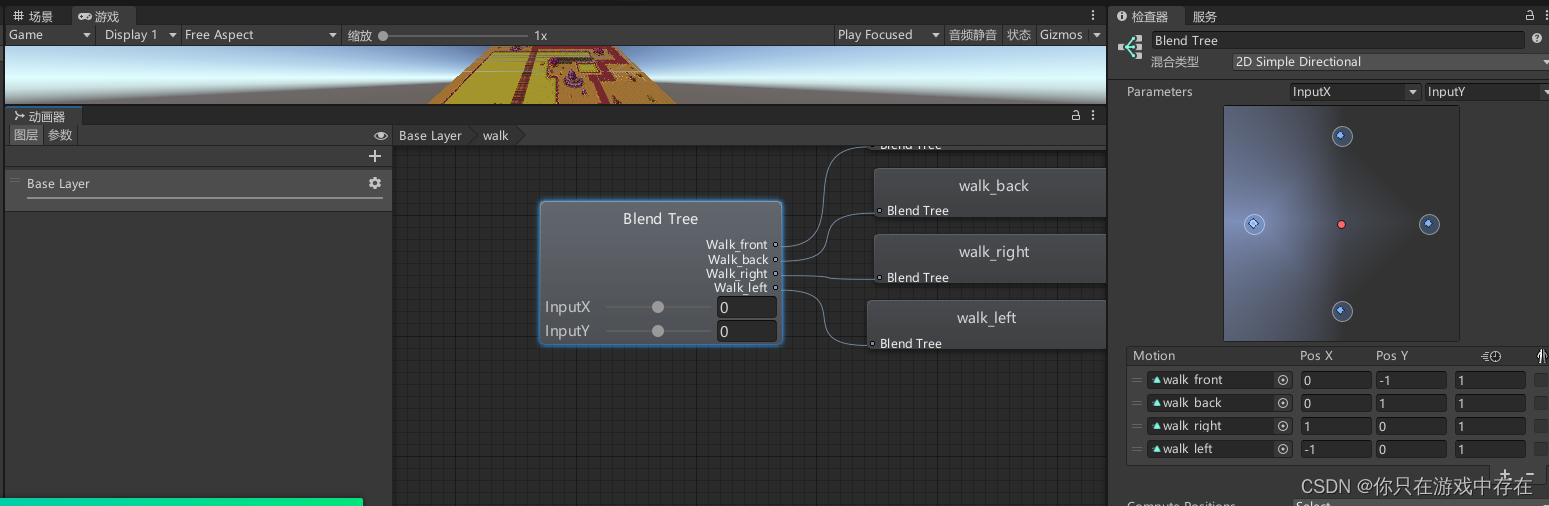
1.混合树控制人物移动
通过控制输入的x,y向量来控制人物的动画
2.物体方向跟随镜头进行调整旋转角度
让子物体的旋转角度与相机旋转角度一致
using System.Collections;
using System.Collections.Generic;
using UnityEngine;public class FacingCarmera : MonoBehaviour
{Transform[] childs;// Start is called before the first frame updatevoid Start(){childs = new Transform[transform.childCount];for (int i = 0; i < transform.childCount; i++){childs[i] = transform.GetChild(i);}}// Update is called once per framevoid Update(){for(int i = 0; i < childs.Length; i++){childs[i].rotation = Camera.main.transform.rotation;//让节点上的子物体与相机旋转角一致}}
}
3.通过手柄摇杆LB RB来转动视角
视角转动脚本
using System.Collections;
using System.Collections.Generic;
using SK.Framework;
using UnityEngine;public class RotateCarmera: MonoBehaviour
{public float rotateTime = 0.2f;//旋转所花费时间private Transform player;private bool isRotating = false;void Start(){player = GameObject.FindGameObjectWithTag("Player").transform;}// Update is called once per framevoid Update(){transform.position = player.position;Rotate();}void Rotate(){if (Input.GetKeyDown(KeyCode.Q) ||Input.GetKeyDown(XBox.LB) && !isRotating){StartCoroutine(RotateAround(-45, rotateTime));}if (Input.GetKeyDown(KeyCode.E)|| Input.GetKeyDown(XBox.RB) && !isRotating){StartCoroutine(RotateAround(45, rotateTime));}}//使用协程函数来更新镜头旋转角度 IEnumerator RotateAround(float angel,float time){float number = 60 * time;float nextAngel = angel / number;isRotating = true;for(int i = 0; i < number; i++){transform.Rotate(new Vector3(0, 0, nextAngel));yield return new WaitForFixedUpdate();//暂停执行 等到下一帧时继续执行下个循环//默认FixedUpdate()一秒更新60帧//使用其他频率 修改number前帧数 例如100 这里使用waitforseconds(0.01f)}isRotating = false;}
}
手柄摇杆对照脚本
using UnityEngine;namespace SK.Framework
{/// <summary>/// XBox按键/// </summary>public class XBox{/// <summary>/// 左侧摇杆水平轴/// X axis/// </summary>public const string LeftStickHorizontal = "LeftStickHorizontal";/// <summary>/// 左侧摇杆垂直轴/// Y axis/// </summary>public const string LeftStickVertical = "LeftStickVertical";/// <summary>/// 右侧摇杆水平轴/// 4th axis/// </summary>public const string RightStickHorizontal = "RightStickHorizontal";/// <summary>/// 右侧摇杆垂直轴/// 5th axis/// </summary>public const string RightStickVertical = "RightStickVertical";/// <summary>/// 十字方向盘水平轴/// 6th axis/// </summary>public const string DPadHorizontal = "DPadHorizontal";/// <summary>/// 十字方向盘垂直轴/// 7th axis/// </summary>public const string DPadVertical = "DPadVertical";/// <summary>/// LT/// 9th axis/// </summary>public const string LT = "LT";/// <summary>/// RT/// 10th axis/// </summary>public const string RT = "RT";/// <summary>/// 左侧摇杆按键/// joystick button 8/// </summary>public const KeyCode LeftStick = KeyCode.JoystickButton8;/// <summary>/// 右侧摇杆按键/// joystick button 9/// </summary>public const KeyCode RightStick = KeyCode.JoystickButton9;/// <summary>/// A键/// joystick button 0/// </summary>public const KeyCode A = KeyCode.JoystickButton0;/// <summary>/// B键/// joystick button 1/// </summary>public const KeyCode B = KeyCode.JoystickButton1;/// <summary>/// X键/// joystick button 2/// </summary>public const KeyCode X = KeyCode.JoystickButton2;/// <summary>/// Y键/// joystick button 3/// </summary>public const KeyCode Y = KeyCode.JoystickButton3;/// <summary>/// LB键/// joystick button 4/// </summary>public const KeyCode LB = KeyCode.JoystickButton4;/// <summary>/// RB键/// joystick button 5/// </summary>public const KeyCode RB = KeyCode.JoystickButton5;/// <summary>/// View视图键/// joystick button 6/// </summary>public const KeyCode View = KeyCode.JoystickButton6;/// <summary>/// Menu菜单键/// joystick button 7/// </summary>public const KeyCode Menu = KeyCode.JoystickButton7;}
}
4.人物的控制脚本
using System.Collections;
using System.Collections.Generic;
using UnityEngine;public class Player : MonoBehaviour
{public float speed;new private Rigidbody2D rigidbody;private Animator animator;private float inputX, inputY;//private Vector3 offset;void Start(){// offset = Camera.main.transform.position - transform.position; rigidbody = GetComponent<Rigidbody2D>();animator = GetComponent<Animator>();}// Update is called once per framevoid Update(){inputX = Input.GetAxisRaw("Horizontal");inputY = Input.GetAxisRaw("Vertical");Vector2 input = (inputX*transform.right + inputY*transform.up).normalized; //标准化到0 1 rigidbody.velocity = input * speed;if (input != Vector2.zero){animator.SetBool("IsMoving", true);}else{animator.SetBool("IsMoving", false);}animator.SetFloat("InputX", inputX);animator.SetFloat("InputY", inputY);//  Camera.main.transform.position = transform.position + offset;}
}
修改 Vector2 input = new Vector2(inputX, inputY).normalized;
到 的解释:
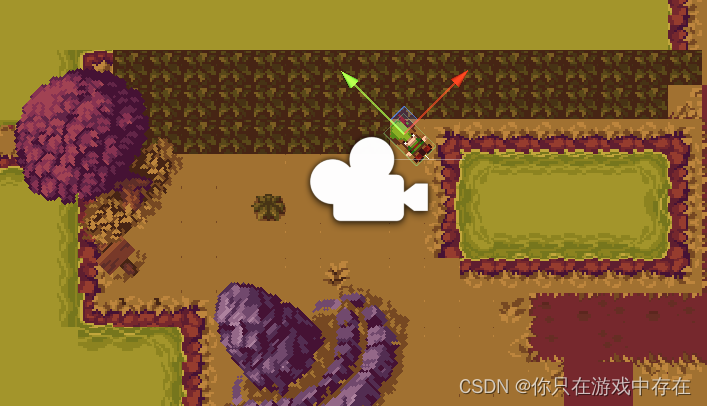
inputX和inputY是基于世界坐标系的参数,如果当自身坐标系和世界坐标系发生偏转时(按下LB或者RB)如下图所示,使用INPUTX 的参数也仅仅会让物体基于世界坐标移动,人物斜着走。
因此需要对人物基于自身坐标进行矫正:
假设人物要向其自身坐标系的Y轴移动
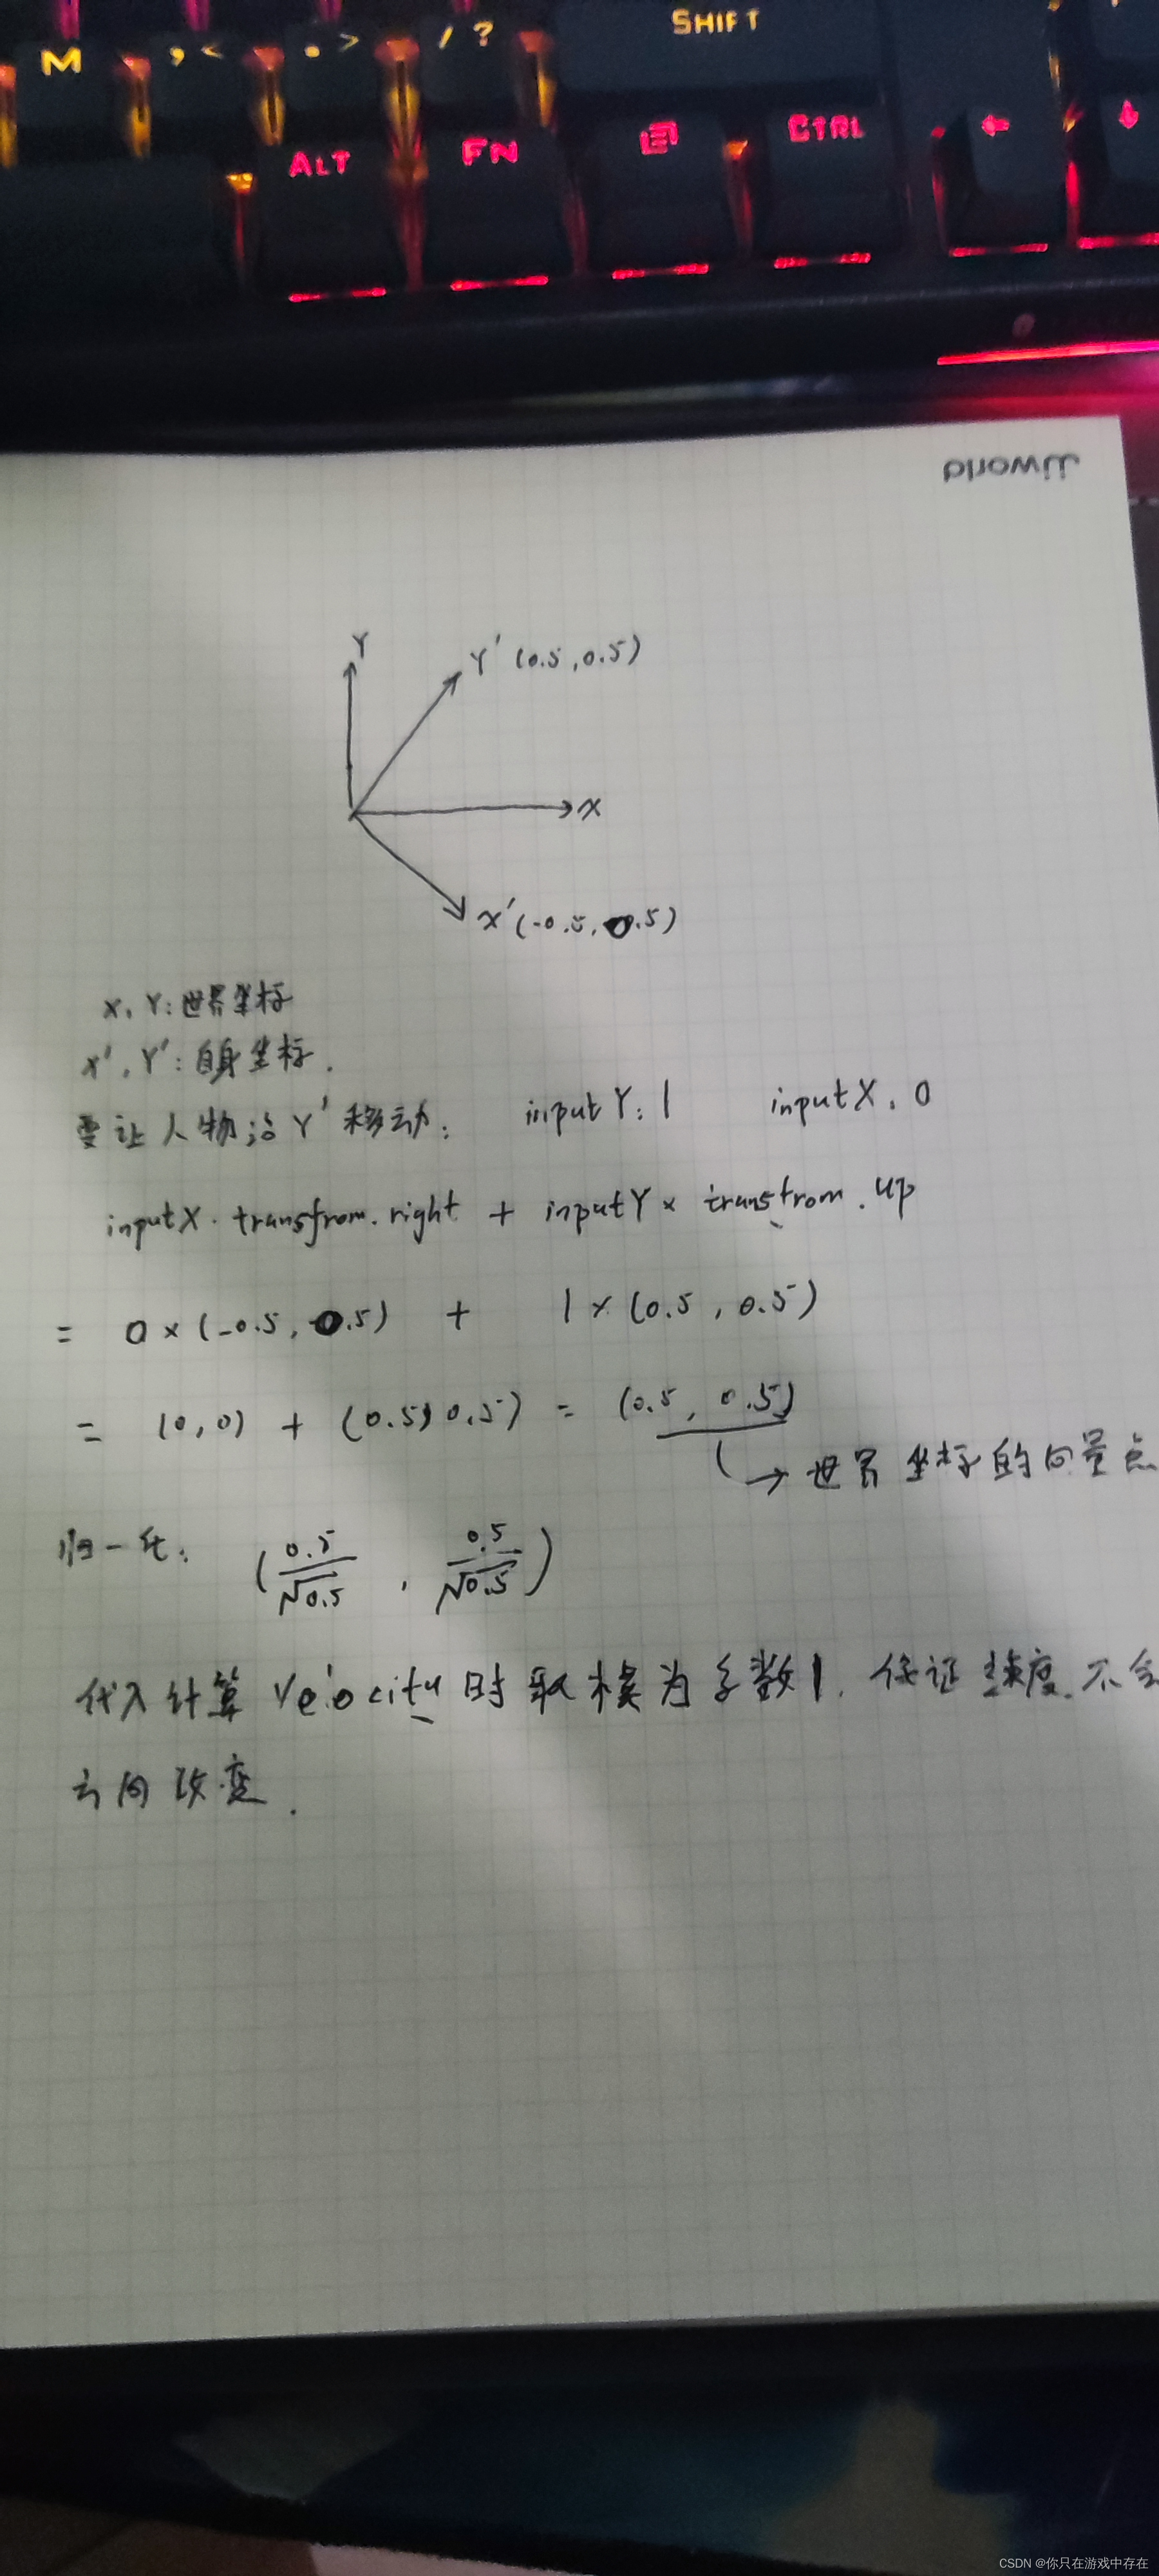
归一化是保证速度不会跟随方向的变化而动态变化,详细见相关文章:为什么要使用Vector2().normalized()
这篇关于unity2D笔记-实现饥荒效果的2.5D游戏的文章就介绍到这儿,希望我们推荐的文章对编程师们有所帮助!


