本文主要是介绍C++利用开散列哈希表封装unordered_set,unordered_map,希望对大家解决编程问题提供一定的参考价值,需要的开发者们随着小编来一起学习吧!
C++利用开散列哈希表封装unordered_set,unordered_map
- 一.前言
- 1.开散列的哈希表完整代码
- 二.模板参数
- 1.HashNode的改造
- 2.封装unordered_set和unordered_map的第一步
- 1.unordered_set
- 2.unordered_map
- 3.HashTable
- 三.string的哈希函数的模板特化
- 四.迭代器类
- 1.operator++运算符重载
- 1.动图演示+分析
- 2.需要哈希表的地址,怎么办?
- 1.解决双向依赖问题
- 2.解决私有成员问题
- 2.const迭代器的问题
- 3.迭代器类的定义
- 4.迭代器类的完善
- 1.解引用和== !=
- 1.解引用
- 2.== !=
- 2.operator++
- 3.迭代器类的完整代码
- 五.哈希表的修改
- 1.begin和end
- 2.insert
- 3.find
- 4.哈希表的完整代码
- 六.unordered_set的完整代码
- 七.unordered_map的完整代码
- 八.test.cpp
一.前言
1.之前我们已经实现了开散列的哈希表,今天我们来用它封装unordered_set,unordered_map
2.本文的封装比利用红黑树封装set和map更加复杂
建议大家先去看我的红黑树封装set和map再来看本文
因为有很多地方跟红黑树封装set和map时是同样的思路和方法,所以本文不会太去赘述一遍
1.开散列的哈希表完整代码
namespace hash_bucket
{//HashFunc<int>template<class K>//整型的哈希函数struct HashFunc{size_t operator()(const K& key){return (size_t)key;}};//HashFunc<string>//string的哈希函数template<>struct HashFunc<string>{size_t operator()(const string& key){// BKDRsize_t hash = 0;for (auto e : key){hash *= 131;hash += e;}return hash;}};template<class K, class V>struct HashNode{HashNode* _next;pair<K, V> _kv;HashNode(const pair<K, V>& kv):_kv(kv), _next(nullptr){}};template<class K, class V, class Hash = HashFunc<K>>class HashTable{typedef HashNode<K, V> Node;public:HashTable(){_tables.resize(10);}~HashTable(){for (int i = 0; i < _tables.size(); i++){Node* cur = _tables[i];while (cur){Node* next = cur->_next;delete cur;cur = next;}_tables[i] = nullptr;}}bool Insert(const pair<K, V>& kv){//先查找在不在//如果在,返回false,插入失败if (Find(kv.first)){return false;}//扩容if (_n == _tables.size()){//开辟新的哈希表HashTable newtable;int newcapacity = _tables.size() * 2;//扩2倍newtable._tables.resize(newcapacity);//转移数据for (int i = 0; i < _tables.size(); i++){Node* cur = _tables[i];while (cur){Node* next = cur->_next;int hashi = hash(cur->_kv.first) % newtable._tables.size();cur->_next = newtable._tables[hashi];newtable._tables[hashi] = cur;cur = next;}//防止出现野指针导致重复析构..._tables[i] = nullptr;}//交换两个vector,从而做到交换两个哈希表//通过学习vector的模拟实现,我们知道vector进行交换时只交换first,finish,end_of_storage_tables.swap(newtable._tables);}//1.利用哈希函数计算需要插入到那个桶里面int hashi = hash(kv.first) % _tables.size();//头插Node* newnode = new Node(kv);newnode->_next = _tables[hashi];_tables[hashi] = newnode;++_n;return true;}Node* Find(const K& key){int hashi = hash(key) % _tables.size();Node* cur = _tables[hashi];while (cur){if (cur->_kv.first == key){return cur;}cur = cur->_next;}return nullptr;}bool Erase(const K& key){int hashi = hash(key) % _tables.size();Node* cur = _tables[hashi], * prev = nullptr;while (cur){if (cur->_kv.first == key){if (cur == _tables[hashi]){_tables[hashi] = cur->_next;}else{prev->_next = cur->_next;}return true;}prev = cur;cur = cur->_next;}return false;}private://哈希表是一个指针数组vector<Node*> _tables;size_t _n = 0;Hash hash;};
}
二.模板参数
1.HashNode的改造
因为unordered_set是Key模型的容器
unordered_map是Key-Value模型的容器,所以需要对节点结构体进行改造
template<class V>
struct HashNode
{HashNode* _next;V _kv;HashNode(const V& kv):_kv(kv), _next(nullptr){}
};
2.封装unordered_set和unordered_map的第一步
1.对于模板参数V:
如果是unordered_set:传入底层哈希表的就是Key,Key
如果是unordered_map:传入底层哈希表的就是Key,pair<const Key,Value>
2.为了取出关键字Key,需要传入仿函数
如果是unordered_set:仿函数返回Key
如果是unordered_map:仿函数返回pair<const Key,Value>的first
3.哈希函数需要传给unordered_set和unordered_map
由unordered_set和unordered_map传给底层的哈希表
1.unordered_set
namespace hash_bucket
{template<class K ,class Hash = HashFunc<K>>class unordered_set{struct SetofKey{const K& operator()(const K& k){return k;}};private:HashTable<K, K,SetofKey,Hash> _ht;};
}
2.unordered_map
namespace hash_bucket
{template<class K,class V, class Hash = HashFunc<K>>class unordered_map{struct MapofKey{const K& operator()(const pair<const K, V>& k){return k.first;}};private:HashTable<K, pair<const K, V>, MapofKey,Hash> _ht;};
}
3.HashTable
哈希表增加模板参数
1.K:就是关键字
2.V:就是具体存放的数据类型(unordered_set就是Key , unordered_map就是pair<const Key,Value>)
3.KeyofT:不同容器传入的取出其关键字的仿函数
如果是unordered_set:仿函数返回Key
如果是unordered_map:仿函数返回pair<const Key,Value>的first
4.Hash:仿函数,哈希函数,用于计算下标的
template<class K, class V,class KeyofT, class Hash>
class HashTable
{
......
private://哈希表是一个指针数组vector<Node*> _tables;size_t _n = 0;Hash hash;//哈希函数的仿函数对象KeyofT _kot;//KeyofT的仿函数对象
};
三.string的哈希函数的模板特化
因为string类型的哈希映射太常用了,
所以这里使用了模板特化,以免每次要存放string时都要指名传入string的哈希函数
//HashFunc<int>
template<class K>
//整型的哈希函数
struct HashFunc
{size_t operator()(const K& key){return (size_t)key;}
};//HashFunc<string>
//string的哈希函数
template<>
struct HashFunc<string>
{size_t operator()(const string& key){// BKDRsize_t hash = 0;for (auto e : key){hash *= 131;hash += e;}return hash;}
};
四.迭代器类
1.这里的哈希表只支持正向迭代器,不支持反向迭代器
1.operator++运算符重载
1.动图演示+分析
++有2种情况:
1.如果当前节点所在的当前哈希桶的后面还有节点,那么直接走到next节点即可
如果当前节点所在的当前哈希桶的后面没有节点了,那么就要走到下一个不为空的哈希桶才可以
如果后面没有不为空的哈希桶了,返回nullptr
2.需要哈希表的地址,怎么办?
我们可以在迭代器里面加入一个哈希表的指针,要求你给我传入你这个哈希表的地址,让我找到你这个哈希表(其实也可以加入一个vector<Node*>的指针,这样就不用传入哈希表指针了,这里以传入哈希表指针来演示,为了介绍如何解决双向依赖问题和友元声明问题)
同时也可以加入一个_hashi代表当前迭代器位于哈希表当中的下标
不过我们发现:
此时出现了一种鸡生蛋,蛋生鸡的双向依赖问题了
我们的迭代器有一个成员:哈希表的指针
哈希表有一个typedef后的类型:迭代器
我们之前的vector,list,set,map的迭代器都是单向依赖关系
只存在容器依赖迭代器而已,可是这里容器和迭代器双向依赖啊,怎么办呢?
1.解决双向依赖问题
我们可以将哈希表前置声明一下
//HashTable的前置声明
template<class K, class V, class KeyofT, class Hash>class HashTable;template<class K,class V,class Ref,class Ptr,class KeyofT, class Hash>
struct __HashIterator
{....}
2.解决私有成员问题
不过我们注意到:我们的迭代器类里面只有哈希表的指针
属于哈希表的外部,而哈希表的vector数组是它的私有成员,我们在迭代器类里面是无法访问的
怎么办呢?
1.在哈希表当中加一个getTable函数,让外界能够获取到内部的vector
2.将迭代器类在哈希表当中进行友元声明
template<class K, class V,class KeyofT, class Hash>
class HashTable
{typedef HashNode<V> Node;template<class K, class V,class Ref,class Ptr, class KeyofT, class Hash>friend struct __HashIterator;
注意:类模板的友元声明时需要加上template<…>
2.const迭代器的问题
为了解决unordered_map的[]与const迭代器问题
我们在迭代器类里面给了三个重载版本的构造函数
template<class K,class V,class Ref,class Ptr,class KeyofT, class Hash>
struct __HashIterator
{typedef HashNode<V> Node;Node* _node;const HashTable<K, V, KeyofT, Hash>* _pht;size_t _hashi;//当前迭代器位于哈希表当中的下标typedef __HashIterator<K, V,Ref,Ptr, KeyofT, Hash> Self;typedef __HashIterator<K, V, V&, V*, KeyofT, Hash> iterator;
public:__HashIterator(Node* node, HashTable<K, V, KeyofT, Hash>* pht,size_t hashi):_node(node),_pht(pht),_hashi(hashi){}__HashIterator(Node* node,const HashTable<K, V, KeyofT, Hash>* pht, size_t hashi):_node(node), _pht(pht), _hashi(hashi){}__HashIterator(const iterator& it):_node(it._node),_pht(it._pht),_hashi(it._hashi){}
....
};
3.迭代器类的定义
//HashTable的前置声明
template<class K, class V, class KeyofT, class Hash>class HashTable;template<class K,class V,class Ref,class Ptr,class KeyofT, class Hash>
struct __HashIterator
{typedef HashNode<V> Node;Node* _node;const HashTable<K, V, KeyofT, Hash>* _pht;size_t _hashi;//当前迭代器位于哈希表当中的下标typedef __HashIterator<K, V,Ref,Ptr, KeyofT, Hash> Self;typedef __HashIterator<K, V, V&, V*, KeyofT, Hash> iterator;
public:__HashIterator(Node* node, HashTable<K, V, KeyofT, Hash>* pht,size_t hashi):_node(node),_pht(pht),_hashi(hashi){}__HashIterator(Node* node,const HashTable<K, V, KeyofT, Hash>* pht, size_t hashi):_node(node), _pht(pht), _hashi(hashi){}__HashIterator(const iterator& it):_node(it._node),_pht(it._pht),_hashi(it._hashi){}bool operator==(const Self& s);bool operator!=(const Self& s);Ref operator*();Ptr operator->();Self& operator++();
};
4.迭代器类的完善
1.解引用和== !=
1.解引用
注意:解引用返回的是当前位置的Value,也就是节点指针里面的值
我们回顾一下节点结构体的定义
_kv这个数据才是真正的Value,因此解引用返回_kv
template<class V>
struct HashNode
{HashNode* _next;V _kv;HashNode(const V& kv):_kv(kv), _next(nullptr){}
};
Ref operator*()
{return _node->_kv;
}Ptr operator->()
{return &_node->_kv;
}
2.== !=
关于比较,跟list迭代器一样,比较节点指针的值,而不是迭代器本身的值
bool operator==(const Self& s)
{return _node == s._node;
}bool operator!=(const Self& s)
{return _node != s._node;
}
2.operator++
看过刚才operator++的动图演示+分析之后,我们就能很好地写出operator++来了
Self& operator++()
{//当前哈希桶的当前节点后面还有数据,往后走即可if (_node->_next){_node = _node->_next;}//当前哈希桶的当前节点后面没有数据了,去找下一个不为空的哈希桶else{++_hashi;while (_hashi < _pht->_tables.size()){if (_pht->_tables[_hashi]){_node = _pht->_tables[_hashi];break;}_hashi++;}//说明找不到不为空的哈希桶了,也就是说到末尾了if (_hashi == _pht->_tables.size()){_node = nullptr;}}return *this;
}
注意:
我们这里的哈希桶是单链表,因此并不支持双向遍历,也就不支持反向迭代器,所以没有实现operator–的重载
3.迭代器类的完整代码
template<class K, class V, class KeyofT, class Hash>
class HashTable;template<class K,class V,class Ref,class Ptr,class KeyofT, class Hash>
struct __HashIterator
{typedef HashNode<V> Node;Node* _node;const HashTable<K, V, KeyofT, Hash>* _pht;size_t _hashi;//当前迭代器位于哈希表当中的下标typedef __HashIterator<K, V,Ref,Ptr, KeyofT, Hash> Self;typedef __HashIterator<K, V, V&, V*, KeyofT, Hash> iterator;
public:__HashIterator(Node* node, HashTable<K, V, KeyofT, Hash>* pht,size_t hashi):_node(node),_pht(pht),_hashi(hashi){}__HashIterator(Node* node,const HashTable<K, V, KeyofT, Hash>* pht, size_t hashi):_node(node), _pht(pht), _hashi(hashi){}__HashIterator(const iterator& it):_node(it._node),_pht(it._pht),_hashi(it._hashi){}bool operator==(const Self& s){return _node == s._node;}bool operator!=(const Self& s){return _node != s._node;}Ref operator*(){return _node->_kv;}Ptr operator->(){return &_node->_kv;}Self& operator++(){//当前哈希桶的当前节点后面还有数据,往后走即可if (_node->_next){_node = _node->_next;}//当前哈希桶的当前节点后面没有数据了,去找下一个不为空的哈希桶else{++_hashi;while (_hashi < _pht->_tables.size()){if (_pht->_tables[_hashi]){_node = _pht->_tables[_hashi];break;}_hashi++;}//说明找不到不为空的哈希桶了,也就是说到末尾了if (_hashi == _pht->_tables.size()){_node = nullptr;}}return *this;}
};
五.哈希表的修改
1.begin和end
实现迭代器类之后,我们在哈希表里面增加begin和end
begin就是返回第一个不为空的哈希桶的节点构造出的迭代器
end直接用nullptr来构造即可
注意:如何传入哈希表指针呢? 不要忘了this指针
public:typedef __HashIterator<K, V, V&, V*, KeyofT, Hash> iterator;typedef __HashIterator<K, V,const V&,const V*, KeyofT, Hash> const_iterator;iterator begin(){for (int i = 0; i < _tables.size(); i++){if (_tables[i]){return iterator(_tables[i], this, i);}}return iterator(nullptr, this, -1);//因为hash迭代器当中的hashi是size_t类型,所以给-1}iterator end(){return iterator(nullptr, this, -1);//因为hash迭代器当中的hashi是size_t类型,所以给-1}const_iterator begin() const{for (int i = 0; i < _tables.size(); i++){if (_tables[i]){return const_iterator(_tables[i], this, i);}}return const_iterator(nullptr, this, -1);//因为hash迭代器当中的hashi是size_t类型,所以给-1}const_iterator end() const{return const_iterator(nullptr, this, -1);//因为hash迭代器当中的hashi是size_t类型,所以给-1}
2.insert
1.这里需要使用KeyofT类型的仿函数对象_kot来取出关键字Key
用关键字Key进行哈希映射,如何进行哈希映射呢?
使用Hash类型的仿函数对象hash即可
所以需要嵌套使用仿函数对象
我们把_kot,hash这两个仿函数对象定义成成员变量了,所以直接使用即可
2.我们只需要修改返回值,哈希映射逻辑,查找方法即可
我们要将insert的返回值修改为pair<iterator,bool>
如果有重复元素,返回重复元素所对应的节点构造出的迭代器
如果没有重复元素,返回新插入节点构造出的迭代器
pair<iterator,bool> Insert(const V& kv)
{//先查找在不在//如果在,返回false,插入失败iterator it = Find(_kot(kv));if (it != end()){return make_pair(it, false);}//扩容if (_n == _tables.size()){//开辟新的哈希表HashTable newtable;int newcapacity = _tables.size() * 2;//扩2倍newtable._tables.resize(newcapacity);//转移数据for (int i = 0; i < _tables.size(); i++){Node* cur = _tables[i];while (cur){Node* next = cur->_next;int hashi = hash(_kot(cur->_kv)) % newtable._tables.size();cur->_next = newtable._tables[hashi];newtable._tables[hashi] = cur;cur = next;}//防止出现野指针导致重复析构..._tables[i] = nullptr;}//交换两个vector,从而做到交换两个哈希表//通过学习vector的模拟实现,我们知道vector进行交换时只交换first,finish,end_of_storage_tables.swap(newtable._tables);}//1.利用哈希函数计算需要插入到那个桶里面int hashi = hash(_kot(kv)) % _tables.size();//头插Node* newnode = new Node(kv);newnode->_next = _tables[hashi];_tables[hashi] = newnode;++_n;return make_pair(iterator(newnode, this, hashi),true);
}
3.find
对于find我们只需要修改返回值即可
对于find和erase,我们无需通过_kot取出关键字,因为find和erase的参数类型就是K,就是关键字
而insert的类型是V,所以insert才需要_kot来取出关键字
erase的返回值依旧是bool,无需修改erase这个代码
iterator Find(const K& key)
{int hashi = hash(key) % _tables.size();Node* cur = _tables[hashi];while (cur){if (_kot(cur->_kv) == key){return iterator(cur, this, hashi);}cur = cur->_next;}return end();
}
对于构造和析构无需修改
4.哈希表的完整代码
#pragma once
#include<vector>
#include <string>
namespace hash_bucket
{//HashFunc<int>template<class K>//整型的哈希函数struct HashFunc{size_t operator()(const K& key){return (size_t)key;}};//HashFunc<string>//string的哈希函数template<>struct HashFunc<string>{size_t operator()(const string& key){// BKDRsize_t hash = 0;for (auto e : key){hash *= 131;hash += e;}return hash;}};template<class V>struct HashNode{HashNode* _next;V _kv;HashNode(const V& kv):_kv(kv), _next(nullptr){}};//template<class K, class V, class KeyofT, class Hash = HashFunc<K>>//类模板的声明当中不能给缺省值template<class K, class V, class KeyofT, class Hash>class HashTable;template<class K,class V,class Ref,class Ptr,class KeyofT, class Hash>struct __HashIterator{typedef HashNode<V> Node;Node* _node;const HashTable<K, V, KeyofT, Hash>* _pht;size_t _hashi;//当前迭代器位于哈希表当中的下标typedef __HashIterator<K, V,Ref,Ptr, KeyofT, Hash> Self;typedef __HashIterator<K, V, V&, V*, KeyofT, Hash> iterator;public:__HashIterator(Node* node, HashTable<K, V, KeyofT, Hash>* pht,size_t hashi):_node(node),_pht(pht),_hashi(hashi){}__HashIterator(Node* node,const HashTable<K, V, KeyofT, Hash>* pht, size_t hashi):_node(node), _pht(pht), _hashi(hashi){}__HashIterator(const iterator& it):_node(it._node),_pht(it._pht),_hashi(it._hashi){}bool operator==(const Self& s){return _node == s._node;}bool operator!=(const Self& s){return _node != s._node;}Ref operator*(){return _node->_kv;}Ptr operator->(){return &_node->_kv;}Self& operator++(){//当前哈希桶的当前节点后面还有数据,往后走即可if (_node->_next){_node = _node->_next;}//当前哈希桶的当前节点后面没有数据了,去找下一个不为空的哈希桶else{++_hashi;while (_hashi < _pht->_tables.size()){if (_pht->_tables[_hashi]){_node = _pht->_tables[_hashi];break;}_hashi++;}//说明找不到不为空的哈希桶了,也就是说到末尾了if (_hashi == _pht->_tables.size()){_node = nullptr;}}return *this;}};template<class K, class V,class KeyofT, class Hash>class HashTable{typedef HashNode<V> Node;template<class K, class V,class Ref,class Ptr, class KeyofT, class Hash>//类模板的友元声明当中不能给缺省值friend struct __HashIterator;public:typedef __HashIterator<K, V, V&, V*, KeyofT, Hash> iterator;typedef __HashIterator<K, V,const V&,const V*, KeyofT, Hash> const_iterator;iterator begin(){for (int i = 0; i < _tables.size(); i++){if (_tables[i]){return iterator(_tables[i], this, i);}}return iterator(nullptr, this, -1);//因为hash迭代器当中的hashi是size_t类型,所以给-1}iterator end(){return iterator(nullptr, this, -1);//因为hash迭代器当中的hashi是size_t类型,所以给-1}const_iterator begin() const{for (int i = 0; i < _tables.size(); i++){if (_tables[i]){return const_iterator(_tables[i], this, i);}}return const_iterator(nullptr, this, -1);//因为hash迭代器当中的hashi是size_t类型,所以给-1}const_iterator end() const{return const_iterator(nullptr, this, -1);//因为hash迭代器当中的hashi是size_t类型,所以给-1}HashTable(){_tables.resize(10);}~HashTable(){for (int i = 0; i < _tables.size(); i++){Node* cur = _tables[i];while (cur){Node* next = cur->_next;delete cur;cur = next;}_tables[i] = nullptr;}}pair<iterator,bool> Insert(const V& kv){//先查找在不在//如果在,返回false,插入失败iterator it = Find(_kot(kv));if (it != end()){return make_pair(it, false);}//扩容if (_n == _tables.size()){//开辟新的哈希表HashTable newtable;int newcapacity = _tables.size() * 2;//扩2倍newtable._tables.resize(newcapacity);//转移数据for (int i = 0; i < _tables.size(); i++){Node* cur = _tables[i];while (cur){Node* next = cur->_next;int hashi = hash(_kot(cur->_kv)) % newtable._tables.size();cur->_next = newtable._tables[hashi];newtable._tables[hashi] = cur;cur = next;}//防止出现野指针导致重复析构..._tables[i] = nullptr;}//交换两个vector,从而做到交换两个哈希表//通过学习vector的模拟实现,我们知道vector进行交换时只交换first,finish,end_of_storage_tables.swap(newtable._tables);}//1.利用哈希函数计算需要插入到那个桶里面int hashi = hash(_kot(kv)) % _tables.size();//头插Node* newnode = new Node(kv);newnode->_next = _tables[hashi];_tables[hashi] = newnode;++_n;return make_pair(iterator(newnode, this, hashi),true);}iterator Find(const K& key){int hashi = hash(key) % _tables.size();Node* cur = _tables[hashi];while (cur){if (_kot(cur->_kv) == key){return iterator(cur, this, hashi);}cur = cur->_next;}return end();}bool Erase(const K& key){int hashi = hash(key) % _tables.size();Node* cur = _tables[hashi], * prev = nullptr;while (cur){if (_kot(cur->_kv) == key){if (cur == _tables[hashi]){_tables[hashi] = cur->_next;}else{prev->_next = cur->_next;}return true;}prev = cur;cur = cur->_next;}return false;}private://哈希表是一个指针数组vector<Node*> _tables;size_t _n = 0;Hash hash;KeyofT _kot;};
}
六.unordered_set的完整代码
unordered_set直接复用哈希表的接口即可
#pragma once
namespace hash_bucket
{template<class K ,class Hash = HashFunc<K>>class unordered_set{struct SetofKey{const K& operator()(const K& k){return k;}};public:typedef typename HashTable<K, K, SetofKey,Hash>::const_iterator iterator;typedef typename HashTable<K, K, SetofKey,Hash>::const_iterator const_iterator;pair<iterator,bool> insert(const K& k){return _ht.Insert(k);}iterator find(const K& k){return _ht.Find(k);}bool erase(const K& k){return _ht.Erase(k);}iterator begin() const{return _ht.begin();}iterator end() const{return _ht.end();}private:HashTable<K, K,SetofKey,Hash> _ht;};
}
七.unordered_map的完整代码
unordered_map直接复用哈希表的接口即可
#pragma once
namespace hash_bucket
{template<class K,class V, class Hash = HashFunc<K>>class unordered_map{struct MapofKey{const K& operator()(const pair<const K, V>& k){return k.first;}};public:typedef typename HashTable<K, pair<const K, V>, MapofKey,Hash>::iterator iterator;typedef typename HashTable<K, pair<const K, V>, MapofKey,Hash>::const_iterator const_iterator;pair<iterator, bool> insert(const pair<const K, V>& k){return _ht.Insert(k);}iterator find(const K& k){return _ht.Find(k);}bool erase(const K& k){return _ht.Erase(k);}iterator begin(){return _ht.begin();}iterator end() {return _ht.end();}const_iterator begin() const{return _ht.begin();}const_iterator end() const{return _ht.end();}V& operator[](const K& k){pair<iterator, bool> ret = insert(make_pair(k, V()));return ret.first->second;}const V& operator[](const K& k) const{pair<iterator, bool> ret = insert(make_pair(k, V()));return ret.first->second;}private:HashTable<K, pair<const K, V>, MapofKey,Hash> _ht;};
}
八.test.cpp
#include <iostream>
using namespace std;
#include "HashTable.h"
#include "MyUnOrdered_Set.h"
#include "MyUnOrdered_Map.h"
namespace hash_bucket
{void test1(){unordered_set<int> s;int a[] = { 4,14,24,34,5,7,1,15,25,3,13 };for (auto e : a){s.insert(e);}unordered_set<int>::iterator it = s.begin();while (it != s.end()){//*it = 10;//不能改cout << *it << " ";++it;}cout << endl;s.erase(13);it = s.find(13);if (it != s.end()){cout << *it << endl;}unordered_set<int>::const_iterator cit = s.begin();while (cit != s.end()){//*cit = 10;//不能改cout << *cit << " ";++cit;}}void test2(){unordered_map<int, int> m;int a[] = { 1,2,4,5,99,331,243 };for (auto& e : a){m.insert(make_pair(e, e));}unordered_map<int, int>::iterator it = m.begin();while (it != m.end()){//it->second = 999;//能改//it->first = 999;//不能改cout << it->first << ":" << it->second << endl;++it;}cout << endl;m.erase(4);it = m.find(4);if (it != m.end()){cout << it->first << ":" << it->second << endl;}else{cout << "没查到" << endl;}unordered_map<int, int>::const_iterator cit = m.begin();while (cit != m.end()){//cit->second = 999;//不能改//cit->first = 999;//不能改cout << cit->first << ":" << cit->second << endl;++cit;}cout << endl;}void test3(){string arr[] = {"a","b","c","ab","ab","ab","kks","qdq"};unordered_map<string, int> ht;for (auto& e : arr){ht[e]++;}unordered_map<string, int>::iterator it = ht.begin();while (it != ht.end()){//it->second = 999;//能改//it->first = 999;//不能改cout << it->first << ":" << it->second << endl;++it;}cout << endl;}}
int main()
{hash_bucket::test1();hash_bucket::test2();hash_bucket::test3();return 0;
}
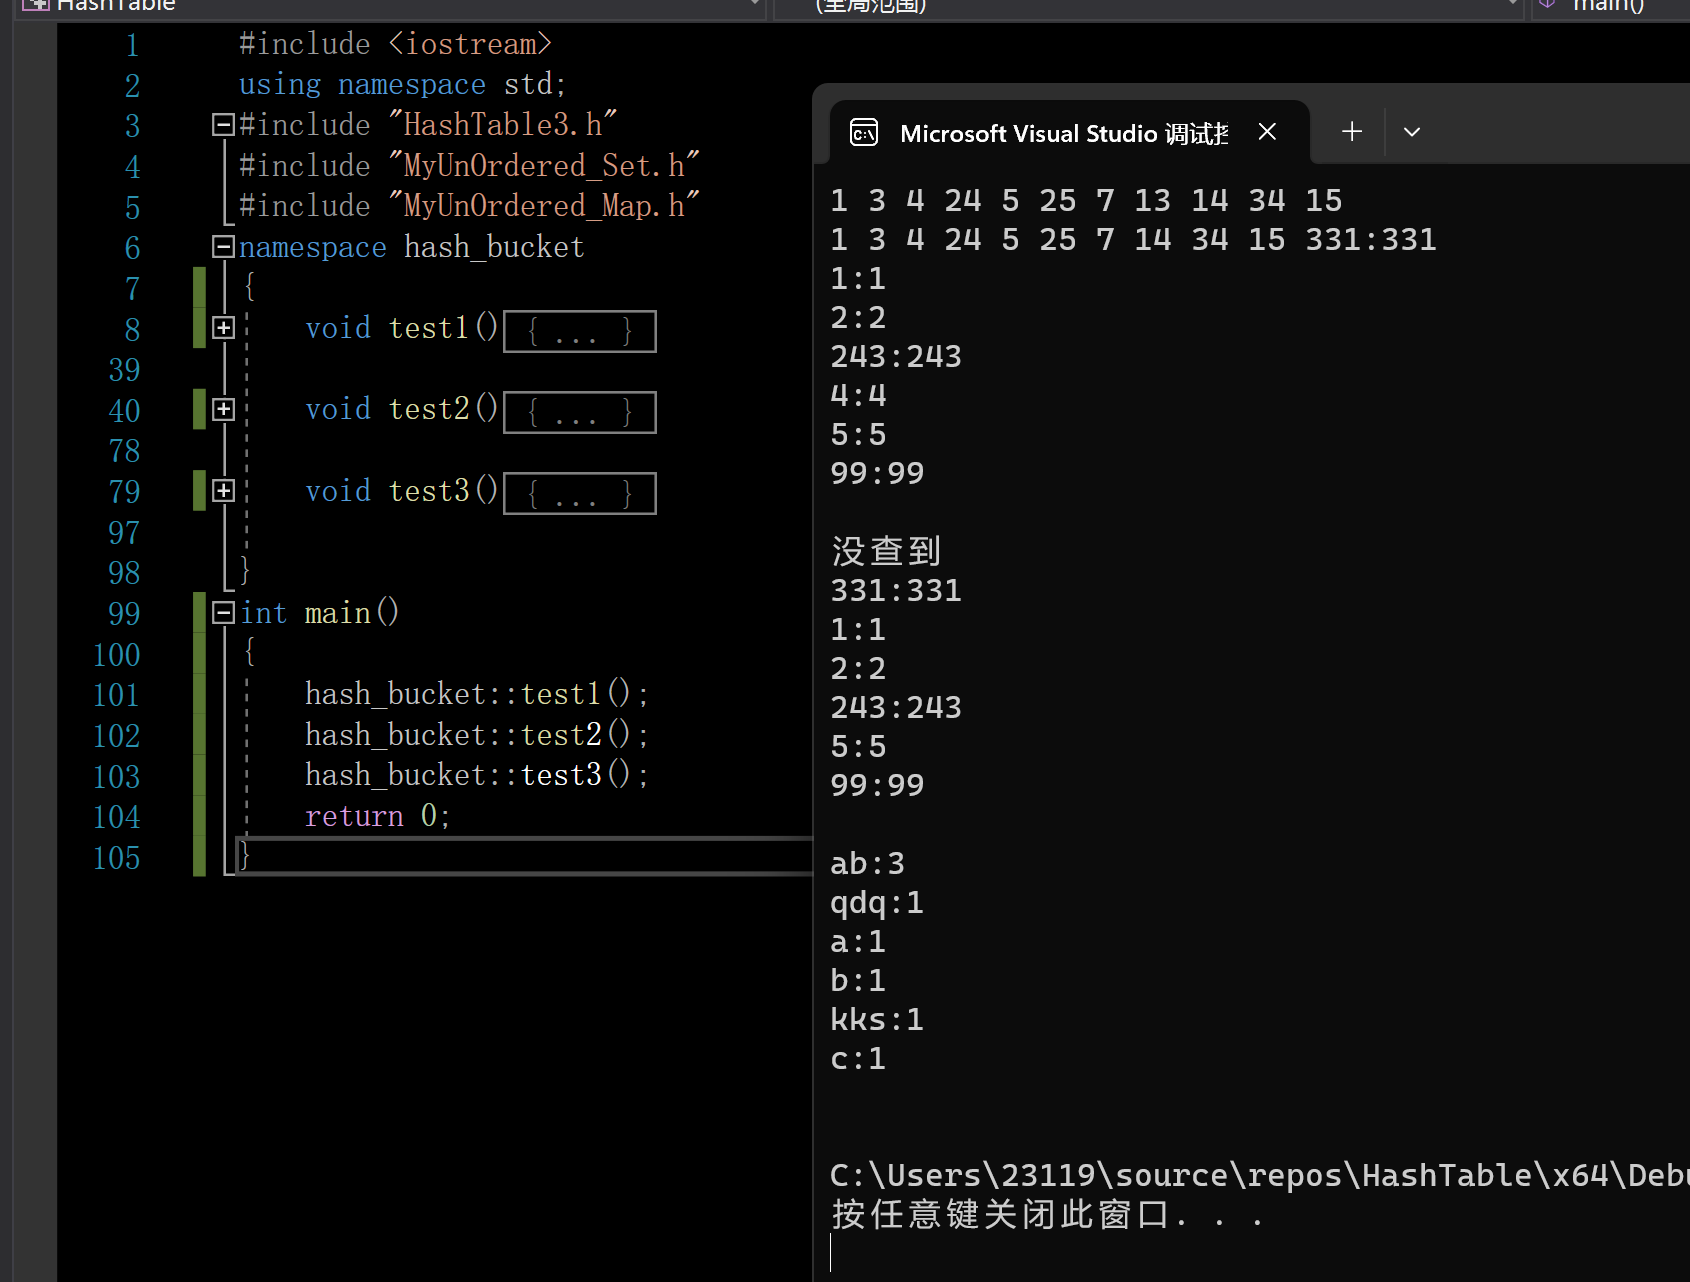
验证成功
以上就是C++利用开散列哈希表封unordered_set,unordered_map的全部内容,希望能对大家有所帮助!
这篇关于C++利用开散列哈希表封装unordered_set,unordered_map的文章就介绍到这儿,希望我们推荐的文章对编程师们有所帮助!


