本文主要是介绍华为配置WAPI-PSK安全策略实验,希望对大家解决编程问题提供一定的参考价值,需要的开发者们随着小编来一起学习吧!
配置WAPI-PSK安全策略示例
配置思路
- 配置WLAN基本业务,实现STA可以正常接入WLAN网络。
- 在创建的安全模板中,配置WAPI-PSK安全策略,满足用户对安全的需求。
| 配置项 | 数据 |
|---|---|
| DHCP服务器 | 中心AP作为DHCP服务器为STA和RU分配IP地址 |
| RU的IP地址池 | 10.23.100.2~10.23.100.254/24 |
| STA的IP地址池 | 10.23.101.2~10.23.101.254/24 |
| AP组 |
|
| 域管理模板 |
|
| SSID模板 |
|
| 安全模板 |
|
| VAP模板 |
|
操作步骤
- 配置中心AP,使RU与中心AP之间能够传输CAPWAP报文
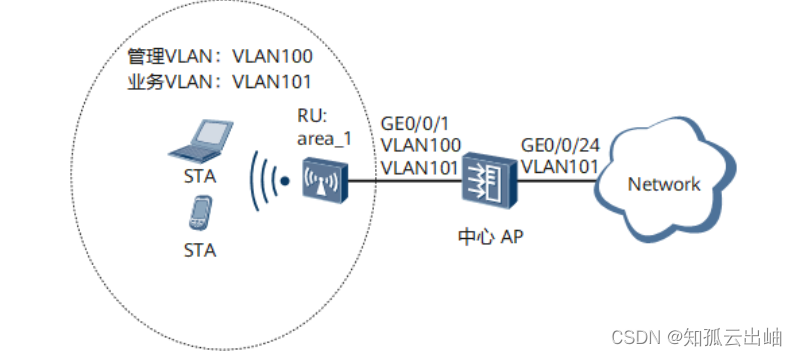
# 配置中心AP,将接口GE0/0/1加入VLAN100(管理VLAN)。
<span style="color:#333333"><span style="background-color:#dddddd"><HUAWEI> <strong id="ZH-CN_TASK_0176919479__zh-cn_task_0175818464_b246945475190907">system-view</strong> [HUAWEI] <strong id="ZH-CN_TASK_0176919479__zh-cn_task_0175818464_b1089173424190907">sysname AP</strong> [AP] <strong id="ZH-CN_TASK_0176919479__zh-cn_task_0175818464_b2078307907190907">vlan batch 100 101</strong> [AP] <strong id="ZH-CN_TASK_0176919479__zh-cn_task_0175818464_b1480089006190907">interface gigabitethernet 0/0/1</strong> [AP-GigabitEthernet0/0/1] <strong id="ZH-CN_TASK_0176919479__zh-cn_task_0175818464_b538052571190907">port link-type trunk</strong> [AP-GigabitEthernet0/0/1] <strong id="ZH-CN_TASK_0176919479__zh-cn_task_0175818464_b1791398723190907">port trunk pvid vlan 100</strong> [AP-GigabitEthernet0/0/1] <strong id="ZH-CN_TASK_0176919479__zh-cn_task_0175818464_b1624351834190907">port trunk allow-pass vlan 100</strong> [AP-GigabitEthernet0/0/1] <strong id="ZH-CN_TASK_0176919479__zh-cn_task_0175818464_b398509587190907">quit</strong></span></span> - 配置中心AP与上层网络设备互通
根据实际组网情况在中心AP上行口配置业务VLAN透传,和上行网络设备互通。
# 配置中心AP上行接口GE0/0/24加入VLAN101(业务VLAN)。
<span style="color:#333333"><span style="background-color:#dddddd">[AP] <strong id="ZH-CN_TASK_0176919479__zh-cn_task_0175818464_b1855267388190907">interface gigabitethernet 0/0/24</strong> [AP-GigabitEthernet0/0/24] <strong id="ZH-CN_TASK_0176919479__zh-cn_task_0175818464_b523367798190907">port link-type trunk</strong> [AP-GigabitEthernet0/0/24] <strong id="ZH-CN_TASK_0176919479__zh-cn_task_0175818464_b1913301035190907">port trunk allow-pass vlan 101</strong> [AP-GigabitEthernet0/0/24] <strong id="ZH-CN_TASK_0176919479__zh-cn_task_0175818464_b1620907968190907">quit</strong></span></span> - 配置中心AP作为DHCP服务器,为STA和RU分配IP地址
# 配置基于接口地址池的DHCP服务器,其中,VLANIF100接口为RU提供IP地址,VLANIF101为STA提供IP地址。
DNS服务器地址请根据实际需要配置。常用配置方法如下:- 接口地址池场景,需要在VLANIF接口视图下执行命令dhcp server dns-list ip-address &<1-8>。
- 全局地址池场景,需要在IP地址池视图下执行命令dns-list ip-address &<1-8>。
<span style="color:#333333"><span style="background-color:#dddddd">[AP] <strong id="ZH-CN_TASK_0176919479__zh-cn_task_0175818464_b60356096190907">dhcp enable</strong> [AP] <strong id="ZH-CN_TASK_0176919479__zh-cn_task_0175818464_b782788619190907">interface vlanif 100</strong> [AP-Vlanif100] <strong id="ZH-CN_TASK_0176919479__zh-cn_task_0175818464_b1439029025190907">ip address 10.23.100.1 24</strong> [AP-Vlanif100] <strong id="ZH-CN_TASK_0176919479__zh-cn_task_0175818464_b178519295190907">dhcp select interface</strong> [AP-Vlanif100] <strong id="ZH-CN_TASK_0176919479__zh-cn_task_0175818464_b894438072190907">quit</strong> [AP] <strong id="ZH-CN_TASK_0176919479__zh-cn_task_0175818464_b1239236207190907">interface vlanif 101</strong> [AP-Vlanif101] <strong id="ZH-CN_TASK_0176919479__zh-cn_task_0175818464_b1000697080190907">ip address 10.23.101.1 24</strong> [AP-Vlanif101] <strong id="ZH-CN_TASK_0176919479__zh-cn_task_0175818464_b1187620607190907">dhcp select interface</strong> [AP-Vlanif101] <strong id="ZH-CN_TASK_0176919479__zh-cn_task_0175818464_b854045514190907">quit</strong></span></span> - 配置RU上线
# 创建AP组,用于将相同配置的RU都加入同一AP组中。
<span style="color:#333333"><span style="background-color:#dddddd">[AP] <strong id="ZH-CN_TASK_0176919479__zh-cn_task_0175818464_b1944526303190907">wlan</strong>
[AP-wlan-view] <strong id="ZH-CN_TASK_0176919479__zh-cn_task_0175818464_b1492569438190907">ap-group name ap-group1</strong>
[AP-wlan-ap-group-ap-group1] <strong id="ZH-CN_TASK_0176919479__zh-cn_task_0175818464_b211419057190907">quit</strong></span></span>
# 创建域管理模板,在域管理模板下配置中心AP的国家码并在AP组下引用域管理模板。
<span style="color:#333333"><span style="background-color:#dddddd">[AP-wlan-view] <strong id="ZH-CN_TASK_0176919479__zh-cn_task_0175818464_b852537192190907">regulatory-domain-profile name domain1</strong>
[AP-wlan-regulate-domain-domain1] <strong id="ZH-CN_TASK_0176919479__zh-cn_task_0175818464_b1230439612190907">country-code cn</strong>
[AP-wlan-regulate-domain-domain1] <strong id="ZH-CN_TASK_0176919479__zh-cn_task_0175818464_b1906410096190907">quit</strong>
[AP-wlan-view] <strong id="ZH-CN_TASK_0176919479__zh-cn_task_0175818464_b1769406750190907">ap-group name ap-group1</strong>
[AP-wlan-ap-group-ap-group1] <strong id="ZH-CN_TASK_0176919479__zh-cn_task_0175818464_b918729171190907">regulatory-domain-profile domain1</strong>
Warning: Modifying the country code will clear channel, power and antenna gain configurations of the radio and reset the AP. Continu e?[Y/N]:<strong id="ZH-CN_TASK_0176919479__zh-cn_task_0175818464_zh-cn_task_0175818441_b2083244362190906">y</strong>
[AP-wlan-ap-group-ap-group1] <strong id="ZH-CN_TASK_0176919479__zh-cn_task_0175818464_b780916136190907">quit</strong>
[AP-wlan-view] <strong id="ZH-CN_TASK_0176919479__zh-cn_task_0175818464_b1180214892190907">quit</strong></span></span>
# 配置中心AP上RU的管理VLAN。<span style="color:#333333"><span style="background-color:#dddddd">[AP] <strong id="ZH-CN_TASK_0176919479__zh-cn_task_0175818464_b1076648720190907">management-vlan 100</strong></span></span># 在中心AP上离线导入RU,并将RU加入AP组“ap-group1”中。假设RU的MAC地址为60de-4476-e360,并且根据RU的部署位置为RU配置名称,便于从名称上就能够了解RU的部署位置。例如MAC地址为60de-4476-e360的RU部署在1号区域,命名此RU为area_1。ap auth-mode命令缺省情况下为MAC认证,如果之前没有修改其缺省配置,可以不用执行ap auth-mode mac-auth。
举例中使用的RU为R240D,具有射频0和射频1两个射频。R240D的射频0为2.4GHz射频,射频1为5GHz射频。
<span style="color:#333333"><span style="background-color:#dddddd">[AP] <strong id="ZH-CN_TASK_0176919479__zh-cn_task_0175818464_b1001360617190907">wlan</strong>
[AP-wlan-view] <strong id="ZH-CN_TASK_0176919479__zh-cn_task_0175818464_b1378045124190907">ap auth-mode mac-auth</strong>
[AP-wlan-view] <strong id="ZH-CN_TASK_0176919479__zh-cn_task_0175818464_b1974212889190907">ap-id 1 ap-mac 60de-4476-e360</strong>
[AP-wlan-ap-1] <strong id="ZH-CN_TASK_0176919479__zh-cn_task_0175818464_b159842295190907">ap-name area_1</strong>
[AP-wlan-ap-1] <strong id="ZH-CN_TASK_0176919479__zh-cn_task_0175818464_b1747769399190907">ap-group ap-group1</strong>
Warning: This operation may cause AP reset. If the country code changes, it will clear channel, power and antenna gain configuration s of the radio, Whether to continue? [Y/N]:<strong id="ZH-CN_TASK_0176919479__zh-cn_task_0175818464_zh-cn_task_0175818441_b1248067968190906">y</strong>
[AP-wlan-ap-1] <strong id="ZH-CN_TASK_0176919479__zh-cn_task_0175818464_b727475792190907">quit</strong></span></span>
# 将RU上电后,当执行命令display ap all查看到RU的“State”字段为“nor”时,表示RU正常上线。
<span style="color:#333333"><span style="background-color:#dddddd">[AP-wlan-view] <strong id="ZH-CN_TASK_0176919479__zh-cn_task_0175818464_b1436775027190907">display ap all</strong> Total AP information: nor : normal [1] Extra information: P : insufficient power supply ---------------------------------------------------------------------------------------------------- ID MAC Name Group IP Type State STA Uptime ExtraInfo ---------------------------------------------------------------------------------------------------- 1 00e0-fc76-e360 area_1 ap-group1 10.23.100.254 R240D <strong id="ZH-CN_TASK_0176919479__zh-cn_task_0175818464_zh-cn_task_0175818441_b2761129184119">nor</strong> 0 10S - ---------------------------------------------------------------------------------------------------- Total: 1</span></span> - 配置WLAN业务参数
# 创建名为“wlan-security”的安全模板,并配置WAPI-PSK安全策略,指定单播密钥和组播密钥均基于时间更新,更新间隔均为20000秒。
<span style="color:#333333"><span style="background-color:#dddddd">[AP-wlan-view] <strong>security-profile name wlan-security</strong>
[AP-wlan-sec-prof-wlan-security] <strong>security wapi psk pass-phrase 1234567@</strong>
[AP-wlan-sec-prof-wlan-security] <strong>wapi usk key-update time-based</strong>
[AP-wlan-sec-prof-wlan-security] <strong>wapi msk key-update time-based</strong>
[AP-wlan-sec-prof-wlan-security] <strong>wapi usk-update-interval 20000</strong>
[AP-wlan-sec-prof-wlan-security] <strong>wapi msk-update-interval 20000</strong>
[AP-wlan-sec-prof-wlan-security] <strong>quit</strong></span></span>
# 创建名为“wlan-ssid”的SSID模板,并配置SSID名称为“wlan-net”。
<span style="color:#333333"><span style="background-color:#dddddd">[AP-wlan-view] <strong>ssid-profile name wlan-ssid</strong>
[AP-wlan-ssid-prof-wlan-ssid] <strong>ssid wlan-net</strong>
[AP-wlan-ssid-prof-wlan-ssid] <strong>quit</strong></span></span>
# 创建名为“wlan-vap”的VAP模板,配置业务VLAN,并且引用安全模板和SSID模板。
<span style="color:#333333"><span style="background-color:#dddddd">[AP-wlan-view] <strong>vap-profile name wlan-vap</strong>
[AP-wlan-vap-prof-wlan-vap] <strong>service-vlan vlan-id 101</strong>
[AP-wlan-vap-prof-wlan-vap] <strong>security-profile wlan-security</strong>
[AP-wlan-vap-prof-wlan-vap] <strong>ssid-profile wlan-ssid</strong>
[AP-wlan-vap-prof-wlan-vap] <strong>quit</strong></span></span>
# 配置AP组引用VAP模板“wlan-vap”,RU上射频0和射频1都使用VAP模板“wlan-vap”的配置。
<span style="color:#333333"><span style="background-color:#dddddd">[AP-wlan-view] <strong>ap-group name ap-group1</strong> [AP-wlan-ap-group-ap-group1] <strong>vap-profile wlan-vap wlan 1 radio all</strong> [AP-wlan-ap-group-ap-group1] <strong>quit</strong></span></span> - 配置RU射频的信道和功率
射频的信道和功率自动调优功能默认开启,如果不关闭此功能则会导致手动配置不生效。举例中RU射频的信道和功率仅为示例,实际配置中请根据RU的国家码和网规结果进行配置。
# 关闭RU射频0的信道和功率自动调优功能,并配置RU射频0的信道和功率。<span style="color:#333333"><span style="background-color:#dddddd">[AP-wlan-view] <strong id="ZH-CN_TASK_0176919479__zh-cn_task_0175818464_b173878809190907">ap-id 1</strong> [AP-wlan-ap-1] <strong id="ZH-CN_TASK_0176919479__zh-cn_task_0175818464_b1068015866190907">radio 0</strong> [AP-wlan-radio-1/0] <strong id="ZH-CN_TASK_0176919479__zh-cn_task_0175818464_b1156070834190907">calibrate auto-channel-select disable</strong> [AP-wlan-radio-1/0] <strong id="ZH-CN_TASK_0176919479__zh-cn_task_0175818464_b10416957190907">calibrate auto-txpower-select disable</strong> [AP-wlan-radio-1/0] <strong id="ZH-CN_TASK_0176919479__zh-cn_task_0175818464_b322716985190907">channel 20mhz 6</strong> Warning: This action may cause service interruption. Continue?[Y/N]<strong id="ZH-CN_TASK_0176919479__zh-cn_task_0175818464_zh-cn_task_0175818441_b1479588541190906">y</strong> [AP-wlan-radio-1/0] <strong id="ZH-CN_TASK_0176919479__zh-cn_task_0175818464_b1212113758190907">eirp 127</strong> [AP-wlan-radio-1/0] <strong id="ZH-CN_TASK_0176919479__zh-cn_task_0175818464_b1397201252190907">quit</strong></span></span># 关闭RU射频1的信道和功率自动调优功能,并配置RU射频1的信道和功率。<span style="color:#333333"><span style="background-color:#dddddd">[AP-wlan-ap-1] <strong id="ZH-CN_TASK_0176919479__zh-cn_task_0175818464_b589503841190907">radio 1</strong> [AP-wlan-radio-1/1] <strong id="ZH-CN_TASK_0176919479__zh-cn_task_0175818464_b1533334760190907">calibrate auto-channel-select disable</strong> [AP-wlan-radio-1/1] <strong id="ZH-CN_TASK_0176919479__zh-cn_task_0175818464_b778771945190907">calibrate auto-txpower-select disable</strong> [AP-wlan-radio-1/1] <strong id="ZH-CN_TASK_0176919479__zh-cn_task_0175818464_b898029763190907">channel 20mhz 149</strong> Warning: This action may cause service interruption. Continue?[Y/N]<strong id="ZH-CN_TASK_0176919479__zh-cn_task_0175818464_zh-cn_task_0175818441_b1479588541190906_1">y</strong> [AP-wlan-radio-1/1] <strong id="ZH-CN_TASK_0176919479__zh-cn_task_0175818464_b2034558345190907">eirp 127</strong> [AP-wlan-radio-1/1] <strong id="ZH-CN_TASK_0176919479__zh-cn_task_0175818464_b1714376074190907">quit</strong> [AP-wlan-ap-1] <strong id="ZH-CN_TASK_0176919479__zh-cn_task_0175818464_b1628278207190907">quit</strong></span></span> - 验证配置结果
- 完成配置后,用户可通过手机终端搜索到SSID为wlan-net的无线网络。
- 用户关联到无线网络上后,手机终端能够被分配相应的IP地址,用户输入预共享密钥可以访问无线网络。
配置文件
中心AP的配置文件
<span style="color:#333333"><span style="background-color:#dddddd">#sysname AP
#
vlan batch 100 to 101
#
dhcp enable
#
interface Vlanif100ip address 10.23.100.1 255.255.255.0dhcp select interface
#
interface Vlanif101ip address 10.23.101.1 255.255.255.0dhcp select interface
#
interface GigabitEthernet0/0/1port link-type trunkport trunk pvid vlan 100port trunk allow-pass vlan 100 to 101
#
interface GigabitEthernet0/0/24port link-type trunkport trunk allow-pass vlan 101
#
management-vlan 100
#
wlansecurity-profile name wlan-securitysecurity wapi psk pass-phrase %^%#cWul9=qe~"#{UzRlWz["^Gzo<X/k8-21m37N4;n'%^%#wapi usk-update-interval 20000wapi msk-update-interval 20000ssid-profile name wlan-ssidssid wlan-netvap-profile name wlan-vapservice-vlan vlan-id 101ssid-profile wlan-ssidsecurity-profile wlan-securityregulatory-domain-profile name domain1ap-group name ap-group1regulatory-domain-profile domain1radio 0vap-profile wlan-vap wlan 1radio 1vap-profile wlan-vap wlan 1ap-id 1 type-id 55 ap-mac 60de-4476-e360 ap-sn 210235554710CB000042ap-name area_1ap-group ap-group1radio 0channel 20mhz 6eirp 127calibrate auto-channel-select disable  calibrate auto-txpower-select disableradio 1channel 20mhz 149eirp 127calibrate auto-channel-select disable  calibrate auto-txpower-select disable
#
return
</span></span>
这篇关于华为配置WAPI-PSK安全策略实验的文章就介绍到这儿,希望我们推荐的文章对编程师们有所帮助!


