本文主要是介绍C# Onnx C2PNet 图像去雾 室内场景,希望对大家解决编程问题提供一定的参考价值,需要的开发者们随着小编来一起学习吧!
目录
介绍
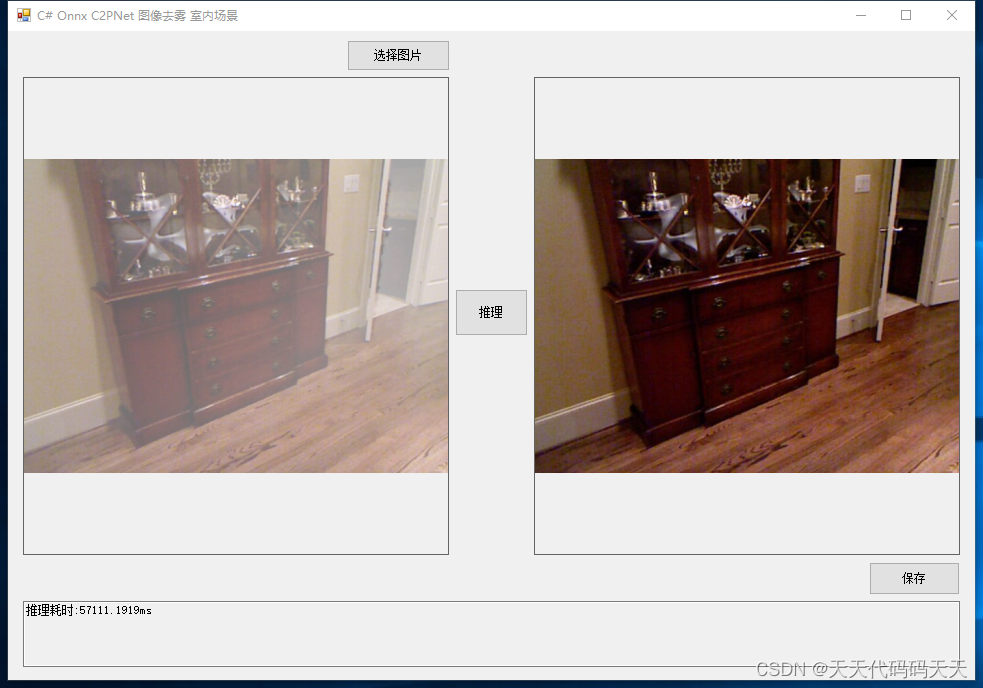
效果
模型信息
项目
代码
下载
C# Onnx C2PNet 图像去雾 室内场景
介绍
github地址:GitHub - YuZheng9/C2PNet: [CVPR 2023] Curricular Contrastive Regularization for Physics-aware Single Image Dehazing
[CVPR 2023] Curricular Contrastive Regularization for Physics-aware Single Image Dehazing
效果
模型信息
Model Properties
-------------------------
---------------------------------------------------------------
Inputs
-------------------------
name:input
tensor:Float[1, 3, -1, -1]
---------------------------------------------------------------
Outputs
-------------------------
name:output
tensor:Float[1, 3, -1, -1]
---------------------------------------------------------------
项目
代码
using Microsoft.ML.OnnxRuntime;
using Microsoft.ML.OnnxRuntime.Tensors;
using OpenCvSharp;
using System;
using System.Collections.Generic;
using System.Drawing;
using System.Drawing.Imaging;
using System.Linq;
using System.Windows.Forms;namespace Onnx_Demo
{public partial class Form1 : Form{public Form1(){InitializeComponent();}string fileFilter = "*.*|*.bmp;*.jpg;*.jpeg;*.tiff;*.tiff;*.png";string image_path = "";string startupPath;DateTime dt1 = DateTime.Now;DateTime dt2 = DateTime.Now;string model_path;Mat image;Mat result_image;SessionOptions options;InferenceSession onnx_session;Tensor<float> input_tensor;List<NamedOnnxValue> input_container;IDisposableReadOnlyCollection<DisposableNamedOnnxValue> result_infer;DisposableNamedOnnxValue[] results_onnxvalue;Tensor<float> result_tensors;int inpHeight,inpWidth;private void button1_Click(object sender, EventArgs e){OpenFileDialog ofd = new OpenFileDialog();ofd.Filter = fileFilter;if (ofd.ShowDialog() != DialogResult.OK) return;pictureBox1.Image = null;image_path = ofd.FileName;pictureBox1.Image = new Bitmap(image_path);textBox1.Text = "";image = new Mat(image_path);pictureBox2.Image = null;}private void button2_Click(object sender, EventArgs e){if (image_path == ""){return;}button2.Enabled = false;pictureBox2.Image = null;textBox1.Text = "";Application.DoEvents();//读图片image = new Mat(image_path);inpWidth = image.Width;inpHeight = image.Height;//将图片转为RGB通道Mat image_rgb = new Mat();Cv2.CvtColor(image, image_rgb, ColorConversionCodes.BGR2RGB);//输入Tensorinput_tensor = new DenseTensor<float>(new[] { 1, 3, inpHeight, inpWidth });for (int y = 0; y < image_rgb.Height; y++){for (int x = 0; x < image_rgb.Width; x++){input_tensor[0, 0, y, x] = image_rgb.At<Vec3b>(y, x)[0] / 255f;input_tensor[0, 1, y, x] = image_rgb.At<Vec3b>(y, x)[1] / 255f;input_tensor[0, 2, y, x] = image_rgb.At<Vec3b>(y, x)[2] / 255f;}}//将 input_tensor 放入一个输入参数的容器,并指定名称input_container.Add(NamedOnnxValue.CreateFromTensor("input", input_tensor));dt1 = DateTime.Now;//运行 Inference 并获取结果result_infer = onnx_session.Run(input_container);dt2 = DateTime.Now;// 将输出结果转为DisposableNamedOnnxValue数组results_onnxvalue = result_infer.ToArray();// 读取第一个节点输出并转为Tensor数据result_tensors = results_onnxvalue[0].AsTensor<float>();var result_array = result_tensors.ToArray();for (int i = 0; i < result_array.Length; i++){result_array[i] = result_array[i] * 255f;if (result_array[i] < 0){result_array[i] = 0;}else if (result_array[i] > 255){result_array[i] = 255;}}int out_h = result_tensors.Dimensions[2];int out_w = result_tensors.Dimensions[3];float[] temp_r = new float[out_h * out_w];float[] temp_g = new float[out_h * out_w];float[] temp_b = new float[out_h * out_w];Array.Copy(result_array, temp_r, out_h * out_w);Array.Copy(result_array, out_h * out_w, temp_g, 0, out_h * out_w);Array.Copy(result_array, out_h * out_w * 2, temp_b, 0, out_h * out_w);Mat rmat = new Mat(out_h, out_w, MatType.CV_32FC1, temp_r);Mat gmat = new Mat(out_h, out_w, MatType.CV_32FC1, temp_g);Mat bmat = new Mat(out_h, out_w, MatType.CV_32FC1, temp_b);result_image = new Mat();Cv2.Merge(new Mat[] { bmat, gmat, rmat }, result_image);result_image.ConvertTo(result_image, MatType.CV_8UC3);pictureBox2.Image = new Bitmap(result_image.ToMemoryStream());textBox1.Text = "推理耗时:" + (dt2 - dt1).TotalMilliseconds + "ms";button2.Enabled = true;}private void Form1_Load(object sender, EventArgs e){startupPath = System.Windows.Forms.Application.StartupPath;model_path = "model/c2pnet_indoor_HxW.onnx";// 创建输出会话,用于输出模型读取信息options = new SessionOptions();options.LogSeverityLevel = OrtLoggingLevel.ORT_LOGGING_LEVEL_INFO;options.AppendExecutionProvider_CPU(0);// 设置为CPU上运行// 创建推理模型类,读取本地模型文件onnx_session = new InferenceSession(model_path, options);//model_path 为onnx模型文件的路径// 创建输入容器input_container = new List<NamedOnnxValue>();image_path = "test_img/0.png";pictureBox1.Image = new Bitmap(image_path);image = new Mat(image_path);}private void pictureBox1_DoubleClick(object sender, EventArgs e){Common.ShowNormalImg(pictureBox1.Image);}private void pictureBox2_DoubleClick(object sender, EventArgs e){Common.ShowNormalImg(pictureBox2.Image);}SaveFileDialog sdf = new SaveFileDialog();private void button3_Click(object sender, EventArgs e){if (pictureBox2.Image == null){return;}Bitmap output = new Bitmap(pictureBox2.Image);sdf.Title = "保存";sdf.Filter = "Images (*.jpg)|*.jpg|Images (*.png)|*.png|Images (*.bmp)|*.bmp|Images (*.emf)|*.emf|Images (*.exif)|*.exif|Images (*.gif)|*.gif|Images (*.ico)|*.ico|Images (*.tiff)|*.tiff|Images (*.wmf)|*.wmf";if (sdf.ShowDialog() == DialogResult.OK){switch (sdf.FilterIndex){case 1:{output.Save(sdf.FileName, ImageFormat.Jpeg);break;}case 2:{output.Save(sdf.FileName, ImageFormat.Png);break;}case 3:{output.Save(sdf.FileName, ImageFormat.Bmp);break;}case 4:{output.Save(sdf.FileName, ImageFormat.Emf);break;}case 5:{output.Save(sdf.FileName, ImageFormat.Exif);break;}case 6:{output.Save(sdf.FileName, ImageFormat.Gif);break;}case 7:{output.Save(sdf.FileName, ImageFormat.Icon);break;}case 8:{output.Save(sdf.FileName, ImageFormat.Tiff);break;}case 9:{output.Save(sdf.FileName, ImageFormat.Wmf);break;}}MessageBox.Show("保存成功,位置:" + sdf.FileName);}}}
}
下载
源码下载
这篇关于C# Onnx C2PNet 图像去雾 室内场景的文章就介绍到这儿,希望我们推荐的文章对编程师们有所帮助!


